With my cow model all textured and ready to go, i now had to set up a small scene to ft him into. My initial plan was to set him in a paddock with two hay bales and a bucket with a fence to his left, but the hay bale was a bit too complicated to try and make. I looked for tutorials on YouTube for blender and Maya but i couldn’t find any that suited my project since if i used xgen or particles in blender, it’d create too many polygons and i could risk going over the limit for the assignment. This doesn’t mean i didn’t have a go though, i tried out both and found out blenders particle system is a lot easier to use than Mayas xgen as you can “comb” the hair instead of just “posing” it. The result in blender did look like hay but i couldn’t find a way to export it and i was scared of converted it to polygons for the reason stated above so i just deleted it and made a cube in Maya, slapping a hay texture onto it.
(i forgot to take a screenshot of the finished hair combed)
For the grass, i did want to try and model some 3d grass instead of just using a plane, but i felt like that could take too long as this is my last day to do anything before handing my work in. For this reason after following up until the curved blade of grass in this video (which i also couldn’t find out how to do so i was already lost at the beginning steps) i decided to just make a plane in Maya and put a texture on it after extruding it to make a cube (should’ve just replaced it with a cube but i wasn’t thinking apparently) and then smoothing it and cutting the edge in the UV editor to make sure the texture sat properly. I decided not to even put the texture on it and just use a flat colour in sketchfab as it looked better anyways.
The fence actually took some modelling and sculpt mode editing in blender to create. I found a tutorial for a stylised fence on YouTube and followed along with it https://youtu.be/SYHWWLYXo2E. I’ve not used blender to model something before as i always use Maya so this was a nice fresh opportunity and change of environment. I started with a cube and scaled it up to the height i wanted, scaling it in on the sides to make it thinner. I then duplicated this shape and pulled it to the right of my other fence post. Going into edit mode, i gave both of these shapes bevels and loop cuts before switching to sculpt mode to fix up the shape and make them more unique and stylised. Once this was done, i went back into object mode and created a cube, scaling it up along the x axis to make it longer, placing it in-between the two existing fence posts, this would be my pallet. I added a bevel to this shape and gave it some loop cuts using the scroll wheel on my mouse to control how many i gave it, then duplicated this object and moved it down below my previous one to make a fence. Using sculpt mode again, I deformed these wooden planks until i was happy with my fence and exported it as an FBX.
I took my fence into Maya to UV it, allowing me to later and texture in substance painter. I cut around the loops on the outside of each object before freezing their transforms and unfolding them, using the layout tool to then straighten up the UVs and pack them neatly in a singular tile. Opening the material editor, i gave each object a separate aistandardsurface material and named them appropriately. Once i had this done, i then exported this as a new FBX and took it into substance painter.
In substance painter, since i had a material for each object all i had to do was select the name of the object i wanted to paint from the top right hand corner and add either a fill or a paint layer. Starting off i added a paint layer to each object and coloured it brown manually which looking back now is a bit stupid because i could’ve just used the fill layer to save time but its fine. Adding a new fill layer, i found out how to add grunge (using this video https://youtu.be/-7F5evcCdyE) and used one i thought suited the fence, slotting it into the greyscale area of the fill layer in my black mask, adjusting the balance slider until i was happy. I copied this effect and pasted it onto my other objects, meaning they’d all have the exact same effect applied with all the value in tact so i didn’t have to keep hopping back and forth.
Adding a paint layer to each object on a low opacity, i took a dark brown and used the soft brush then started painting random dark blotches onto the wood so it didn’t look so stale and flat. It helped to use the grunge effectively here and paint the dark brown in the areas where the grunge was tight together and very visible.
After doing this, i added another paint layer to each object on a low opacity and took another dark, almost black brown and painted shadow onto my fence where the wood planks joined together and round the back and bottom where i thought no light would hit. To follow this up, i made another paint layer with a darker colour again and enhanced the shadows closer to the wood where there’d be harsh shadows using a hard brush.
My last paint layers were highlight the difference in colour on the bevels from the wooden fence itself, as usually seen in real life as the wood on the corners are usually sanded down therefor shiny and smooth. I took a light cream colour and used the soft brush again, painting along the bevel seams of the fence. Once done, i lowered the opacity of the layer until it looked good and saved my file then exported my textures back into Maya.
In Maya, i placed everything in the scene and saved it, making a few adjustments to position and scale before adding textures to everything and adjusting the specular values so they weren’t too shiny. Selecting everything i then exported my selection as an FBX and uploaded my work to sketch fab.
Fun fact: I was going to call my cow Falafel because it sounded cute but after speaking to my boyfriend he called him Moomi and I thought it was adorable as well as relating to the character so i kept it 🙂
Importing my FBX model into substance painter, i went into texture settings and clicked a button which opened bake settings where i then selected my high poly sculpt from blender and baked the textures onto my low poly model in substance painter. This meant the small details from sculpting were baked onto my low poly model, making it closely resemble my sculpt.
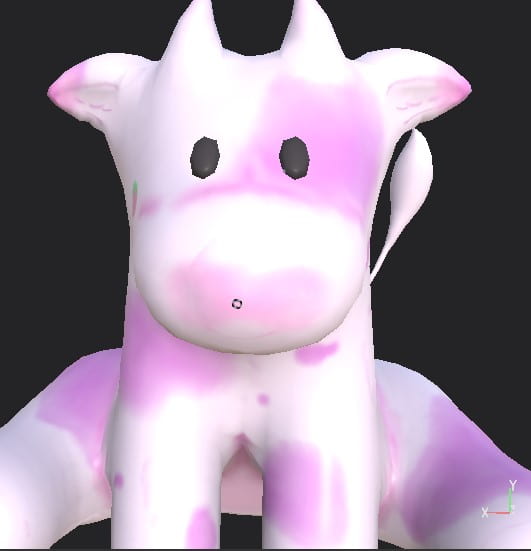
To start painting my textures on i created a fill layer and set the colour to a pale pink then created a new paint layer, selecting the fine smooth fur brush and colour dropping from my reference image for the pink spots, which i then painted on my cow model carefully so they looked natural and weren’t jammed onto my model in a mess. I made a little heart shaped spot on its head too because I thought it added to the cuteness and I love those simple little Easter eggs on things like this, it makes it feel more special.
I added three new paint layers and chose a light pink/magenta colour and started painting on a light dusting of blush on the nose bridge, cheeks, ears and horns. I changed to the above layer and made my colour a little darker then made my brush a little smaller, painting on a darker layer on blush before adding one last layer of a darker blush. I figured the horns didn’t suit the colour of the blush as they were too dark and made them a lighter grey, erasing some of the blush colours with a low opacity on my eraser.
Adding another new paint layer, i chose a pale red and painted a strawberry on the cheek of my cow using the hard stroke brush, choosing a paler pink and adding on the strawberry seeds followed by a light green on a new layer for the leaves. To go along with the strawberry I thought it’d be cute to try show my cow as being fluffy by taking a dark pink and drawing on fluff on the fur brush to make it look soft. I added a shadow below the fluff layer so it appeared as if it were sitting off his body like real fluff.
I still had to paint all the light pink areas now such as his nose, chest, stomach, hooves, inner ears and his tail tuft so I added a layer and moved it down to just above the base colour and started painting “shadows” in with a dark pink on a low layer opacity. I thought this gave my model more depth and believability. I also added nostrils and mouth at this point.
Lastly I took a muted purple colour and went over the hooves to make them stand out a little bit more as if they were another material on the cow. This looked alright on the front feet but unfortunately the texture on the back feet was a little warped and kept appearing on the bottom of my model, which i obviously didn’t want so I erased what I could from under the leg and drew on the little hoof separation line on the front legs. I was pretty happy with how everything came out except for the fact I had a more fluffy detailed cow in mind but I didn’t have enough time to add individual fur strokes to all the spots, I tried and it was taking far too long so I gave up.
Overall, I’m pretty happy i got here in the end with a finished model as i was really doubting myself and struggling earlier in the assignment. I’ve learned to have a bit more confidence in myself and acquired new skills such as sculpting and retopology, even if they aren’t perfect I can work on them until they are. All that’s left now is to make the field scene and upload my model to sketch fab.
This was quite difficult for me to achieve and i had to get quite a lot of help off my tutor Henry, as i couldn’t figure out how to sort all types of errors that kept arising with my mesh, as well as having hardware issues when trying to unfold my UVs.
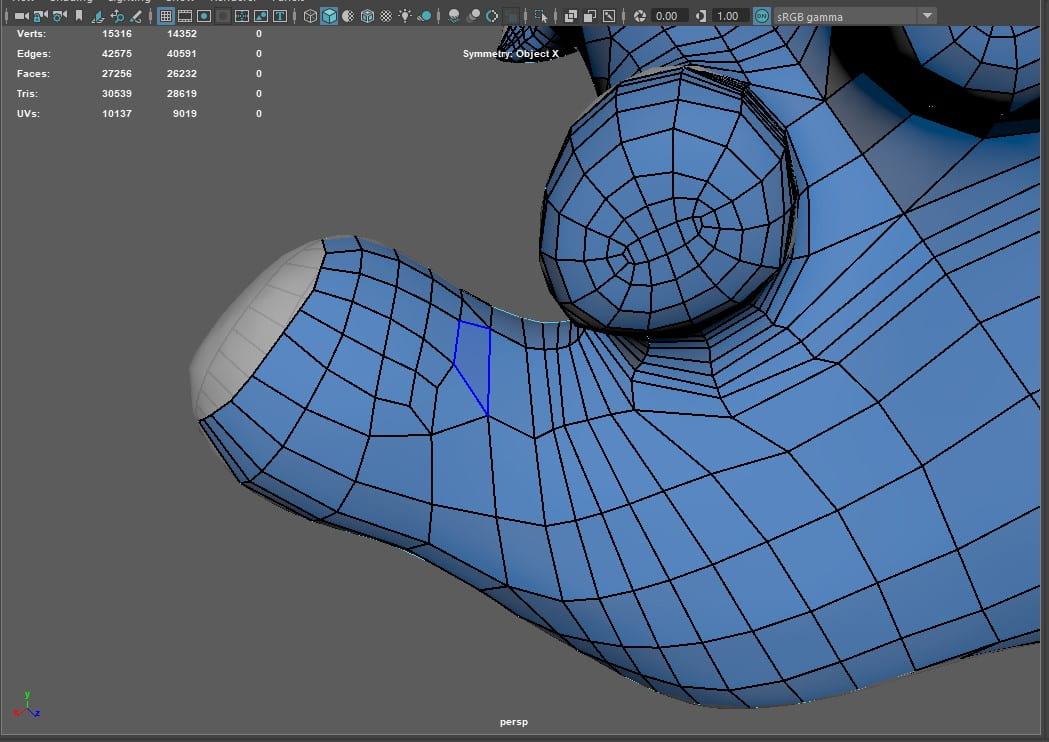
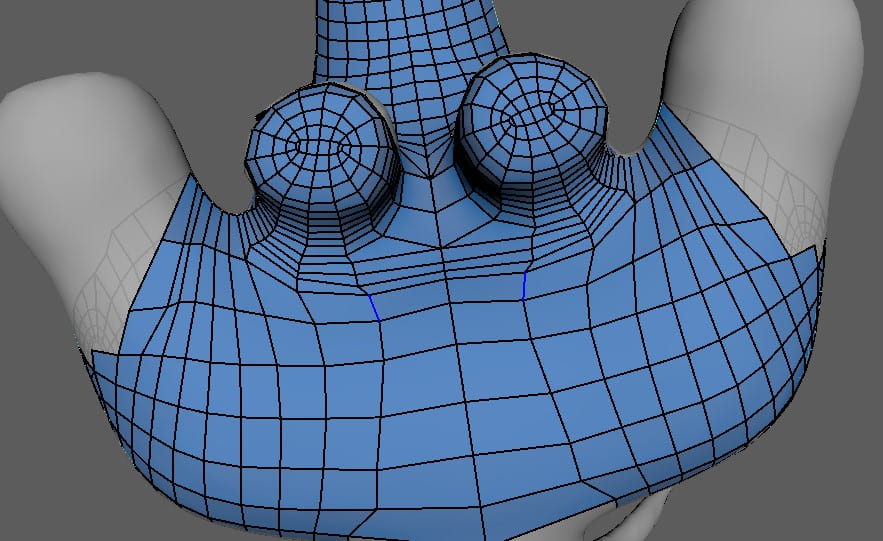
Bringing in my FBX model from blender to maya, i had to make the surface live and use the “quad draw” tool to manually draw on polygons to make my high poly blender sculpt a low poly mesh which was then suitable for UV unwrapping and texturing in substance painter. To make things easier for myself, i turned on the symmetry on “object x”, this meant whenever i made a quad on one side of the model, as long as it had a symmetrical mirror of the model on the other side of my symmetry line, it’d mirror what i was doing on the other side including when i placed quads or made adjustments to my mesh y relaxing my polygons and edges. This tool really cut down a lot of modelling time which I’m thankful for, but when it came to the ears of my model i was very confused on how to place my quads as the polygons id placed previously didn’t match up with the ones i placed around the base of the ears. My base from blender was also messing up my polygons, as i didn’t smooth everything down correctly which was causing my quads to sit awkwardly, trying to place themselves on all the bumps and corners of the base.
Going back into blender, i used the smooth brush to smooth the areas on my model that were causing me trouble, using different perspectives to ensure i did it properly then exported it as an FBX, over righting my previous model. From here, i deleted my mesh and asked my tutor Alec for help in a 1 to 1 tutorial on blackboard. He showed me how to start my mesh, by drawing quads on the nose of my cow and working up to the eyes, placing a rough circle for the eye as i was using a flat sphere placed on top of my model for the eyes. I asked him a couple of questions about how to do the ears and the tufts of hair on top of my characters head, both of which i got a detailed answer to so i went off after this tutorial and used my newly gained knowledge to create my retopology.
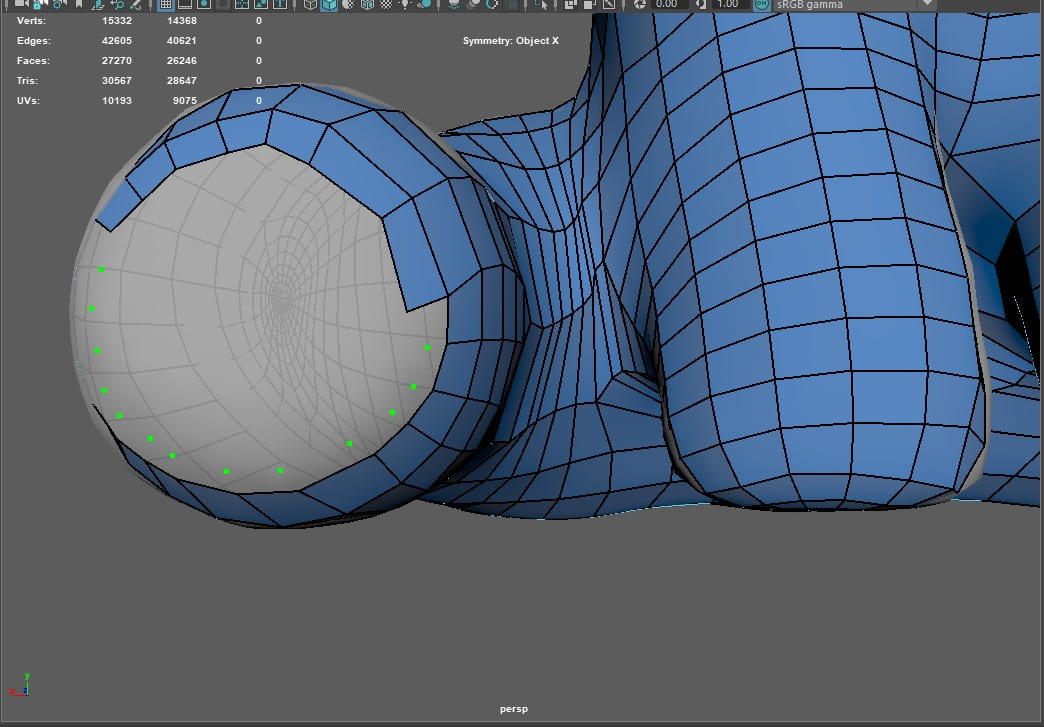
Even following the tutorials on blackboard, i had some issues when it came to creating loops for my retopology, and my mesh came out a little messed up around the ears which i tried a few times to fix as there were problems with non-manifold geometry, floating vertexes and other strange happenings. I ignored it for now and moved on with the rest of my retopology, creating quads that ran down the back and into the legs i had placed quads around as to frame the foot where after a few tries, i managed to get a loop around the curves of the thighs, but the quads leading down the legs still didn’t look correct and made awkward loops going from the bottom of my model to a new loop on the thigh. This was quite infuriating as it meant i wouldn’t have a clean cut for my UVs later, but i was running out of time at this point so i just left it and continued on with the rest of my model, relaxing the polygons as i went and holding down control to check if the loops were circular. Around the face area, my polygons were perfect, but when i came to the chest, horns and ears, i started struggling as they went off on their own path instead of in loops. So from this, i know that over the summer I’m going to work on my retopology and teach myself how to do it correctly with loops.
Now came the awkward part of trying to get the stomach of my model to line up with the legs and bottom. Since the symmetry tool was active, i couldn’t create extra dots in the middle to try add more polygons, so when i created quads down the stomach and chest, i took the vertexes and merged them together so they were sharing an edge and created two polygons running down the centre, which i then used to create quads leading off of to the legs, tying everything together. From these quads, i added more dots and used the shift button to place a quad from these dots continuing on down the legs to create a bottom. There were some weird shapes along the way, but i know triangles if in a small quantity wont ruin a mesh and the other shapes were just oddly shaped quads so that was also fine. It wasn’t until i got to the legs that i realised the shapes weren’t even with the rest of my mesh and i had to start removing edges and replacing quads, even deleting whole chunks of my meh to try rebuild it in a neater form but i was getting stressed and confused so i had to take a break and come back with a new perspective.
Relaxing the polygons around the bottom and thighs of my model as much as appropriate, i started creating the bottoms of the feet for the hooves of my cow by following the loop of quads and placing new loops until it was too small to go any further where i then just capped it off with whatever shapes would fit inside the hole. I went around the foot and leg relaxing the polygons again as i wanted to make sure my mesh fit nicely with the shape of my base as well as trying to evenly space my quads to give a somewhat neat presentation for my mesh.
Now comes the tail again. Tuning off symmetry as there was nothing symmetrical about this part of my model, i started by creating a ring of quads around the base of the tail, not really realising this later would cause problems as it didn’t match up with the rest of my polygons. The only reason i made this many small quads was because i was concentrating on getting the smooth curve around the base and i couldn’t capture that with big chunky quads. A few rings in, i tried to connect them to my main quads by creating another quad or two between them and relaxing them a little to let them sit more tightly to the base. I continued around the base of the tail with this method until i had to start creating extra quads and edges to accommodate the curve of the tail, additionally creating problems for me where i had to try figure out how to join polygons together with quads and in some places triangle so i could get the whole way round my base sculpt. Admittedly, it did result in a bit of a mess but it worked so with my limited knowledge, I figured after spending so much time on it, it was time to move on a to meet the deadline, it also meant i wouldn’t create new issues in case i messed with too many polygons and edges and made it worse.
Starting from a thin place on the tail, I created quads in a ring around the shape trying to make them small yet long enough to capture the curve but also so I didn’t have to overload the tail with quads. I continued up the tail to the tuft of fur on the tip and placed big quads around this as i wanted to emphasise it was a tuft of fur and not just a weird point on the end of the tail. I had to readjust and relax these polygons quite a bit until i was happy with it and moved on to the rest of the tail. I made the quads longer as i worked my way down the tail, relaxing and readjusting as I went. These quads fit pretty alright with the quads at the base of the tail so I relaxed the polygons some more going up the tail and manually dragging any vertexes or edges into place where the relax tool wasn’t helping.
Closing up the whole back of the model was a bit of a pain as there were a lot of edges that had to be removed and at the start i was getting a lot of oddly shaped and awkwardly stretched out quads, so i decided to do another two loops around the tail base to make the quads join a bit easier, which took a while but after settling for a couple of triangular shapes and not so perfect squares, I’d finished my retopology for now.
This is where I started really having problems and had to consult my tutor Henry, where we tried for a good 15 minutes to try solving a problem which in the end we found was most likely caused by my processor being an AMD Ryzen.
Going through and making a cut in my model around the neck and to the forehead, following a blackboard tutorial on how to manage UVs, I tried to use the unfold tool in the UV editor and kept getting errors such as “Unfold3D process error” and non-manifold geometry being found in my mesh so to go clean it up first. Getting help from Henry, we managed to locate the non-manifold geometry and fix it, he sent me a YouTube video and tried going over a few other solutions with me but after i tried them I still couldn’t fix the problem. I sent the file to him and he sent me back a recording of how to fix it, which was as easy as pressing 3 to smooth preview my mesh and viewing it in different perspectives to try find anything that looked off. I didn’t see this when i tried it but it probably was in connection to my lack of sleep and the stress i was under with having so many errors, nevertheless I went in and fixed it on my file and tried to unfold my UVs again, but still got an error.
Going back to Henry, he got me to take screenshots, read articles, go into the plug-in manager and check for Unfold3D and to enable it, but even after all this we still couldn’t find an answer to my problem. He was very helpful and in the end we found a workaround which was to unfold using the legacy algorithm instead of unfold3D as my laptop had no problem running that, but the Unfold3D error still remains a mystery. He offered to unfold all my UVs and send them to me before i told him about the legacy unfold method though which I really appreciated. He had made a few edits to my model and sent me the files to help me take examples from so I could better understand what to look for if my model was going wrong as I went back to my fixed version and continued to work on it.
Selecting all of my UVs, I used the legacy unfold and unfolded all my UVs after freezing their transforms, clicking the layout tool button to neatly arrange all my UVs on a single tile. Now that the cow was UVed, i created a cube and scaled it down, pulling it in on the x axis and pulling it up on the y axis to make a thin oval shape for the eyes. Holding shift down and dragging on the arrow, i duplicated this shape for the other eye and put them in place on the cows face so they had the cute chibi vibe i was going for with the small simple eyes. Going back into the UV editor with my eyes selected, i used planar mapping on them and cut the edge loop along the side of each eye, taking the UVs and spreading them out before unfolding them and using the layout tool to make everything tidy and presentable. My model was now ready to export as an FBX and take into substance painter.
Importing my character reference into Blender, I started sculpting with metaballs by placing 5 around the one in the middle, bringing them close together so that they’d merge into one shape. For this star model, this is as far as i got as i was confused and once i received help from Michael, he advised me that my character was too simple and there wasn’t much to sculpt so if i was aiming for a higher grade, to change it to something a bit more complicated.
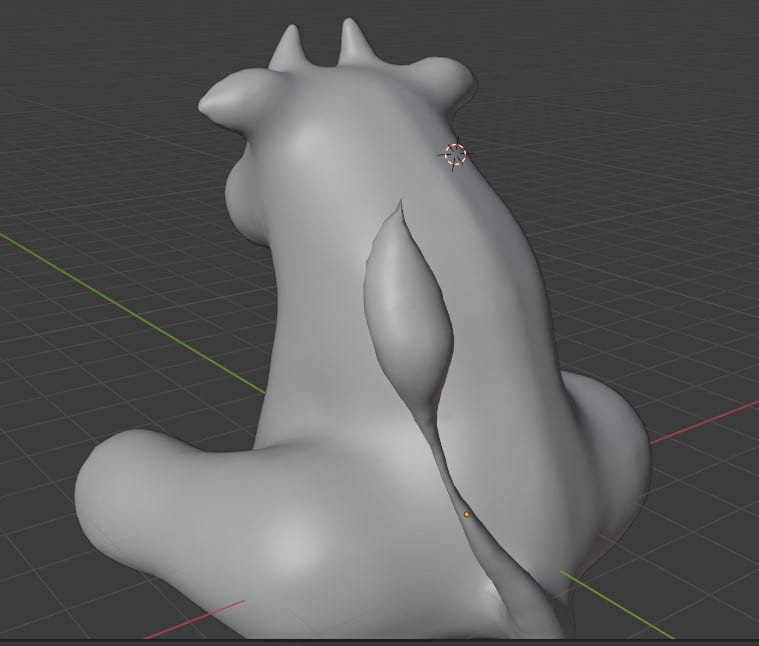
I sat in class, brainstorming again for a while as everyone was taking their turn sharing their screen and getting help with their sculpts. I was just quickly drawing out sketches of ideas on my iPad, trying to follow the star idea but making it more complex and interesting. Star fruits came to mind and i thought about designing a star shaped fruit with eye catching leaves and small textures made from clay to make the fruit seem spikey coated. After sketching out a few variations of leaves and fruits, my mind just very suddenly jumped to a cow and i started sketching. I’d been interested in something called a “strawberry cow” for quite a while as I like how they’re very closely related to the real life animals but with a small twist on their colour pallet and sometimes appearance, with strawberries either as horns or on the tuft of the tail. For this reason, i then decided I’d make a strawberry cow instead of a normal cow, giving it a pale pink for the main colour and a nice deeper shade for its spots and other stand out areas such as its tail tuft and its hooves. Since i wanted it to be simplistic, centring its design on its colours more than features, i didn’t give it any distinguishing features of strawberries and put it in a plain paddock setting. This meant the scene wasn’t crowded and everything fit together nicely, framing the cow and making it easy and pleasing to look at.
Now i had my remade design, i started a new file in blender and placed my reference image on a pureref window down at the bottom left of my screen, as this would help me to get the overall shape and pose of my character with the metaballs. I got some help from Henry after class in a 1-1 tutorial on Blackboard, as i still wasn’t sure how to sculpt correctly and it was starting to stress me out. He took about an hour explaining things to me and letting me follow along step-by-step in my own blender file, stopping to look over my sculpt every now and then, helping me correct any mistakes or catch me up if I’ve missed anything. It was a very helpful session as I got to understand more about sculpting and how to use the metaballs as well as gain more knowledge about the tools and learned that the sculpting tools all have a “falloff” which helps me get a better understanding of how they’re going to effect my model.
To make the model, I took the earlier model as a guide and looked back over the video Henry recorded from our tutorial, using spheres and ellipses from metaballs to shape my base mesh. Once i had this done, i sent it to henry to see if it was alright and he gave me the go ahead but i wasn’t happy as i thought it looked more like a monkey so i restarted for the third time and when i finished with this base mesh, i was pretty happy and proud of myself because i just did it from my own judgement this time. Before i got to my final basemesh, my friend Rhys tried to help me create a basemesh from mesh shapes relating to the character but i wasn’t happy with how that turned out either, though I’m still thankful for his help.
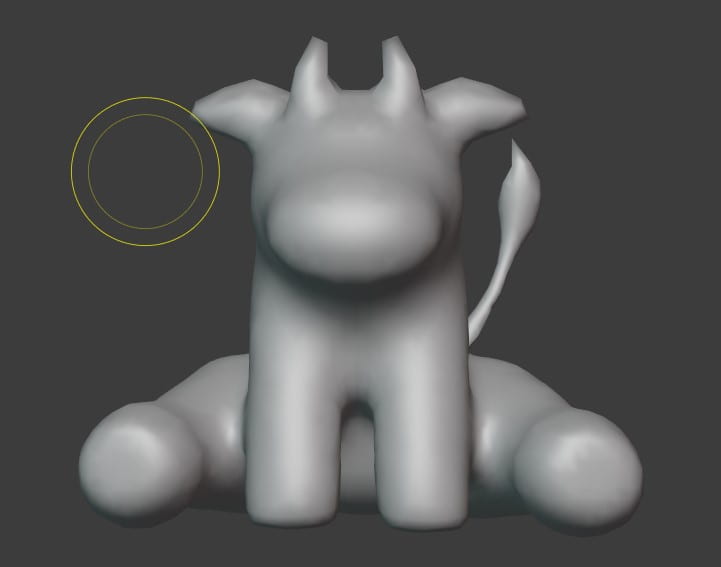
(the above image is close to but not exact of my new basemesh as i forgot to take screenshots, so i used a more developed and smoothed version from later on to show the differences.)
With this new basemesh, i went into the sculpting tab and started to shape my cow with the sculpting tools. I found myself mainly using the inflate, clay strips, hard draw and smooth brushes throughout this process. To start with, I had to use the dyntopo option to give me more geometry to work with which was done by turning dyntopo on, changing the detail to constant detail, turning on smooth shading then hitting the “detail flood fill” button. I now had something to enable me to get finer details onto my cow model, which going in with the grab brush i started to sculpt by pulling certain vertexes out after turning on the x symmetry. Having created the ears with the grab tool, i smoothed them out by using the smooth brush on a low strength as this was a brush that could very easily become destructive if the strength was set too high.
I used the grab tool on the sprouts of the horns to pull them up to be a little more pronounced than stubs and used the snake hook brush to give them the point that horns have, aiming to curl it inwards. The horns changed a lot throughout the process of my model as at first i wanted them to be big and easily noticeable, curving inwards, then decided this made him look unbalanced and tried to curve the horns outwards, making them smaller, changing the distance between both horns and a whole lot of other stuff just trying to figure out what suited my model until i eventually settled on a simple horn shape where they were cartoonish and just pricked up, kind of like the “story of seasons: friends of mineral town” cows and some chibi drawings which you can find an image of below.
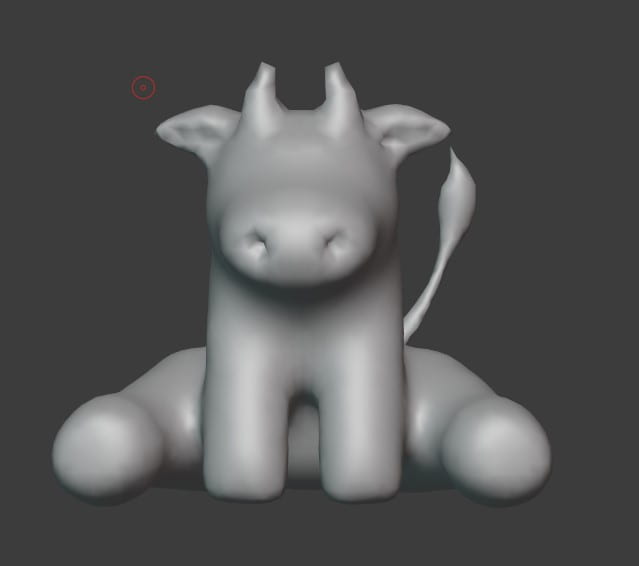
Smoothing out the shape of my cow after using the inflate brush to make his limbs a bit chunkier, i went in with the crease brush to set apart the legs from the stomach of my cow, making it look more believable that he was sitting down.
By this point i felt my model looked more like a pig than a cow and wanted to restart, so I saved my progress on this model and hit “new file” using my base mesh from the last model, making some adjustments where i thought needed such as the whole model was too spread out, so i rotated the legs to better face the viewer and positioned them more believably at the back, as well as moving the head a bit more upwards facing, thinning the metaballs at the neck and shoulders and picking up his back end slightly to look more balanced, though i couldn’t move it as much as id like because then it messed up the rest of my base mesh. Going back into the sculpting tab, i used dyntopo again then smoothed out my model with the smooth brush. This let me see the places on my model where i needed to sculpt detail into and what parts i could just make small adjustments to.
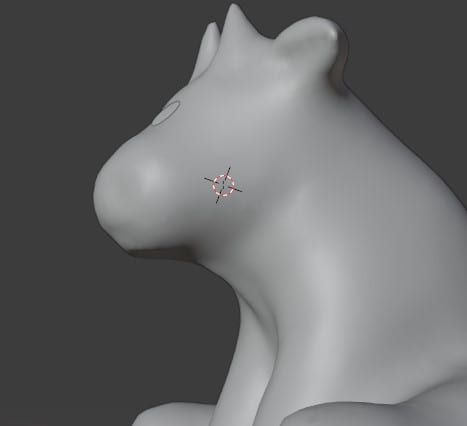
I started adding in the details such as using the snake hook brush to pull the horns into points and taking the grab tool and moving them slightly to be shaped more like horns with thickness. Keeping with the grab brush, I took the small starts of the ears and used a big sized falloff brush as seen in the image to pull them out to the side to better represent ears. For all the creases and fold in my model, i took the smooth brush and smoothed out the surfaces such as in-between the front legs at the chest, the skin between the back legs and stomach and the nose of the cow. This meant i had a better area to work with when adding in finer details such as deeper and more accurate creases.
Next i used the draw sharp brush and made two dents in the nose for the cows nostrils, using the smooth brush later to smooth it out but not too much as this would fill the holes in and get rid of the nostrils, so i had to be careful and moderate how far i smoothed them. I took the same brush and moved onto the ears, with the symmetry still on i only had to work on one ear and it would copy to the other. I smoothed the ear down after making the insides where the fluff would sit later and smoother the horns out little after pulling them up again. For the tail you will realise that i made more changes to it with the snake hook brush to make it look more pointy like a tuft of fur.
Yet again, i changed the horns slightly as i was very indecisive about them and wanted them to suit my sculpt. In this stage i smoothed everything out after doing another run over with dyntopo as this adds more geometry to work with meaning it gets rid of all the smoothing you’ve done previously. Using the grab tool again, i started pulling and puffing out the cheeks of my cow to make it look less flat as well as giving the nose more character.
Using a UV sphere and scaling it down, i created a new pair of eyes and tried my best to “attach” them to my character, more so just getting a placement idea for now as i was no where near done to even add the yes. Upon inspection i realised my cow looked a bit too unnatural still so i decided to use the inflate brush and give him a bit more meat around the shoulders so they looked more like muscles then thin skin and bones.
Lastly. i used clay strips along the back to make a spine by smoothing and using the draw sharp brush until i was happy with it, moving on to create a little neck skin that cows have using the same technique. Before finishing and exporting my model as an FBX, i smoothed everything and used the flatten brush to create a smooth bottom for my cow to be sat on a piece of ground later and flattened the soles of his feet to make smooth hooves.
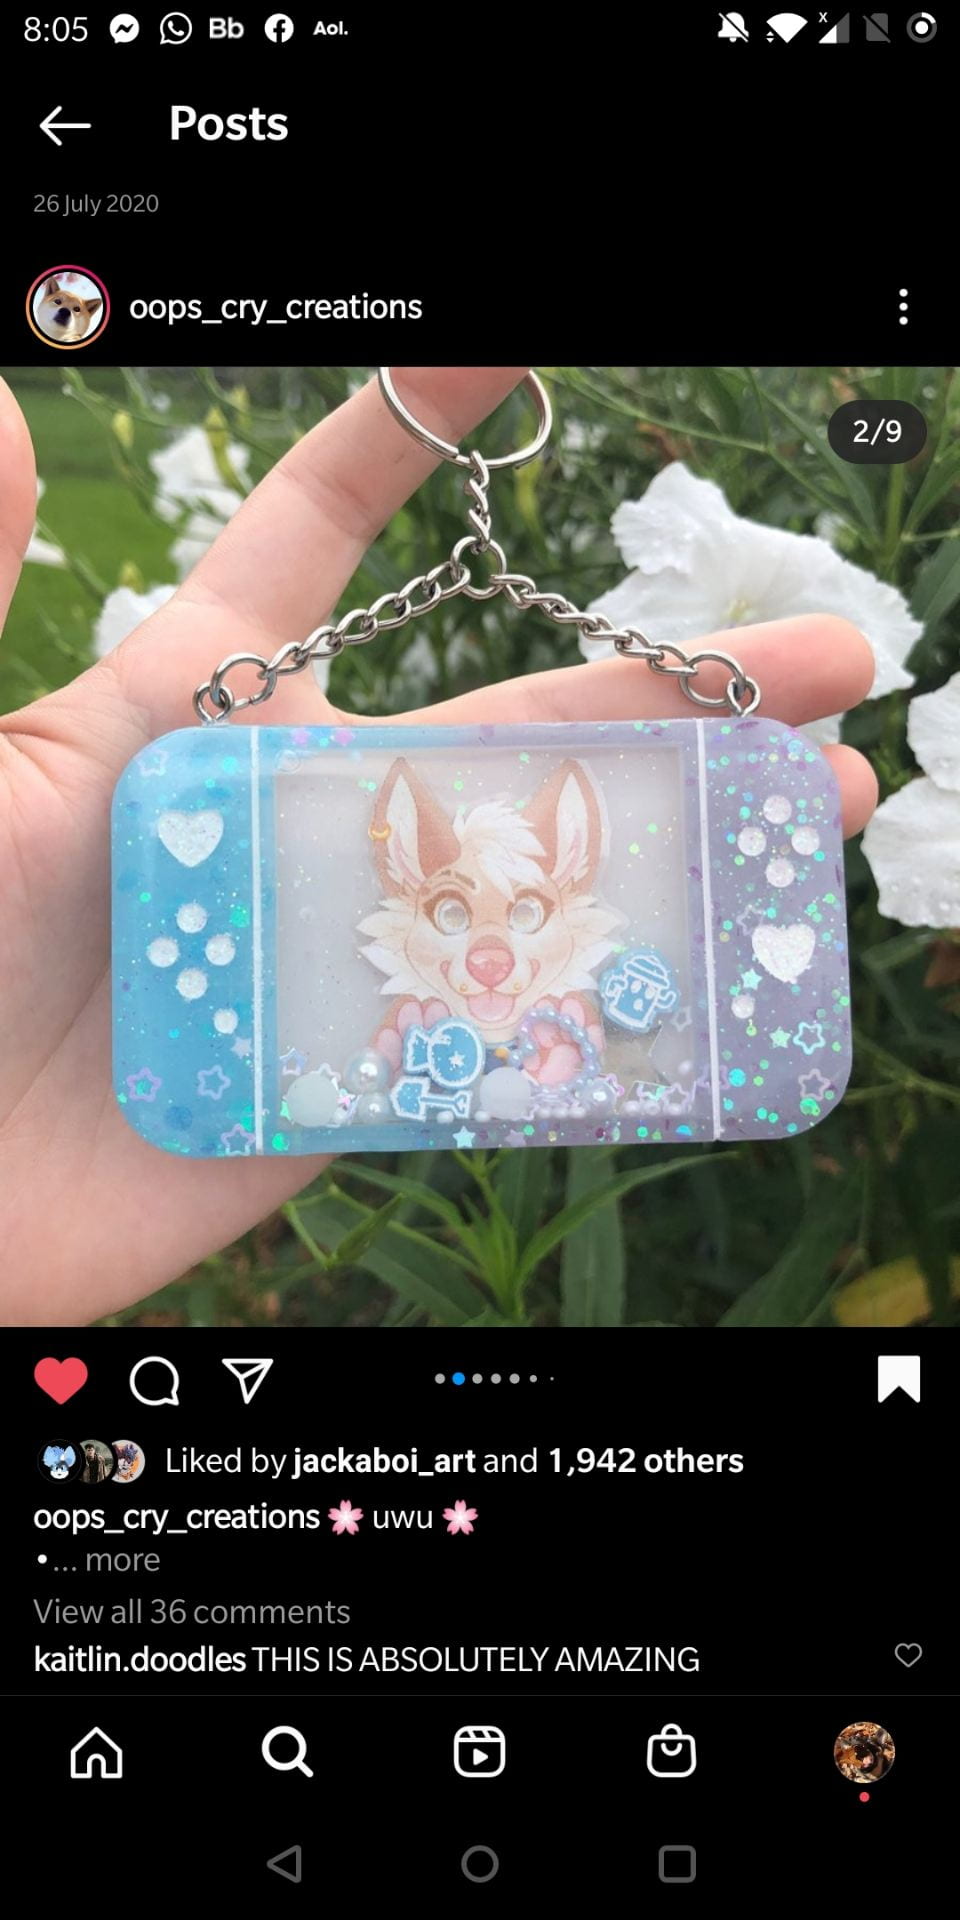
For our first assignment working with sculpting in blender, we were given creative freedom with making a sculpt themed around a “cute character”, immediately a star shape popped into my head and i got to sketching out my concept. I wasn’t sure if my idea was too simple so i then started adding to it, i gave it a ._. face as i thought that was really cute and I’m usually drawn to poker face characters so i wanted to take this opportunity to create my own, i then added an orange on top of its head and honestly this was completely random and i was thinking of my among us character at the time which i always have a little leaf on the head of, so i thought that’d make a nice hat decoration for my model. After looking at my design for a little while, it reminded me of these little resin toys i see a lot when scrolling through Ali Express as well as resin keychains I often look at made by Oops Cry Creations on Instagram and thought it’d look interesting and be fun to try and sculpt, so i added a layer of transparency to my star and gave it smaller glitter stars to fit inside. I had planned to animate my character a little to give it life and seem more interesting, but I didn’t realise how unrealistic that was with the kind of work we were set out to do in blender.
Below are two examples of the keychains made by Oops that inspired my design, followed by the Yuki figure series.
Below you will find a link to my sketchfab 3D model inspired by the content creators Dream and Ranboo, and the lore behind their roleplay server on Minecraft.
Personally, to go from making a simple vase with a real-life already generated reference, to drawing out my own concepts and using that as reference for a staff with techniques that I’ve never used before, I think I did quite well. Obviously there’s some things in my model am not too happy with that I want to go back and change or fix such as the mask and the leather straps, but I’m really happy with the overall shape and how well put together it looks. There were quite a lot of techniques used in the beginning models at the start of the year that i revisited to help make my workflow faster such as using the marking menus to get to different views and modes such as “vertex” “object” and “edges” which I used all the time but also the general scaling of vertices and edges to help get more accurate shapes, alongside using the edge loops to refine those shapes and make everything smoother. I also learned a lot of new things such as how to extrude along a curve and how to make an object “live” so as to neatly trace another shape onto it.
For our first assignment in 3D digital literacy, we had to pick from a list of objects to model in 3D in a 3D software called “Maya” created by Autodesk. I chose to go with a wizards staff and base it off of a streamer i watch often called “Ranboo” he mainly streams Minecraft and is in a roleplay on a server with other big content creators. I used the events of this roleplay as inspiration for my model.
Below is Ranboo’s actual skin in minecraft, helping inspire his fanart designs, as well as the actual lore behind his character.
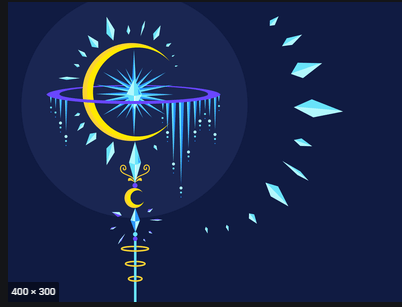
Coming back to my staff, since Ranboo’s design is two halves of two entities, he is thought to have horns, inspiring the horns on top of my model as seen here:
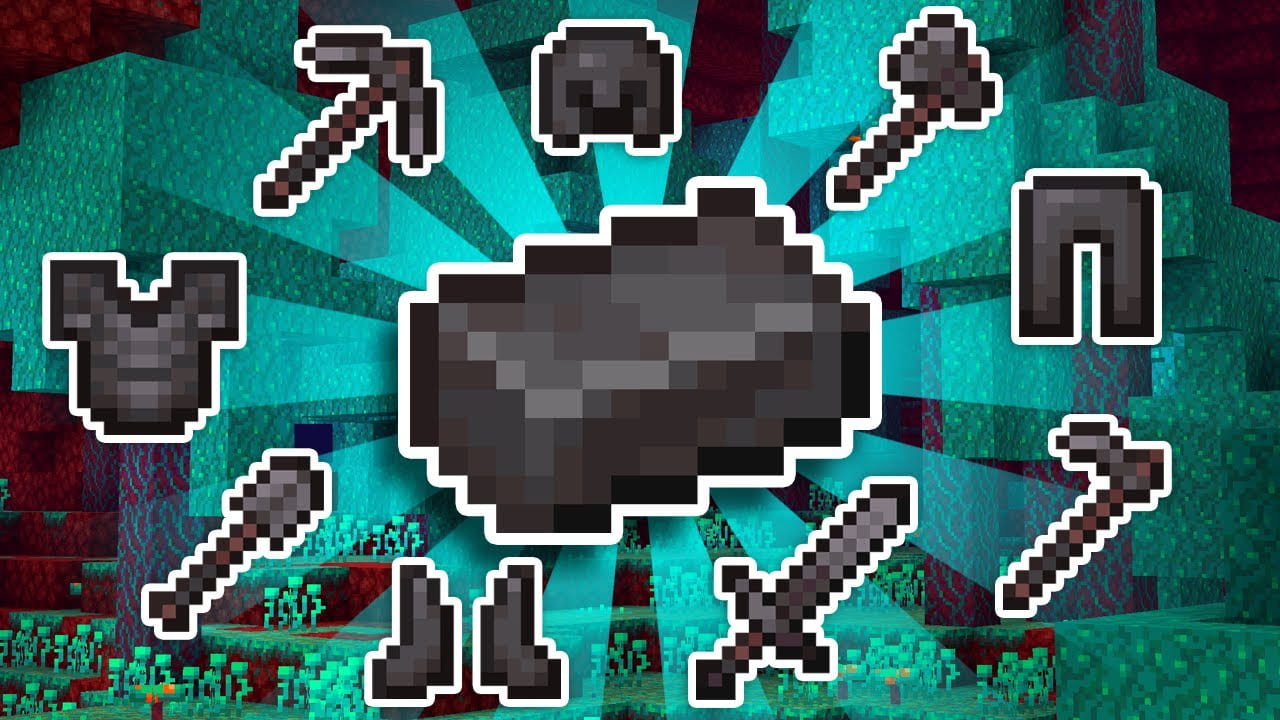
The main material of my staff is inspired by the strongest material in Minecraft called “Netherite”. I tried doing some research into what Netherite was based off of in real life, and found that its closest relation would be a man made material developed by scientists called “Carbyne” which is shiny and black in colour. I found this material on a Quora post (https://qr.ae/pNdu60)
I thought black would be too dark and boring for the colouration of my staff and since enchanted weapons made in Minecraft with Netherite are a colour of purply-grey, I decided to take inspiration and make my staff a dark shade of purple to keep it dark but give it colour. My material for my staff was also inspired by the real life crystal of obsidian, as its a smooth, shiny black stone but whenever it hits light it reflects in purple.
The persona of Ranboo’s character is half Enderman, a passive creature which can become hostile if you look it in the eyes or attack it. Endermen have small purple particles emitting from them, which gave me the idea of the purple spread through the horns of my model, being a representative of the corruption of the Enderman gene.
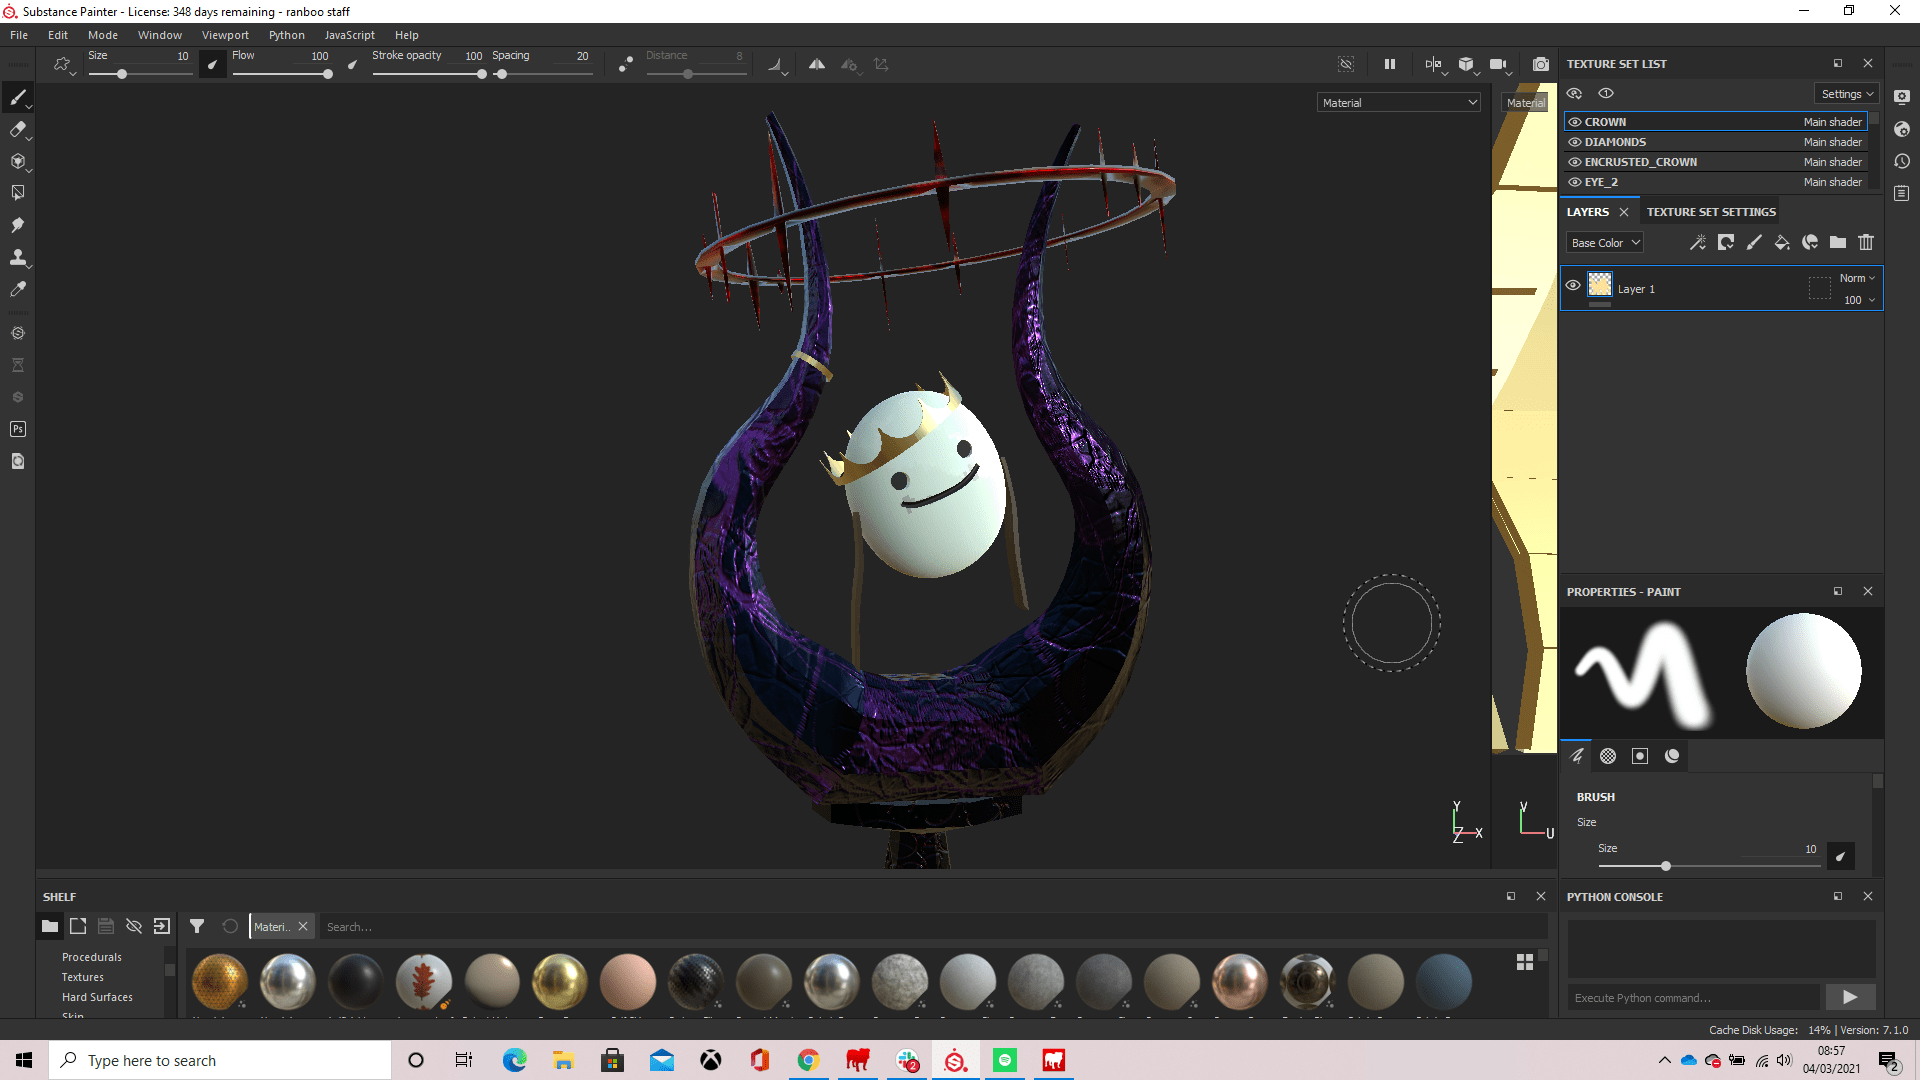
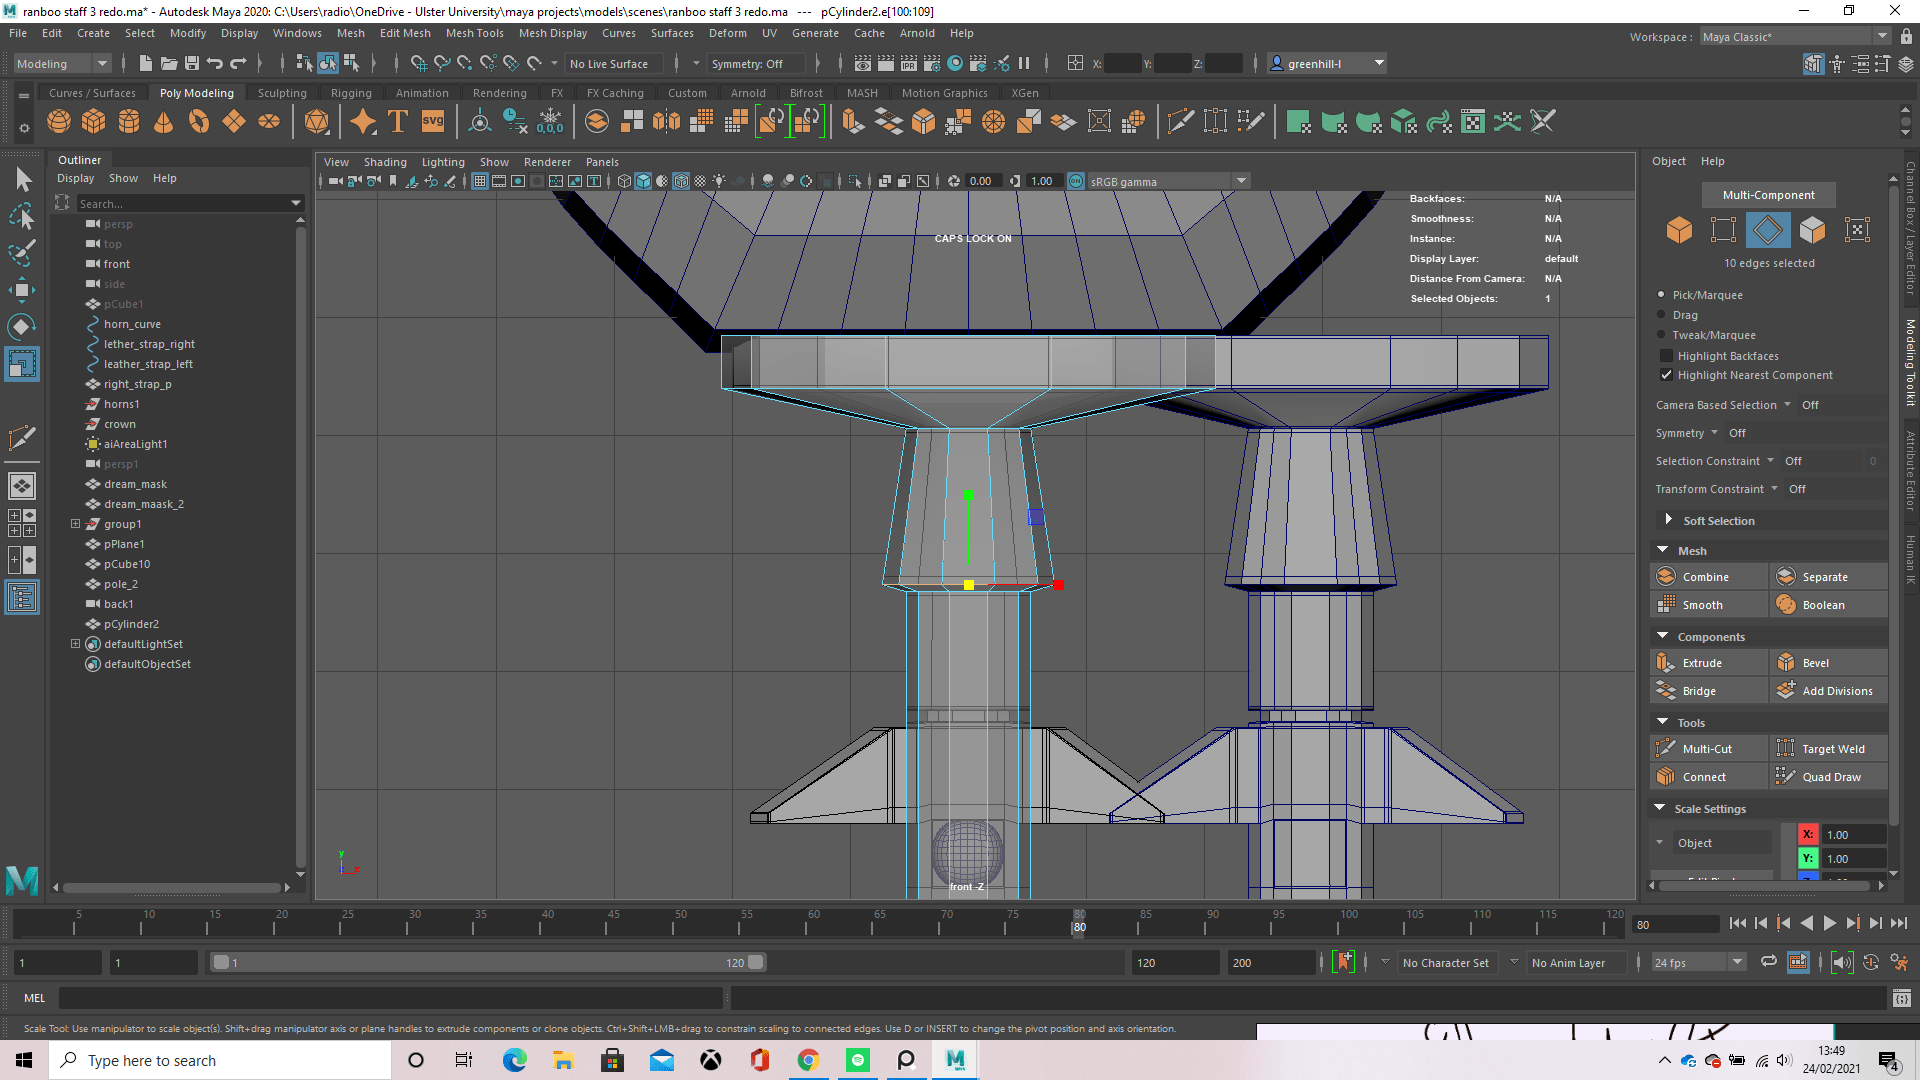
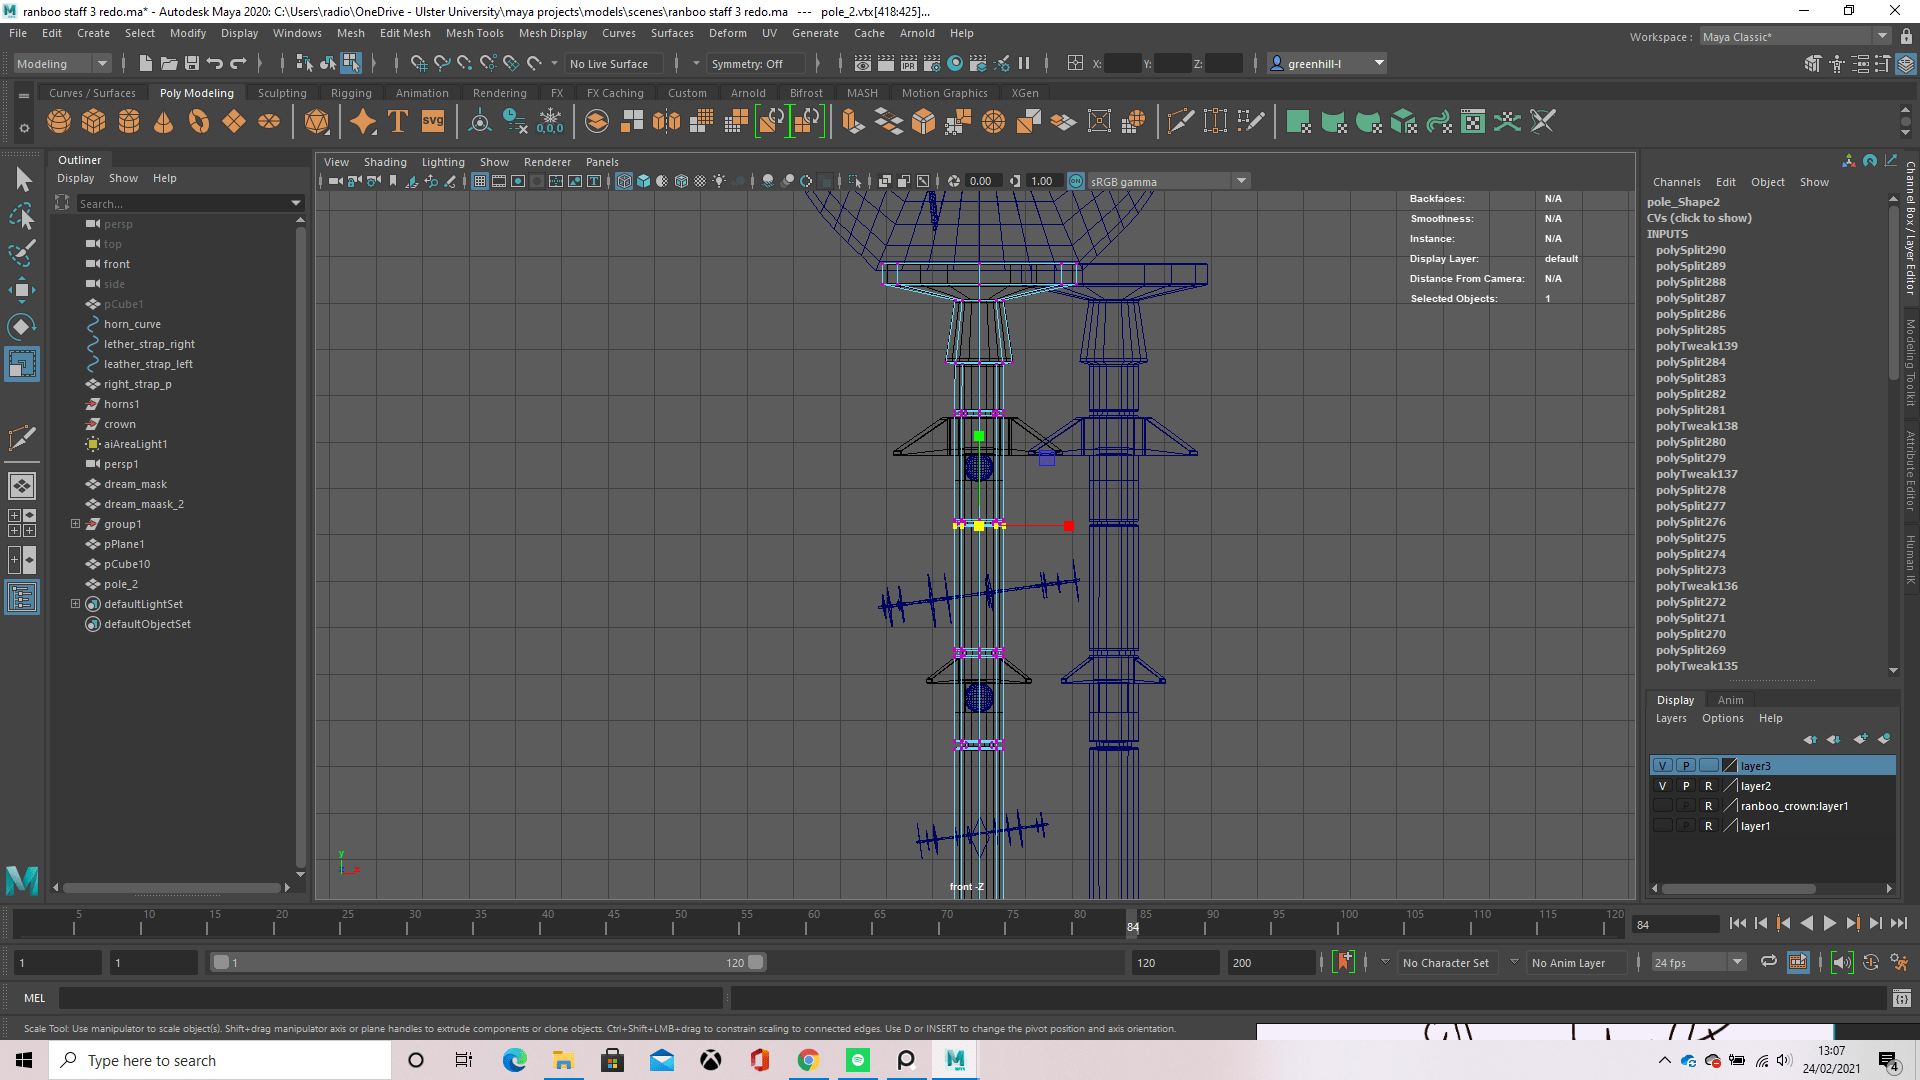
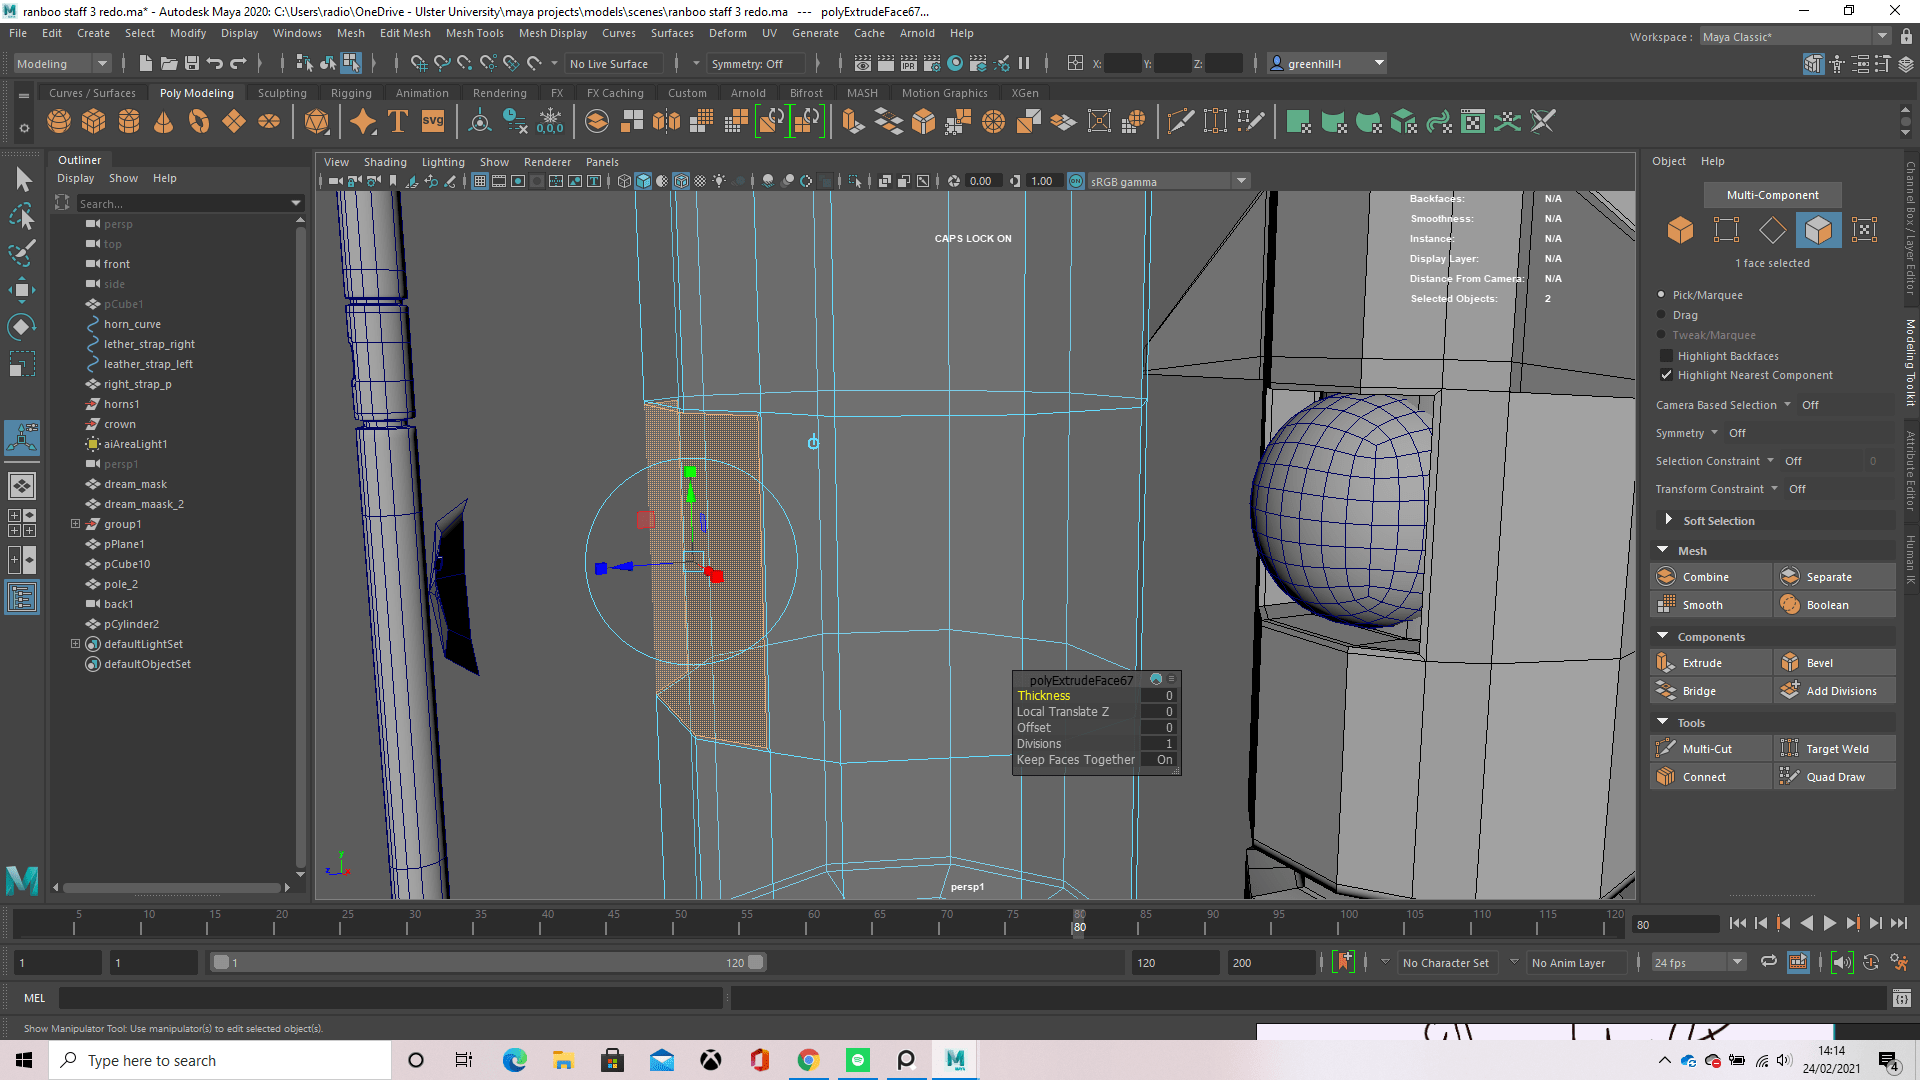
Since the actual staff itself was already purple, I couldn’t really put another purple running through it, as that wouldn’t look like corruption and I thought would just look like a mess, so instead I used the organic spread in substance painter and gave it a red colouration, clicking random points of the staff to make sure it was covered in what I hoped would look like a corrupted spread like in the horns. The staff pole was made from a cylinder with 9 height segments, which I then scaled up in the Z axis, scaling it down in both the X and Y axis by using the little box connected to both axis. This makes the length and width of the staff pole, adjusted until its proportions fit well with the horns.
To actually make the model, I used an extrusion along a curve for the horns then mirrored it and placed it further away, bridging the edges together to make one solid object, these horns would represent the mutation of Ranboo’s character and his bravery. The staff pole itself is one whole model, with a lot of extrusions, and bevels for the indentations where the eyes sit. I first made the pole from a cylinder as stated above and then grabbed an edge near the top after placing a edge loop and extruded it, this created the top part of the staff which I call the “mantle” as the horns rest on it. From there I had to further scale it so it was in proportion with the horns and looked like it was supporting them, for this i used the scale tool and scaled it in the x and y axis to make it longer and wider, afterwards, placing another edge loop and creating the side of the mantle so it looked smoother.
Carrying on further down the staff to the very bottom, I made a spike which would be connected to the blue coloured parts of the obsidian, being weld together to create a strongly enforced weapon at the end of the pole. I did this by creating edge loops and scaling the faces outwards in the x and y axis and pushing the edge in at the middle to give it a chamfer effect. To make the spike I firstly made two edge loops, bringing on down near the middle and scaling the vertices out on all axis, scaling down the z axis if need be, and the adding more edge loops in other places that were vital such as the very bottom to support the point of the spike and up near the top to give it a classic arrowhead shape. After all these edge loops were placed, I used my middle mouse button on the multi-cut tool to go through and add more loops to smooth everything out.
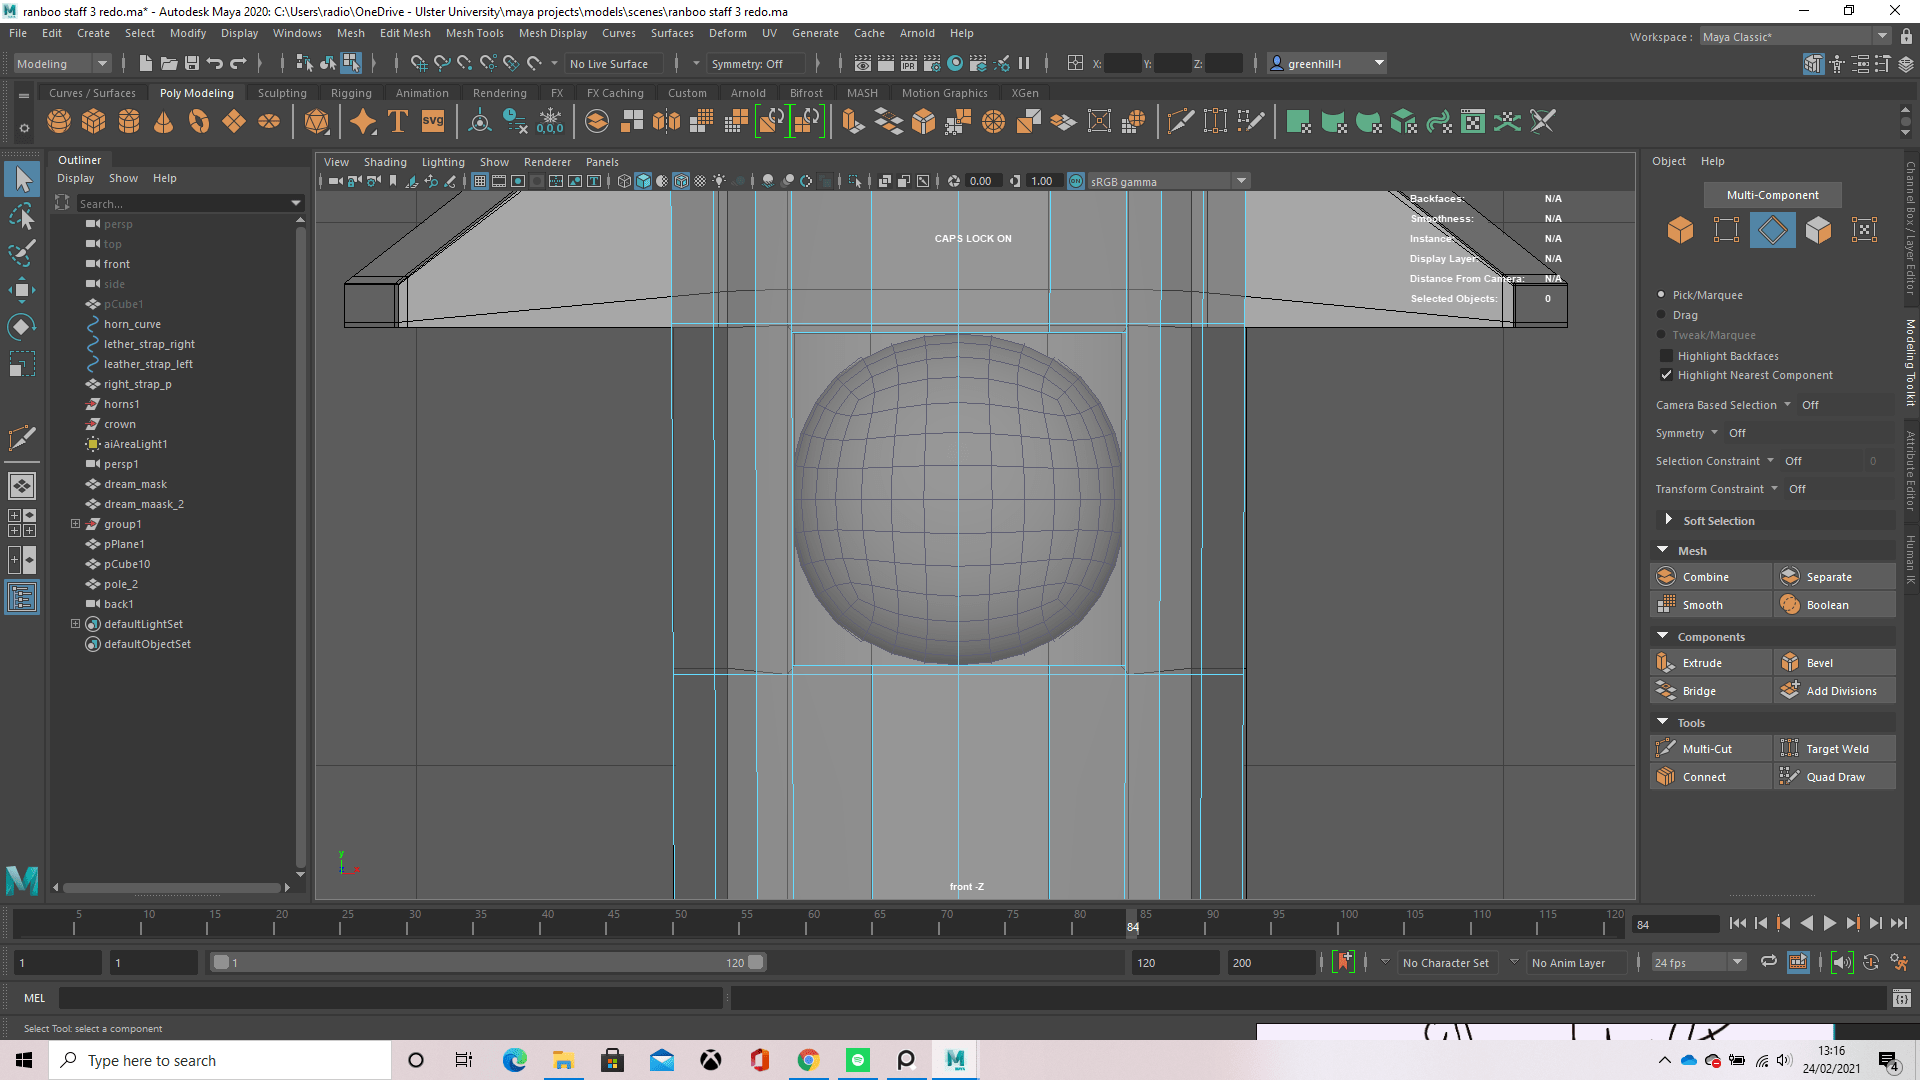
The indents in my opinion were the parts of this model I struggled most with, as this was my first time doing anything like it, and the first couple YouTube videos I followed made my entire model freak out and gave me concaved faces all around the hole. I fixed this by putting together some general rule of thumbs id learnt from the videos and putting them into practise, for example, the main one was the extrude then place an edge loop, this made sure whenever I wanted to smooth out my model by pressing 3, the indent I made would still be there and in the shape I created. Another helpful part to this was when we had our one to ones with Michael and he showed me how to do the eyes on my mask, I was able to take this information and input it into my staff pole. So how I ended up doing it was creating an edge loop at the top and bottom of the object I wanted to set in the indent (in this case it was the eyes), then deleting the rest of the edge loop aside from the three edges at the front (taking away unnecessary geometry from my model) then repeating this for the side of the object (my edges were already there so I just had to delete the two inside my square), select the face in the middle and bevel it to about 0.01 to create a very thin edge then extruding the face and pushing it back to where I wanted my indent depth. After that, all that was left to do was place an edge loop at the top and bottom of my indent by using shift and the right mouse button then navigating down to “insert edge loop”. Once I pressed 3 to smooth my model, the pole looked fine and the indent was now a rounded square where I could neatly slot the eye.
The spikes on the sides of the staff were made by creating an edge loop at the top and bottom of where I wanted the spike to start and end, selecting the 3 faces I wanted then extruding them out with ctrl + E on the keyboard and using the scale tool to move them both at the same time to get equal length and width apart by first scaling outwards on the x axis and then pulling their end vertices in on the y axis to form a blunt spike. In relevancy to the staff, these are purely for intimidation points and can’t be used to attack or deal damage.
Moving onto the spiked halos that are seen floating around the staff, these were once cylinders believe it or not. Before giving them flattened look, I had to first bevel the top and bottom faces of the cylinder to get one whole face in the middle and a little thickness for the edge. I deleted the top an bottom faces then selected an edge on the inside and holding shift then double clicking on another edge, selected the entire ring, did the same for the top ring, and then bridged all the edges together. This gave me a nice round ring-like shape (this is also exactly how I made the ring that sits on the left horn) which I then went back into object mode (right click hold on the object then dragging my mouse over to “object” in the marking menu) and used the scale tool to push my object down in the z axis, squishing it into the thin ring it is now. To make the spikes, i selected a face then extruded it in on the x and y axis to make a smaller square before selecting that face and extruding that in the z axis (+ or – depending on if the spike was at the top of bottom of the halo) then repeated this for every single spike (yes it was a tiring process). To finish off, i scaled it down to fit my model then duplicated if with shift + D and dragged the other two down to their spots, scaling them down so they got smaller as they went.
The final assets of the staff pole itself are the diamonds and crown at the bottom. These were made as separate objects then moved over and scaled down to fit the model. To make the diamonds I literally just made a cube, went into vertex mode and grabbed its vertices, moving them to the shape of a diamond then duplicating the object after freezing its transformations. To make the crown I took another cube, deleted all faces but the front, (this was to make sure I was only working with one face so I couldn’t mess up) and used the multi-cut tool to cut the shape of a crown onto it. The faces that weren’t in the crowns shape, I selected and deleted, leaving me with a flat crown. Grabbing the front face again, I extruded it outwards on the y axis and gave it a little thickness so it could pop out from the staff.
Finally, we get to the mask. I did do this wrong, but learned how to correct it in the future thanks to help from Michael, Alec and Daryl (basically everyone who viewed my model, so thank you!) Firstly I’ll explain how I did it (the incorrect way) then I’ll explain how I should go about making things like this in the future (the correct and cleaner way in way of geometry and topology.)
How I did it
To make the mask I first thought taking a sphere and cutting it in half would work- soon found the very opposite, didn’t work at all- so instead I used a cube to make a quad sphere which is done by taking a cube and smoothing it to give it subdivisions. From here I cut half of the sphere off and scaled the mask’s length, width and height a little to make it more suited to what I wanted. Once this was done, I made two cylinders and scaled them down to size, move them over and into the mask then used a Boolean difference to cut holes in he mask for the eyes. This didn’t work first time and kept deleting my model, but i fixed this by going into the Boolean settings and ticking “legacy”. To make the mouth, i extruded the front face of a cylinder along a curved line I made with the Curve NERBs tool, froze the transformations, then moved and scaled it down, rotating the ends a little to better fit the mask, and made another Boolean. For the back of the mask, i selected the loop of edges around the back of the mask and extruded them, scaling them in on all axis to make a face, then pressed g to repeat my last action and kept doing this until I reached the middle. To fill this hole in, I simply used shift right click then went down to “fill hole” and a polygon was created in the shape of the hole. I then went over this with the multi-cut tool the fix the topology by creating edges from the vertices opposite each other.
How I will do it in the future
I want to start off by saying I did try doing this method, but I didn’t think it looked as good as my current mask, so I asked my tutor and he told me for this assignment I could use the mask, but to practice for the future doing it more efficiently without Booleans.
For any future projects I have, instead of using Booleans, I’ve been taught its better for topology and animation if I use the multi-cut tool and the tool kit in general to make my shapes, as using Booleans gives messy geometry which is hard and frustrating to clean up as they leave Ngons, concaved faces, extra vertices and all sorts of nuisances behind. For this project in specific, id make the quad sphere again and select the face where i want to place the eye, extrude it then scale it in on the x and y axis, then extrude that new face inwards, placing edge loops at the top and bottom to make sure it keeps its shape whilst smoothed. To give it a circular shape, id have to line the vertices up into a square before extruding. Making the mouse was rather similar, although using the multi-cut tool to continue on where the extrusion left off for the rest of the mouth. Myself personally, I didn’t like the way this came out as the smile wasn’t stretched out enough and looked too much like a regular smiley face, but that’ll come with practice. It could also be because I used a mirror projection for the other half of the face to make everything symmetrical.
To make the straps that accompany the mask, i just used a NERBs curve and extruded the face of a cube along it, adding an edge loop through the middle then using shift + d to duplicate the strap after freezing its transformations, moving and rotating it to fit the other side of the mask.
The crown on top of the mask was made following a YouTube tutorial, though after further inspection from a tutor, I found it was either a bad tutorial or I’d missed a step because the topology was all over the place and there were edges coming from nowhere and faces on top of faces, though at this point there wasn’t really any time to fix it and retexture everything as id already got halfway through texturing, so those errors are unfortunately still in my model. The way I’d tried to layout the UVs also left me nowhere to texture in jewels, so its a plain gold crown.
So now I’ve walked you through the 3D modelling process of my model, I’d like to point out the reason it took me around 4 tries. Apparently at some point when in settings, I’d messed with the amount of divisions made when extruding, without knowing this I competed my first model but when Michael took a look at it, the faces he pulled just had faces upon faces, it was honestly like watching a magic trick and gave us a good laugh, we didn’t find out what was causing it though and just agreed i needed to remake my model. So jump forward to about the 3rd model, id FINALLY found out what was wrong… My divisions were set too 100 per extrusion. So that didn’t go down well, but making it easier on myself I just used x-ray and traced the edges and vertex line-ups on my model, adjusting them until they looked ok and called it a day. The joys of 3D modelling.
UV mapping:
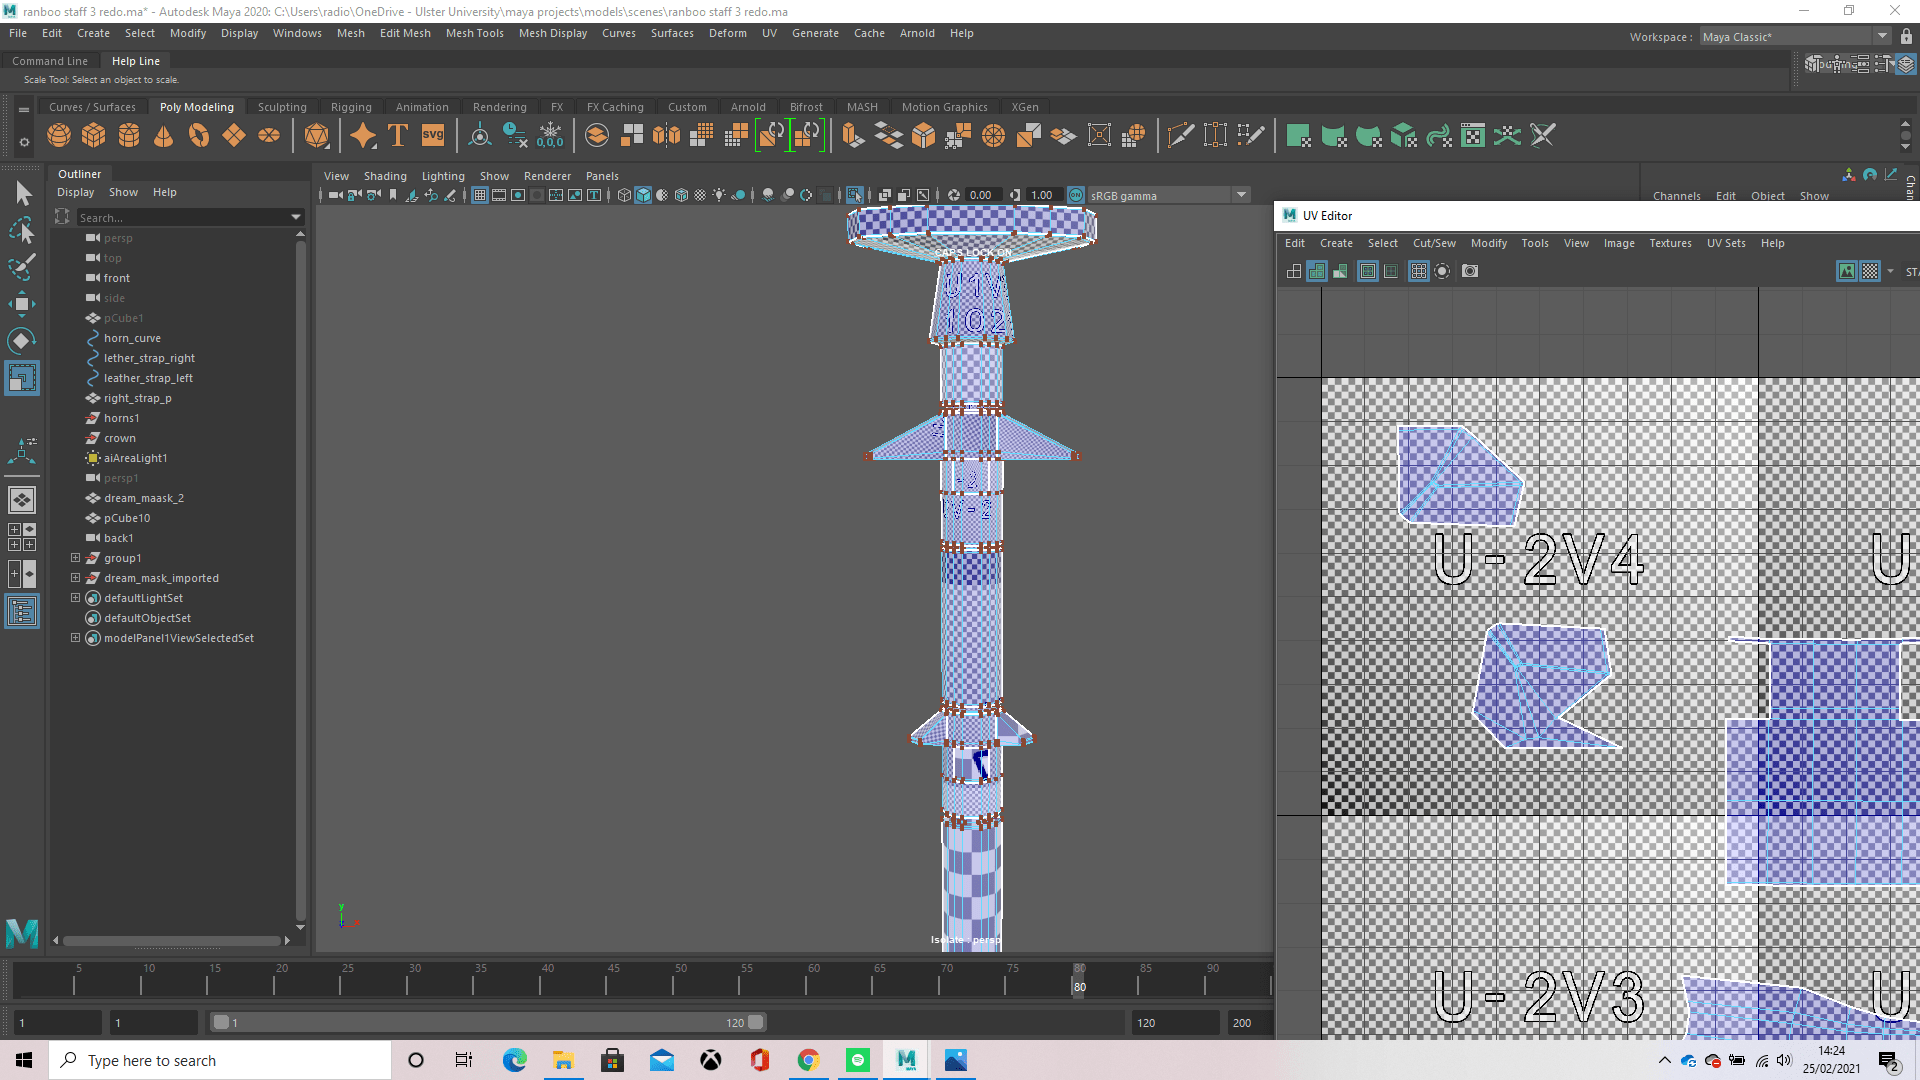
After modelling everything, i had to start thinking about texturing. This is done first by creating what is called a UV which allows you to cut and unfold your models shape in a UV editor to help you lay them out neatly and fit textures appropriately.
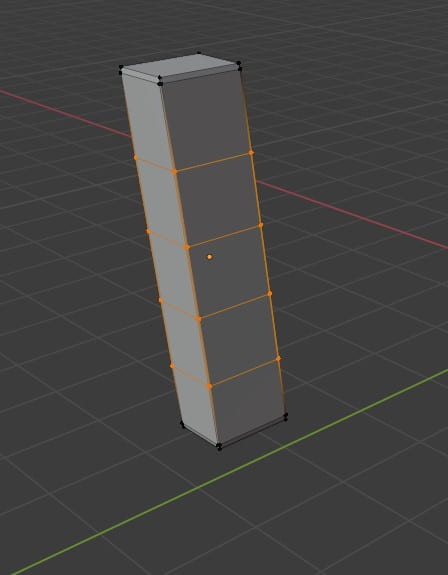
Above is a screenshot from when I was starting to use the UV editor to UV map my model, obviously it’s not correct yet because at that stage I’d only done a small section.
For the rest of this section, I had a problem with my one drive, so my laptop wasn’t allowing me to take screenshots as it had nowhere to save them. I only figured out how to bypass this problem whilst writing this blog, so from here I only have the post production screen clippings, sorry.
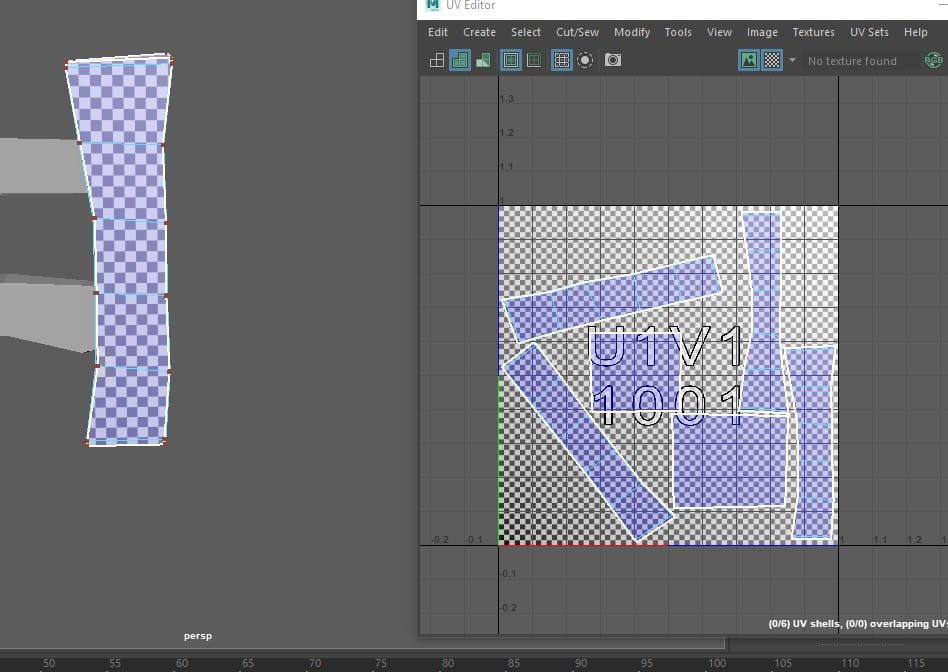
Above, you will find the whole UV mapping for my staff pole. There were many different sections that had to be cut, such as the spikes which also had to be cut down the middle so the UVs could balance out. I made a cut down both sides of the staff pole, giving the UVs a front and back, making it easier in some places to deal with, whilst it made other parts more confusing, but i found a way to do it al in the end. I had to go through the process first though of laying out the whole staff in a planar projection on the y axis, allowing me to view my whole staff from the side and make cuts from there, dragging them off to the side to be ready to unfold later.
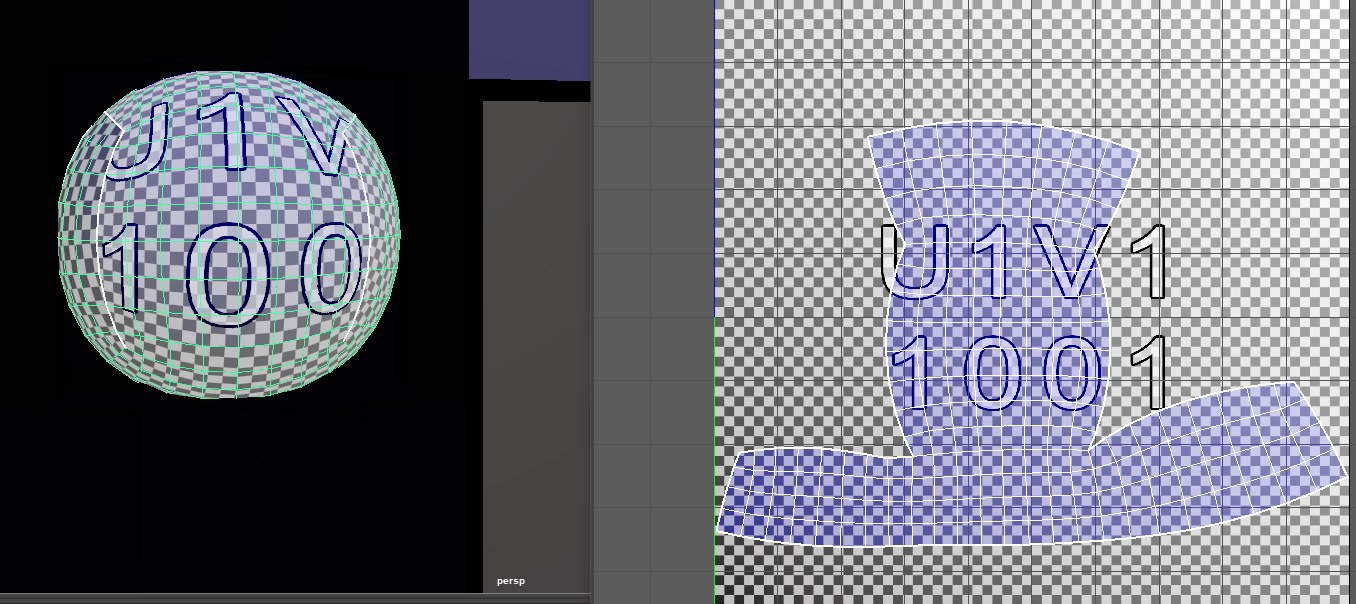
The eyes weren’t too hard to unwrap, I just had to open the UV editor then unfold them and it gave me this shape. I did try to straighten the UVs with “straighten along” but the curve needs to be there to make it more realistic, as a straight UV didn’t let the texture curve around the sphere and instead lay flat and looked odd.
For the horns, I used a video tutorial which I will credit at the end of this blog. I did have it on my own the first time by just cutting a seam down the side of the horns separately and going from there but once I bridged the two horns together, it messed up and I needed a tutorial to help me. What I had to do in the end was leave the seam there but then unfold each horn’s UVs separately, cutting another seam along the bottom of each horn. I later realised when writing this, I should have also cut a seam along the bridging of the horns, but forgot about this.
The spiked halo, I cut seams alongside the top and bottom edges on the inside and outside, then made a vertical cut along the side edge. I moved the UVs off to the side and unfolded them all, and this is what i ended up with. Honestly, looking now, I see Ii probably should have made cuts around each spike too and unfolded them to make it a lot neater.
The ring was done in a similar manner to the spiked halo, making cuts along the inside and outside edges of the top and bottom edge loops, then selecting those UVs and moving them off to the side and unfolding them. I then took the remaining UVs and creating a cut along the side edge, as you can see in the left of the image, then unfolded that and used “layout” to lay all my UVs out neatly, as with every UV map I created.
This is just showing the bottom half of my staff and how the UVs are fitted around it. You can see the two seams along each side where I made the cuts, along with the cuts i made for each face on the pointy out bits. When there was a surface that wasn’t flat and stuck out, I made another cut to make sure that UV would fit that shape of the model.
Here is the diamonds UV. All i had to do for this was project a planar on the Y axis and unfold the UVs.
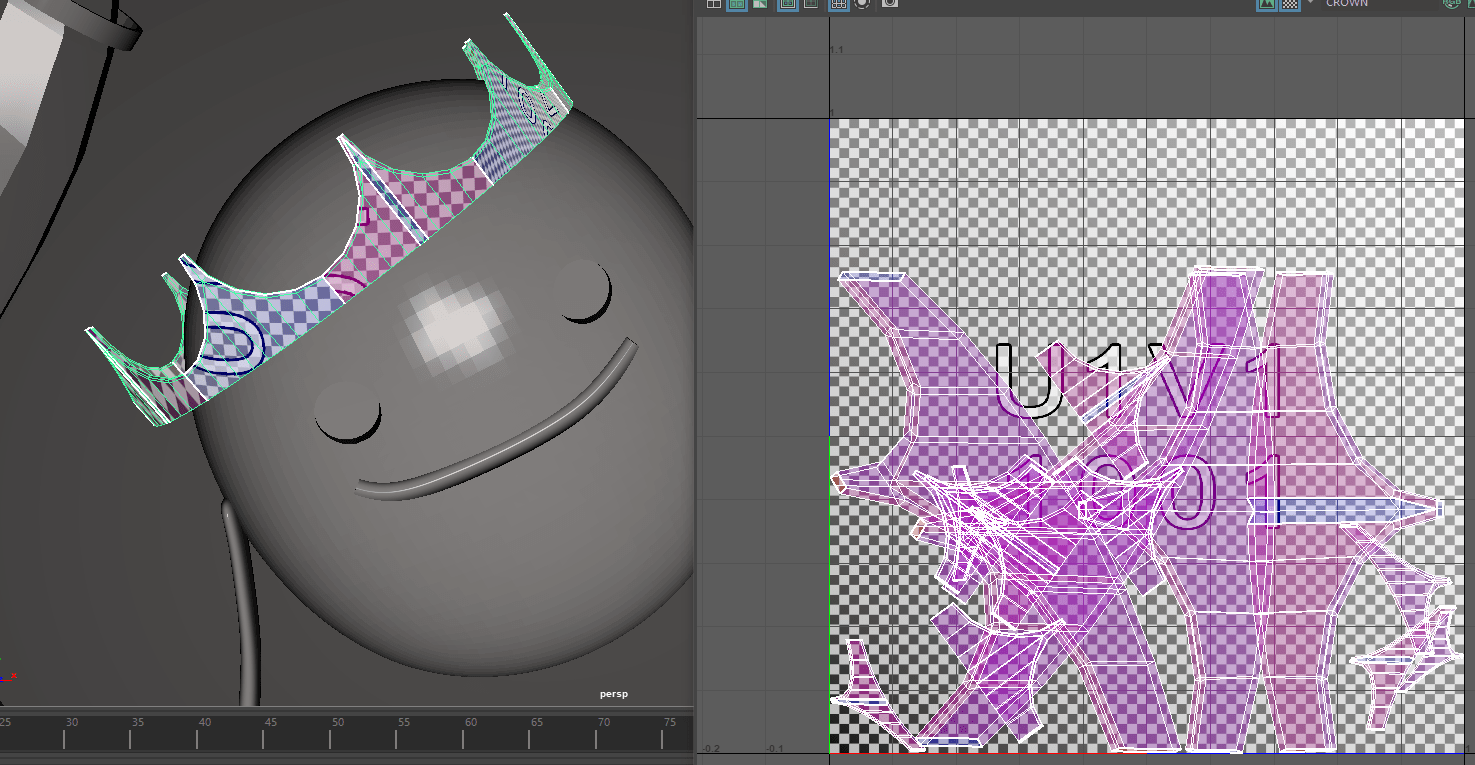
The mask was a bit more complicated than i thought it’d be, as the topology was a mess and there were a lot of Ngons. I had to first project a planar on the y axis, the make a cut around the edge to separate the back face from the front. I then moved the front face off to the side and unfolded it and that was done. Now i had to work on the back. I made several cuts along the edges that were extruded and scaled down in the hollow of the mask, pulling each of them out and then unfolding them separately. The UVs in the middle of the mask were easy to unfold as they just unfolded into a neat oval.
The crown, I was completely lost and confused in how to unwrap it but still gave it a shot. I later was told by my tutor Daryl how to properly unwrap it, but unfortunately I didn’t have time and had already started texturing everything. The proper way to do it was to make a planar projection in any axis and cut along the sides of each face then unfold them. Unfortunately with this current model, that wouldn’t even be possible without fixing the geometry first, as there were faces on top of faces and edges that led to nowhere.
Inspiration
Here is my concept design and a more improved version down in the bottom right of the page. The mask is inspired and in relation to the popular youtuber “Dream”, who alongside Ranboo, is also a Minecraft youtuber and is owner of the roleplay server they play on called the “Dream SMP” (SMP in Minecraft stands for Survival Multiplayer)
The image following is another concept I had but with an eye instead of a mask, though I thought the mask would have more impact as it’s less repetitive and for people who know the reason behind the Dream mask, more impactful.
And below is the spiked halo concept
Some little details I threw in are the crown and the ring, along with the mask itself. Knowing the lore of the roleplay, I know Ranboo is rich (hence the golden ring on the horn) and his character wears a crown. The reason the crown is on the mask of Dream is to represent the power Dream has over Ranboo -as in the roleplay, Dream’s character is an antagonist and commits murder, starts wars and manipulates people to turn against each other-.
Some looking around on the internet at other magical staffs gave me inspiration for my staff, for example this staff gave me the idea for the spiked halos around my staff
Other inspirations were things such as animal horns and how they curve, more staffs for a general idea of a staff, the crown shape and colour and this ring which helped me figure out how to make the spiked halos.
Goat skull isolated on the white background
Improvements
In the future, if I was able to come back to this staff or even try remaking it when I’ve gained more knowledge on 3D, I’d add the straps so there was a clear way the staff pole and horns were being held together, I’d add animated particles around the staff making it look like it were emitting them, and I’d want to try my hand at animation. I’d love for the staff to float on the spot along with the mask and halos, though a little out of sync, and the halos possibly slowly and subtly turning? A ring of light on the ground that fades in and out relevant to the staffs distance from the ground would also look pretty cool.
Overall, I really enjoyed this task and look forward to working more with 3D in the future!
Here is the sketchfab link to my model, sound warning for creepy ambience 🙂