Here is a showcase of my three cycle animations. I have created a walk cycle, a run cycle, and a body mechanic.
Walk Cycle:
Syncsketch link:
https://syncsketch.com/sketch/449da411a66b/
Run Cycle:
Syncsketch link:
https://syncsketch.com/sketch/268ab7f7dd33/
Body Mechanics:
Syncsketch link:
https://syncsketch.com/sketch/b52b4817b814/
Reflection:
I found this project very fun and exciting to make. I definitely see the improvement I’ve made throughout this project in 2D animation, and the creativity I was able to produce during the project. I am happy with my results. I successfully created a walk cycle, run cycle and body mechanic animation. I made sure to create these cycles with reference, the principles of animation, and create them in a unique, creative style for all three videos. The lessons from Sorcha McGlinchey teaching about 2D animation in After Effects, and other tutorials I came across, have been immensely helpful in building my skills and learning new skills. Although, there are parts I would go back and improve on if I were to do this again. I wish I had found new ways to make my animations smoother and more interesting as they move. I would’ve liked to find ways to avoid stiffness in the motions. Other than this, I think I did a pretty good job to produce an animation with fundamental principles for each of the cycles, with unique and experimental characteristics and style in the animations.
The 7th week of this term – 1st week of this assignment, we were introduced to the Animation cycle/mechanics project. In this assignment we are to animate three scenes. A walk cycle, a run cycle, and a form of physical motion (body mechanics). We are to plan, research and peer assess/critque/help classmates. We will consider exploring our abilities in either 2D or 3D, explore different characteristics/personalities in these cycles. We are to gather video/image reference of ourselves/online/or friends/relatives, to thumbnail our sequences before we animate, and apply our knowledge of animation principles to our work. By the end of this project I hope to produce an animation for each of the cycles, with unique and experimental characteristics and style in the animations.
This Mondays class we got a talk with Sorcha McGlinchey (Sorchacartoons on social media) as she introduced us to 2D Animation and animating on After Effects. She went through with us the basics of setting up an after effects scene for an animation, and the controls to make a shape move.
In the end of her class we all had produced an animation of a walking character. Here is my attempt below.
In the afternoon Alec introduced us once more to the mechanics and posing of characters in 3D animation. He went through the importance of reference and the mechanics of the example rig he provided. We worked on posing two rigs at the same time. My work is below.
These two tasks ultimately helped me decide which form of animation to go for. I was very interested to try out 2D animation through After Effects again and learn new things about it, so I chose 2D Animation.
Here I will be documenting about my progress to animate a body mechanic with fundamental principles for each of the cycles, and with unique and experimental characteristics and style in the animations.
To start my brainstorming and organizing for each animation, I used Miro Board. I decided I wanted to use a video of a friend/relative to help me reference the body mechanic animation, and I set down my idea of a character skateboarding. (info in green)
I did brainstorm and think about casual, physical motions that we would do. I thought of building a snowman – like lifting the head of the snowman onto the body, or cleaning a room – reaching a high place, riding a skateboard and riding a scooter.
My sister agreed to help me out with video reference as I try out these ideas.
We filmed a few takes of some of these ideas and we decided the skateboarding idea was the best out of them all. My sister has experience with skating and owns her own skateboard, so we were able to film these shots pretty easily. She helped me out with tricks ideas she could do which enhanced my original idea.
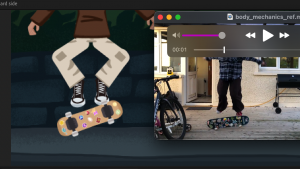
I got a shot of her doing a trick and a shot of her skating out of frame. Here are the videos below:
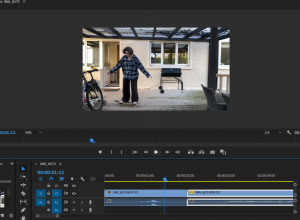
I also thought it would be very helpful for me to combine these videos so I could view both of the body mechanics at the same time. I used Premiere Pro to put these videos together. I made sure the the first video lined up with the second by adjusting the size/shape of the video – I lined up the last position on the first video, to the first position of the second video. Here it is below:
I also tried collecting other pieces of reference to help me perfect this body mechanic. I researched for more skateboarding videos that I could study the body movements & the skateboard positioning.
This was one of many videos I looked at that more or less replicated the trick that my sister did in my reference video. I combined the clips from the “older school kick flip” trick – this helps me picture how the skateboard is positioned as it flips, and how a persons body anticipates the jump and lands.
In addition to this motion reference, I was also looking for style/animation inspiration. I was very inspired by Sorcha McGlinchey’s class with us where she used Photoshop/Illustrator/After Effects to create 2D animation. I’d like to produce my animations in this way.
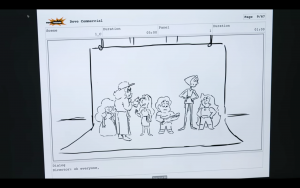
I also took inspiration from this advert series for the ‘Dove Self-Esteem Project’ based on the show ‘Steven Universe’. They have this shape-layer-rigging style in the animation that I could take inspiration/reference from. It is filled with beautiful colours/lighting and showcases many different shapes. Below is one of the videos that I enjoy, and I also found a short Behind the scenes video about the project.
In this behind the scenes video you could get a glimpse of how the project was made though the screens of the creators/artists. They show their blocking out/line-art stage, their storyboard/animatic stage, and their painted concept pieces. Seeing these parts of the project help me understand their process and how familiar these steps are to me already – that I could achieve them for my project too.
This short animation called Kaeru, made by students from the San Jose State University, is also a nice visual inspiration. From the variety of analogous colour palettes, to the subtle textured look that gives the story more life and realness. They also portray strong emotions such as self doubt, rage and joy.
I also looked for more in depth tutorials on After Effects so I could refresh myself for using After effects, and learn some new tricks.
This After effects animation tutorial has a little bit of a different approach to what I know of, as they make all their layered shapes on after effects directly instead of importing them from photoshop. This is still quite an informative video as it provides options in After Effects I didn’t know about before, such as the ‘Set Matte’ tool – to clip one shape layer onto another shape layer, and the ‘parenting’ tool – to make shape layers follow another shape layer when positioned.
This approach is also really good to know because in my body mechanics move, the characters body may turn slightly to the right to go from the trick to the skate away. This video helps me to understand how I could try to achieve that action.
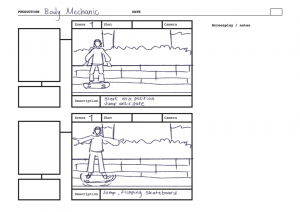
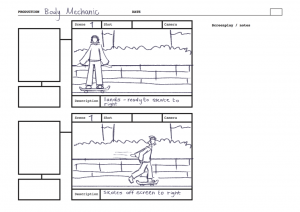
At this point, after gathering my reference, I am ready to start the body mechanics animation. I will start by thumb-nailing my main key poses.
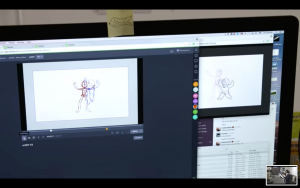
I used Adobe Photoshops video sequence timeline tool to complete this thumbnail sequence. I drew in a rough character model and drew out the main key frames that I picked up from the video reference I made.
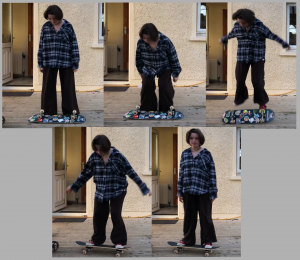
To help me point these out, I made a collage of the key poses in a picture, one for the trick, and one for the skating away.
I can see in both sequences of images that there are hints of anticipation – bending of body & knees, and squash & stretch – in the jump and skate. The use of these animation principles will help to enhance my body mechanic animation.
These still images were really helpful in posing the character in the way I hoped for. This was a similar process that our tutor Alec taught us – how he prepared his reference in the jump animation tutorial.
Source
Blackboard -Jump Animation – Blocking to Spline Video Tutorial – 01 – Jump – Blocking – Start.mp4
Here I had my reference on the side as I drew in my poses in the animation timeline. I placed a layer for each pose and timed them at one frame long to start with.
I then used the video I edited together to figure out a rough timing set up. I made selected layers longer or shorter depending on how slow or fast an action occurs.
After a few adjustments I finished off the first, rough thumbnails of my body mechanics animation:
I am quite happy with the poses in this mechanic. It definitely looks like a skateboard trick so I know it translates well, and it will help for the animating stage later on.
Next, I want to design my character and background in preparation for the storyboard, and for the final scene buildup.
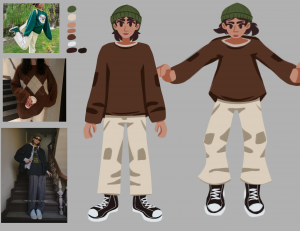
I gathered reference from Pinterest to find images of a casual skating girl. These will help me design my character, inspire new ideas, and pick my colour scheme.
I was inspired by the art style look of the Steven universe x Dove videos, and combined my style, and theirs to make this. I think this style is very appealing, and it will also help during my rig/animating stage with its line-less look.
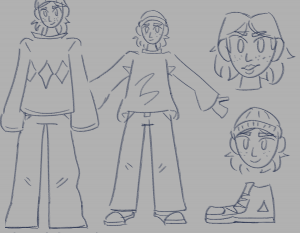
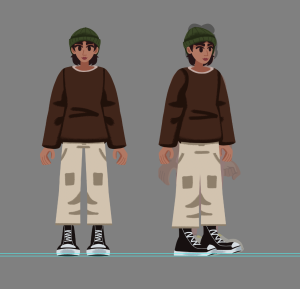
I made some first initial sketches, and then designed my body mechanics character below. I illustrated a standing pose to highlight each aspect of the design, and also positioned them in one of the poses I collected previously, to see how it would work. I like the accessories on this character and how the outfit is quite easy to draw.
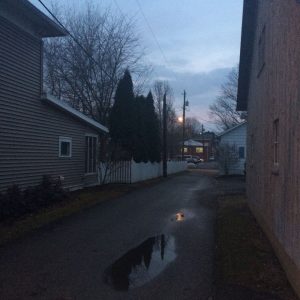
From my brainstorm beforehand, I had a visual of what setting I wanted to achieve for the scene. I wanted to capture the darkish fall evenings in a quiet neighbourhood. I found some reference images to the right that help visualise this for me.
With these reference images, I picked out the main pieces of each setting that I wanted to capture etc. the brick wall with bushes, the small houses, the rough footpath. I also used these images to pick out my colours as I thought they fit well. The preview of the background with my character, is below. This was quite fun to draw especially creating the leaves, and adding the textured look.
Right after my design process, I started capturing how the scene will play out in a storyboard. I added a rough sketch of the designed character, and a rough sketch of the background. I also added descriptions on each shot to explain what will happen, and what reaction I want to capture from them.
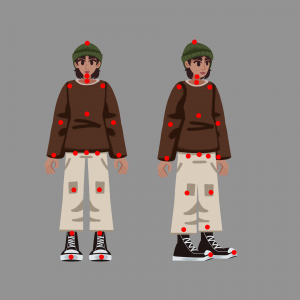
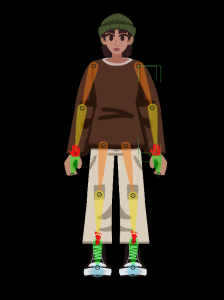
Soon enough, I started building the character rig on Photoshop. I drew out the character model, each part of the body in separate layers. I made two rigs, One facing the front, and one turned to the right. This is because the character will be positioned in two poses throughout the scene. I added sphere shapes around the body where the joints are, or where the skeleton pins will be within the rigging stage.
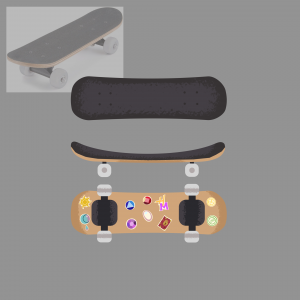
This scene also contains a major prop. I designed a skateboard in photoshop in three different poses: the back, side and top of the skateboard.
Once this rig was finished, I was ready to bring my work into After effects. I brought over my background, the thumbnail walk cycle to reference from, the skateboard, and the character rig/layers.
Again to start rigging the character, I set up the DUIK skeleton on both versions of the characters. I went through the same process as the other animations when setting up DUIK, which was: pinning each skeleton part to the body, parenting the parts to the skeletons, auto-rigged these skeletons and assorted the controls.
I made sure to continuously refer back to my reference images and videos to accurately capture the poses and positions I was aiming for. I especially needed reference for this animation as it is quite difficult to predict this uncommon kind of body mechanic.
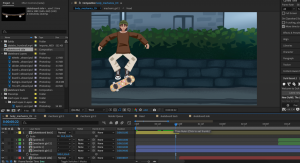
I started animating the limbs and skeletons of the rig to make the body mechanic. My first draft is below:
In this first draft I was focusing on the first rig of the character first. I make blockout poses of the jump, and also the flip of the skateboard. It looks quite slow and floaty as the moment, however more concentration to the positions will help the visual.
Draft 2:
In my second draft I worked on the jump again, focusing on the impact, and lifting from the ground. I also took time to align what parts of the body were moving out of place, and figuring a way to position them. The landing looks off at the moment, and the jump overall is quite stiff. I will soon look within the graph editor to clean up and smooth the motion.
Draft 3:
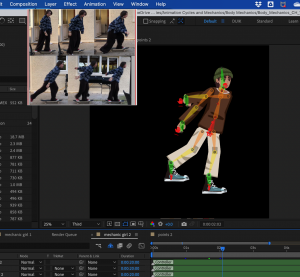
On my third draft I focused on starting the second rig of the character, looking to the side that will skate off frame. I referred back to my references to capture the pose in this second part, however it is still at a rough blocking stage.
To be able to find ways to improve my work, I asked my peer for feedback on my animations. Although an early draft was shown of this animation, they still could see what it will become, but suggested to keep focusing on the timing/pace of the scene, as it will be important. I appreciate another person viewing my work for a different perspective and thought about the visual. This will help me improve what I couldn’t see.
Draft 4:
Here I was making progress with the graph editor. I took some time to work on the first motion again to detail its values and speed. It does need some more work later on. I added a closed eye illustration to give the idea the character is blinking, which gives it more life.
Draft 5:
I made much more progress with this draft. I made details with the animation of the skateboard: I had taken out one layer that was not needed, I adjusted the scale to make the skateboard look like its lying on the feet and spinning, and rotated it the same way it was in the reference. I made more progress with the positions on the first rig, after looking more into my reference for extra help in finalising it. I still need more progress on the second rig of the character, and a little more progress on the jump – as it still looks floaty in my opinion.
Draft 6:
Here I started on the transition from the first rig to the second, and working on details of the second rig movements. The transition looks quite quick right now, but I made some more progress with the video below.
I focused a lot on altering the positions and movements of each rig to better finalise them. The jump now looks less floaty this time, and the landing works well. I also changed the position of the arms in the second rig, as before hand the left arm looked out of place. I was mostly adjusting the neck and head around this time as I had trouble with its position – the neck would slip down too far down the torso during the jump. I continue to fix this with this next part below.
The jump works a lot better now with the detail adjustments, and work on the graph editor. I also slowed down the transition between the rigs just a slight touch.
Draft 7:
In this draft I started working on animating the second rig and skateboard moving off to the right of the scene. Right now it looks a bit slow and does not fit with the impact of the skate of the leg. I could try editing the graph on the skate so that it could go a touch faster. I am also not sure about how the legs move as the first rig lands from the jump. It slightly snaps up then down, making it look like it shakes. I was not sure where or how this was animated, but I will look into this next.
Draft 8:
In this draft I took time to view each movement I thought looked off, e.g. the shaking legs, and finally polish/finishing them up. I found the source of how the legs were shaking and I redid the keyframes in a simpler way.
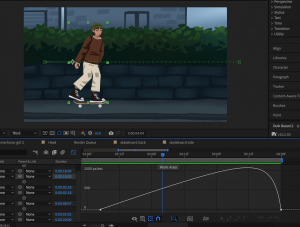
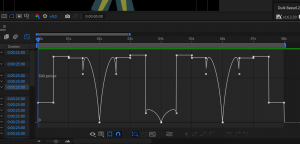
I used the graph editor to edit the path of the second rig/skateboard skating out of frame. I was able to achieve a nicer ease in / ease out look. The speed works well too. (Image on the left: screenshot of the graph editor path for the skate)
I animated the hands rotating based on the impact of the jump, and I sped up the jump overall. I am happy with the outcome of this draft and feel as though the animation is just about done.
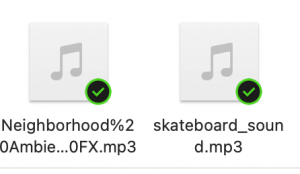
Now that I finished the animation, I brought the final video into Premiere pro to create a looped video and add sound.
I gathered some sounds to suit the scene. I cropped skateboard sounds from my main video reference with my sister, into a sound effect. I also made use of a copyright free neighbourhood ambience sound effect.
I uploaded my video and these sounds onto a Premiere Pro file.
I duplicated my video four times to make a longer video of the animation play in loop.
I also cropped and cut the skateboard sounds apart to fit with when the skateboard flips, and when the character lands on the skateboard. I added the neighbourhood ambience sound below it.
After this the edited version of my animation was done, and overall the body mechanics animation was complete. Here it is below:
I am very happy with the outcome of this body mechanic. It definitely was the more difficult animation to complete out of all the cycles, but it was a challenge I had fun tackling. I like the environment and how the motions came together, I feel as though I did great in recreating the motion of skating on a skateboard. However I could have improved in the timing of the jump/the jump motion in general. I feel like I could have studied more on how to accurately replicate a jump. Other than this I am happy with the result.
Here I will be documenting about my progress to animate a run cycle with fundamental principles for each of the cycles, and with unique and experimental characteristics and style in the animations.
I used Miro Board to help me brainstorm and organise how I will plan and what I can do for my run cycle. It took me a while to think of an idea for the run cycle, however I found inspiration and sparked an idea from a video I watched shown below. (run cycle info in pink)
I will go for a nice wholesome reaction we may all get when our favourite song comes on – when we become a lot happier and gain a lot of energy. I will animate the character running, possibly holding a phone with earphones on, and bopping along to a song.
I decided to look for online reference for this cycle. For my run cycle, I wanted to aim for a fun and entertaining action& character personality. The video below called ‘Weird running styles’ really inspired my idea from the one example of running in the video. I clipped it just below the full video. I believe I could use this lively and bouncy run as reference.
Full video:
Clipped version:
I will also make use of this simple run cycle reference to help me with creating my key poses and making sure the cycle flows well.
Again I would like to produce my animation in the same way as Sorcha McGlinchey’s class with us where she used Photoshop/Illustrator/After Effects to create 2D animation.
And also, the advert series of the ‘Dove Self-esteem project’ and ‘Steven Universe’ is one of my animation/visual inspirations for each of my cycle/motion animations. Here is another video from the same project which I enjoy.
This short animation called Kaeru, made by students from the San Jose State University, is also a nice visual inspiration. From the variety of analogous colour palettes, to the subtle textured look that gives the story more life and realness. They also portray strong emotions such as self doubt, rage and joy.
I am ready to start the body mechanics animation. I will start by thumb-nailing my main key poses.
First of all I was preparing what key poses I am looking for in this run cycle, I screenshotted and combined the parts of the main reference video I am using, that would fit.
I also had an image of the run timing chart in the book ‘The Animators Survival Kit’ in view to remind myself of the cycles key positions – such as contact, down, pass pos/ etc.
I labelled each pose so I would know which order they would go, and how they flow together.
In the video, and in these images too, I notice the man’s arms stay in the same position as they hold onto to the phone. He also bops his head more noticeably and vigorously as he reacts to the music being played. These are aspects of this body mechanic that I could implement to my run cycle to capture this same emotion.
I drew in these key frames and copy and pasted them them around two times to get a good loop. I drew the frames all in one spot so I made adjustments wherever I needed to make the cycle run on the one spot – etc. lining up the feet.
To distinguish the front and back legs/arms I used a different colour to colour in the other leg/arm. This helped to figure out when each leg takes a turn to step forward so I could loop it correctly. I made adjustments where needed – such as redoing the upper legs, as they moved to irregular places from the body beforehand.
This is the rough thumbnail for the run cycle:
I like how the feet are positioned and the use of the key poses flow well, however the body position is too jittery (moves about too much). I know for next time to focus on the body and line the frames up closer to each other.
My tutor gave me some feedback for this thumbnails, that I should focus on how the body of the character moves. I should make sure the body only moves up and down, and not left to right. This makes for unrealistic movement and looks jittery on screen. I redid the thumbnail with this information in mind:
I redid the body and arms to give it more of a running look and structured mechanic. I still went for the look of the head bopping up and down to a song so I hope this could translate well during the animating stage.
Next, I want to design my character and background in preparation for the storyboard, and for the final scene buildup.
I gathered reference from Pinterest to find images of a sporty girl going for a run. These will help me design my character, inspire new ideas, and pick my colour scheme.
I made some first initial sketches, and designed my run cycle character below. I illustrated a standing pose to highlight each aspect of the design, and also positioned them in a running position. I admire the face of this character and how she suits the joyful tone of this run cycle scene.
I couldn’t think of a solid idea for the setting of the run cycle at first, but later on, when designing my character, I finally thought of a visual for the scene. I wanted to go for a city garden/park in a sunny, bright day. I found some reference images to the right that help visualise this for me.
With these reference images, I picked out the main pieces of each setting that I wanted to capture etc. The clear blue sky, the fence with water behind, the fall colour leaves on the ground . I also used these images to pick out my colours. The preview of the background with my character, is below. This was a change from the other backgrounds, but was fun to create. I love the vibrant colours and the look of the trees.
After my design process, I started capturing how the scene will play out in a storyboard. I added a rough sketch of the designed character, and a rough sketch of the background. I also added descriptions on each shot to explain what will happen, and what reaction I want to capture from them.
I used my character design page as reference to make the character rig on photoshop. I placed down two guides to position where the feet are, for the right to be closer to the foreground than the left. I added sphere shapes around the body where the joints are, or where the skeleton pins will be within the rigging stage.
Once this rig was finished, I was ready to bring my work into After effects. I brought over my background, with the gate, leaves, clouds layers separate, the thumbnail walk cycle to reference from, and the character rig/layers.
To start rigging my character, I set up the DUIK tool to add a skeleton to the body.
While I was working with DUIK, I set up a new workspace that would help me use each control I needed in a clear format. I had the DUIK skeleton controls to the left, the timeline, the Duik menu and the character rig.
I also noticed while I was animating the limbs of the rig, a path was created where the rig is. This help for when I wanted to adjust the movement of the legs after I had set down the keyframes. This would also help me later on with the graph editor.
Draft 1:
My first draft consisted of blocking out where the legs and arms will move, using my reference and notes beforehand. The run is very slow right now but I plan to fix it later on. The shape of the hips is quite strange so I will try out some ideas, to see what I can do to fix it.
Draft 2:
In draft two, the pace is much better and works well. The arms and legs move in sync too much, I will try to offset their movements. The head moving left to right doesn’t look right as the hair behind doesn’t follow it.
Draft 3:
In this draft I made a lot of progress. I created a shape layer, in the same colour as the hips, that filled in the irregular space. I added a phone to her hand which adds to the idea she will be listening to music. I am considering adding a pair of headphones to add to this idea. I also animated the background moving which makes it looks like she’s running faster. Next I would like to work on the head movements, and add more details where I can.
Draft 4:
In this draft I added the headphones that I thought about last draft. I worked on the foreground again, mostly on the leaves, to give the idea the girl is running. The background moving last time didn’t work as well as I hoped, as I am looking to loop the video. However this time round it may work out well. Next I will work with the graph editor and graph out the motion of the character.
Adding the extra props to the character, like the phone and headphones, were actually quite simple to do. There were two different ways I would align the props to the character in a simple way.
For the headphones, they would be sitting on the head of the character. The head is set in a pre-comp, as there are multiple parts of the head to combine together. I placed the headphones in the pre-comp, and they were able to move in time with the head successfully. In here I also added the blink. I worked with opacity to turn on the closed eye, and turn off the open eye – and vice versa to create the look of the blink.
For the phone, I added it to the main composition for the character, just underneath the right hand. I parented the phone to the right hand control, and the phone successfully moved along with the arm, with the hand holding onto it.
Draft 5:
On my fifth draft I made a lot of progress with the graph editor. The motion is a lot smoother and clean: I fixed the head bop this time, and added the blink idea. However I had trouble with the arms. I noticed when rotating the head, the arms were parented to the head. They did not work like this as the arms would rotate along with the head, so I detached them. I need to figure out a different way to avoid the offset of the shoulders from the torso. In addition, I may revisit the legs again as they snap a little too much.
To be able to find ways to improve my work, I asked my peer for feedback on my animations. They liked the animation and pointed out the knees/legs look stiff as they move in the run cycle. I appreciate another person viewing my work for a different perspective and thought about the visual. This will help me improve what I couldn’t see.
Draft 6:
Here I took note of what my peer said, and retouched on the legs and also repositioned them – this makes them look more like a run than before. I also fixed the arms by animating on the layer of the shoulder/arm layer. I was able to keyframe the position along with the chest, and it works very well.
Draft 7:
In this draft I was polishing up the animations in each of the layers. I mostly touched on the torso moving up and down, and the head bopping more. I am happy with how this is looking. I may look for a motion effect idea I could add to the animation if I have time, to strengthen the scene.
Draft 8:
In this draft I was focused on trying out a motion effect in the scene that emphasises that the character is listening to loud, upbeat music. It was quite difficult to get an effective animation of it. I like the effect, but I am still deciding if I should try a different approach at this time. In addition, I worked on the foot rotations as it makes contact with the ground. I noticed they would jitter a bit as they land. I tried to fix this up as much as I could. After these adjustments I was happy with the result of the animation.
Once I was finished my animation, I brought the final video into Premiere pro, to create a looped video, and add sound.
I gathered these sounds to suit the scene. I downloaded a song I thought would fit the idea that the character would be happy and surprised that it started playing. I also used a copyright free city park ambience sound effect.
I uploaded my video and these sounds onto a Premiere Pro file.
Here I had duplicated my video four times to get a long looped video of my animation. The transition from one to the other works very well. I added the song, and the park ambience to the timeline.
I wanted the song to have an audio effect that it was coming from headphones – so quiet and muffled. I added a highpass filter that remove low-frequency from an audio – which makes It static and quiet. I also added a graphic equaliser to adjust the settings of frequencies to what I thought sounded right.
After this the edited version of my animation was done, and overall the run cycle animation was complete. Here it is below:
I am happy with the outcome of my run cycle. It was a lot easier to complete out of all the cycles however it contained some challenges along the way. I like the colours in this environment and how the actual run came out – I tried my best to resemble a run in the visual I was thinking of. However I could have improved in the leg structure and animation. I feel like the legs were illustrated too small which caused a few problems for me later on e.g. when the legs make contact with the ground, sometimes the feet could not reach the guide line. If I took more time to design this character that would avoid this problem it would be more effective. Other than this I am happy with the result.
Here I will be documenting about my progress to animate a walk cycle with fundamental principles for each of the cycles, and with unique and experimental characteristics and style in the animations.
I used Miro Board to help me brainstorm and organise how I will plan and what I can do for my walk cycle. I had an idea for the walk cycle even before this assignment started. I knew I wanted to showcase my original character in a whimsical, but spooky scene based on the story I made for it. (info in blue)
I had pictured making a walk cycle based on this art piece I made some time ago. I wanted to capture this characters personality in this work.
She is a tired, young woman trying to start a new life, but ends up in a town cursed by nightmares. She is almost numb to the world, so she would walk slumpy and would be unbothered by her spooky surroundings.
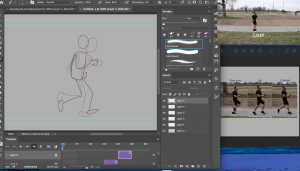
For this cycle I will record myself to try capture the same slump, tired walk I am thinking of in my head, and see if it will translate in real life.
I tried to capture a subtle drowsy, slumpy walk but I couldn’t exactly translate it into my walk. As backup, I will gather a few more videos online of this similar kind of walk so I could have more to study and reference later on.
The two videos below are quite average walks that I could take reference from. They are slow, delicate walks that I could reference and enhance to the feeling I am looking for.
From this video I clipped the three reference walks that I think would be most useful for the walk Im aiming for. They consist of slow, sleepy, and flimsy walks which helps to picture the feeling I am looking for.
Source: “Character Walk Reference” – on YouTube
Again I would like to produce my animation in the same way as Sorcha McGlinchey’s class with us where she used Photoshop/Illustrator/After Effects to create 2D animation.
And also, the advert series of the ‘Dove Self-esteem project’ and ‘Steven Universe’ is one of my animation/visual inspirations for each of my cycle/motion animations. Here is another video from the same project which I enjoy.
This short animation called Kaeru, made by students from the San Jose State University, is also a nice visual inspiration. From the variety of analogous colour palettes, to the subtle textured look that gives the story more life and realness. They also portray strong emotions such as self doubt, rage and joy.
I found this After effects animation tutorial that quickly goes over a simple walk cycle sequence. This is an informative video for referring back to the tools and tricks on after effects, and also remind me of Sorcha’s 2D animation class with us. I will keep these bits of information in mind when I am at the animating stage.
Now I am ready to start the body mechanics animation. I will start by thumb-nailing my main key poses.
I used Adobe Photoshops video sequence timeline tool to complete this thumbnail sequence. I drew in a rough character model and drew out the main key frames that I picked up from the video reference I collected.
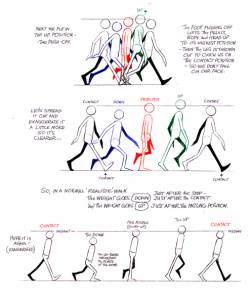
Before I started, I brought up this walk cycle reference from the book ‘The Animator’s Survival Kit by Richard Williams’. This is a very helpful guide to point out the main key poses to use such as contact, up, and down.
I used reference at the side of my screen as I filled in the key poses of a walk cycle such as the contact, down, pas pos. etc. I made sure to include the personality/ feeling of unbothered and slumpy. I made the arms swing as they were flimsy, and the walk itself is slow.
After some adjustments, I finished the rough thumbnail for the walk cycle – I made two versions, one faster than the other just to see what speed I should go for.
I am quite happy with how these turned out. I may look over them one more time but I am okay with the flow and how the arms swing.
Next, I want to design my character and background in preparation for the storyboard, and for the final scene buildup.
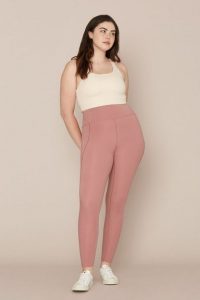
Again I was hoping to bring to life the design and look of one of my drawings as I think its an effective and stylish design. I also made sure to back up my design with a reference from Pinterest, just to help me out with structuring the clothes, seeing it from a real life photo. These will help me design my character, inspire new ideas, and pick my colour scheme.
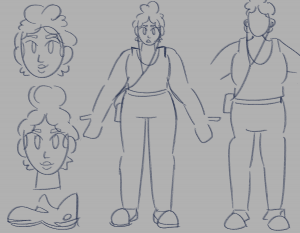
I made some initial sketches, then designed my walk cycle character below. I illustrated the character in a standing pose to highlight each aspect of the design, and in a walking position to see how it will appear in the cycle. I really like the colour palette on this character, and how it fits with my visual for the walk cycle scene I imagine.
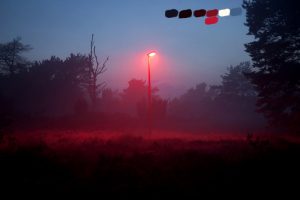
From my brainstorm beforehand, I had a visual of what setting I wanted to achieve for the scene. I was going for a dark night, rural area with strange red vibrance across the scene. I found some reference images to the right that help visualise this for me.
With these reference images, I picked out the main pieces of each setting that I wanted to capture etc. The bright red lights, the dark blue clouds/sky, the dark grassy areas. I also used these images to pick out my colours. The preview of the background with my character, is below. I enjoyed illustrating this background, I like the composition of the clouds, and how the moon shines through.
After my design process, I started capturing how the scene will play out in a storyboard. I added a rough sketch of the designed character, and a rough sketch of the background. I also added descriptions on each shot to explain what will happen, and what reaction I want to capture from them.
From my last 2D Animation lesson with Sorcha looking at building rigs on photoshop – I learned to Illustrate each part of a character’s body in separate layers – how to position each part, and add pin points to help with rigging the limbs at a later stage.
I used my character design page as reference to make the character rig on photoshop. I placed down two guides to position where the feet are, for the right to be closer to the foreground than the left.
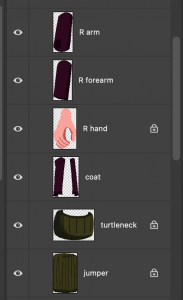
I made each part of the character in a separate layer. I adjusted the layer settings so I could see the preview of each part better. I labelled each layer of what the parts are called etc. the hands, the arm, the head, the neck. I also made multiple parts to the arms and legs as they will be movable/bendable when I transfer them into After Effects. etc. arm, forearm, then hand, thigh, calf then foot. I added shadow details to the design with a textured brush on Photoshop to distinguish each part from each other, but also give it a nice style.
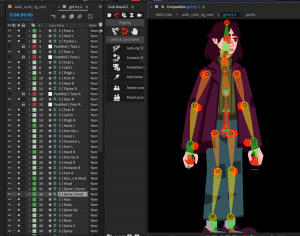
After this, I added sphere shapes around the body where the joints are, or where the skeleton pins will be within the rigging stage. I made them bright red so they are clear to see and use.
Once this rig was finished, I was ready to bring my work into After effects. I brought over my background, with the foreground grass layer separate, the thumbnail walk cycle to reference from, and the character rig/layers.
To start rigging the character, I used a free tool called DUIK Bassel.
Since this is the first cycle I will try to animate, I practiced the rigging process of the whole character to see what I could learn from it. There are rigs for different parts of the body. What I used most were the arms, legs, and spine rig. they come in coloured bones and pin points to link to each part. Etc. There are three bones for the arm, forearm and hand. When I aligned the bones to the pin points on my character, I parent and linked each character part to the skeleton part. I highlighted the skeleton rig from the timeline, and clicked auto rig from the Duik menu.
Once this was done a control for the rig appeared. I was able to use this to adjust the function of the rig, and its animation.
Within this control I found that:
I could edit the icon position to sit where the hand is for easier movement
I could reverse the bend of the limb if the bend was wrong, of If I were to change it for animating
I could turn off auto-stretch to avoid the limbs from disconnecting from each other.
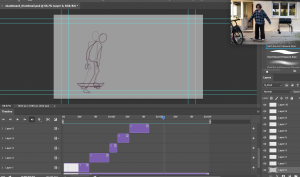
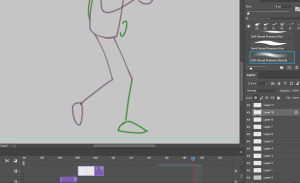
I started animating the limbs and skeletons of the rig to make a walk cycle. My first draft is below:
Here I started to work on the leg positions using my video reference, and the Animation survival kit walk cycle reference. I tried out movements within the head and the body however they weren’t very accurate. The walk also appeared too slow, I would try fix this later on.
Draft 2:
In my second draft I blocked out the arms for the first time, and had toned down the movements of the body and head for the time being. I did not like how the arms would snap and lock as it moved. I made note of this to work on later.
Draft 3:
I made a lot more progress with my third draft. I added some rotation to the hands that make the arm look like it swings more. The legs work better with the additional adjustments I made. I also worked again on the up and down movements of the body and head. I also animated the background moving to see how it looked. What I can improve on is that the shoulders of the arms are not moving along with the body – I have to find a way to implement this. I am still not a fan of how the arms snap – I may redo the arm animation later on.
Draft 4:
Draft four had a nicer flow to the walk cycle, but I made a strange motion to the arms which I thought would give it a smoother look. It ended up swinging too fast, and snapping too much. I will look over the arm animation again to see what I can do to adjust it.
Draft 5
With draft five I focused on the body positions. I animated the hips and torso going up and down, the coat and collar moving along, and the head tilting as they walk.
Draft 6:
I fixed the arms in draft six as much as I could. The arms do not snap as much as it did, and it flows alot better. However I still feel the animation overall is quite slow and blocky. I want to take time to explore ways I can add detail to the movements.
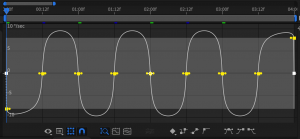
I explored the basics of the graph editor, built into After Effects. This is a tool that helps to graph our motions by speed values etc. I will be using the tool to help time my positions of the character, and smooth out the sequence as a result.
It was at first strange to see a graph like this when I started to look through my controls motions. I was not sure where to begin with cleaning this up, or if it was meant to be like this.
I had a look at a few videos that helped my understanding of the tool, and how I could make the graphs cleaner and smoother.
This video called ‘How To Use the Graph Editor After Effects’ by SkillShare introduced me to the basics of the graph editor on After Effects. I learnt about the different values, the easy ease options, the curve tool, and more.
This video called ‘Clean Up Your Act – Editing the Speed Graph’ by ‘After Effects by Gerard’ helped me grasp an idea on how to edit the graph and fix what keyframes have already been set. This enormously helped me in understanding how the speed graph works and what angles I could create to make different speed effects.
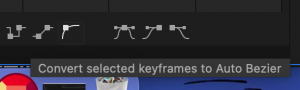
This is a graph for the rotation value of a part of the body (walk cycle). I selected each keyframe and pressed the fourth keyframe button to the bottom right, ‘Auto-Bezier’. This created a curve throughout the path and made the motion smoother. I could also use options like ‘Easy ease’ to create a similar effect.
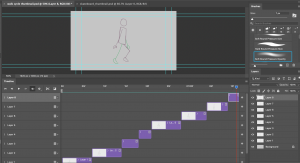
Draft 7:
With this knowledge, I moved on with my walk cycle. With this seventh draft I made use of the graph editor to clean up the movements. During this time I had also added a closed eye illustration and made it so the character blinks. I worked on the head tilt which works a lot better this time round. However, I am still unsure about the arms – they still look quite stiff. I also would like to revisit the legs and adjust them too.
To be able to find ways to improve my work, I asked my peer for feedback on my animations. They liked the animation and suggested that the walk cycle character could have more personality. I appreciate another person viewing my work for a different perspective and thought about the visual. This will help me improve what I couldn’t see.
Draft 8:
In this draft I made some additional touches to the expression and personality to the cycle. I mentioned before I wanted this character to be tired and unbothered to the world around her. After the feedback I realised I did not add this idea in sooner. I made a few more lip shapes, and animated the chest going up then down – suggesting that they are taking a deep breath and sighing. This adds a lot more personality to the character and visualises what they are feeling at the moment. (Image to left: process of adding lip shapes)
I also reassembled the keyframes of the arms and legs again, as I was not happy with them before. I will try adjusting the graph editor on these parts more. I also want to try another visual to the scenery by adding fog. I will try experiment within After Effects and see what I can make.
Draft 9:
Here I was polishing up the animations on the arms and legs once again, making sure they move correctly and smoothly. I still think the arms could use with a little more work, so I will try finalise it soon. I also made some coloured fog images to add to the scene. However they aren’t very visible and do not quite resemble the look of fog. I will also try this out again, and see what I can come up with.
I continued on from here and adjusted the arms once again.
I also turned up the intensity of the fog, and added a grain effect. It is an interesting visual, however I think it could be more effective with some movement – the way fog moves in real life. I may try look for a reference, and a way to achieve the look.
Here is an interesting video on different kinds of fog visuals and how they spread across an environment. I will try experiment with what I know within after effects with the help of this reference.
Draft 10:
I found this smoke/fog animation tutorial that greatly helped me in creating an effective fog look to my scene. I added some of my own touches to the animation such as the gradient / transparent look, and the slowness to fit the behaviour of fog. This is a quite different approach to what I was experimenting with. I was going for a more realistic fog look, while this is a simple solid shape. I think this fits more to the style of my animation based on the solid shapes in my scene.
This created a great visual for my scene that adds to the spooky, mysterious surroundings the character is in. I am happy with this result, and I would say the animation is done here.
Once I was finished my animation, I brought the final video into Premiere pro, to create a looped video, and add sound.
I gathered this sound to suit the scene. I found a copyright free wind sound effect. I thought this would be great to add to the spookiness and eerie atmosphere of the scene I built.
I uploaded my video and this sound onto a Premiere Pro file.
Here I had duplicated my video four times to get a long looped video of my animation. The transition from one to the other works very well. I added the sound below playing through each of the videos.
After this the edited version of my animation was done, and overall the walk cycle animation was complete. Here it is below:
I am happy with the outcome of this walk cycle. I found it challenging at times but It was fun to create an environment like this. I like the scene style and the character personality. The actual walk cycle took a lot of tries to perfect, but I feel if I had studied a bit more with the tools within after effects, or looked more at my references, I feel the cycle could have been improved as a result. Especially the arms in this animation, I had struggled with them quite a lot along the way. Other than this I am happy with the result.


 For the phone, I added it to the main composition for the character, just underneath the right hand. I parented the phone to the right hand control, and the phone successfully moved along with the arm, with the hand holding onto it.


 In this draft I made some additional touches to the expression and personality to the cycle. I mentioned before I wanted this character to be tired and unbothered to the world around her. After the feedback I realised I did not add this idea in sooner. I made a few more lip shapes, and animated the chest going up then down – suggesting that they are taking a deep breath and sighing. This adds a lot more personality to the character and visualises what they are feeling at the moment. (Image to left: process of adding lip shapes)

