During week 7 we took on some animation practices on Maya to further learn about more technical techniques and functions of 3D animation.
Source: Week 7 – Animation Practice & Introduction to Rigging – Morning Animation Exercise – Jump-intro.mp4, Jump-setup.mp4, Jump-blocking-pass.mp4, Jump-2nd-pass.mp4, Jump-polish-pass.mp4.
Introduction to rigging – Exercise 01 – Parent rig, Exercise 02 – Control rig, Exercise 03 – Robot control rig.
Our morning exercise was to make the Rig, Ultimate Walker, do a jump on the spot. We gathered our own reference. I picked out a video reference, a picture reference and I also used the grease pencil on Maya to sketch out a quick storyboard/thumbnail of how the jump will occur.


Video Source: https://youtu.be/t0i72FCq2dM
Image Source: https://martinsammut.wordpress.com/2014/01/10/jump-animation-reference/
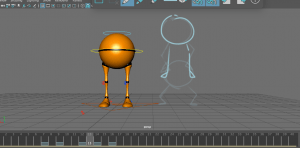
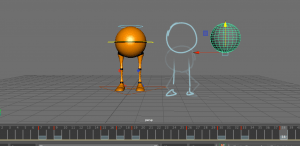
As I followed my tutors tutorials, I also added a sphere to block out the keyframes, or position of the head, on the scene. This guided me for animating the ultimate walker.
Eventually, I was blocking in the keyframes of the ultimate walker jump. I positioned them to how the sphere was then I positioned the legs, and body to where it suited best realistically etc. at the anticipation where the body meets the bent legs, the body should be balanced parallel to the heels of the feet. If it was further back, realistically that would make the rig fall backwards.
When I have most of my keyframes down and the animation plays smooth enough, I would use both the graph editor and the dope sheet to polish up the animation. Using these would help me pick out parts that were off and easily adjust them to a better position.
It was quite simple to move around the rigs and parts of the ultimate walker for the jump animation, however I feel like my attempt could have had a more lively action than the one I created – I was mostly trying to find where the legs would be positioned during the jump throughout the animation without thinking so much about adding a personal flair to it. I may work on this in my own time to see how I could improve.

Next, for my afternoon exercises, we looked at the introduction to Rigging. We would be focusing on the two main parts, the Parent tool, and the Control tool.
I followed my tutors tutorial (Exercise 01, Parent rig) on how to constrain objects together using the Parent tool.

I started with the arms of this man model. To connect the three parts of the arm together, I start by highlighting the hand. I shift-select the forearm and I press P for Parent, or find the constraint section and press Parent.

I go through the same process for the upper-arm by highlighting theother parts first, then shift-selecting the upper-arm, and pressing P. When I want to connect the arm to the body, I drag the now arm group I have created, into the middle of the body part in the outliner. This then connects each part together.
I do this technique the same way for each of the arms and legs. For the head and neck however, I only need to drag the hat and shades into the middle of the head on the outliner. I then parent the neck to the body, and then parent the head to the neck. This will give me a simple parent rig of a man model. I can now move their arms, legs and head into any position.

I followed my tutors tutorial (Exercise 02, Control rig) on how to structure the constraints of these three cubes to make a function similar to a moving tail.
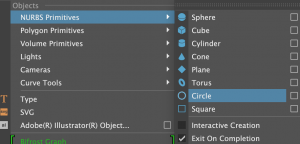
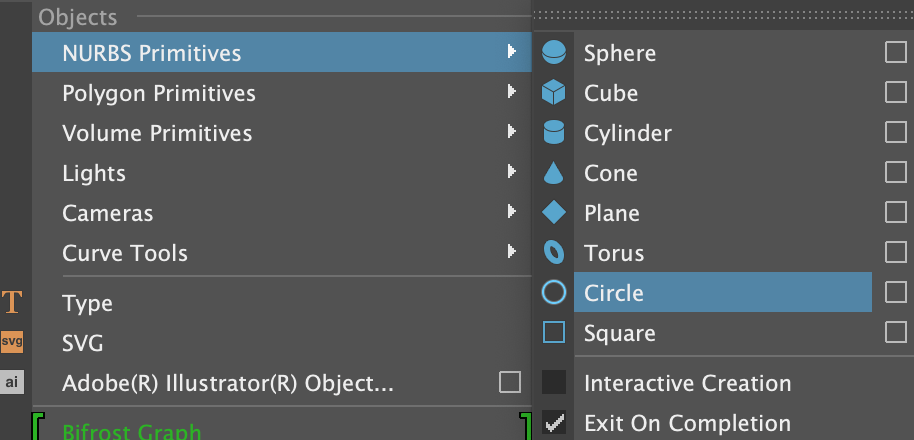
First of all we bring out the circle tool from the NURBS section, and place then underneath each cube. I was to make sure the pivot point was directly underneath by holding X to snap it into place.
 During this time I also made sure to label all my parts to know what they are later on. I made sure to label them by what position they were in and what function they have etc. Bottom_CTRL, Top_GRP.

I also froze the transformations of the circle control rigs to avoid the change of position later on.
Next, I put each of the cubes into a separate group to keep them as not just a shape, but a constraint. This is so if I wanted to replace the shape to something else, or scale it, I can do that easily while it is in a group. I also labelled each group to what cube its assigned to.
Now, I was able to parent the control rigs to the cubes. I held Command and clicked both Top_CTRL and top_GRP etc. then pressed ‘Parent’ to group them together.

As I had finished this, I bring together the control rigs into their own group. I dragged top into middle, then middle into bottom.