Monty Rig – Final playblasts & Reflection

Below are the final playblasts of my Monty rig animations reflecting studies of weight in motion / body mechanics, and of conveying emotion / personality.

Here are my playblasts displayed in SyncSketch:

Motion: https://syncsketch.com/sketch/981db0adfa61/

Emotion: https://syncsketch.com/sketch/8f3249476ba9/

Motion View 1:


Motion View 2:


Emotion View 1:


Emotion View 2:


Reflection

Going into this assignment was quite nerve-wracking for me as I had not touched Maya, or Maya’s animation tools to be exact at all before this year. It has been quite a lot to wrap my head around but after completing this assignment I feel much more confident and more aware of what I am working with now. The tutorials I watched from both my tutors and youtube videos, the reference videos I found, the use of the 12 principles of animation, and inspiration from animators and classmates have all helped me throughout this assignment.

I feel as though I did well in structuring my plan and the research I have done – I made sure I wanted to gather great understanding and knowledge before I got into this. I also think I did well in creating something appealing in both the motion and emotion animations; capturing the motion of pushing and jumping, and the emotion of feeling tired. Aswell as this, I also surprised myself at using the animation editors the best I could. This included the Dope sheet, the Tweenmachine and the Graph editor.

I tried my best to convey weight in motion, focusing on body mechanics, and conveying personality. However, I feel as though I could do better in preparing the keyframes and positioning the monty rig so that it looks more appealing and realistic, rather than stiff with little weight etc, the legs, the box movement. I know for next time I have to be careful of where the rig parts are positioned as they may move to a wrong place during the process etc. the knee constraints and the bottom circle move tool.

Overall I think I did a good job in making these animations. I have gained better understanding of 3D animation, I have improved greatly from my first few attempts, and I am excited to bring these skills into the Second Animated Short assignment.


Monty Rig – Animating

First I will be completing my action animation ‘Pushing box then jumping onto box’. I started off my new scene by using the reference editor to bring in the monty rig. This provides me a fresh, new rig to work with and excludes any other touches It may have included in the actual file it comes from.

I used my reference of my legs as picture in picture at the top corner of my screen so I could clearly see the video while also seeing my Maya workspace.

I started blocking out my keyframes, also following my storyboard, to where important key poses are placed. As soon as I added in a few frames I went back to add some more to enhance each keyframe. This provided me with a blocked animation. At this stage no timing, or in-betweens are figured out yet, just simply the overall poses in the action. Here is a quick playblast of how it looks at this stage.

I think so far I’m definitely achieving the look i’m looking for so far, but there so much more to work on and polish up before its properly animated.


Further on, I used the tweenmachine to help me place in-betweens down to smooth out the action. As I first went through the frames and turned off stepped preview to see how it looked, there was lots to fix. Below you can see a lot of errors with the legs and the timing is off too.


Here is the result of looking back on the frames on stepped preview and seeing what went wrong. Below is two versions of the in-betweening process and timing structuring with the use of the dope sheet. The first video is with stepped preview off, the second is with it on.


Next, I moved onto polishing up the movements with the use of the graph editor, and added squash and stretch frames for the body. I usually get a little stuck at this part because some of the things I do on the graph editor, don’t usually turn out good. I’ve had some experience before and I feel like I did a little better at handling the graph editor this time around. I also added squash and stretch features just after using the graph editor. This is because that function is what I mess up most in the graph editor. I wanted to make sure I avoided any complications I might have run into. In the end I added the squash and stretch with little problems and it came out looking good.

I also added some more touches to how the monty rig pushes the box, a wobble after it jumps, and the subtle movements of the legs after it jumps. This is to add more realism and spark to the animation instead of solid movements. 

Here is a preview so far. At this point I can now look over the animation one more time, and now plan the position to where the monty rig will move across the screen, and where the box will be pushed to.


I have been working on the feet placement as I thought they were quite off from key-framing I had done beforehand. This is how it looks now. At some points, the left legs knee would stick outwards too far that I thought didn’t look right. I was able to fix this by going through the frames again and pushing up the knee control towards where the box is so that it would straighten out more. However I left in a bit of outwards bend all on a same level of translation because I thought it would add realism to the leg movement. It also fits in with the right leg, where they both stick out a little.


I have now also worked on the positioning of the Monty rig. I could say that this animation is done however I still am not happy with how the feet almost ‘slip‘ as it moves forward. I have been trying to fix this but this is as far as I’ve gotten.


Here is a closer look at the feet movement. As you can see, sometimes when one of the feet is on the ground, it can slip upwards or downwards. I have been trying to fix this by setting their translate positions regularly the same as the last frame but It doesn’t always work. I will need to look back on some tutorial videos to see if this problem can be solved.


I’ve come back to this action after a while and with more experience with the graph editor, I can figure out the feet placement and the circle tool placement and fix them up as best I can. It was tough to find the key frames on the graph editor a good place to sit when the monty rig is moving forward, but I worked with it until it looked right.

As soon as I got through this, I did one more look through the Monty rig to see where I could improve. I added some eye movements such as a blink, stretching when its jumping, and a wink at the end. I also reset the box translations and did them again so they could line up with the feet again. All of this was done using the graph editor.


Before I wanted to make a proper render of my animation, I wanted to change the settings. I went into the render settings and set the preset to HD_1080 in the Image size option. This allows my previews to appear more clear and better quality. Then I went over to the playblast settings to change the display size to ‘from render settings’ so it will follow the same preset. Since I am on MacOS, my only format option is to go with avfoundation, instead of having the option to go with qt for QuickTime. I searched this up and found out that avfoundation is another name to represent Quicktime so the settings will come out normally anyway.

By setting up my render settings for a better quality playblast video, this is the finished result of the Monty rig Action!


Now, I will be completing my emotion animation ‘Feeling Tired’. I started off my new scene again by using the reference editor to bring in the monty rig, providing me with a fresh scene to work on. I got my reference videos ready to switch between on picture in picture to start working!

I started off with blocking out the major keyframes that will structure out my animation taken from the reference I was using and the thumbnail video/storyboard I made. Again, no timing, or in-betweens are figured out yet, just the overall poses in the action. Below is a quick playblast of how it looks at this stage.


Further on, I used the tweenmachine to help me place in-betweens down to smooth out the action. I also timed out the action at this stage. Here is what it looks like so far in stepped preview. There is still a lot to fix considering the walk cycle, and the fall.


Below is what i’ve achieved in the in-betweening process and timing structuring with the use of the dope sheet. In this preview, I had stepped preview turned off and fixed up a little movement from where the monty rig lifts up the legs as it falls. There still needs more work on especially for the wobble, the fall etc.


Here is a little more work on the in-betweens, the timing and just the translation of parts to fix up any other motion I thought needed adjusting. I slowed down the pace of the walk which made it easier to adjust the legs, the fall works a lot better and I added additional movement to when monty is on the ground – the head bounce and leg bounce. I am thinking of going back to adjust the head a little more at the beginning and fix a little bit of the step up to where the monty rig loses its balance.  I can polish up these parts with the graph editor.


This is the result of going through the animation with the graph editor to polish up. During this time I also added in some more touches such as the left to right wobble at the walk cycle, and a squash action as the monty rig hits the floor. I do want to look over this squash though as it looks a little off (stretches too far to the left) but overall the animation is coming along great. The timing is good now, the leg positioning is at a better place now and the roll to the front finishes off the animation well. I will go through the animation one last time and fix up what I can, and make it a little more appealing.


Heres a little more alteration i’ve made for this emotion action. I almost forgot about the eye function so I added them opening and closing, trying to stay awake. I have also been working lots on the feet placement and overall little touches with the use of the graph editor. During this time I feel like i’m getting better use of the graph editor than I have before so this is good progress.


I took one more look through of this Monty rig emotion to see what can be adjusted. I used the graph editor the majority of the time to alter the feet placement when the monty rig walks forward. Again it was challenging to configure in the graph editor but I’ve become more familiar with it. I also worked on the legs where the monty rig struggles to balance, and when the legs hit the floor, just to enhance the action a little more.

By setting up my render settings for a better quality playblast video, here is the finished result of the Monty rig Emotion!


Monty Rig – Planning

For planning my Monty Rig, I will be taking in the inspiration I researched, looking over the 12 principles of Animation, and going over what techniques I will use, and in what way. Here I will also produce thumbnails and a storyboard to help my progression to the animating stage.

I have implemented a few of the 12 principles of animation into my practice work already. From these I can learn how to achieve said principles and how I can improve them to feature in my Monty rig assignment.


First off I have attempted squash & stretch in this monty rig practice. From the monty rig jumping side to side, I could add a squash and stretch feature into the jump by squashing the head at its anticipation stance, and stretch the head when it is reaching up in the air.

This squash and stretch feature is good to enhance the action and gets the point across that the monty rig is jumping. However, I feel I could improve in this animation overall. I could have left a few more frames for the anticipation and therefore give the jump more of a punch to it. I can see where I tried to achieve this but I feel it could be enhanced more. This way I could get more squash and stretch seen in the action – I would have more time to squash the head etc.

Overall I did a good job, but next time I could focus on the timing of the jump that will allow more space to provide squash and stretch.


I have also attempted anticipation in this Character rig. In this next jump action, I could focus more on the anticipation as I only had the body to work with. I could squash down the head every few frames then made it jump with a stretched head, and land it back with a follow through action. (squashing then returning to normal)

Anticipation is beneficial to start an action before going straight into it, it allows for thinking time and a better-looking outcome for the action executed. I think I did pretty well attempting an anticipation action. This was a very simple task so I could achieve more in many other practices to come.

All I would say is there could be more realness to the movement, I can see in my attempt that the anticipation pose just goes straight down. To add more to the pose there could be a little wobble, a tilt of the head eg. just to make it a little more loose and expressive.


I attempted a follow through/overlapping action with this rig. In this expressive jump, either side of the body would overlap the other as it goes up and then down. There is also follow through when the body lands and the ‘head’ still reacts to the jump until it returns to normal.

Follow through/overlapping action is excellent in adding realism to a character or object. I think this attempt was pretty good in terms of the timing, the additional action at the start and the follow through at the end.

I think overlapping action/follow through will be easier to tackle with a more complex character rather than this shape here. So in the future, I’ll have a better idea of how to go about follow through/overlapping action once I test out a different kind of character.


To help with my knowledge and find more inspiration, I wanted to find examples of the principles of animation (for action and emotion) in any films I could find. This will help me spot them out more clearly and I can also see what kind of scenes they used these principles for.

I know I will be using squash and stretch, so I wanted to find an example of that first. I found this youtube video called ‘How to animate like Disney: Squash and Stretch’ The clip below, from Tangled, is what they used as an example. This is an action performed by Eugene, where he slams into a part of the dam structure. The use of the stretch technique (on his head, neck and limbs) as he hits the surface intensifies how fast he flew there, and how hard he hit it. It also could make the audience feel how Eugene feels too because of how intense the action is.

Source: https://youtu.be/L7okQED-8nM


I also looked for a good anticipation example and found this video called ‘Spider Man: The Anticipation Principle of Animation’. This was a really interesting video analysing the actions of spider-man from multiple films, shows and games the character comes from. As similarly explained in the caption of the video, many actions from spider-man and others constantly use anticipation to build onto what he does etc. punch, jump etc. The first example of Miles pulling back his arm for a more impactful punch adds realism and strength. And the second example of Noir webbing a car, and doing a spinning-jump to throw it to the bad guy, is also a symbol of strength.

Source: https://youtu.be/0MD2jHSYvTc


What popped in my mind was one scene that I love from the film ‘Moana’ where Moana convinces Maui to join her. Here we see a follow through technique made with Moana turning too fast that her hair flies past her face. I clipped this from a Youtube video called ‘Moana – All movie clips‘ Although this is a simple action from Moana as she just turns around, it could also pass as emotion. This is because in this situation, she is frustrated with Maui and desperately wants to get her point across. She turns around quickly with an angry expression, resulting in her hair flying across her face. As a result she becomes frustrated.

Source: https://youtu.be/0ydAYENu1RM


I can now move onto deciding on the actions I want to create! These were quite difficult to choose as I couldn’t find any clear ideas, or any good references to help out for a long time. I had a list of what I could possibly do written down in my notes:

Action and physical motion:

  • Ballet Twirl
  • Running in air Scooby doo style
  • Banana peel fall
  • Pushing box with foot
  • Sitting down on the floor


Type of emotion:

  • Joyous
  • Laughing
  • A wink
  • tired
  • Laughing then straight face


My final thoughts were to go with a combination of ‘pushing foot with box’ and ‘ sitting down’ for the action, and ‘tired’ for emotion.

As i’ve said before it was difficult to find references for what I hoped to do, especially for the action one. I decided I could do a few life references of myself to bring to life the idea I was thinking of.

I don’t have a lot of stuff, or space in my flat, but I made use of what I had. Unfortunately, I don’t have a box to work with.. So I filled up my washing basket with my cushions and that made it easier to push (I needed more weight for the action to work) I recorded myself pushing the basket with my feet similar to how the Monty rig will end up doing so. Again, I didn’t have much space in this room so that is why the camera is quite close to my legs. Though I still think I could work with this to focus on the feet movement.


I also made another video with a better shot of my legs – this time I can see clearly how each leg will react to the push and what will happen in-between the action. These references will really help me out to determine how this animation will play out.


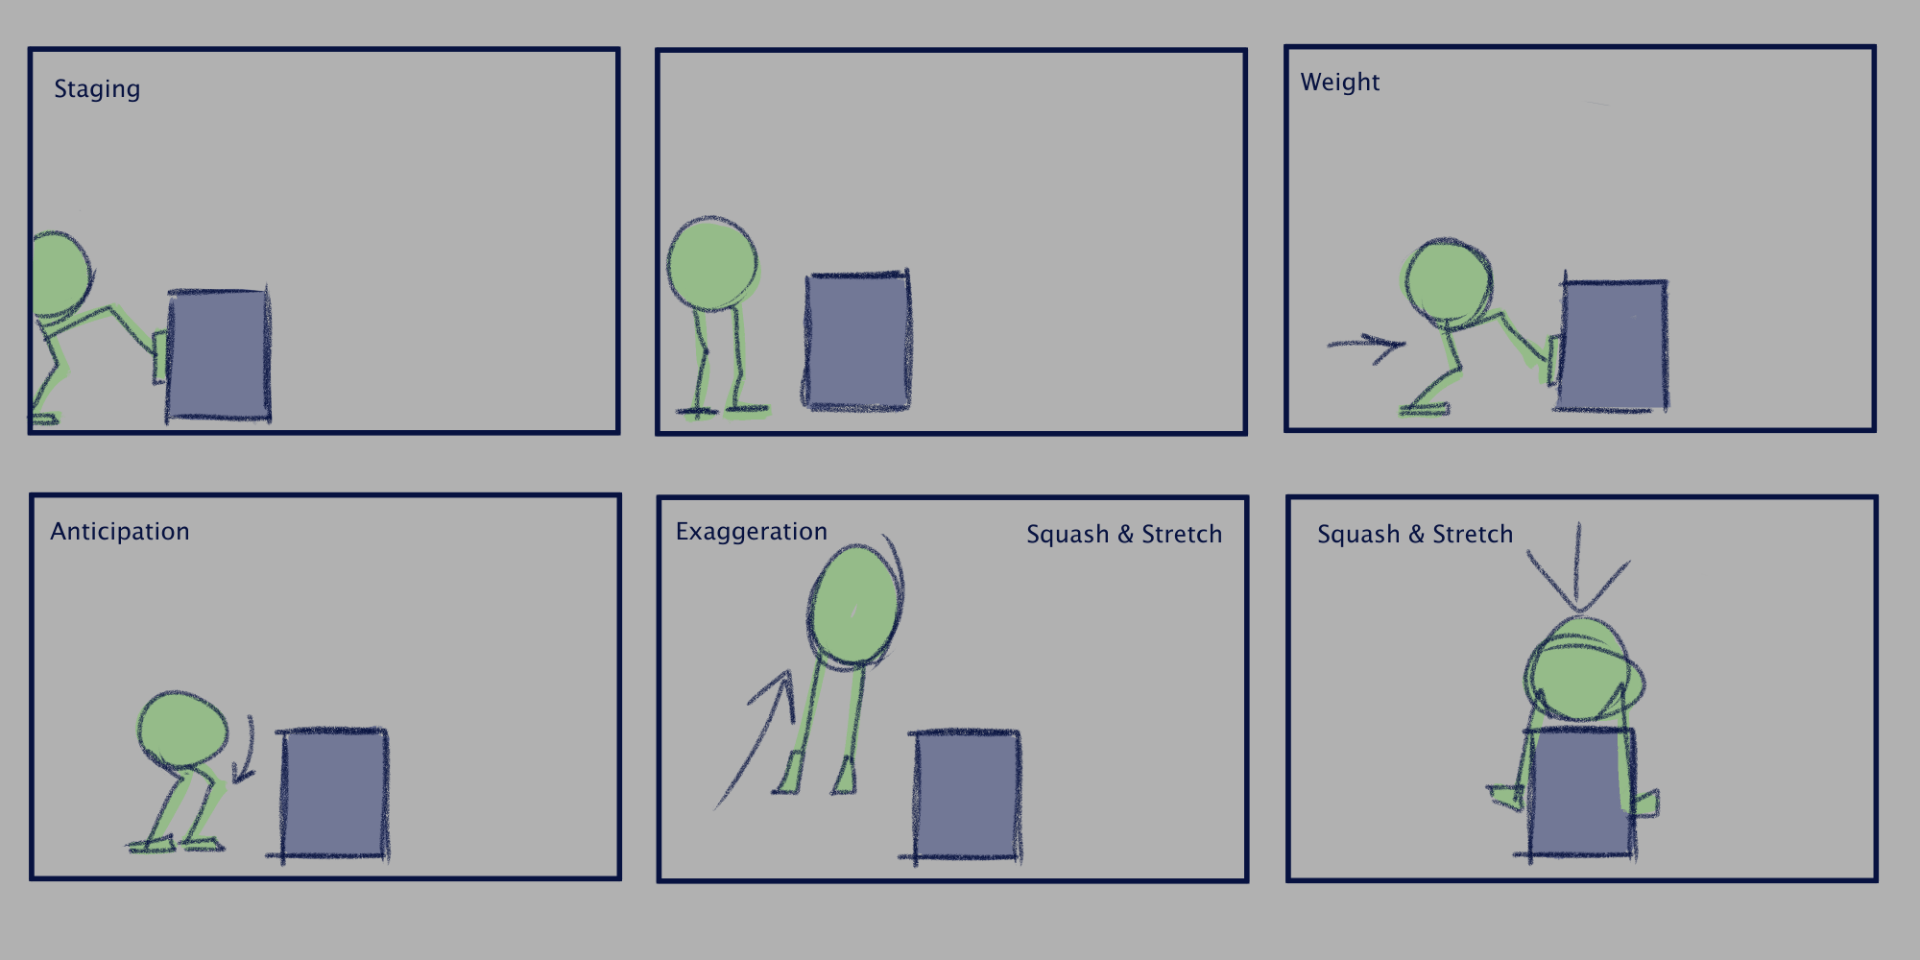
Here is a quick storyboard/thumbnail of keyframes i’ve made of what my action idea looks like and how I will achieve it.

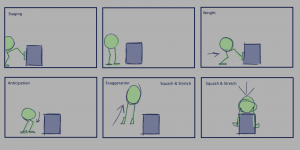
I want to capture the monty rig pushing the box into frame around two times to grasp the idea it is pushing the box. Then I would like it to jump onto this box, spinning around a bit so it faces the camera, and land with their legs in follow through movement.

Aswell as attempting to capture what I was thinking of, I also wrote down the principles that I may use in that certain part of the animation. I write down principles such as Staging, Anticipation, and Squash & Stretch. I added another  feature such as weight. Weight will be a big factor in this animation as the monty rig pushes the box.

I have also made a quick thumbnail video to time out the action and picture how the body and legs will perform.

For the tired emotion, I was thinking of a tired walk into the frame, then the monty rig might fall to the ground to sleep. I found this great reference video of a person walking in a dazed walk cycle with two camera views. This will help me achieve the ‘tired’ feeling to the monty rig and will also help with referencing a walk cycle.

Source: https://youtu.be/Xjg1GijjazE


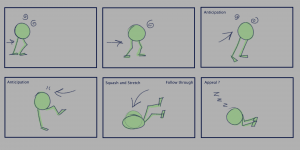
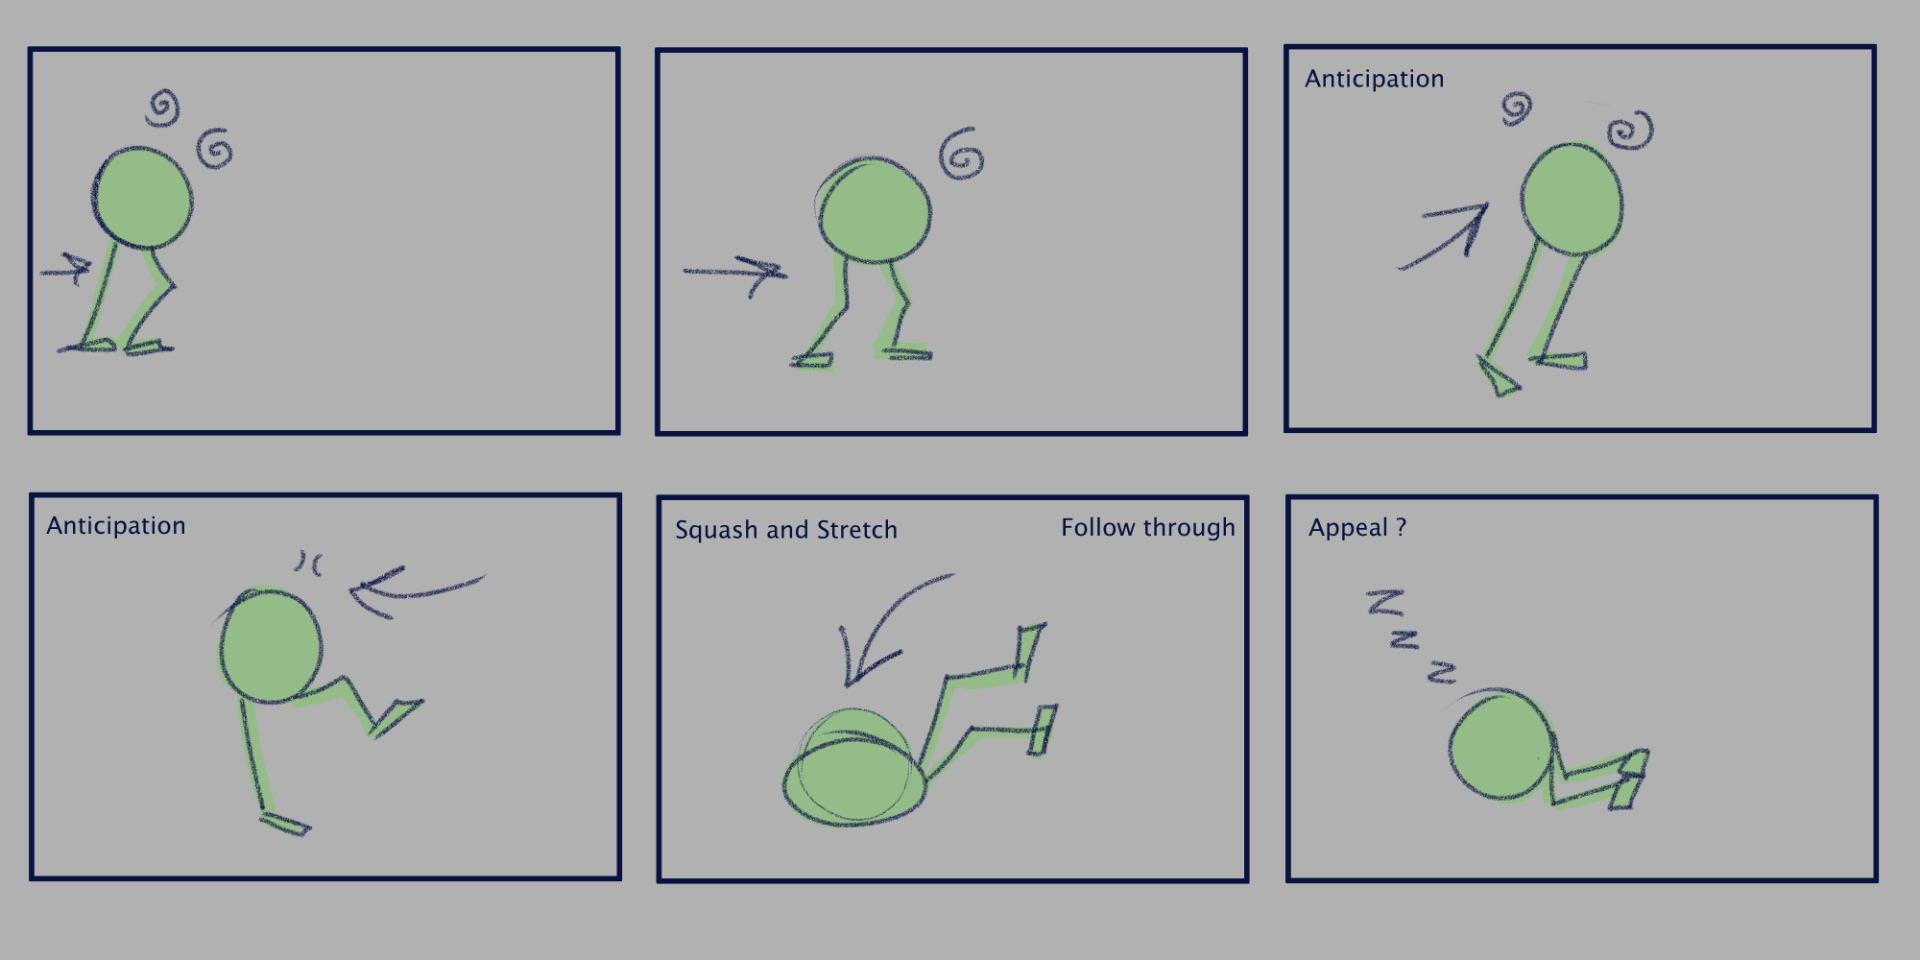
Here is the emotion storyboard I made, also highlighting the major keyframes and how I will achieve it. I was going for a dazed, tired walk. Then the monty rig will loose balance, fall onto the floor and start sleeping. Again I added in the principles to where I might implement them. I added anticipation, Squash, follow through, and possibly appeal for the last scene.

Again I made a quick thumbnail video to time out the action and picture how the body and legs will perform.

Monty Rig – Inspiration

Here I will be completing my second assignment of my Animated Narratives module – The Monty rig. During this assignment I will be producing two separate animations of a rig we have been given. One scene should convey weight of motion / action / mechanics of the character. And another scene should convey emotion / personality of the character.

To start off, I want to explore the world of 3D animation – exploring and studying other artists / animators techniques and styles will give me a sense of inspiration.

IMG_6413.jpg

The first animator I found was Jamaal Bradley. Jamaal is an animator, artist, storyteller, & director. He has worked for Dreamworks, Disney, Sony ImageWorks and also runs PopWilly Productions LLC. Jamaal has a website/porfolio showcasing his creations and progression.

Source: https://www.jamaalbradley.com/


One of his challenges shown on his website that was interesting to me is ‘Progression of an Animated Shot: Mother Gothel & Rapunzel‘. Throughout the video you can see the progress of creating this shot from ‘Tangled’ from the Layout, 2D Showing, life reference, blocking passes, and many more polishes until the final render. This was amazing to watch and seeing how life reference can be used so effectively actually encourages me to try it out too. Jamaal effectively captures the confused daze on Rapunzel and the effect Mother Gothel has on her as she spins around the dark room unexpectedly.

I’ve also been watching his short film ‘SUBSTANCE’. I’ve seen the way Jamaal creates emotion in the characters through their expressive physical and emotional actions, all without dialogue or sounds from the characters: only the music is present. There is contrast between the two brothers playfully fighting at the start and the real fight that the substances cause. This is easily highlighted and expresses their relationship and their different intentions to help the future of the family. In the end, the presence and heart of the child was able to change this situation for the better. This film highlights the realness of the substance situation as it can happen regularly in real life.


This short film gave me inspiration because of its overflowing range of emotion captured in 3-4 minutes. The way the body and face is positioned in each character to always convey a sense of emotion, makes it seem so real and genuine. I hope to capture this level of emotion some day. Source: https://youtu.be/c650yL4X7Wk


Another animator I have found is called Nathan Engelhardt. Nathan is a Supervising Animator at Walt Disney Animation Studios has worked on many films such as Frozen 2, Ralph breaks the internet, Moana and Zootopia. Nathan regularly posts on his Instagram page his previous works and progression. Source: https://www.instagram.com/nathan.engelhardt/

There are two posts of his that stood out to me. One is about the blocking passes he created for a scene in Ralph Breaks the Internet with the character Vanellope. I love the description Nathan provides explaining his process and thoughts on the action he is trying to achieve.

Instagram post quoted below.

‘..In both blocking versions You can see I had a section where I lifted the hands off the car hood for an additional gesture. One was more of a powerful fist pose to show the energy of how she felt when she thought about racing in that new game. The other was using two hands as if on a steering wheel, pretending she was racing again in the game for brief moment. In the end, we all thought it was cleaner to not lift the hands at all in that section while she was reminiscing about the new racing game and only lift them off the car hood when she moved to her next main internal thought, which was a sort of a summation or assessment of her experience. this was just another great reminder for me to only move the character (or pieces of the character) when I have to. Typically when the internal thought changes.’

Source: https://www.instagram.com/p/CMQhPmHj1ys/?utm_source=ig_web_copy_link

This is one out of the three videos featured in the instagram post.

I love the thought process of linking personal traits to the actions of a characters body. The idea that Nathan had in mind that her moving hands would symbolise how she would be holding a steering wheel, would have been great to see. It just adds so much detail, personality and meaning to her actions. Although progression of the characters thoughts matter more, I would love to learn from this good idea.

Another post is about how Nathan adds drivers to his progression to help him understand what constraints he needs to work on in a shot. he talks about the importance of planning from this shot in Frozen 2.


Planning is key to making your shots (and life) easier. The times I don’t, I struggle way more. So when

thinking about constraints in this long scene, I tried really hard to think about the anatomical dependencies and what pieces of each body drove the other pieces.’

He goes on to say that he’d much rather use life reference to capture the scene between Olaf and Anna.

‘After I did this thought experiment, it became clear that there was no clear constraint solution that could support everything I wanted to do, so I didn’t use any constraints. That setup (or lack there of) was a pain with the hand contact, but I usually babysit hand contact stuff per frame anyway; plus it kept me free to push things around without a ton of counter animating…

…It’s usually around this time I simultaneously look for inspiration in art or life. My son happened to get pretty sick that winter I was animating this shot, and I managed to capture some sweet inspiration. I love the way my son plays with my wife’s hair. So stinkin adorable! I ended up trying to use some of that “hand wandering” in Olaf as he’s talking to Anna.’

Source: https://www.instagram.com/p/CCZA7UhjpG3/?utm_source=ig_web_copy_link

Although planning with drivers may be a good tool to use in other cases, Nathan proves that impactful references can help out just as good, maybe even better. Nathans thought process and detail to work inspires me to do as best I can in my assignment and structure my work well.

Back To Top
Skip to toolbar