Here I will be documenting about my progress to animate a run cycle with fundamental principles for each of the cycles, and with unique and experimental characteristics and style in the animations.
I used Miro Board to help me brainstorm and organise how I will plan and what I can do for my run cycle. It took me a while to think of an idea for the run cycle, however I found inspiration and sparked an idea from a video I watched shown below. (run cycle info in pink)

I will go for a nice wholesome reaction we may all get when our favourite song comes on – when we become a lot happier and gain a lot of energy. I will animate the character running, possibly holding a phone with earphones on, and bopping along to a song.
I decided to look for online reference for this cycle. For my run cycle, I wanted to aim for a fun and entertaining action & character personality. The video below called ‘Weird running styles’ really inspired my idea from the one example of running in the video. I clipped it just below the full video. I believe I could use this lively and bouncy run as reference.
Full video:
Clipped version:
I will also make use of this simple run cycle reference to help me with creating my key poses and making sure the cycle flows well.
Again I would like to produce my animation in the same way as Sorcha McGlinchey’s class with us where she used Photoshop/Illustrator/After Effects to create 2D animation.
And also, the advert series of the ‘Dove Self-esteem project’ and ‘Steven Universe’ is one of my animation/visual inspirations for each of my cycle/motion animations. Here is another video from the same project which I enjoy.
This short animation called Kaeru, made by students from the San Jose State University, is also a nice visual inspiration. From the variety of analogous colour palettes, to the subtle textured look that gives the story more life and realness. They also portray strong emotions such as self doubt, rage and joy.
I am ready to start the body mechanics animation. I will start by thumb-nailing my main key poses.
First of all I was preparing what key poses I am looking for in this run cycle, I screenshotted and combined the parts of the main reference video I am using, that would fit.

I also had an image of the run timing chart in the book ‘The Animators Survival Kit’ in view to remind myself of the cycles key positions – such as contact, down, pass pos/ etc.
I labelled each pose so I would know which order they would go, and how they flow together.

In the video, and in these images too, I notice the man’s arms stay in the same position as they hold onto to the phone. He also bops his head more noticeably and vigorously as he reacts to the music being played. These are aspects of this body mechanic that I could implement to my run cycle to capture this same emotion.
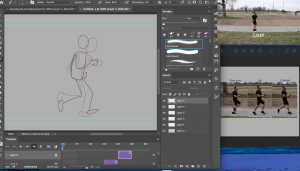
I drew in these key frames and copy and pasted them them around two times to get a good loop. I drew the frames all in one spot so I made adjustments wherever I needed to make the cycle run on the one spot – etc. lining up the feet.
To distinguish the front and back legs/arms I used a different colour to colour in the other leg/arm. This helped to figure out when each leg takes a turn to step forward so I could loop it correctly. I made adjustments where needed – such as redoing the upper legs, as they moved to irregular places from the body beforehand.
This is the rough thumbnail for the run cycle:
I like how the feet are positioned and the use of the key poses flow well, however the body position is too jittery (moves about too much). I know for next time to focus on the body and line the frames up closer to each other.
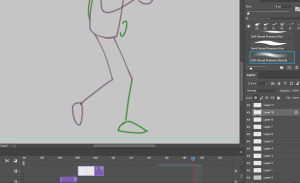
My tutor gave me some feedback for this thumbnails, that I should focus on how the body of the character moves. I should make sure the body only moves up and down, and not left to right. This makes for unrealistic movement and looks jittery on screen. I redid the thumbnail with this information in mind:
I redid the body and arms to give it more of a running look and structured mechanic. I still went for the look of the head bopping up and down to a song so I hope this could translate well during the animating stage.
Next, I want to design my character and background in preparation for the storyboard, and for the final scene buildup.


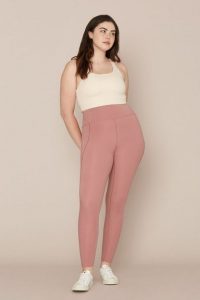
I gathered reference from Pinterest to find images of a sporty girl going for a run. These will help me design my character, inspire new ideas, and pick my colour scheme.
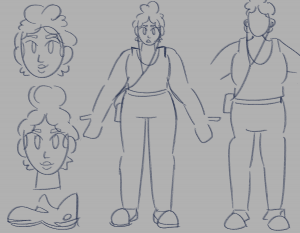
I made some first initial sketches, and designed my run cycle character below. I illustrated a standing pose to highlight each aspect of the design, and also positioned them in a running position. I admire the face of this character and how she suits the joyful tone of this run cycle scene.

I couldn’t think of a solid idea for the setting of the run cycle at first, but later on, when designing my character, I finally thought of a visual for the scene. I wanted to go for a city garden/park in a sunny, bright day. I found some reference images to the right that help visualise this for me.


With these reference images, I picked out the main pieces of each setting that I wanted to capture etc. The clear blue sky, the fence with water behind, the fall colour leaves on the ground . I also used these images to pick out my colours. The preview of the background with my character, is below. This was a change from the other backgrounds, but was fun to create. I love the vibrant colours and the look of the trees.


After my design process, I started capturing how the scene will play out in a storyboard. I added a rough sketch of the designed character, and a rough sketch of the background. I also added descriptions on each shot to explain what will happen, and what reaction I want to capture from them.
I used my character design page as reference to make the character rig on photoshop. I placed down two guides to position where the feet are, for the right to be closer to the foreground than the left. I added sphere shapes around the body where the joints are, or where the skeleton pins will be within the rigging stage.


Once this rig was finished, I was ready to bring my work into After effects. I brought over my background, with the gate, leaves, clouds layers separate, the thumbnail walk cycle to reference from, and the character rig/layers.


To start rigging my character, I set up the DUIK tool to add a skeleton to the body.
While I was working with DUIK, I set up a new workspace that would help me use each control I needed in a clear format. I had the DUIK skeleton controls to the left, the timeline, the Duik menu and the character rig.

I also noticed while I was animating the limbs of the rig, a path was created where the rig is. This help for when I wanted to adjust the movement of the legs after I had set down the keyframes. This would also help me later on with the graph editor.
Draft 1:
My first draft consisted of blocking out where the legs and arms will move, using my reference and notes beforehand. The run is very slow right now but I plan to fix it later on. The shape of the hips is quite strange so I will try out some ideas, to see what I can do to fix it.
Draft 2:
In draft two, the pace is much better and works well. The arms and legs move in sync too much, I will try to offset their movements. The head moving left to right doesn’t look right as the hair behind doesn’t follow it.
Draft 3:
In this draft I made a lot of progress. I created a shape layer, in the same colour as the hips, that filled in the irregular space. I added a phone to her hand which adds to the idea she will be listening to music. I am considering adding a pair of headphones to add to this idea. I also animated the background moving which makes it looks like she’s running faster. Next I would like to work on the head movements, and add more details where I can.
Draft 4:
In this draft I added the headphones that I thought about last draft. I worked on the foreground again, mostly on the leaves, to give the idea the girl is running. The background moving last time didn’t work as well as I hoped, as I am looking to loop the video. However this time round it may work out well. Next I will work with the graph editor and graph out the motion of the character.
Adding the extra props to the character, like the phone and headphones, were actually quite simple to do. There were two different ways I would align the props to the character in a simple way.

For the headphones, they would be sitting on the head of the character. The head is set in a pre-comp, as there are multiple parts of the head to combine together. I placed the headphones in the pre-comp, and they were able to move in time with the head successfully. In here I also added the blink. I worked with opacity to turn on the closed eye, and turn off the open eye – and vice versa to create the look of the blink.
 For the phone, I added it to the main composition for the character, just underneath the right hand. I parented the phone to the right hand control, and the phone successfully moved along with the arm, with the hand holding onto it.
Draft 5:
On my fifth draft I made a lot of progress with the graph editor. The motion is a lot smoother and clean: I fixed the head bop this time, and added the blink idea. However I had trouble with the arms. I noticed when rotating the head, the arms were parented to the head. They did not work like this as the arms would rotate along with the head, so I detached them. I need to figure out a different way to avoid the offset of the shoulders from the torso. In addition, I may revisit the legs again as they snap a little too much.
To be able to find ways to improve my work, I asked my peer for feedback on my animations. They liked the animation and pointed out the knees/legs look stiff as they move in the run cycle. I appreciate another person viewing my work for a different perspective and thought about the visual. This will help me improve what I couldn’t see.
Draft 6:
Here I took note of what my peer said, and retouched on the legs and also repositioned them – this makes them look more like a run than before. I also fixed the arms by animating on the layer of the shoulder/arm layer. I was able to keyframe the position along with the chest, and it works very well.
Draft 7:
In this draft I was polishing up the animations in each of the layers. I mostly touched on the torso moving up and down, and the head bopping more. I am happy with how this is looking. I may look for a motion effect idea I could add to the animation if I have time, to strengthen the scene.
Draft 8:
In this draft I was focused on trying out a motion effect in the scene that emphasises that the character is listening to loud, upbeat music. It was quite difficult to get an effective animation of it. I like the effect, but I am still deciding if I should try a different approach at this time. In addition, I worked on the foot rotations as it makes contact with the ground. I noticed they would jitter a bit as they land. I tried to fix this up as much as I could. After these adjustments I was happy with the result of the animation.
Once I was finished my animation, I brought the final video into Premiere pro, to create a looped video, and add sound.
I gathered these sounds to suit the scene. I downloaded a song I thought would fit the idea that the character would be happy and surprised that it started playing. I also used a copyright free city park ambience sound effect.

I uploaded my video and these sounds onto a Premiere Pro file.


Here I had duplicated my video four times to get a long looped video of my animation. The transition from one to the other works very well. I added the song, and the park ambience to the timeline.

I wanted the song to have an audio effect that it was coming from headphones – so quiet and muffled. I added a highpass filter that remove low-frequency from an audio – which makes It static and quiet. I also added a graphic equaliser to adjust the settings of frequencies to what I thought sounded right.
After this the edited version of my animation was done, and overall the run cycle animation was complete. Here it is below:
I am happy with the outcome of my run cycle. It was a lot easier to complete out of all the cycles however it contained some challenges along the way. I like the colours in this environment and how the actual run came out – I tried my best to resemble a run in the visual I was thinking of. However I could have improved in the leg structure and animation. I feel like the legs were illustrated too small which caused a few problems for me later on e.g. when the legs make contact with the ground, sometimes the feet could not reach the guide line. If I took more time to design this character that would avoid this problem it would be more effective. Other than this I am happy with the result.