During this week we presented our second game update, and got lots of feedback that has encouraged us to discuss further into our research, our original ideas, and our narrative. I also got recommended to start using Substance Designer to help produce our modular textures.
It was essential for our group and the game idea to properly research the elements, like puzzle, Level and narrative design. We looked into gameplay and information of current horror games such as Poppy Playtime, and analysed their elements, and why they are effective. I focused on researching modular textures and design within horror games, and what feeling/emotion that they can show.
Source:
https://80.lv/articles/relapse-how-to-build-content-for-horror-games/
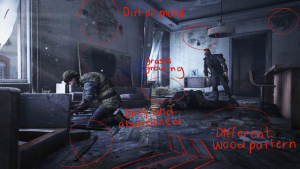
To make a horror video game scary, the floors and walls of a room tend to be dark, gloomy, and worn out. They can also appear broken, covered in substances e.g. blood, trashed with mess.
The most common kind of flooring would be wood planks as they create length to a room – etc. long wood planks can make a corridor look longer/more stretched out – gives a sense you’ve been there too long, needing to escape, but seeming endless.
Most common kind of wall would be rough white concrete, or chipped painted walls. They give a sense of wear and tear and make it seem a place has been left not taken care of/abandoned for some time. Making it seem spookier that no one is around/or has been around for a long time – makes you feel alone and almost responsible for the damage.


Within toy/arcade horror themed games, floors and walls consist of:
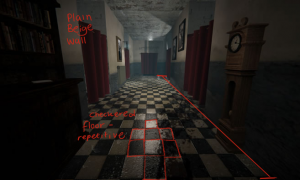
1. Checkered / tiled floors – gives a continuous pattern throughout the room/s which could be a nice visual to look at, but also so repetitive it could make you feel nauseous – especially if you were a kid running about a play area for so long and got tired.
2. Solid bright coloured walls – give a sense of playfulness and life – children are always associated with bright colours – but the colour alone could feel isolating to be surrounded by


Next, I took some time to learn about Substance Designer, as this my first time using it. I followed a few tutorials and practice videos from YouTube, and LinkedIn Learning tutorials.
Sources:
https://www.linkedin.com/learning/substance-designer-2020-essential-training/menus-and-preference-settings?autoAdvance=true&autoSkip=false&autoplay=true&resume=false&u=35574164

With a tutorial on the side, I followed their steps and learned about the interface of Substance Designer, setting up a file, what the nodes do, and what can be connected together, and much more. I played about with shapes tile samplers, levels, histogram scans, gradient maps etc.
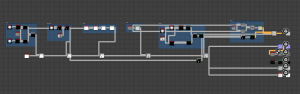
Eventually the node view will come to something like this. I made use of straight lines and frames to keep each section of texture together, so I know where to look if I wanted something adjusted.


This week I was able to produce a wood texture, and a concrete texture. I do want to experiment more with these textures once I get a better understanding on how to create my own node combinations.
Due to strikes being held this week, our presentations were put on hold just for this Monday, so we did not prepare a new presentation. Since I was in campus I met with the animation teammates in my group to discuss what tasks we were doing and the progress we had made.