Reflecting Semester 1

Here I will be reflecting on my work during Year 1 Semester 1 of my Animation course.


Form and shape: Form and shape was the first topic we learnt. We practiced our drawing skills by drawing lines, circles and shapes. We drew in constructive lines in these shapes. This allowed for clear interpretation of the object. we experimented with this by drawing a flour sacks form. Form and shape was interesting as I have never properly studied it before. I feel I did well capturing the flour sack, but I need more practice with coming up with my own shape and form and making it work. In the future, this will help how I structure my drawings.


Composition and Perspective: Composition and perspective was the next topic we learnt. We studied how composition is in everything we see, so we took pictures of things around us with clear composition and perspective forms. Then we took screenshots from three animated shots and found their perspectives in either one, two or three point perspective lines. Composition and perspective has always difficult for me to figure out even during this lesson. I liked finding the perspectives in animated shots but was struggling in making my own perspective from a drawing. In the future, this will help me create a composed environment or scene that is realistic.


Tone and Value: Tone and value was the next topic we learnt. We experimented with the brightness and darkness captured in an element. We made multiple thumbnails of environments implementing the fundamentals; depth, range and texture. Tone and value was quite fun to work on and I enjoyed doing the environmental thumbnails, but I sometimes have trouble with capturing two different elements together that have the same tone. In the future, this will help me with capturing the right light/dark forms in an element.


Colour theory: Colour theory was the next topic we learnt. We learnt about the combinations, meanings and emotions of colour, then we implemented colour into a sketch drawing to show a certain emotion. we also picked out an environmental study we did a while ago and gave it the colour that best represents the environment. We also picked three animated shots and studied its colour and how it impacts the scene. Colour theory was fun to work with, I liked blending and using multiple colours in a piece, but I had trouble shading these colours also. In the future, this will help me pick out the right colours for the right emotion.


Character design: Character design was the next topic we learnt. We learnt about the structure of a character and how we can make it unique by finding its shape and form in silhouettes, experimenting with clothing, and finding their personality in their looks and movements. I made character designs for my world project, and studied three music artists I know, and characterised them based on their personality and looks. This was a challenge for me to do. I liked drawing the characters once I knew what I was drawing, however it took me a while to actually design the characters. In the future, this will help me design my own characters based on different kinds of personalities and traits.


Animation basics: Animation basics was the next topic we learnt. We focused more on timing and spacing, where we practiced animation with a coloured ball. We were to focus on adding more keyframes as the ball is floating in the air, and less when it is falling down or bouncing up. This gives the illusion of a bouncing ball. we practiced this with three kinds of balls such as a ping pong ball/bowling ball. I liked working on this topic. It was enjoyable drawing out the frames and seeing the animation move, however I had trouble getting the timing just right for the momentum of the ball falling and bouncing. In the future, this will help me time my movements right in my animations.


Storyboarding: Storyboarding was the next topic we learnt. We studied storyboards and how they serve the staging and anticipation of a scene. We made a storyboard for a flour sack sequence to practice the exaggeration and where important actions should be presented. We made another storyboard for our world project to tell its story in a simple animation. I really enjoyed storyboarding. I liked how I could exaggerate each frame and how it didn’t have to be so detailed, however there were times I had to change parts because the actions were too difficult to animate. In the future, this will help me structure my animation sequence and tell a story.


Animatics: Animatics was the next topic we learnt. We went back to our storyboards and brought it into a moving image. We used software to draw out our frames and put them together, making sure the timing is right and the staging is in the right place. I really enjoyed this topic also. I liked placing my frames together and adding the effects, however it took some experimenting and redo-ing to make sure the animatic looked good enough to reference when animating the real thing. In the future, this will help me find what sequences work and doesn’t work when taking from a storyboard.


Animating effects/animals: Lastly we quickly learnt about Animating animals and 2D effects. We use both an animal and effects in our final animation. I learnt about the main positions of an animal walking cycle, weight transferral, and where their limbs are placed when animals walk. I also learnt about the elements such as water, fire and smoke that require different ways to capture their presence such as, the irregular flames of fire, how smoke rises fast then slows down, and how water could have multiple actions based on what hit the water etc. I found these interesting to study and they helped out in our animation. I had fun animating flashing lights and a cats tail. In the future, these will help capture the presence of elements and animals.


Overall I am proud of myself for what I have achieved. I have learnt lots over these past few weeks and I can only get better at my work from here and towards the future. The teachings in this module has helped me become more aware of how I create my work and how to strengthen my creations with proper and logical ideas. I am excited to see what I can achieve next in this course. I have improved since I started, and these lessons will continue to help me develop my skills and produce new ideas for the future.

Week 13

During this week I had finally completed my full animation part for our Create a World project. It was a challenging, difficult project but I created something I am quite proud of. I know there are parts I could improve on such as the perspectives, running cycles, and frame placing. However, from this experience, I will be able to strengthen my skills and work for projects in the future. I am excited to see what I can do next with everything I have learnt in this semester.

As soon as I finished my part I got in contact with my group again to see where everyone was. We all added in sound effects which we thought suited our environment and later on picked a soundtrack to go with the action-filled sequence.

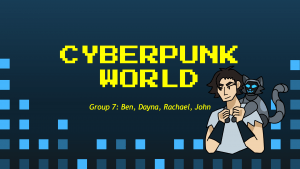
Here is my final animation sequence for the Cyberpunk world.


And here is our full animation with my groups work included!

Week 12

During this week we have been busy working on our final animations. We were also tasked to present a slideshow including the progress of my groups work, how we feel about our project, what we can work on/do better next time and a preview of our animations so far. We watched each groups presentation together so we were given an overall idea of how everyone was doing and how they progressed to the world they have today.

Me and my group worked hard on making our presentation ready for Thursday afternoon. I provided the slides to put all our information in, we all collectively filled in the slides with information and then we were ready to record ourselves talking about our progress. We all recorded ourselves talking about their own progress overall then information about communication, pre-production and referencing were separated into another recording. I put the presentation and recordings together while Ben put together our animations to showcase to the class.


Overall our group did very well in presenting. I may have thought too much about the presentation and one point and took out two slides that I thought weren’t needed but would have made the presentation stronger. I feel bad for taking it out but the message came across well even without those two slides.

(Video of presentation is too big to be uploaded here)

Week 11

In week 11 we studied 2D Effects. 2D effects consists of elements like water, rain, fire, smoke and explosion which in animation can be made to enhance a scene and be a form of substance for an action. There are different types of timing cycles for the different elements to create their organic and realistic presence as they are in real life.

Source: Week 11 – One to one feedback tutorials & animating 2D effects, Animating 2D effects.mp4

Burning fire

      • Not repetitive
      • Can change shape very fluidly – the bigger the fire the longer the flames take to reach top of fire
      • Requires cycle of 1+ seconds
      • Can be arranged in or out of order
      • Result – to look more alive and unpredictable as fire is in real life


Smoke

      • Smoke can move in waves and circular curves, can be smooth, fluid lines or puffy shaped
      • Drawings become closer together as smoke rises to top
      • Requires cycle of several seconds (3+)
      • action is fast at start then slow as it rises
      • Result – to achieve the presence of smoke dissipating into air


Snow

      • Requires cycle of several seconds (2+)
      • Drifts in wavy lines, needs longer cycles to reach bottom of surface
      • E.g. if you have animated snow in three positions of a scene, create three long cycles at different lengths – foreground moves faster than ones further away
      • Result – to give the effect of a longer cycle (no noticeable repetition) of falling snow


Flags/Banners

      • Requires no key frames – All frames stimulate movement
      • Each frame should flow smoothly to the next
      • Can use secondary action / follow-through cycle
      • Result – to give realistic approach to wind catching flag


Water

      • Smooth movement
      • Requires cycle of 1+ seconds, can be split into two different movements
      • Timing is crucial; too slow – oily, too fast – fizzy
      • Water splashes radiates outwards into sheets, then splits into individual drops – splash depends on weight of object that hits water and/or depth of water surface
      • Result – for a realistic rise/fall/curve movement


Rain

      • Mechanical movement
      • Can fall in different intensities, directions and slopes
      • Requires fast timing/multiple layering
      • Foreground raindrops tend to be faster than further away raindrops
      • Needs long continuous cycle
      • Result – effective rain fall and splashes


Explosions

      • Explosions are effective to shock the audience – meant to be staggering and exaggerated
      • Anticipation, then short series of bursts, then dispense of smoke
      • Requires cycle of several seconds (3+)
      • Result – dramatic effect to action


2D effects are important in animation to give life and purpose to animated objects in a sequence. With 2D effects comes lively, realistic and entertaining actions.

Source: Week 11 – One to one feedback tutorials & Animating 2D effects, Animating 2D effects.mp4

In our World project we are looking into creating 2D effects such as explosions and smoke, we will experiment and see how this goes for us.


We took a one-to-one tutorial this week for the tutors to help us out and answer any questions that we had. I talked to Aodhan and he have me some great feedback and advice for the bits of animation I had completed so far. This is the feedback he had sent to me:

Make his stop and turn more panicked and less casual. Fix the perspective on the left hand building, foreshorten the open apartment bit. Push the depth a bit more by making your skyscrapers lighter. Make him a little bit bigger as he comes towards the screen. Line thickness for your BG to help with depth. Thicker lines in FG.

My edits to my animation are shown in blog post Cyberpunk World – Week 11.

Week 10

In week 10, we studied Animating Animals. Animal Animating requires you to think about the animal and their quadruped walking cycle. This cycle can also be interpreted as two biped walk cycles with offset timing. (one pair of legs moving ahead and another moving behind) The main positions of an animal cycle is Contact, Up, Down and Passing. Contact is when a limb is making contact with the surface the animal is walking on, Up is where the pelvis or chest rises when taking a step, Down is when the pelvis or chest lowers when taking a step, and Passing is the moment when limbs cross each other or are located in the same position.

Animal cycles also depend of timing, weight transferral, animal mass, age, speed of action etc. that can make them differ from other animal cycles. For example, a walking dog has each leg moving in different positions, has at least two limbs in contact and either the pelvis and chest is up or down. A running cat pushes themselves from the back legs meaning they pass through the front legs in the middle, while also using the technique of squash and stretch as they leap from the ground, making both the pelvis and chest rise, then contact the ground with their front legs first.

Knowing how to animate animals is important in animation to find realism in creatures we know unless we may not recognise them.

Source: Week 10 – Reflective blog & peer review & animating animals,  animating animals.mp4


  Prior to last week where we studied animatics, I made use of my time to update my animatic based on the feedback I was given by my tutors. This time I focused a lot more on the background setting, making sure that it felt natural and it connects with Ben’s animatic part before me. It now looks much stronger and can fit the three main focuses of the scene in good space.

Updated Animatic:

Week 9


In week 9 we studied Animatics. Animatics are essentially moving storyboards, but hold much more purpose in calculating the timing, fixing up essential scenes and deciding what pace the sequence will go depending on the mood of the scene. An animatic is quite rough and simplistic but should include enough detail to determine what something is and what is going on. All that should be focused on is camera angles, simple lighting, shapes and forms and timing/pacing. Animatics is important in animation as it helps to understand from your storyboard if you have added too much or too little to the idea that can cost or leave out many seconds. Animatics help to grasp the overall idea of how the final animation could look like.

Source: Week 9 – Lecture videos, Animatics and secondary actions, Animatic lecture.mp4, Secondary actions – principle of animation lecture.mp4


For homework we were asked to make an animatic for our part/scene in our animation idea, based on our storyboards. I am working on the second scene of the animation and had designed it myself. I followed Alec’s lecture on how to use after effects to make an animatic. Source: Create a shot for an animatic using after effects – tutorial.mp4

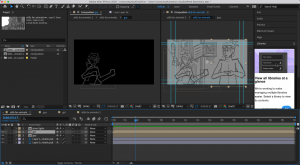
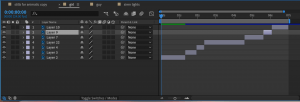
First of all, I drew my scene on photoshop. I made grouped layers for each frame/movement of the characters or objects I included. When I finished this I made a new composition in After Effects and added the photoshop file. The software organised the layers into easy spots so I could navigate my frames easily. I worked on After Effects and using layers as frames once before so this was familiar to me. I resized the layers into how long they would play for – I do this to sort the timing of the movements. I also had to test the pacing of the sequence as the guy in the video is running, so it would have to be fast, but not too fast so we can capture the presence of the side character. Next I added flashing lights to resemble what the guy is running from, the police. I organised this so it would all play together in seven seconds.

Of course I needed some reference to help me out with the running sequence, the background setting etc. I made two attempts at the animation. The first one is using reference for the background, and the character designs. I realised after I made the first attempt that the running sequence was not the best. In my second try I had a video of a running sequence with me as I drew out the running frames again.

References: Running sequence – https://youtu.be/lCpotGr0TB4

Chase scene example – https://youtu.be/5qSgoZPnTuw

Try 1:


Try 2:


I see for myself there is a lot I can improve on in this animatic, such as the perspective of the scene – its hard to tell if where the girl is standing is a corner, or if she’s in the middle of the street,, the background could look a lot better etc. However, when I bring this animatic into a full animation, i’ll recognise the problems and work hard to make it great!

Week 8

In week 8 we studied the building of storyboards. Storyboards are hand-drawn sequences of a scene or action. They serve as the blueprint to animation. The aim of a storyboard is to grasp the feeling of how the story can fit into a sequence. Storyboards are used for many projects such as films, animation, games and adverts. There are important principles in storyboarding: these are Staging and Anticipation. Staging is the pose or action that a character makes that conveys a clear intention. Good staging is determined by its clear silhouette shape, and the direction of the line of action. Anticipation is the preparation of an action like a jump or punch. Anticipation is used to emphasise a main action for a more dramatic scene for the viewer. Anticipation relies on exaggeration, and timing to be successful. Storyboarding is important in animation as it can convey how your story will flow. the use of Staging and Anticipation will allow the audience to grasp what is happening with precise timing and emotion.

Source: Week 8 – Storyboarding & Animating with forms, Week 8 video lectures, storyboarding.mp4, staging.mp4, anticipation.mp4


For homework each of us in our world group had to complete a storyboard on what kind of scene we want to animate. Also for homework we worked on Animating with forms.

I followed Alecs’ lectures on the software Krita to successfully complete a piece of animation using keyframes,adding in-betweens and working with frame rates. We were asked to animate a flour sack in any way we’d like to. I was inspired by a drawing I did of a flour sack on stairs in week 1, to animate a flour sack falling down a couple of steps.

Source: krita floursack animation Part 1, 2, 3.mp4

I started thinking of my approach with a storyboard. It includes the major key frame points that I want to create back in Krita. This really helped me get straight into animating the sequence with just these five drawings.


This was my first time using Krita, so it took awhile to get used to. I added a background of the stairs and locked the layer. Then I got started with drawing my keyframes in the right places. At this point I changed the frame rate to 24fps, and Spread out the keyframes to add in in-betweens next. I then drew in my in-betweens so that the flour sack would fall down the stairs with variety in how it falls, and exaggeration in the jumps from one step to another. As a result, I completed a sketched, full frame animation. Video below.

After showing this to my Lecturers, I was able to take in some advice and feedback. I realise that I could make the flour-sack a little bigger as it goes down the stairs given that the stairs grow bigger as they go down also. I can also work on the tassels to make them fall a little more realistically. Otherwise, I was told it was good work. I plan to come back to this and rework it using the advice I got.

Week 7

In week 7 we studied Animation basics. We looked more specifically at timing and spacing. These features are apart of the 12 principles of animation. Timing refers to the number of drawings or frames for an action, which translates to the speed of said action. It is how long something takes to happen or not happen. Spacing refers to where that object is at each frame of the animation. The distance of each space in each frame gives the illusion of movement.

Frame rates consist of how many drawings are displayed in motion every second. Here are some examples:

          • 1’s, 24 images in 24fps (fast, fluid)
          • 2’s, 12 images in 24fps (a little choppy)
          • 3’s, 8 images in 24fps (choppy, limited)
          • Can go higher (4’s, 5’s) can mix frame rates above

Source: Week 7 – Animation Introduction, Lecture & tutorial videos, Animation 101 lecture.mp4

Timing and spacing is important in animation because they determine how action can move in any kind of way. I completed some activities trying out timing and spacing. I used Adobe Animate to complete these activities.

At first I tried out an experiment Alec had shown in the lecture video to practice timing and spacing in different frame rates with a ball shape.

Source: Week 7 – Animation introduction, Bouncing Ball – Animation tutorial.mp4

My homework was to animate 3 bouncing balls of different weights, such as a tennis ball, or a bowling ball. Before I attempted this homework I made a practice run with the help of this diagram my tutor provided. Source: Week 7 – Ball bounce timing & Adobe Animate hotkeys.pdf

The first ball I animated was a volley ball. I figured this kind of ball would be quite neutral but has a bounce to it. I used this video as reference: https://youtu.be/Rq3kErnT-oE?list=LL

The second ball I animated was a ping pong ball. This kind of ball would bounce vertically unlike other balls; it is also quite small and light which can be seen when it bounces. I used this video as reference: https://youtu.be/-aTibaqEwl8

The last ball I animated was a bowling ball. This ball is very different from the rest as it carries much more weight. A bowling ball bounces very little compared to others. I used this video as reference: https://youtu.be/8eejc0p7nCM

Week 6

Week 6 was the mid-term of our first semester. We took this time to finish off our activities we may have missed and build up our blogs to this date. We also took one-to-one sessions with our tutors to talk about how we were doing, what struggles were going through, what we enjoy doing and how well were doing in the course. I received good feedback from my tutor and plan to keep working well.

During this time I fixed up my character design homework. I had some work done before talking to my lecturer and they gave me advice on now to improve my character design technique by using silhouettes, shape and form, and experimentation with multiple costumes. I took this advice and completed a set of two concept designs for two possible characters.

Week 5

In week 5 we studied Character design. Character design is an essential part of bringing life to a story/scene. ‘Character is what drives the story and breathes life into a film’ – PixarThere are many character design steps that will help develop your character in the best possible way, such as:

        • Figure out your target audience
        • study other designs
        • make your character unique – body shape, face shape
        • add personality
        • add exaggeration
        • give your character a background, goals, dreams, wants
        • research real subjects etc. props, clothing, species


When it comes to creating your character there are initial considerations you can take to improve your work. These are:

        • Silhouette – is the characters shape distinguishable
        • Shape – round, square, triangular
        • Appeal – what feature is most appealing – hair, eyes, shape
        • Structure – head, chest, torso, limbs
        • Animate-ability –  is it simple enough to animate?
        • Colour – palettes/colour schemes
        • Variation – in multiple character designing


Character design is very important in animation as characters are a main part of any story. Characters can carry the story from the start right to the end. I completed a quick exercise on character design and drawing from real subjects.

Source: Week 5, Lecture video and slides, Character design Intro video.mp4/Character design lecture part 2.mp4


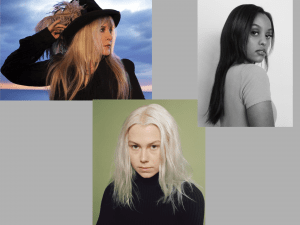
In the video, Character design lecture part 2, I tried out the experiment Aodhan had did himself where he found images of celebrities or known people and took 20 minutes of each person to draw them out in a cartoonish, exaggerated style. This took a while for me to get used to but I pulled through and drew three of my favourite artists. Reference Image Below.


As I were drawing these, I tried to find the overall emotion or personality from each artist. This helped me to make  their personality and emotion more visual and exaggerated.

Back To Top
Skip to toolbar