Once I had set up my main layout of the environment, and had set up my main source of light, I started recording some shots for the cinematic part of the project.
First of all, I brainstormed what kind of shots I was looking to achieve – from a look at our inspiration from our Miro Board, and my own initial ideas I came up with. I wrote what asset I would like to record, what kind of shot etc. close up, medium shot, and what movement will happen in the shot.

At the time I also considered what was done and what was not done. The Piano, fireplace and bookcase were still in construction. So I waited until they were made, and in the meantime, I worked on the shots that the assets were ready for.

I made some cameras and labelled them by number so they will be easy to recognise. I also made a folder for the sequences that matched each camera.

In each sequence file, I connected the camera with the shot. As the camera was in the right position, and was connected to a sequence, I was ready to start recording.
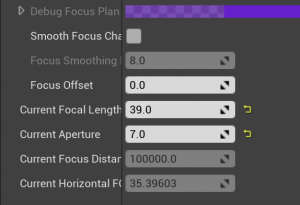
I set the camera settings as below:

Filmback: Super 35mm
Focal Length: 39
Aperture: 7
ISO: range from 100 to 600
These settings were what I mostly used throughout recording. However, to create some different kind of effects, these settings would change around. E.g. the Aperture would change if I wanted a lighter or darker setting.

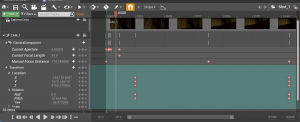
This is the sequence workspace. It works as a timeline, like most animating software. So It was quite simple to get used to.
I worked with the location and rotation of the camera to create the movements of the camera. I worked with the focus distance to set which object would be the main focus, or what will be out of focus. I also used the focal length to create different styles of zoom.

Here In the first shot of the clock, I made a lighting strike effect at the start. I turned the aperture up and down once each frame to help me achieve the look. I set a still position from the start to around frame 24 so I had a close up shot of the clock face. From frame 24, I made the camera zoom out, and roll to the left until the end. The distance between the frames allowed the movement to flow slowly and eerily. The end frame was to capture the full shot of the clock and candles.
 In the second shot, I presented the entrance of the Haunted house. The camera moves backwards, while zooming out, and rolling round, giving the same effect as the first shot. I set the first frame close to the door handles, and zoomed out until the wide entrance to the house, included each asset in frame. I altered the focal length from the start and middle of the shot as the camera moves back, that it can keep focusing on the door.

The third shot focused on the writing desk, and the objects on top of it. I framed the shot at the group of candles by the left side of the writing desk for a second or two, then I moved the camera so it frames the other side of the desk, where the ink pot and open book is. The cameras location is shifting to the right, while also rotating to better frame the objects.

The fourth shot is a short clip showcasing the books on the floor by the bookcase. I set the position and rotation at the start and a slight different position and rotation at the end, viewing around the books. I set a blurred focus at the start then a clear focused shot by the end.

The fifth shot presented the dining table, where the candelabra, dishes and cutlery were placed. Again this was a short clip. The camera moved slightly around the table as the focus was set from the closest dish, then to a far away dish – making the closer dish out of focus.

This sixth shot was considered for the end of my cinematic. I recorded a single candle as it is lit, then being blown out, making the surroundings dark. I made use of the transitions inside UE that included a fade out feature. I used this to end the clip where the scene goes dark.
I included a few more shots that were mostly very quickly made. They were not as experimental as the other shots, as I was just looking for simple medium shots of the room. I recorded a shot of the camera looking around the entire room, one of the piano by itself, and one of going up the stairs.


After animating the camera and shooting the shot, I was ready to render the sequences. I went to windows-movie render queue to render the sequence. I clicked on +render to add the shot I wanted to render at the time, and set up the settings I preferred. I added the option to render in a PNG sequence. I added anti-aliasing, as I learnt from a video below about rendering UE sequences, that it helps to remove a ‘jagged effect observed along straight lines in the frames.’ I applied the temporal sample count to 64. This gives each frame an amount of time to be calculated to a higher quality image.

Once I set up the render options I let it run. I was using both the uni computers and my laptop during the rendering stage. The uni computers took approx 2-10 minutes rendering the shots, while my laptop took 20-50 minutes each shot :’). The preview told me the total frames that were rendered, what was to be rendered, and how long the rendering process was taking.
After a few draft shots were recorded, I brought them to After Effects to start editing the cinematic. I made sure each image sequence flowed correctly while on After Effects, then I combined them together.
My first draft was very rough. Some of my shots were cut too quick because of a setting I forgot within UE. I also had not picked out a background song yet so it was difficult for me to find a good place for each clip to go, and flow well. This draft was merely testing the clips for the first time, to see how they looked.
In my second draft I had picked out a song, I rendered out some new shots, and rendered out the shots that were cut too quick. This was a little better to grasp how I would edit my cinematic, but I ended up changing the song after this, because the song was too short, and it was not a great song to edit to.
My third draft was more suitable, and felt more interesting and spooky. I think the different choice of music fits much better aswell. At this time I am missing a few shots because they were rendering as I was editing this together. In addition one of my shots has rendered wrong, as it stops and cuts to a further frame suddenly – I plan to get this fixed in the next draft or two.
https://ulster-my.sharepoint.com/:v:/g/personal/keaney-d_ulster_ac_uk/ESGPov_BOspAsMExcWtN2DEBZ4Wrg_CuT1_rcRu964hhNA?e=vTu6x9
This is the fourth draft of my cinematic. Here I collected as much rendered shots as I could, while others were still rendering. I made a more structured order but it may still change by the final cinematic. The error with the paused frames on one of the shots was still occuring – I was still figuring out what the cause of it was.
https://ulster-my.sharepoint.com/:v:/g/personal/keaney-d_ulster_ac_uk/EV1XWVFlB3ZEigc-xMtLpWABeRT1sHViC8oit58a4Rdivg?e=Ag5qLt
This is now my final cinematic animation. I was able to fix the frame pause problem by re-downloading the frames. I also added a fade transition to each shot so they can flow better together. This version is definitely an improvement from the drafts. I was able to add many more assets that enhanced the environment tremendously. I love the spookiness of the shots and how I was able to find interesting places to record. I also like the mystery to the visuals – such as the muddy footprints on the steps, the blown out candle, and the portraits on the wall. The group and I did a great job setting up the environments, and I feel I successfully captured the wonky, spooky, decayed Haunted Mansion that we were looking for from the start. However, if I were to complete this again, I would have spent more time crafting the camera shots, and making each shot a unique visual. I did take time to look at simple camera techniques, but I had an opportunity to go more into depth and create a more fascinating cinematic.
https://ulster-my.sharepoint.com/:v:/g/personal/keaney-d_ulster_ac_uk/EbIyfSKi8V1CrVx_E_9MdVkBMl_Blrwx8j17wpjPd5Aglw?e=APRAud