We looked at how to write a CV in early module classes, which helped give us a start on producing our own CVs. I already had a CV from hospitality/retail jobs I have worked in, so luckily I could use this as a base. However, it was not perfectly suited to an artist’s CV, so I had to make several tweaks. I looked at the examples of past pupils’ CVs for an original design but decided to look online as well to get a wider sample.
(Cover Letters of previous Students^)
(Examples of artist CVs found online^)
Looking at my old CV compared to the other art-focused ones, I was able to see what needed improvement. Visually, it was boring compared to the layout of the artist portfolios so I knew I had to change the design. It also did not show off my most important skills the way it should for applying for a job in the creative field.
This website was helpful when considering what I needed to add to my CV to make it more creative and engaging. One recommendation was to include keywords from the job description, which I thought would help tailor the CV to specific roles. I also decided to add a section to my CV with the software I am familiar with to draw this to the attention of potential employers.
This website was mainly for providing a template to work off, but I found the tips very useful. They recommended keeping a CV between one and two pages which I followed with my work. It also highlighted what we had covered in class on the importance of colour, fonts, and good formatting. You want your CV to be readable so that the person you are submitting it to is not searching for information.
I had a few drafts of my CV as I updated it each time I found some new advice. With my second draft, I made the content more specific and added a list of my proficiencies in various software.
My lecturer provided feedback on this draft that the content was good, but the structure could be more consistent. I agreed and made the change but was still not entirely happy with the layout as it didn’t resemble the examples I had sourced of artist CVs. So I decided to make some major formatting changes to give the document a more striking design.
Draft 2 ^
Draft 3 ^
I submitted this draft for final feedback in my one-to-one meeting and my lecturer suggested I list the software I am proficient in as well as use pictures. This was because a hiring manager might not be familiar with logos and could be looking to see the keywords written down. I did this and also moved my soft skills onto the second page so that the document was less crowded. In addition, I decided to revert to using bullet points instead of full sentences, as this made the document easier to read. Finally, I changed the overall formatting to make sure everything matched, which helped improve the appearance of the CV.
One of the seminars we had involved speakers coming to talk about their experiences in the industry. This chat was helpful as it gave an interesting insight into what it is like to work in the field of animation. There were representatives for a range of careers, including a Director & Creative Director ((24) Denis Bouyer | LinkedIn), Animators ((24) Matthew Hamill | LinkedIn)((24) Rachel Dixon | LinkedIn), and a recent graduate just starting as a 3D artist ((24) Rheanna Devlin | LinkedIn). Having representatives from different career paths and levels got me thinking about what career I want to do. During the talk, I asked if there were any tips the panel had for interviews, and I got some helpful feedback. They suggested that by the time you’ve gotten an interview, the company already knows your skills, so now they are trying to find out if you are a good fit for the company in terms of personality.
We were also asked to research a job role to find out what skills companies are looking for, and to look into artists in the starting stages of their careers.
Next, we looked at how to write a cover letter. I have never written a cover letter for an art-related job, so I was eager to learn what makes a good one and how to relate your CV to your cover letter. As hiring managers read plenty of cover letters and CVs, it is important to ensure yours stands out. At the same time, these can’t be too long as you don’t want to overwhelm them with information that may lead to them losing interest. Another key thing I learned from the lecture was to personalise your cover letter to the position you are applying for. If you have a very general CV, it will come across that you don’t know anything about the company and their work, so they won’t want to hire you.
There is a good layout to follow when writing a cover letter: Firstly, you should mention the studio and why you want to work there, including what you have learned from the job listing. Flattery is good, as it proves that you know about the studio and are invested in them. The second paragraph should introduce yourself and why you think you would be a good fit for the role. At this point, you should link back to your CV, especially to any relevant work experience. The third paragraph should be the final one, thanking the employer for reading your cover letter and considering you for the position. You want to keep it polite, as an overconfident or rude tone could damage your pitch. From comparing various examples, I’ve found that a simple design works best as an overly complicated layout can take away from the content.
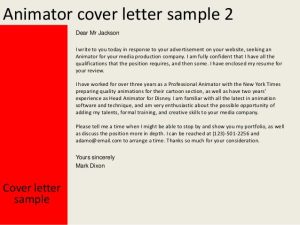
(An example I thought was a good cover letter ^)
(Two examples of cover letters that I did not think were very good^)
The showreel design task was the most difficult for me as I have no experience making one or presenting my work for display. Luckily, I have made short films and animations, so I am familiar with premier pro and other editing software. Finding the right content is crucial because you want to show your best work. We covered this in our Ulster University lectures and my extra module at Berkely Community College. One of our assignments for this class was to make a final showreel, which helped me practice for this task.
During the Berkley module, I had the opportunity to see examples of showreels from the lecturer, Chris Carter, and others who worked at the Pixar internship. They explained how they improved their showreels over the years. I asked Chris where you should put your favourite; the start, middle, or end. He suggested it would be ideal at the beginning, but if you are only using your best pieces, it shouldn’t matter too much.
In UU, we had a lecture highlighting the importance of tailoring your showreel to the job role you are applying for. I picked a job as an animator and applied this knowledge by including more of my animations than 3D models. I watched videos on what makes a good showreel and seeing the diversity of examples inspired me to add extra effects, such as setting videos to a beat and professional transitions between projects.
I asked for feedback from my classmates on this draft, and they advised me to keep the colour scheme simple. Alec also suggested I include simple renders of my animations instead of playblasts as the quality would be higher, so I did. For my final draft, I rearranged the position of clips in the timeline to give them a better flow.
Self Reflection
I enjoyed this module as it helped me to prepare for the future. I learned the most when working on my showreel, as it was the area I was weakest in. I have gained valuable insight into highlighting my best work as effectively and professionally as possible. The piece of work I was happiest with was my cover letter because it was strong, professional, and demonstrated my abilities well. There are aspects that I will need to continue to work on, such as updating my showreel regularly with improved content, but as a result of this module, I will be more confident when presenting myself to future employers.
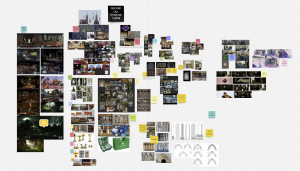
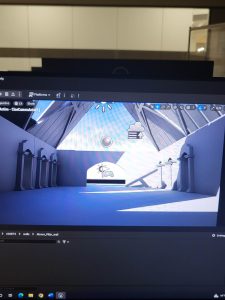
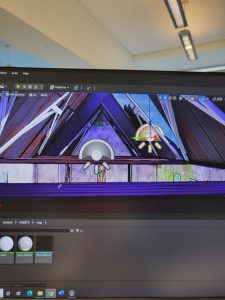
The concept which our group decided to explore was ‘Ancient Temple’ however, we took a slightly different approach to it. We took the approach of far in the future, after a natural disaster has occurred, humanity would look back on churches in our time as an ancient temple. For the aesthetic, we all agreed that the inky, outlined look of TellTale games such as ‘The Walking Dead’ and ‘Borderlands’ would work really well for our concept and keep it visually interesting. We all worked off an initial Miro board, as this allowed us to collaborate and share mood boards and layout ideas with each other.
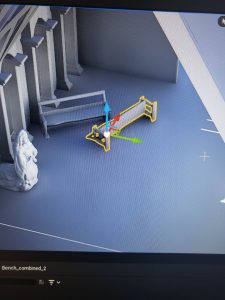
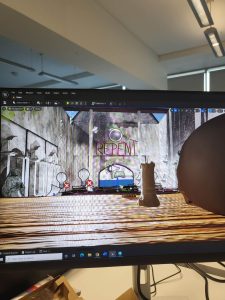
Once we felt we had gathered enough initial research to begin, we made a list of the assets we would need. Then we divided them up so that everyone in the team would be in charge of one Hero Prop as well as well as 4 to 5 smaller ones. The people in the team who were more comfortable with modelling took on a few extra props, with the compromise that the others could work on more of the texturing assets. I took on the Walls, pews, rugs, statues and a stuffed animal.
My research led me to what sort of scene I wanted to do. I initally looked at an underwater scene, based off some of the reference images I found, but after delving a bit deeper into general research and the telltale games I decided that I would like to take a horror film/game approach as I really like the dark shadows and grey tones which are in media such as ‘The Walking Dead’ and ’28 Days Later’. Luckily, both of these things feature churches so I was able to look at this for reference. I also looked at a lot of TellTale Games to find inspiration, not only in their style and textures but also in the cinematics of the cut scenes they use. (Stylized Game Production: Overview from Aleasha Ford (80.lv))
I also found a very interesting thread on how the developers made the telltale games. It was mostly focused on the characters of the games, and how they do the shading on the faces but I was able to take this information and apply it to my statues to give the lines less of a uniform approach. (How to Draw Telltale Games Style — Telltale Community)
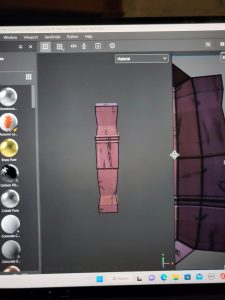
Creating the assets and textures was a very enjoyable part of the process. We knew how we wanted our scenes to look, and so I looked into how to achieve this. We looked at these videos as an initial exploration. (1) Post Processing in UE4: Cel-Shading | Live Training | Unreal Engine Livestream – YouTube, (1) Comic Style World-Building in Unreal Engine 5 | UE5 Cel Shaded Environments – YouTube and(1) How to Make Toon Outlines in UE5 – YouTube. The last one seemed like the most helpful as it gave a lot of different options for customizing the shader how you wanted. Cloe ended up building the shader, and since hers worked really well, I decided to use her shader in my own project. After some research and discussion, I decided I would add lines onto my texture maps in substance, to help with any areas of the project which may not have been caught by the shader in unreal. This helped to give a little more detail in areas which may have been missed, such as on the face of my statue.
I collected several references to help me with both the modelling of the statue as well as the texturing. At first I struggled a little with getting the texturing to have that hand painted look I wanted but this was really helped when I discovered the blur scope. I found a video on hand painting wood ((1) Substance Painter Stylized Hand Painted Wood – Tutorial for Beginners!!! – YouTube) which was really good and allowed me to create pews exactly how I wanted, with some of my own tweaks. I was also able to combine this with the advice given by one of our guest lecturers, John Hannon, who showed me how to use the curvature feature in the exact way that I wanted. Combining these elements helped me to create the pews exactly how I wanted. It also allowed me to rework my other textures and get them looking exactly how I wanted.
I made most of my assets in Maya, but I chose to use Zbrush for adding some details, as the orb brushes which were suggested at our extra Zbrush workshops really helped to achieve the look I wanted. I was able to add these details onto the statue, to look as if it had been broken away at, as well as on one of the legs of the pew. This worked really well after I had brought it into substance and baked the high poly and low poly, as the curvature generator picked up all of the marks and scratches, giving a very outlined, telltale inspired asset. (Making a Cel-Shaded Porta Potty in the Borderlands Style (80.lv))
I attempted MASH for the first time with the help of some YouTube tutorals. These tutorials were for Rubble but I was able to apply the same basic principles and techniques to make one of my benches look like it had been destroyed in an organic way. The first video I watched was a little bit hard to follow as it went very fast, however, the second video was much better. (How to create a pile of rocks with mash and maya 2018 – YouTube)
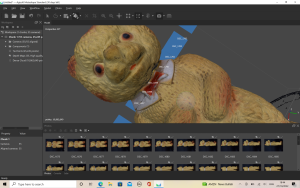
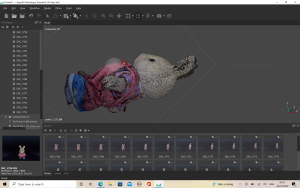
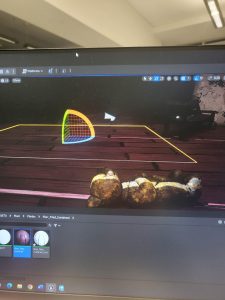
One of the experiments which I enjoyed the most was photogrammetry. Initially I thought about doing Photogrammetry of a soft pink bunny rabbit but Henry pointed out that the fur would be hard to capture. Myself and Cloe initially started with a starfish which we placed in a lightbox, and used a turntable to photograph at all angle using a camera on a tripod which we could control remotely. After we had the photos we took the model into agisoft metashape, which is software specifically developed for photogrammetry. This allowed us to create the 3D model from a real life scan, including all of the textures. I was very interested in the process so I chose to explore it further. I took further photos of a plastic bear and a small sylvanian family doll to attempt to create them as 3D models. I tired out a variety of software’s for photogrammetry, including ‘Micmac’ and ‘meshroom’ but the user interface wasn’t as clear and I wasn’t able to provide as high quality results as when I used ‘metashape’ so I decided to stick with this for further experimentation.
Unfortunately I could not get the small sylvanian family’s points to align in the software so the model did not turn out the way I wanted but I did learn that this was because the model was not completely centered and in future I would have to do this to ensure quality results. The Bear turned out very well and I was very please with it. Once I had exported the initial textures and FBX of the bear I was able to take it into Z brush and clean it up a little, including filling in a small hole on the head which the scan had not been able to pick up. I was able to texture it from here and the bear was ready to import into my project. I also experimented with my own turntable and homemade lightbox however the results were not clear due to the light source not being strong enough. I also attempted photo scanning a face for the first time using myself and my sister. I used a camera which i controlled remotely and turned us around to collect data of all angles. the model of myself was recognizable but the skin was quite bumpy where it could not align properly and as I had my hair down it was unable to capture it properly. In future I will try this again with a wig cap on to avoid capturing the hair and hopefully develop the face scan properly. My initial thought was if it was of a high enough quality I could use it as a statue for my final project. I don’t think it quite fits the world but I will be able to develop the model into other experiments such as on a bolder or into a tree like in Pocahontas.
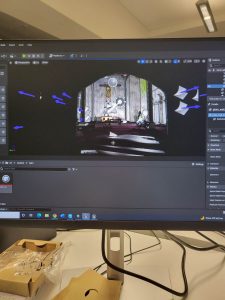
I found the process of putting the scene together and importing the assets quite straight forward and enjoyable. I enjoy working with Cinematics and I had done myself a layout example of roughly how I wanted the scene to look so I could work off this. I did encounter some problems such as one of my team members assets not importing properly but I was able to fix this by opening his original FBX into Maya and reexporting. I also had to go back and soften the edges of the bear but this was again a simple fix.
The main issue I came across when putting the textures into the scene was that all my walls were not the exact same color and so I had to go back and retexture them. I discussed with my team which version of the wall we liked best and made versions to suit all of their project variations.
I struggled with lighting initially, as the scene didn’t seem to be lighting properly. However, I found out during the bake that it was because there was a slight problem with the floors Cloe had made, and they just had to be imported as a plane with the texture applied. Luckily this was an easy fix, and my lecturer was able to spot it easily. Once I had figured this out, I was able to work on my lighting a lot easier. I knew what colour lighting I wanted through my research of different films and how they use light to create the feeling of horror and ominousness. I was able to take my references, and use adobe colour picker to help decide what colour lights would help set the scene. I went for a quite dark scene, with a lot of brown and a hint of orange to add some variation. I also added a custom sky sphere in, which I set to lightening. I wanted to really increase the fear and post apocalyptic feeling so I turned the colour of the lightening to red.
I really wanted to have rain in my scene so I did a lot of research into what the best way to do it would be. The simpler option was to download a pack from the marketplace and add it this way, however the only free ones were not compatible with Unreal Engine 5 so I ended up creating my own using the Niagra System. This required me to watch several videos which helped me gain an understanding of how everything worked.
I watched these videos but as I tried to follow along I realized that the ‘Box Location’ was missing and so was the ‘Sphere Location’. I looked in different places but I couldn’t find it and I couldn’t find a solution in any of the forums I searched. I found a different video which said that it was making rain using Unreal Engine 5 but it turned out that they were just adapting a what they had made in unreal 4 so I decided I would try this. (Unreal Engine 5 – Rain and Thunder in Open World – YouTube) The process was simpler than I had initially thought it might be, as I was able to follow along smoothly with the first video I had found. Once I was happy with the collision, speed of falling and volume of the rain I had created I was able to use the migrate button to bring that file into Unreal 5 and bring it into my project.
While doing research into what camera shots I wanted, I discovered this great article from studio Daily which had an interview with the lead cinematographer on The Walking Dead (tv show). The interview talked about how everything was filmed by hand, and much of it was filmed on a Super 16mm. I knew this camera was an option in Unreal so I decided to implement it into my own shots. (A Cinematographer Among The Walking Dead – Studio Daily)
I had also looked into the cinematics in ‘the walking dead (telltale game), as well as ‘The walking dead TV show’, The Road and ’28 Days Later’, to get a sense of how these things would be shot. Through this, I decided I wanted to have the camera seem to be hand held, to really immerse the viewer in the scene and add to the sense of fear. I looked up the best way to do this in Unreal, and I came across a really helpful video on adding camera shake, and adjusting it how you wish. ((1) How to Add Camera Shake in Unreal Engine – YouTube). I was really happy to have found this channel as it had a lot of easy to follow, super helpful youtube tutorials and I found another great video which really helped me with thinking in terms of cinematics. I looked at a lot of Telltale games as a reference, so it was important that I start to think in terms of cinematics for the project as I didn’t want it to feel like a cut scene from a game. Because Unreal is a game engine, I initially found myself falling into the pitfalls of gaming instead of cinematic but after thinking things through a bit better, I changed the frame rate of my shots to 24FPS, which is the standard for film. I also paid a lot of attention to depth of field and setting things so that they were nice and in focus when I wanted but, had that blur of backgrounds when I wanted. Again, I think this helped to achieve a more cinematic look. I also thought about what type of camera shots and angles are used in the horror genre and I found a lot of low angle shots, which make the viewer feel smaller and so adds to a sense of fear and overwhelming. There is also a mix of extreme close ups, and extreme long shots to help break things up. And, one of the most the important I think is the hand held camera shots as this helps bring the narrator into the action more, so it was vital for me to include this to give the ‘Gun and Run’ feel that cinematographer David Boyd used for the walking dead. ( A Cinematographer Among The Walking Dead – Studio Daily).
This video was really helpful initially showing me how to set up the cameras and move them in unreal engine. It was simple but easy to follow, making it a good starting point before diving deeper. (1) Unreal Engine 5 UE5 How to Learn Camera Animation Level Sequencer Functionality Guide – YouTube. Thankfully I had already done a shot list for my project so I was able to avoid taking any shots that I didn’t want for my scene which sped up the process. I kept having a recurring issue where the file would only render half of the shot, so I checked the settings, based of this post I found on the unreal website (Render Cinematics in Unreal Engine | Unreal Engine 5.0 Documentation) but everything was set correctly. However, simply re-rendering this helped me out. I chose to render in EXR files as I knew I wanted to explore a little bit of colour correcting in After effects and this seemed like the best way to achieve this due to the depth of colours.
Once I had exported the EXR files, I took them into after effects to work with the colour and other settings. I had the camera shake applied to my shots so in after effects I added the ‘camera shake deblur’ effect to help with too much shaking in the scene. I also added Glow to the scene with the stained glass window as I thought it would be cool if it looked like the red lighting was showing through which also worked well. The colour grading was the main thing I wanted to achieve, and I found a youtube tutorial which gave inspiration for how to achieve the washed out colour of the walking dead tv show. I didn’t make the settings exactly the same because 1) my initial colours were different, and 2) I wanted to create a slightly stronger green undertone in the scene to give a really cold feeling to the shots. Once I was happy with how every scene had been corrected, I was ready to export them and start the edit.
The editing process was simple as I already have some experience with Premier Pro and I knew what I wanted to achieve. I searched freesound for some background music and some thunder that I could add into the scene to create more ambience. Once I had adjusted the volume, I tried my initial shot list but I found that I wasn’t quite happy with the shots. I changed the order so that the camera moves through the church, starting at the entrance and ending at the cross on the other side, giving the feeling of the viewer walking through this environment and discovering all of the items which had been left behind. I added a few simple transitions as well, just to make the video slightly more eye catching. The dip to black effect worked nicely as it gave a feeling of a blink, again successfully placing the viewer into the world.
Overall, I was happy with my project. I know that I worked hard to achieve it and I’m proud of all of the things I have learned throughout the process. I am happy with the assets which I created and the textures I created. I was able to make assets which fitted our initial idea and theme which was pleasing to me. I feel like one of the biggest struggles I had was working out the nodes based system in Unreal. I feel like if I had delved deeper into this and explored more I would have been able to create a scene with more depth and some more interesting details. One of the things which I tried very hard to improve on in this project was tidying up folders and files, with proper naming conventions as this is very important, not just to allow unreal engine to read the files, but also to enable my teammates to find the shared assets. Unfortunately, I was not able to delete anything off our shared OneDrive which made this more difficult but to overcome this I made sure to label each folder and update them as I went and the project developed. Still it was a shame as I felt it was rather burdensome to my teammates so I will try harder in future to improve. I was happy with the mood I was able to capture through my cinematic and I was successful in creating an ominous, eerie feeling like I wanted to. I believe this was due to the use of camera shots I chose and the colour grading I added in after effects. I believe this really helped to bring the project together. If I were to redo the module from the start I would definitely be tidier with my files, in order to ease others work loads and I would also try to be more firm with other team members about the importance of finishing assets as unfortunately there was some which were not finished in time and I could not include in my scene. Overall, I was happy with the final project and I am looking forward to taking these new skills and applying them to future projects.