WEEK 7: AN INTRO TO RIGGING
Rigging is a crucial part of 3D animation so we had two classes on it to learn. We started with the basics, learning about the different elements which make up Rigging, such as hierarchies, kinematics and joint skinning. It is important not to move the mesh when animating, but instead use the controls which means that anything in your scene which moves, will have to have a very simple rig to make it work for your animation.
We started with the very basics of hierarchy structures, such as parenting one object to another to allow them to move together in an FK chain. These rigs behave much like your own joints would, e.g. you upper arm controls you elbow, your elbow controls you forearm and your forearm controls your wrist. This makes it a very useful rig for animation so it is important to understand it well.
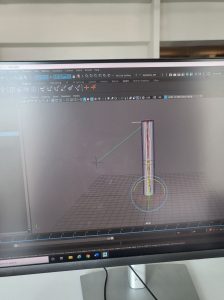
We did a practice exercise to try and get familiar with FK rigs, using a very simple arm. We used a simple cylinder, with some cuts around the middle to allow it to bend. Then, we applied the joints using the rigging tab of maya. It is important to parent the joints in the correct order otherwise it will not behave how you wish. The arrows between the joints are a crucial way of seeing which way the joints are parented but they are not actually part of the joint.
After you are happy with your joints, you have to bind the skin. You do this by opening the rigging menu, selecting the bones and then the mesh, and clicking ‘bind skin’ from the skin menu. This connects the bones to the mesh, and allows them both to move together.
There are times when you want to clean up the way your mesh moves with the joint, such as if you are getting a pinching motion when you try to bend it. This can be adjusted using the skin weights tool. This allows you to adjust the influence of the bones on the mesh. It is important in order to keep your mesh looking natural and moving in a realistic fashion.
The second exercise we looked at was how to use joints, constraints, points and orients. This exercise was a lot of fun as we got into some more of the principles of animation, such as follow through. There are cases when objects want to follow a different orientation from their parent. This makes things a little more complicated but it does provide a much smoother animation. A constraint allows us to do this. So in this case, instead of using a parent constraint, we looked at using an orient constraint. This will then connect the object you want to move with the constraint you have created. However, this will result in the object being set to the coordinates as the constraint so if you wish to avoid this, then you can simply open the orient menu and unclick the maintain offset button. This means now when we turn our example wheel it will simulate gravity better.
Again, we do not want to be animating the mesh so we have to create a control for the wheel to follow so as to not interfere with the mesh. Following this, we will create a point constraint so that we can have everything connected to one point and move the control and constraint from the one point. This is helpful for moving your model about your scene.
You can then create your animation by setting the key frames. This allowed me to add in some extra animation, such as having some wind in the scene blow the water buckets a little unevenly.
The next exercise we looked at was a control rig for a tentacle model. Control rigs are very important for animation, particularly as you often share files with and you want to have a nice clean rig which teammates will be able to maneuver. We started with creating the bones for the tentacle to follow, and made sure the parenting was correct. Next is binding the joints and mesh. This will allow us to move the tentacle, but it would be easier to attach a controller which will allow for more interesting animation. It will also make the animation better.
To create our controls, we use a nurbs curve which can be scaled up to surround the object. Then we need to freeze the scale of the nurbs so that we don’t get any deform on the objects. We can then change the colours so that they are easier to see against the mesh. Once that is done, and we have created enough nurbs curves for each joint we can use the match transformations to make sure that the controls are placed at the same level as the joints which will be better for the animation. The next step is to do the constraints. We can use a parent or an orient but in this case we want to use an orient constraint. The contraints will allow the joints to move when we use our controls, instead of having to use the joints or mesh for movement.
I did an exercise in parent constraints which involved having an arm pick up a cup and lift it up to take a drink. We started with making a simple IK arm, which will be used to pick up the cup. The cup was created with a base control and a second control which will allow us to move the cup also. This is helpful as it will allow us to add animation into the cup even after we have locked the hand with the base control. If we do the animation of the arm and hand moving up before we move the cup it will be easier to find the key frame where we wish to have the cup go with it. We first select the controlling object, and then shift select the cup and add a parent constraint. In this case we want the maintain offset button to be ticked. We have to keyframe the object we want to move with the parent (which in this case is the cup) in order to stop it from moving along with the arm when we don’t want it to. This will create a blend parent node in the channel box which we will need to set to ‘1’ when we want the motion to start. Then on the keyframe before, set the blend parent to ‘0’ which will allow the cup to only move whenever we want it to. Next, repeat this with the keyframe where the cup is put back down on the table and the arm lets go. It is the extra control above the main control which allows us to add more animation into the scene.
WEEK 8: BLENDSHAPES
Blend shapes is a very interesting part of animation, as it allows you to create a number of different expressions. It was interesting to learn about the different relationships objects have and the use of the shape editor. It is important to set a target for your object, otherwise your blend shapes will not work properly. You can use different areas together to create a variety of expressions which makes blend shapes very useful for character animation.
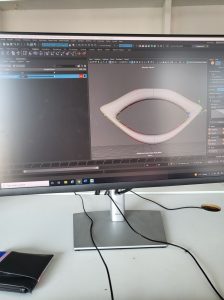
I started by making myself a mouth shape which I would use to create the expressions. Using the soft selection when selecting your vertex points helps to create a more subtle change and helps make the expressions look better. When I wanted to make the mouth open I selected the areas I wished to change and moved them up and down to create the shocked expression I was after. You can also duplicate the target if you wish to mirror a smile for example on the other side of the mouth.
You can use more than one slider at once, so you can experiment with the variety of different expressions you can make by using different blend shapes together. I made different expressions by only tweaking one side of the mouth compared to the other to experiment with a smirk or a full smile. It was also interesting to add on the opening and closing of the mouth with the smile.
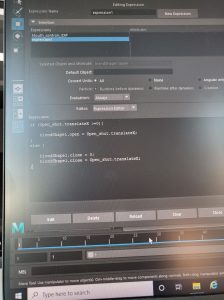
Next I looked at connections and expressions for UI. It is very handy to be able to connect attributes such as scale between objects. You have to use the connection editor of this. I started with a cube, and a circle. This allowed me to simply see how the sphere could be affected by the cube. You can also use the expression editor to do the same thing as the connection editor. With the expressions editor you have to create expressions which gets a little bit more into the coding and programming side of animation which is not my strong suit. I struggled at first with this as I was not able to get the expressions to change but I was able to make it work on the second attempt.
This is an area which I still need to work on as I feel there is a lot more to learn and explore but it was good to start to explore getting a grasp on the basics.


