For this week we learnt about Retopology which is used for the masking for sculpting characters with polygons from having a high resolution to a smaller resolution, so it can be easier to deform the mesh within the 3D model. Here is my process of the masking of the elephant within the class exercise:


Meanwhile I have been working on my character sculpture by smoothing, adding eyes and working on the arms using the curve tool with Bezier to line them up.

For the curves I watched a YouTube video to help me out with the arms and the worm I have inserted.
Blender Bend Object using Curve Modifier Blender 2.8 – YouTube
For this week we have been working on our 3D characters on Blender, getting some tips and support from our lecturers on how to improve/add in for character with shapes before moving onto the sculpting and adding final designs for our characters. Here is my 3D model which is still a work in process.
I tried doing the petals like how my lecturer did with the elephant ears in the last exercise which can be found on blackboard. The pot, head, and small petals were easy enough just like using Maya.


This week the bee team took a call meeting on discord to see each other’s parts for the previs animation. Some of us were finished to show to the others while 2 people got confused for what should be done for theirs. But all was good in the end so we continued to finish ours before we sent them to Dylan to edit them and send them off to Alec.
For final designs and products are still a work in progress but won’t take too long to decide on final designs and finishing products in the environment. For my part on the 3D previs, is scene 3 in that order and here is my wip with no sound:
Just crying in the corner for a short second time before sees the DJ set which makes him happy and gets the idea.
This week for 3D Literacy we had learnt about character blocking and sculpting pipelines for 3D characters. That we always use shapes and references while using geometry when sculpting and that each form is simple with rough shapes, big shapes small details. I had watched Mikes videos on the introduction on sculpting with it came to sculpting shapes, heads and a full character.
In the meantime I had drawn my concept ideas, character designs and my final design for the assignment 2 cute character model. Here are my concept ideas:


It was difficult to choose but I went with the flower character and its finals design.


This week for 3D Narrative since university was closed for St Patricks day, we watched videos for rigging, blendshapes, parent constraints and expressions on Maya. I took one of the exercises to do this week that was the parent constraints.
Apart from exercises I have been working on my animatic for my 3D project with my team.
I also worked on 3D modelling on one of the bully bees for the project.


For week 7 in 3D Narrative we were introduced to 3D rigging in Maya. We were taught on how rigging controls models and sculptures into puppets for movements of animation. We had practised in class with rigging with the a tentacle and Ferris wheel and learnt about the skinning and joints.
For my exercise I had to do a ultimate walker jump this week using Alec’s videos to help me through the process.
For week 7, we were introduced to our assignment 2 coursework and Blender that we will use to create a 3D character for May. Using Blender is a new beginning for me just like with Maya but has more buttons and controls to sculpt a character. It was confusing at first, but I know that I will get the hang of it in the next couple of weeks while doing exercises from Blackboard.
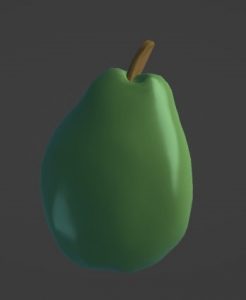
For my exercises this week I had to sculpt a pear and pepper bell using Blender. I tried my best but I think it went pretty well for its a start for this semester.

Throughout half of semester 2 in 3D Literacy, I want to reflect on my work and exercises within these 6 weeks of 3D modelling along with the assignment 1 and Maya.
At the beginning of this semester, when all us were starting with 3D modelling and introduced to the Maya software, I felt very nervous and unsure as it was my first time creating with 3D modelling and animation as I always preferred the 2D. While 2D is hand-drawn in a sketchbook or on Krita/Photoshop software, 3D still required concept and references from the internet. Throughout these weeks on working on assignment 1 and doing exercises it was starting to feel natural for me as I went along with the UV maps, textures and creating models which I thought looked complicated. Watching the lecturers tutorials gave me the help I needed to go though each exercise and help with my assignment 1 project.
Although there were drawbacks to 3D modelling as well as finishing the final project design, that I have learnt for myself during this course. For starters, it was very time consuming when it came to the modelling stages, mistakes were made with the edges or faces as it became frustrating to fix and get right and finally it also took up a lot of storage space within my laptop desk.
For my Assignment 1, we were introduced to 3D modelling at the start of semester 2 in 3D Literacy. We were instructed to create one 3D model, using UV wrap, texture and render the model which would be either a windmill, magic staff, treasure chest, sword and shield, old well, sci fi helmet or a cuckoo clock from our choosing. For me I created at least 5 models for this assignment as it was tricky to pick one of them, however I narrowed it down to the windmill model adding the treasure chest I have done. Here are shots through the process and references I used:


I also added in a treasure chest model with references that I added to my main project


It was an interesting experience with 3D modelling using Maya for the creation of the model and using substance painter for the colour and textures. I used textures such as rust, iron raw damage, grass texture and ship wood for my models creation.
Full version found on sketchfab
Windmill model assignment 1 – 3D model by LaurenMaxwell3 (@LaurenMaxwell3) [570f45f] (sketchfab.com)
This week I had my one to one tutorial talks with lecturers Henry and Alec. On Wednesday Henry gave me pointers on my 3D windmill model when it comes to 4 sides to a polygon and creating other objects like a fence or a treasure chest to fill in the space around the windmill.
On Thursday Alec was seeing how our bee group project was going and if there was any worries this week or on the project. The discussion went well and I just said I would be focusing on assignment 1.
Here are the five models I had done this week and had picked one of them for my final product.


