Archive of ‘3D Digital Literacy’ category
For the summer I have been watching videos on Blackboard talking about the walk cycles from 2D to 3D. I will talk about the 2D first with two walk cycles I’ve done. For the 2D animation I had a small bit of knowledge with frames and different poses for the character when moving then being a still image. After looking on 2d animation on blackboard by Sarah and watching LinkedIn learning with animation tips, I became familiar with the walk cycle and tried doing two sperate work for it on Krita with the number of frames used for each pose like an animatic.
The first practise
The Second work
The first was a practise to working on the layers and movements from the legs where one is shown in the light and the other in it’s shadow.
For the next one I chose one of my original characters with the arms, legs, hair and skirt. The arms and legs where easy enough and doing the skirt was simple as I watched on LinkedIn learning tips for fabric animated. I also added in some colour for the skirt and nose as a simple practise with the colour as well for the skirt to show it flowing.
Now the 3D animation walk cycle was used on Maya with a rig from blackboard called the azui.rig. Totally different from the 2D animation cycle where we used 32 frames and we didn’t have to draw. Watching Alecs videos helped me through the process to understand about the curves, rigs and motion of the character when walking. I couldn’t get the texture colours displayed on the rig but everything else checked out perfectly in the end.
This semester with 3D Digital Literacy has been very creative and diligent with 3D while using the software Maya, Substance Painter and Blender for creating the our characters. This assignment 2 is just like the previous when we created objects and sent them off to Sketchfab however this time we used Blender that was very handy and interesting as it opened my mind on how Maya took basic shapes and polygons while Blender was flexible and gave us so many options to create our cute characters. Overall the assignment was very enjoyable but there was some issues with the retopology/UV in Maya and Substance Painter.
The Retopology was very time consuming in Maya and there was times that an objects UV did not show when it was topologized so I had to do it manually which was time consuming. Also substance painter had to go through multiple updates which I had to patiently wait for it to finish. But I managed to get it done in time, I’ve learnt that I maybe have to get better equipment or make sure everything is updated. It became much easier to do the work while watching the videos on blackboard to help me out on any issues I had or had been stuck on.
Here is my model uploaded to my sketchfab website which I have done over the weeks up till today. Watching the lesson content videos on blackboard from Henry and Mike has really helped me out over the weeks with creating my character. Using Maya and Blender was a fun experience.

Here is my UV from doing the retopology which now I fully understand other than last assignment from re-watching the previous videos on UV located in blackboard to get my head around it. My substance painter kept shutting down so I couldn’t send any pictures of my work on painter but my models are uploaded onto my OneDrive.

Textures and models are onto my OneDrive for here is the link
3D Digital Literacy Assignment 2
Here is the link to my sketchfab website
Cute Character Flowery Assignment 2 – 3D model by LaurenMaxwell3 (@LaurenMaxwell3) [eb33cfb] (sketchfab.com)
For week 12, it was our last week before the Easter holidays where the lecturers would give their guidance for our assignments before submission in May. On Wednesday in 3D Literacy we were going over our models, for I was at the retopology stage when Henry gave some tips to do it faster by using a shortcut or just to do it manually. i decided it do it manually on Maya so there would be no problems with the software.
On Thursday I was not in but I had recorded my part for the PowerPoint presentation for my progress on models and previs. My team informed me what changes had to be made to my animation pre-vis part, the summer practise that was added onto blackboard and what we have to download for semester 2. Furthermore I am working on both projects up to early may so I may submit my assignments on blackboard.
For this week we had learnt on UV mapping and had a sketchfab recap like what we have done for assignment 1 models. For this we learnt on what we had to do after the retopology on Maya and move onto Substance painter before sending it off to Sketchfab before release.
Here is where my blender project has finished with my character, before sending it off to Maya.


For my progress on my character I had saved it a Fbx and moved into Maya ready for retopology.

I watched the lecturers and other videos on YouTube to help work on the retopology faster for my work with Quad draw on specific areas like the arms or petals.
37 – Maya 2015 – Continued Work with Quad Draw – YouTube
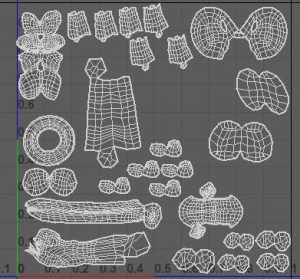
For this week we learnt about Retopology which is used for the masking for sculpting characters with polygons from having a high resolution to a smaller resolution, so it can be easier to deform the mesh within the 3D model. Here is my process of the masking of the elephant within the class exercise:


Meanwhile I have been working on my character sculpture by smoothing, adding eyes and working on the arms using the curve tool with Bezier to line them up.

For the curves I watched a YouTube video to help me out with the arms and the worm I have inserted.
Blender Bend Object using Curve Modifier Blender 2.8 – YouTube
For this week we have been working on our 3D characters on Blender, getting some tips and support from our lecturers on how to improve/add in for character with shapes before moving onto the sculpting and adding final designs for our characters. Here is my 3D model which is still a work in process.
I tried doing the petals like how my lecturer did with the elephant ears in the last exercise which can be found on blackboard. The pot, head, and small petals were easy enough just like using Maya.


This week for 3D Literacy we had learnt about character blocking and sculpting pipelines for 3D characters. That we always use shapes and references while using geometry when sculpting and that each form is simple with rough shapes, big shapes small details. I had watched Mikes videos on the introduction on sculpting with it came to sculpting shapes, heads and a full character.
In the meantime I had drawn my concept ideas, character designs and my final design for the assignment 2 cute character model. Here are my concept ideas:


It was difficult to choose but I went with the flower character and its finals design.


For week 7, we were introduced to our assignment 2 coursework and Blender that we will use to create a 3D character for May. Using Blender is a new beginning for me just like with Maya but has more buttons and controls to sculpt a character. It was confusing at first, but I know that I will get the hang of it in the next couple of weeks while doing exercises from Blackboard.
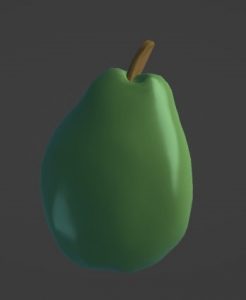
For my exercises this week I had to sculpt a pear and pepper bell using Blender. I tried my best but I think it went pretty well for its a start for this semester.

Throughout half of semester 2 in 3D Literacy, I want to reflect on my work and exercises within these 6 weeks of 3D modelling along with the assignment 1 and Maya.
At the beginning of this semester, when all us were starting with 3D modelling and introduced to the Maya software, I felt very nervous and unsure as it was my first time creating with 3D modelling and animation as I always preferred the 2D. While 2D is hand-drawn in a sketchbook or on Krita/Photoshop software, 3D still required concept and references from the internet. Throughout these weeks on working on assignment 1 and doing exercises it was starting to feel natural for me as I went along with the UV maps, textures and creating models which I thought looked complicated. Watching the lecturers tutorials gave me the help I needed to go though each exercise and help with my assignment 1 project.
Although there were drawbacks to 3D modelling as well as finishing the final project design, that I have learnt for myself during this course. For starters, it was very time consuming when it came to the modelling stages, mistakes were made with the edges or faces as it became frustrating to fix and get right and finally it also took up a lot of storage space within my laptop desk.