There was a 2D workshop this morning with Dan Wilson who showed us his works with circles and animating shapes on after effects. Some tasks were easy but had lots of controls, tools to follow and he did speak fast during the first half of the lecture which was hard to follow.
The second half of our session had our lecturers during our tutorial talks wit Aodhan. I showed Aodhan my intro for the first part of the storyboard since I couldn’t squeeze it in for the pre – production. I also showed of my gestures of the boy (more than for final design sheets) which Aodhan thought they were really good since I explored the facial expressions of the boy and asked me to do a scare o meter to show the boy’s sacred face from 0% to 100% from having a heart attack.
For this month were focusing on experimenting and recognizing the art style of our project with the hybrid animation and both 2D and 3D art styles that will perfectly match in sync. Here is the gestures I done this week including the storyboard intro. From the gestures I fully understand what I would have to when redoing the boy on the character sheet to avoid it looking flat and stiff to the viewer.
This week our group had presented our Pre – Production Presentation of our short film ‘Is Somebody out there?’ to show off the progress we had done to 7 weeks. Sarah and I spoke for our presentation with Dylan clicking the screen to the next slide. We briefly recapped our finished plot which Sarah wrote, the style and other animations were taking inspiration from and other short films to fit the horror genre of our short film and the style of animation we are going for which is hybrid animation of 2D and 3D animation.
I had talked about the character designs of the boy, the father and the creature each represented by a specific shape with colour schemes and inspirations and research from other characters that fit our characters personality. Dylan worked on the layout and environment of the cabin on the rooms hallways and doors of the environment and the 3D previs of it on Maya.
We also did an asset list of what it would be included for our short film like significant prop assets, furniture, the environment outside and finally what will be in 2D and 3D. (I did a 3D model of a pumpkin or simply known as a jack o lantern. I shown my research on jump scares and building up suspense which we are going for 2 suspense scenes and 3 jump scares for short film for this time.
Sarah had shown off the first 2D animatic in her style to show what we are aiming for and how to greatly improve our animatic/previs. We then showed our storyboards which I had created to fit the art style we are going for which includes the middle and ending parts. We then mentioned the software’s we will be using for the project and finally redid our schedule of the timeline of what we should be doing.
Lecturers Review on project
Overall good and a bit better to the pitch presentation from October with some things covered compared to the last presentation. First was us finding someone or selecting music for our sound design which we did not add into the film, the pacing of the short film as what will be quick paced and what bits will be slow, the pipeline of our production and finishing off with our pre – production stage. Also some references they mentioned with die hard in the elevator scene and smiling friends for reference for our main project to look at. With our storyboards I had made, they had some comments on some scenes an specific moments with the camera angles for third person, zooming out instead of rotating and some scenes needed fixing. They also said to include gestures for the boy and the dad when it comes to line of action and to improve drawings of the character design sheets. They also made comment on Sarah’s animatic which did not match the style of the storyboard itself.
After the talks I wrote down notes from the presentation on what I should focus and what needs improvements. So talking with the group and our roles on fixing, I focused on the intro of the storyboard and gestures of the boy, Dylan with the environment and picking colour schemes of the project the layout of the cabin and Sarah starting the experimentation stage for the production.
We were briefly recapped on blogs and especially our reflective blogs for this semester’s major project which should cover our research, artistry, techniques/planning and we’ve used communication between team mates. For our major project we have to focus on our idea, pre production, production, post production and our portfolio pages.
This really gave me a new insight to my blog and what should be changed and added onto it. That I should always add my opinions on the lesson on what I have learnt, what the lecturers had explained in our lessons and evidence on what we have done for our projects/lessons. It gave time to reflect and go to my previous posts to make sure everything is clear and concise for my major project and essay.
For our pre-production stages and before having our presentation for week 7 I took the time to model a pumpkin for our major project being the 3D element for our environment outside the cabin. Here the link to the reference I used to help me model a 3D jack o’ lantern.
Following the videos guide was a bit hard sense I had to remember certain controls and keys while modelling and it was very fast to follow. But I was able to follow it and model the pumpkin and fix the UV of the pumpkin to showcase for next weeks presentation on pre – production.
Here is the result.
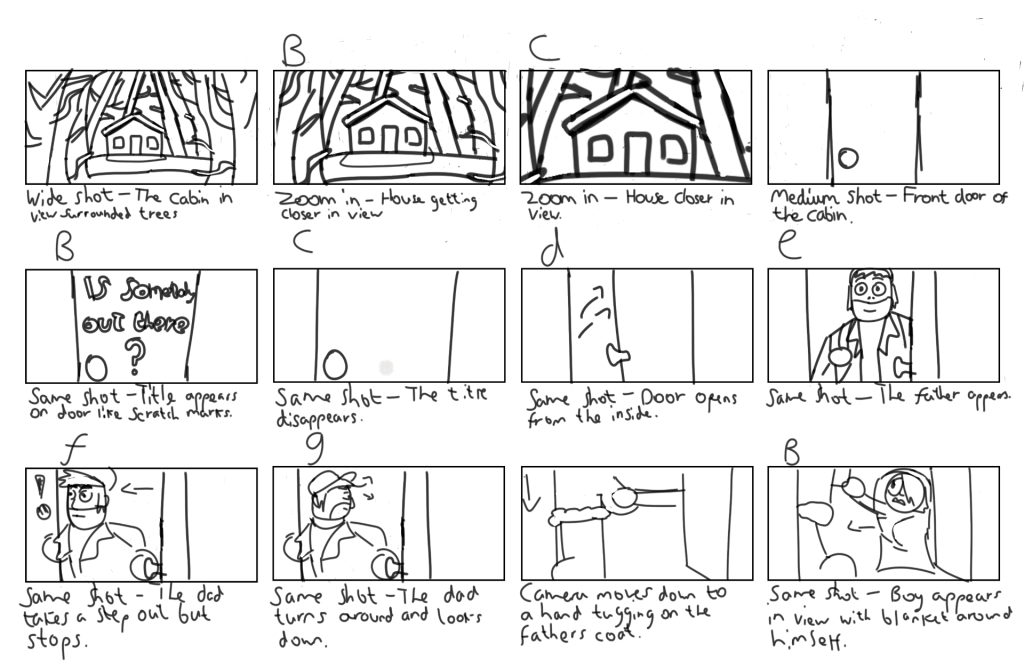
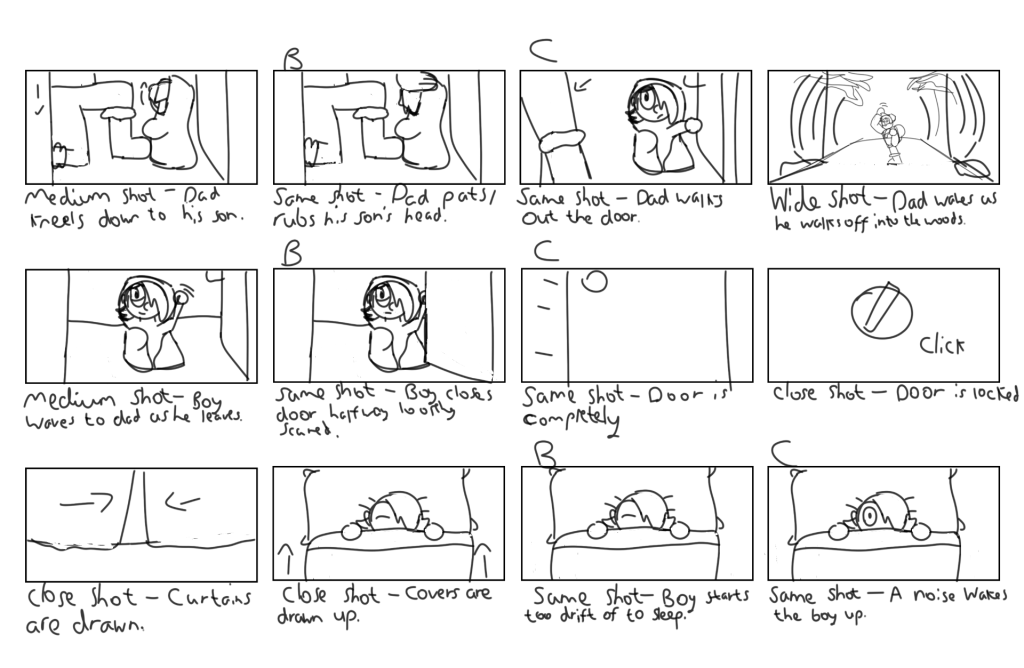
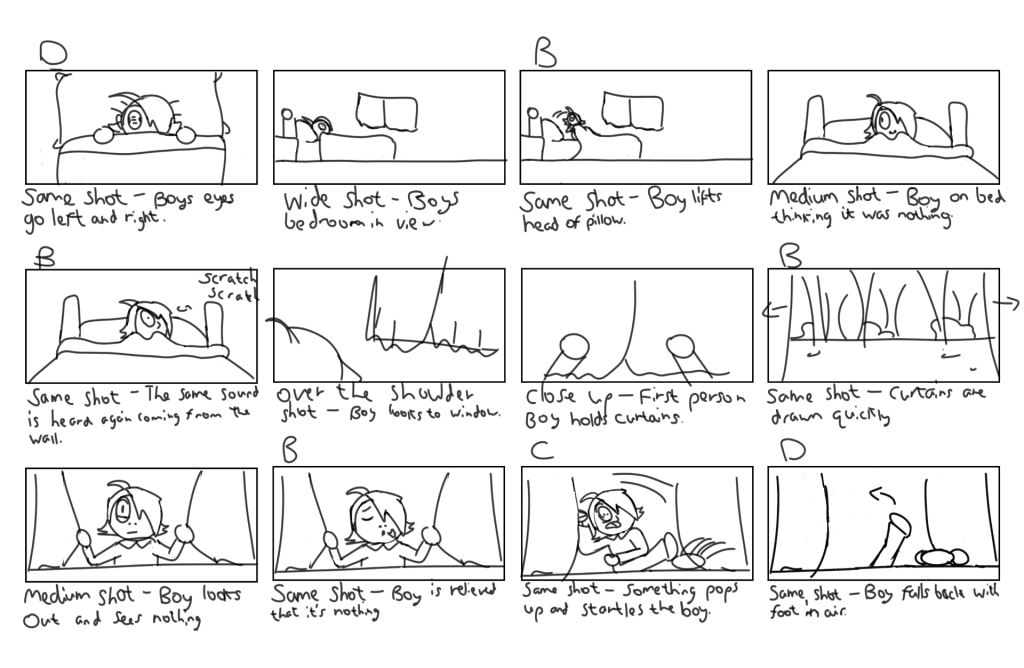
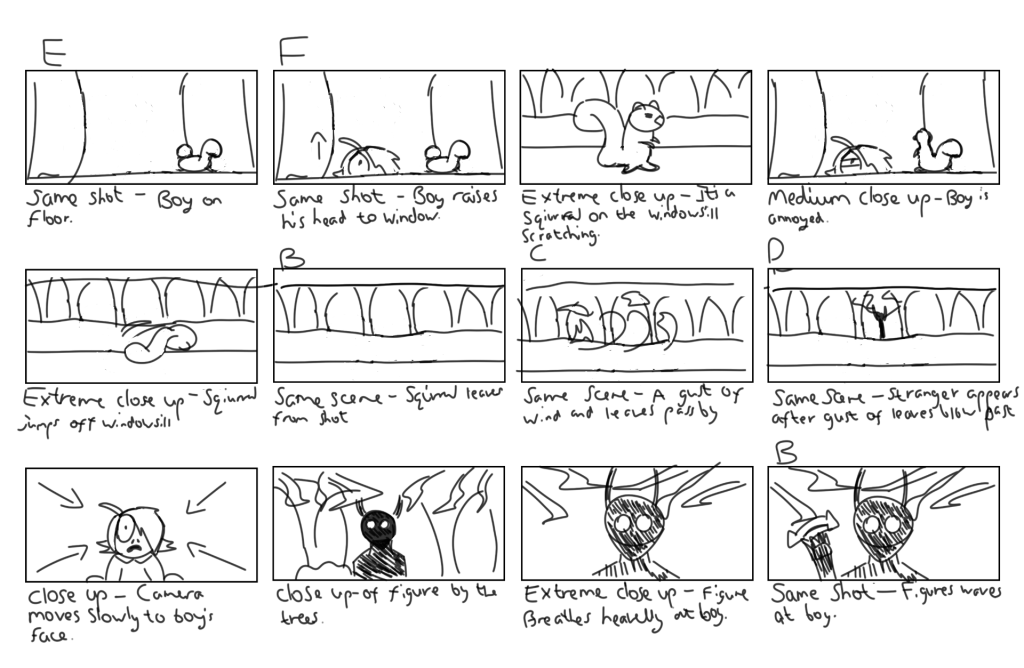
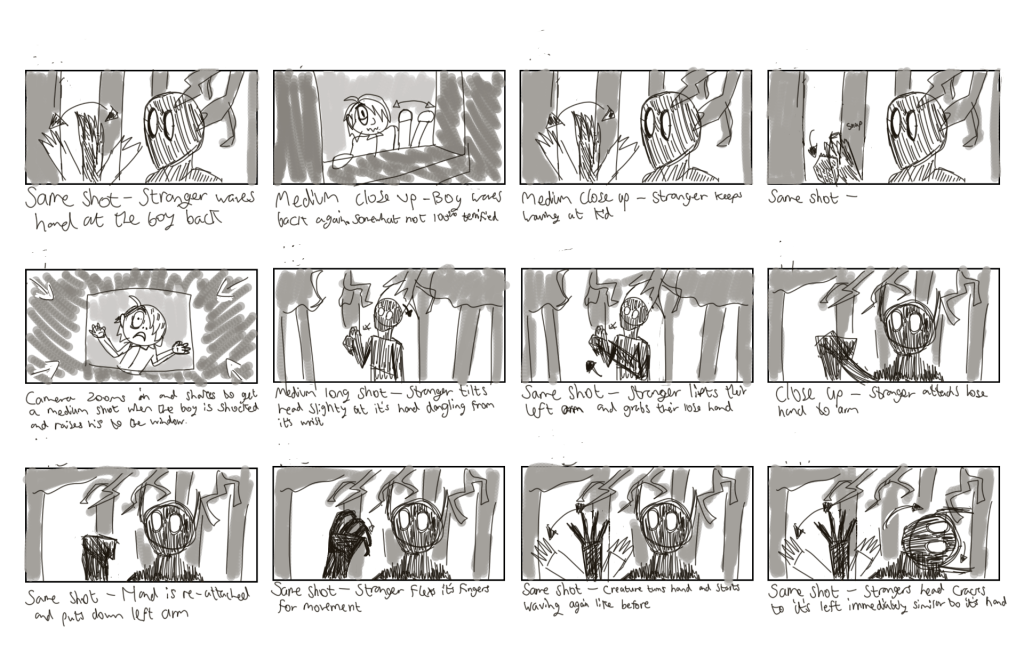
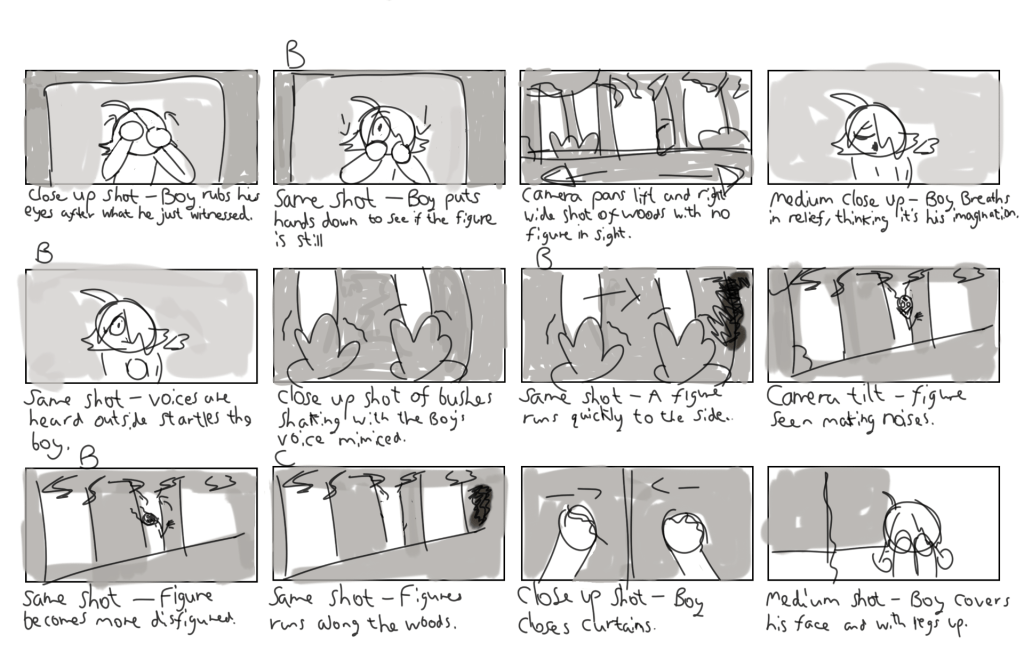
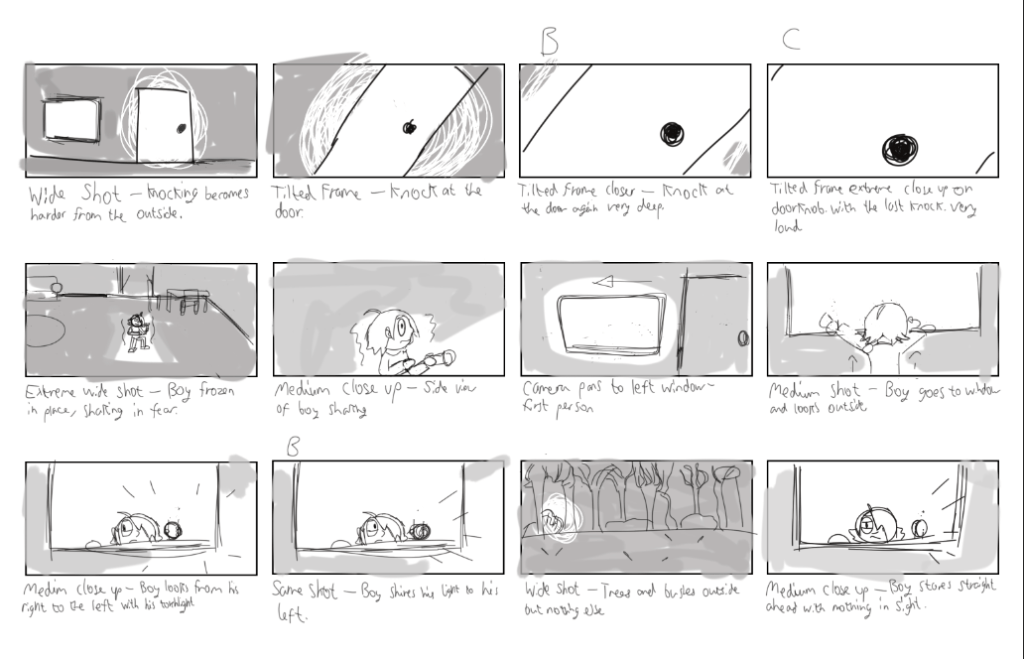
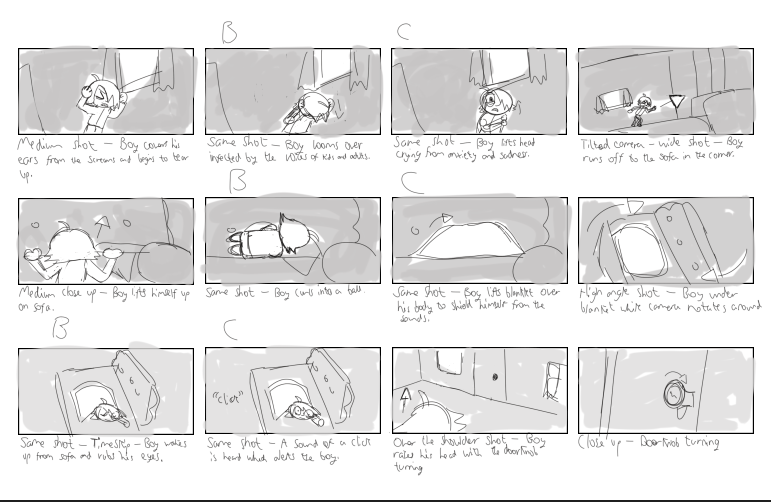
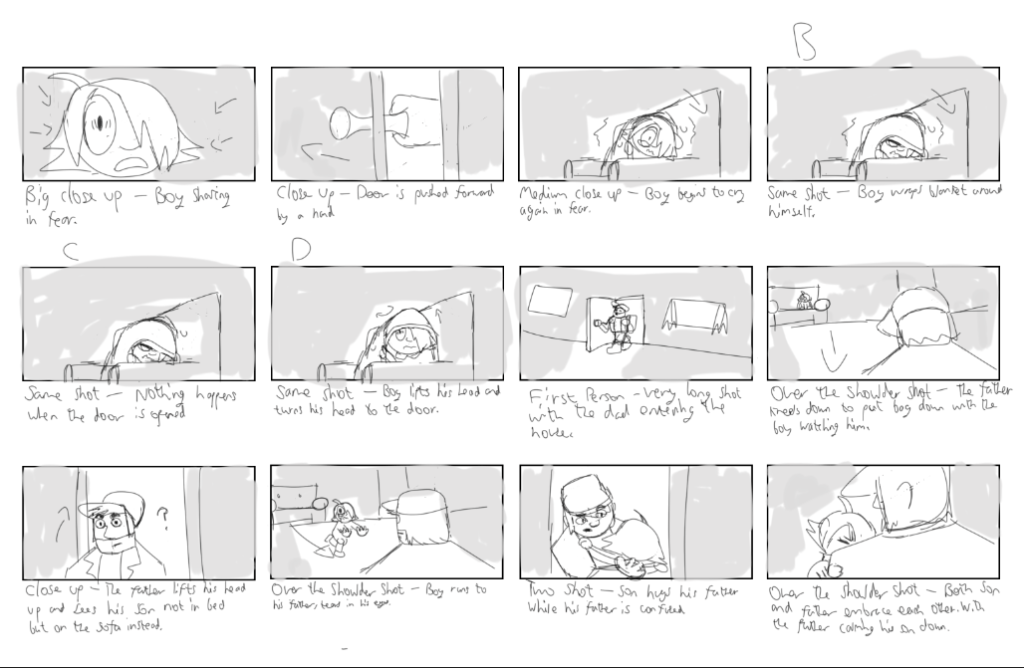
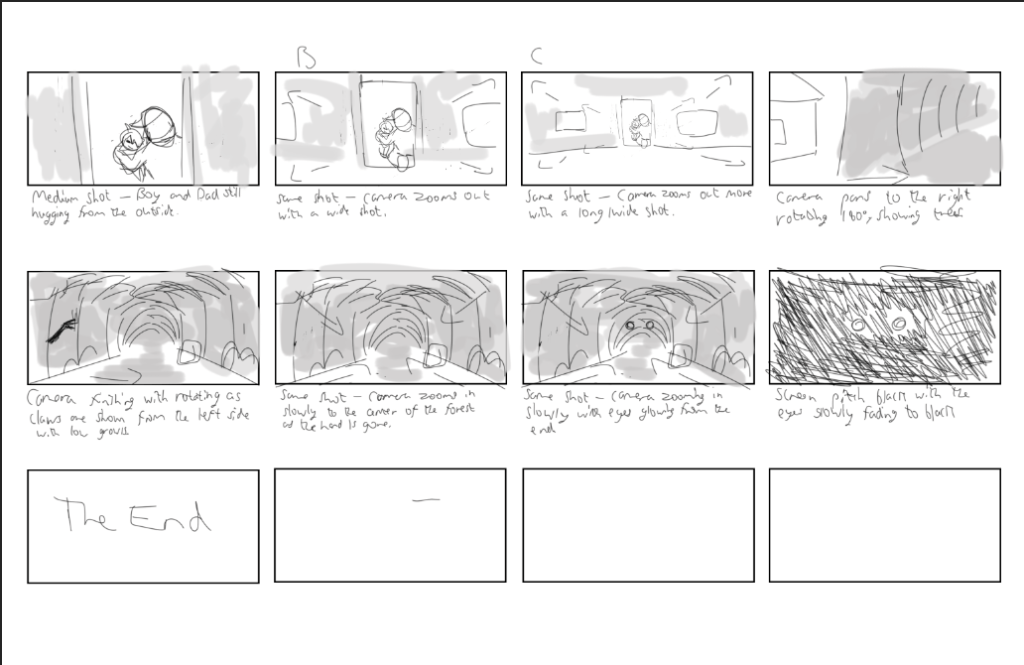
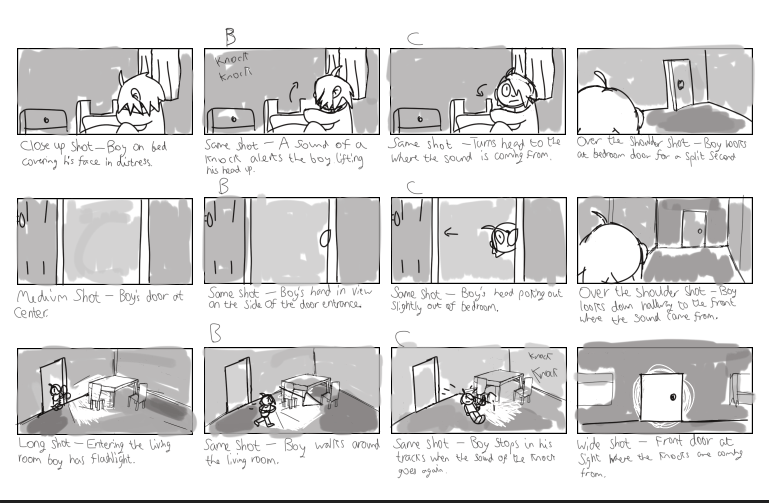
I also took time to create character design sheets for the father and son with references I had collected from other multimedia shows and movies to build the characters and work on the middle and ending part of the storyboard this week to experiment with camera angles and use the layout of the cabin which my teammate Dylan had modelled for the proper layout of the cabin.
Took a lot of time for the storyboards and experimenting different camera angles and perspective which my lecturer Aodhan talked about the story and to make it feel less comedic.
This weeks lecture involves the experimentation and ideation of animation which Henry went over for Tuesdays class. He talked during the lecture about:
– Defining Pipelines
– Research
– Reference!
– Identifying methods and processes
– To achieve art style
– Learning & Developing techniques and skills
– Identifying risks
– Strategic Planning
– Identifying and Developing resources
– Recycling resources
Contrast
Key element for visual legibility • Contrast is achieved in different approach • Some overlap • Independent factors
Colours
• Colour Theory & Psychology • B&W • RGB = 100 • Indication of saturation and luminosity • R = 30, G = 59, B = 11, Y = 89, C = 70, M = 41 • Vibrance Saturation • Perceived Brightness
Composition, Lighting, Storytelling, Framing, Leading lines, Contrast, Shape Language, Repetition, Level of Detail, Scale and Dynamism.
3D vs 2D
• Identify your Tools • Weaknesses / Limitations • Strengths / Efficiency • You have experience in both – Use it! • Do not discard an ideas because a complex technical skill • Research • Ideate and Experiment • Find solutions • Work non-destructively • Don’t be intimidated by procedural workflows • Don’t be intimidated by node-based systems • Feedback – Adjust – Feedback – Adjust – Results • Keep learning
Resources and Advice
• YouTube
• Community Forums
• Other Social Media
▫ Twitter / X
▫ Facebook
▫ LinkedIn
▫ Art station Portfolios and resources
• Documentation and Sample Files
Reverse Engineer Sample Files
• Libraries and Recyclable assets
Build your Libraries 2D and 3D
Learn to build Custom Brushes
Understand Masks & different types of texture maps
Resources & Advice
• Build simple projects with block outs and
premade assets and test!
• Don’t be afraid of Software. It’s just a tool
• Understand the pipeline
▫ Embrace Ambiguity in the early stages
▫ Adapt to ambiguities and investigate
Communication
• Find Solutions
▫ Even if it means using different mediums (3D
and 2D)
▫ Always go back to the script and consider the
end goal.
This weeks class had recapped the things I already know but the importance from each one to help with my major project since my team and I are going for a type of hybrid animation. Communication is vital and gaining our resources for experimentation with the 2D and 3D animation. For this week I took time with my group on character design, collecting more references and working on the storyboards with Sarah’s script. I took this time to gather some movies and short films with the best jump scares to add into our short film which involves amount of suspense and jump scares which would make the audience shake with fear as I had to narrow down the inspirations for our four minute short film and out them on our Miro. There it took some time but I managed it quite well picking the ones I knew and what others on YouTube think are the best jump scares to fit within our script of the story.
The morning session with Alec had been an recap what we learned the years before which involved the 3D previs which is the previsualisation of creating a scene like a 2D animatic but in 3D. For we have to keep things simple for the narrative, consider the music/sound used, use free rigs, considering camera focal length, visual contrast and after effects for editing.
We had learnt more with camera movements with the virtual cameras which move like real cameras but can’t at the same time. So try to keep things based on the real world by studying cameras and editing references to experiment and to have fun. So we must remember the types of lenses we use and camera movements and angles. For the morning, Alex gave us a folder on creating a previs for ourselves with the chase scene happening between the two on maya which was fun.
Sarah took over the afternoon class recapping the 2D animatics, storyboards and layouts with the use of cinematography/composition/perspective used effectively. The rule of thirds were recapped which serves as a guideline with it’s intersections to balance objects and characters using diagonal key points. The golden ratio with golden number, proportion and ratio by two numbers represented as a Greek letter which is found in nature and pleasing to the eye. There is also geometry and summary to craft interesting compositions, add visual interest, correct perspective, distortions and create balance.
There are also types of camera shots found which are
Close ups
Extreme close ups
Medium shots
Long shots
Very wide shot
Head shot
Two shot
Zoom in/out
Pan
Tilt
Crane
Track
Dolly
There’s also crossing the line [180 Degree Rule] – the onscreen spatial relationship between character and another character or object within a scene. The camera should be kept on one side of an side of an imaginary oasis between the characters while moving the camera over the axis which is jumping the line or crossing it. The rule enables the audiences to usually connect with unseen movement happening around the immediate subjects.
Continuity – The movement and direction is key to avoid unintended jumps cuts to lose the audience. Screen direction is critical. Natural reason for the character to suddenly look in another direction is a mistake to avoid. Attention to continuity also extends to reactive character sizes, positions, characters, camera movements anything that would create confusion shots.
Layout – After storyboarding, it leads to the creation of final backgrounds and shot compositions. Role of layout artists to design and create the stage upon which the characters and special effects do their magic. They are developed for storyboard panels and layout artists are required to have graphs of concepts such as perspective, compositions and level of detail. Layout artists should furthermore be able to think their environment in 3D space.
Perspective – Important aspect related to layout. It is what creates the illusion of space and enhances the principle of solid drawing. Perspective is also tricky to use and fully understand and takes a lot of practise to perfect.
Scale in layout – Mastering scale in layout is difficult and takes a compositional eye as well as an understanding of perspective. In digital animation levels can be replaced in layers. Different layouts will require different styles and number of levels.
Rules of layout scale – Different layouts will require different styles and number of levels.
Different layouts will require different styles and number of levels. Different layouts will require different styles and number of levels.
Layout Composition – Composition in terms of layout is structing the scene and its components to highlight the story in a deliberate and conscious manner. It deals with the overall structure of a scene and manipulates viewers into looking where ands at what you want them to focus on. It not only deals with placement of character but with props and settings as well.
Be careful of tangents – Especially circled above to be avoided, completely destroy the perspective and the illusion of space. Avoid it, especially masters when it comes to the horizon line.
Be careful with placements – Try not to have large blocks of wide open space, everything placed on the background, mid ground or foreground.
Compositional Tips – Have something in each place (background, mid – ground and foreground). Consider the composition of every single item you draw in your layout, even down to small details such as fallen leaves or brickwork.
Alternative Angles – Snake like serpentine elements can be used to draw the eye across environments and frame objects. Similarly very direct converging points focus the eye immediately where you want the audience to look.
Be careful with dominant horizontal or vertical lines as they can lead audiences eyes off screen. In this shot the eye travels around the image but in a controlled manner which aids a sense of wonderment or of being lost. In this example the position and masses of objects causes the eye to jump from object to object.
Positive and negative space – Be careful with dominant horizontal or vertical lines as they can lead audiences eyes off screen. In this shot the eye travels around the image but in a controlled manner which aids a sense of wonderment or of being lost. In this example the position and masses of objects causes the eye to jump from object to object. Often no character will appear in the scene. In these instances particular attention should be paid to the negative space. In this example every layer of the cave is a negative shape and care should be taken in designing each one to ensure a composition which is pleasing to the eye and does not dominate.
Framing – In this example the brush hose and boots lead the eye away from the focus on the main characters. This can be improved by pointing the hose and boots inwards towards the characters and by adding the brickwork which narrows the scene and helps focus. This is what can be called a framing device.
Techniques for generating compositions
Silhouettes
Storyboarding
A solid base
General Rules –
MOVEMENT REFERENCE IS KEY – ACT IT OUT OR FIND VIDEO FOOTAGE
Don’t be too precious with the storyboard panels – expect them to change
Focus on capturing the movement and story
Stick to greyscale to speed up the process
Create an animatic as soon as possible
Test storyboards and animatics with people who aren’t familiar with the story
It’s great to learn this all again like in first year knowing what we have to look out for our major project.
Our pitch presentations had been presented for this week in class with our current ideas including what we had worked on for the last 3 weeks with our team members or others who had done the work individuality. Our pitch presentations included the art styles we were leaning towards the project, references/inspirations for the characters, environment and assets within the project and timeline on both semesters this year.
My team which includes Sarah Elliot, Dylan Short and myself presenting our horror short to the class and what each of us had done for. For myself I had done the main character in different versions and my team went for one design with the references and inspirations from other characters appearances and personalities for being a timid, scared little boy around 8 to 10 years old.
I also helped Sarah with the concept art of the monster creature with references/inspirations from other evil, mythical and dangerous characters. I worked on a bit of the middle part of the storyboard to show an example for one scene with shows the characters first interaction with the creature. I also collected references and other inspirations from short films which helps explore the horror/supernatural were going for. Here is my work which I included in our slides;
Our lecturers give us some feedback on our project, certainly with the hybrid art-style, the plot which should have the ending, the beast character design and finally the appearance of the creature showing up only midway.
This week we learnt about scheduling and what it is as it will be vital to our major project this semester. How we must handle our budgeting, time management, time in production and finally overlapping like a waterfall with everything to keep the scheduling full. We must also plan the development of the project with the main idea, the script made, research (visual/context) and concepts.
Focus on the pre-production on designs, storyboards of the story and appearance of characters, animatic/3D previs and dialogue. Then the production with character rigs, animation, backgrounds/assets, VFX/simulations and lighting/rendering. After that would be the post-production with editing, compositing music/sound FX and fixes to any mistakes found out.
The first act of this would be to break down the schedule with working with the start, middle or end or start from backwards. Getting dates sorted and due dates for each task at hand to finish by. To work on the frame count per day by blocking, animating and fixing. When it comes to a short film it must have one person or a team working on the project, discuss how long the the pre production will take, to make characters, how long to render the animation and how long to animate the project.
To calculate the 20% buffer with sick/holidays off work or any family emergencies that has occurred for the individual. Other assignments or modules to work on with the major project and essays for the creative futures and dissertation. Finally any documentation for the work blog on on the website.
We were introduced to Chris (Chriswastyping) who handles sound design for short films and how he’s always free to help us add his sound to our short films. We then were introduced to time management tools such as;
Todoist
Wunderlist
Goggle Calendar
Microsoft Outlook
Toggl
Rescuetime
Trello
Asana
Focusbooster
Pomello
Other note taking apps include;
Evernote
Onenote
Eisenhower
Getting things done (GTD)
Streaks
Habitica
Google Calendar
Clockify
Team Management is vital when working in a team as we must discuss conflict resolution strategies that includes;
Talk
Clarify roles
Collectively assess task importance and deadlines.
Implement regular team meetings, encourage active listening and clarify expectations.
facilitate a brainstorming session to explore different active ideas.
Encourage open minders and compromise or consider combining elements from each vision to create a unique solution.
Review the project timeline and make adjustments if deadlines are unrealistic.
Distribute tasks more evenly, and provide support to reduce stress.
Balance life and work
Work/life balance
Routine
Perseverance
Take a break/get up
Marathon (occasional/sprint)
Keep notes/annotations
Show talk to people about the project
For our activities we had discussed what we will be doing for both semesters on our major project and what to focus on before the week of our pitch presentation. Here is the first draft of our time management of both semesters.
I had two meetups with my team on discord from Wednesday and Monday when finishing our pitch presentation before the Tuesday and what we have contributed for it.
We had started our first week back. With our modules for our final year recapped by our lecturers and what we will be learning this year especially for the major project.
They explained that we will be put into groups and we working on our main project which would be worked on over the two semesters this year with one idea in mind. We had seen examples from the previous years work’s, must say they were astonishing and gave us some ideas for our projects. They informed us that we would be having a pitch presentation on Tuesday 10th October which would showcase our work towards our major project such character designs, storyboards, references-inspirations, art style of animation, environment, concept art, colour scheme, software we would be using for the project and the theme.
By the end of the intro we quickly formed groups which should only be between 2 to 5 people in the group. I formed a group with Dylan Short and Sarah Elliott. We came around an idea which follows the theme ‘horror’ which follows a little boy in a cabin in the middle of the woods waiting for his parent to be back with the fire wood however, he’s the only one in the woods when a mysterious figure is lurking around the house in the shadows, for this boy finds out this isn’t a person but a monster from his deepest nightmares that any child is afraid of becoming real.
By our first week we took things slow but were able to come up with ideas for the plot, the setting and location and what kind of creature the character is dealing with. For this week we decided to think only on the plot before our second week.
For our induction week which took place on the Monday 18th September, we were introduced to the first and seconds as well as our modules this year. We were sorted into mixed years with the 1st and 2nd years which Connor Presley and I Lauren Maxwell as 3rd years with other years such as Oliwia Zembala, Sarah Dobson and Felix.
Our task for the week was too take photos of our surrounding areas with google plate eyes to make objects and props look alive. After collecting our photos and posting them on discord we quickly took the characters and made them feel alive by adding expressions. It was a fun activity for the week for all of us. Here is my piece I have done from the past two days which I’m happy with.