For the animation style, I didn’t want to go for any specific style especially anything too exaggerated. I wanted to keep the animation style more basic. I think this helps improve my basic animation skills and also gives me practice for my idea of my final year project.
reference:
So for my reference I thought it would be best to record myself playing out the scene in the way I had imagined so that I had footage to base my animation off. The scene was pretty basic, I didn’t want to copy the original breaking bad footage exactly. However I did use the original scene as reference for the mouth animations as the footage is much clearer and its easier to see how the mouths were moving. There is one point of the dialogue; ‘You’re Heisenberg’ which is kind of hard to see the mouth. To get round this I just recorded myself saying that one line then slowed it down.
Development:
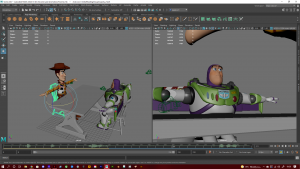
I first started out by laying out the scene, I imported the two buzz and woody rigs along with the table and chairs. Then just spent a bit of time posing the rigs and trying to set up camera angles. Once the scene was ready I started with the head movements of woody, so I took the reference footage and imported it into premiere pro, this allowed me to go frame by frame. Once I had the head movements down I wanted to finish the body animation which was just the pointing scene. I didn’t put too much time into the arm lifting as I knew I was gonna to make a slight cut to this later, so I mainly focused on the hand pointing. Next I went back and started working on the lip sync. I started with the shortest bit of dialogue then worked my way up to the longest. I used both of the reference footage to copy the mouth. Some of the dialogue was easy enough to match but other parts were tricky. The timing was hard to get right, I tried going frame by frame and and listen to when each sound was pronounced. Once woody was finished I created a new layer for all of buzz’s keyframes. I took a few more passes again to try and refine the animation. I then added some simply lighting and tried rendering, although in the Arnold preview I noticed a problem with the textures. Both rigs were extremely shiny so I went into the hypershade and change the reflectiveness of all of the textures.
Final outcome:
I’m not sure what happened to the colour in the final render, as the Arnold preview displayed a different colour. While the rendered clip seems over saturated. I also only noticed after the render that the textures for the table and chair weren’t working right. However I didn’t have time to try and fix the lighting and re render, but I think the final outcome was decent anyway.
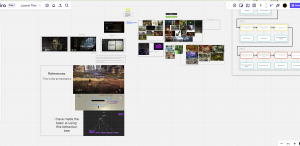
I was really excited when I heard we were going to be working with the game development course to create our own game. I’ve always been interested in that area and also considered choosing that course before I decided on animation. In our first week we were put into pre chosen teams and had to come up with ideas for our game. The basic idea of the game was a breath of the wild/ God of war type game but with a more Irish folklore theme. The idea went through many iterations and once we had a rough idea of the narrative we were ready to start planning the animation side of things. Once we had got a rough idea of our game; each member thought of a task they could complete that would fit our game and also ‘the room’ task which we had been given. I had decided to model a door that in the style of our theme that the character could exit the room through. Later on after class we had a group meeting over discord so we could talk further and start to get concrete plans. We also created a miro board so we could keep all of our ideas organised.
Models:
So before any of the animation members started work on models, we thought it would be a good idea to pick someone to be the ‘Head of art’, this would be Benny. The responsibilities of this role was to give the modellers a guide to what the art style should be, and how textures and models should look. Originally I wanted to go with a more realistic style as that is what I’m most comfortable with, but the rest of the team decided they wanted a more low poly look; Although this would end up causing me some issues. I had the idea in one of our group meetings to create a spreadsheet with a list of all of the assets with needed with various stages, eg concept art, model, uv, texture. This allowed us to keep a more accurate track on the progress of each model. Once the spreadsheet was finished we filled it with all of the assets we needed, I believe I was completed the most assets, again as its what I believe my strong point is.
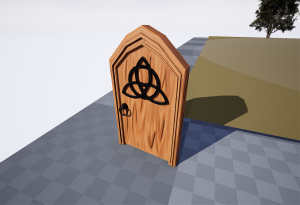
The first model I made was the door for ‘the room’ task. The door was straight forward enough. It was modelled in maya then textured within substance painter. I wanted to add a Celtic symbol to go with the theme of our game. To match our low poly style I thought it would be best to hand paint the wood texture on the door and frame as most materials substance had were more realistic. Dylan and Benny as later decided that we should just use Base colour and normal maps. Again in attempt to keep a more consistent style. Next I thought I should do the rock models as they should be easy enough and I could get them out of the way. I used some of bennys images as a guide and a YouTube tutorial to help me get the right shape. I created the rocks by first starting with a platonic solid shape, then changing the primitive to tetrahedron. Then adding some divisions and using soft selection to help create the right shape. After I had done the UV maps it was time to texture. So to give the rocks a low poly look, I used the same three layers for each. I started with baking the mesh maps and painting the uv’s grey. Next I added two fill layers, one with a slightly darker grey and one with a lighter grey. I then added a ‘soft dust’ mask on the darker layer and a ‘edges strong’ mask on the lighter layer to give the impression of highlights along the sharp edges. I then tweaked the properties a bit then repeated this for each rock.
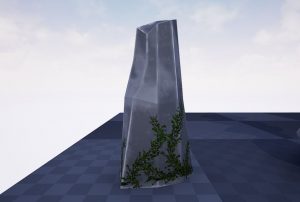
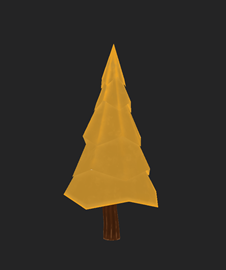
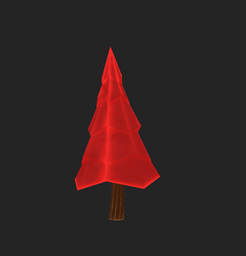
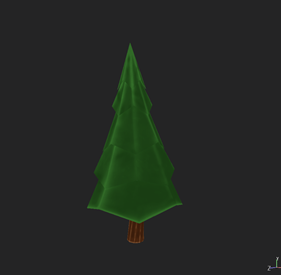
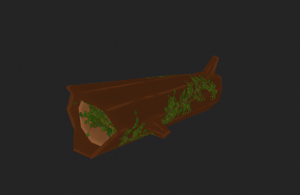
Next up was the trees. These were basic to make, I started with a cylinder and lowered the amount of divisions, then make multiple cuts across the cylinder. Scaled out the vertices shorter as they went up the tree to create the cone like shape for the leaves. I then made the trunk from a separate object and simply joined them together. To make the tree look more organic and give it a better shape I played with some of the vertices by scaling and twisting. The UV’s were straight forward then it was ready for texturing. I used the same idea as the rocks for this asset too. Again Baked the mesh maps then painted the wood on the trunk, then used two fill layers for two different shades of green. And again used the same masks on the layers. Using the same method of texturing help keep my models consistent. We discussed how we wanted the game to take place around autumn time, so I created four variations of the tree but for autumn colours. To give a bit more variation to the environment I also made a tree trunk by it self or ‘fallen tree’. This was also pretty basic, starting with a cylinder scaling, inserting cuts throughout then using the vertices to give it its shape. I also used the circularize tool to add some branches to the trunk. Once again I used the same workflow to do the textures however this time I added a ivy decal around the trunk, to give the impression it had been sitting there for a while. I think this helps give the environment a bit more life.
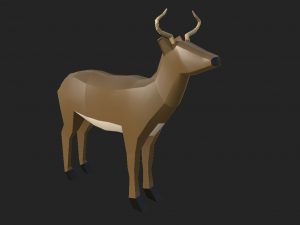
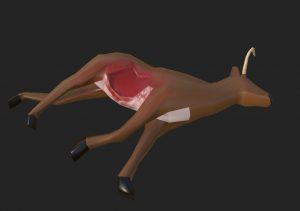
Now that I had the easier models out of the way it was time to start the deer model. I found the deer quite hard to model. I struggled to hit the low poly art style we were going for. I started by looking up a 360 reference of a deer and using it to create the basic profile of the deer. I then scaled the vertices along the body to try and achieve the right curves and overall shape of the deer. Again I used the circularize tool to add antlers onto the head. Once I was happy enough with the model I started to rig it. I was very inexperienced with rigs so I followed a YouTube tutorial for a quadruped rig. I thought the rig would be hard to create but I actually found it quite easy to follow. However I think my model could have used more topology around the legs as the model would stretch in an unusual way with the rig. In class I received some feedback on the rig and model of the deer. I was told to soften the edges of the model and told to use curves for controllers instead of shapes. After the rig was done I started to unwrap my model. This is were I ran into a problem, I kept getting an error ‘two polygons are connected by their interior edges’. I spent a while searching how fix the problem but nothing was working. So I sent my Maya to Alec to see if he could find the issue. While creating the model I accidently added a face on the inside of one of the legs. Once the face was removed I was able to continue unwrapping. The same texture workflow was once again applied here. I also created a second deer model but this time as a carcass. I simply extruded some faces and tweaked the vertices to make it look as if a chunk was missing from the deer and added blood in substance painter. Overall I think the Deer model is alright, it could definitely have stayed closer to our art style.
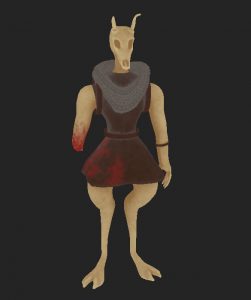
Lastly I created the enemy model. This is were I believe my quality of work really dropped. I had to make the enemy last as Benny was creating the concept art, although eventually she had to pass the task onto Nicole so I received the concept late. Originally I started making the model inside of maya. Once I had a basic shape of the creature I thought it would be better to sculpt it. So I used the basic model I had already made to give me a base to sculpt on top of. As I had never made a character before the sculpting process was a bit frustrating. I was using symmetry to help and getting the right shape was a bit of a struggle, especially in the hand. I think it just looks downright bad. I used a stretched sphere to build the fingers then sculpt and blend them together. I also thought It would be best to cut off one of his arms. I thought this gave the creature a bit more character. Next I took the model back into Maya, reduced the faces then retopologized. Now I don’t have a lot of experience with retopology and I was in a rush so I used to retopologize tool and save some time. This gave me a good but not perfect topology. Next I did the UV unwrapping which was straight foward then took the model into substance for texturing. Again this was straightforward, I gave the creature a bone texture to make it a little more like a skeleton and added some blood around the arm that had been cut off and dripping onto the clothes to give the impression as if it had happened recently. the last step was to create the rig. Because I was in a rush to get the creature done I used mayas auto rig tool to create the rig. It didn’t give me a perfect rig, some of the joints were in the slightly wrong place but I think its good enough for our purpose. There was a bit of weird stretching happening with some of the joints so I spent some time fixing the skin weights; like the joints they’re not perfect but will do the job. I think my biggest mistake with this task was trying to rush it. I think I could have produced a much cleaner model and rig if I had taken more time with it. I didn’t want to mention every problem but I did run into quite a few issues while trying to make this model, most I was able to find a fix for by searching online.
Door:
Rocks:
Trees:
Animals:
Team:
Our team was made up of 10 members. Karl, Dylan, Nicole, Jessica, Eamonn, Ben, Benjamin, Benny, Fionnula and me. Overall I think the team communicated pretty well throughout the project. Some weeks were more productive than others, but we still managed the achieve most of what we had set out to do and on time. Most members of the group carried their fair share of work for the game. We had a good collaborative way of working, through the discord server, google drive, spreadsheets and miro board. However I think there were a few things that hindered us.
Conclusion:
Overall Im not really sure how to feel about this assignment. There are areas of my work were I definitely could have done better. I don’t think my quality of work was up to the level I wanted, I think this was due to me struggling quite a bit with keeping a consistent low poly art style throughout my work and other team members works. My enemy model is something I definitely could have done better with. This is a area I need to improve upon, especially for working in a team in a future job. I also found it a bit difficult to work in such a large team, however project to work on and gave me a rough idea of what its like to work within a game development team.