Here my Content Audit I sketched out for my Portfolio site. This the break down of the content that I will add to each page on my site.
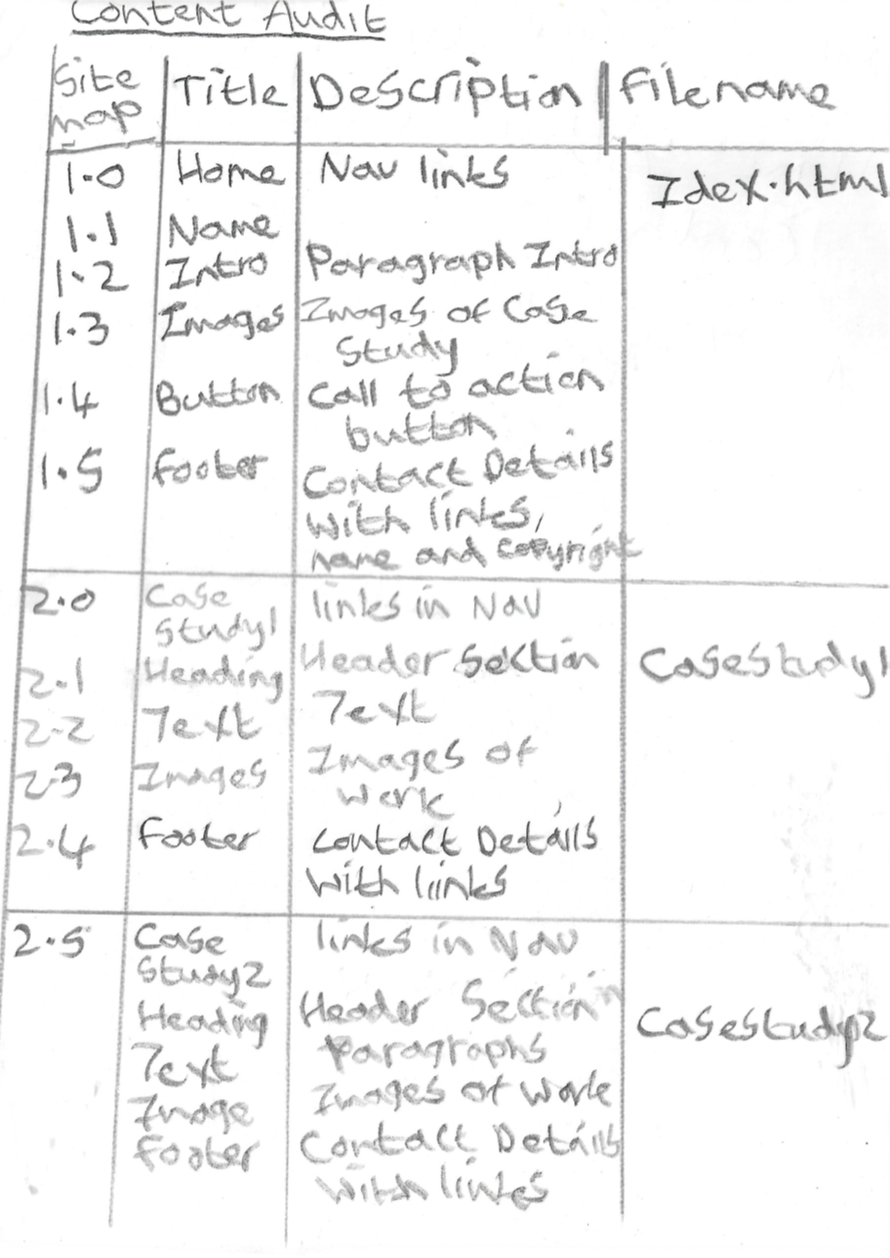


Here my Content Audit I sketched out for my Portfolio site. This the break down of the content that I will add to each page on my site.


Before I started designing my Portfolio site I created a site map. This will help me plan and structure my site. In my site maps I included links and information I wanted to have in each specific page on my site.
The topic we covered today in class was Usability Testing. A list of books we should look at are:
When designing any product make sure it is simple and makes sense.
We then looked at what specifically usability is.
Testing
Screenflow or Quickflow can be used to test people through recording.
The types of testing are:
Usability Metrics
Make sure you Run a test script
Write Pre and post test questions. This can be a survey or questions.
Sus is another way to test users. Anything above 68 in a Sus is a good score.
You can evaluate people who use your website. Sus can be done through calculating using a spreadsheet
After test review
Reservoir of Goodwill
Increase Goodwill
The Minimum requirements for usability testing are:
Online usability Testing
Crowdsourcing is where people remotely give you feedback
Example to check out is: Maze
Reflection
I felt today’s class as very useful and it was good to find out about usability testing. I will try and do some user testing for my elements project or any future ones.
Today at the start of class we were given an opportunity to work on any outstanding work for any of the units. For example write a few blog posts or do project work. I thought it was great as allowed me some time to catch up on any necessary work I needed to complete.
After Lunch we received a placement talk from David Henderson the owner of DHD company. DHD are a multimedia design company who are located in the Hubflow on the Dublin Road in Belfast.
The type of work they deliver includes
DHD have worked with clients from all over the global. They have worked with companies such McDonalds, Oxfam, Volvo, nest, etc.
The are particularly looking for someone who is:
They rather prefer someone with a great attitude over skill.
At the end of talk we had an opportunity to ask any further questions about the company or placement role.
I thought this talk was very interesting and someone I may want to work on my placement.
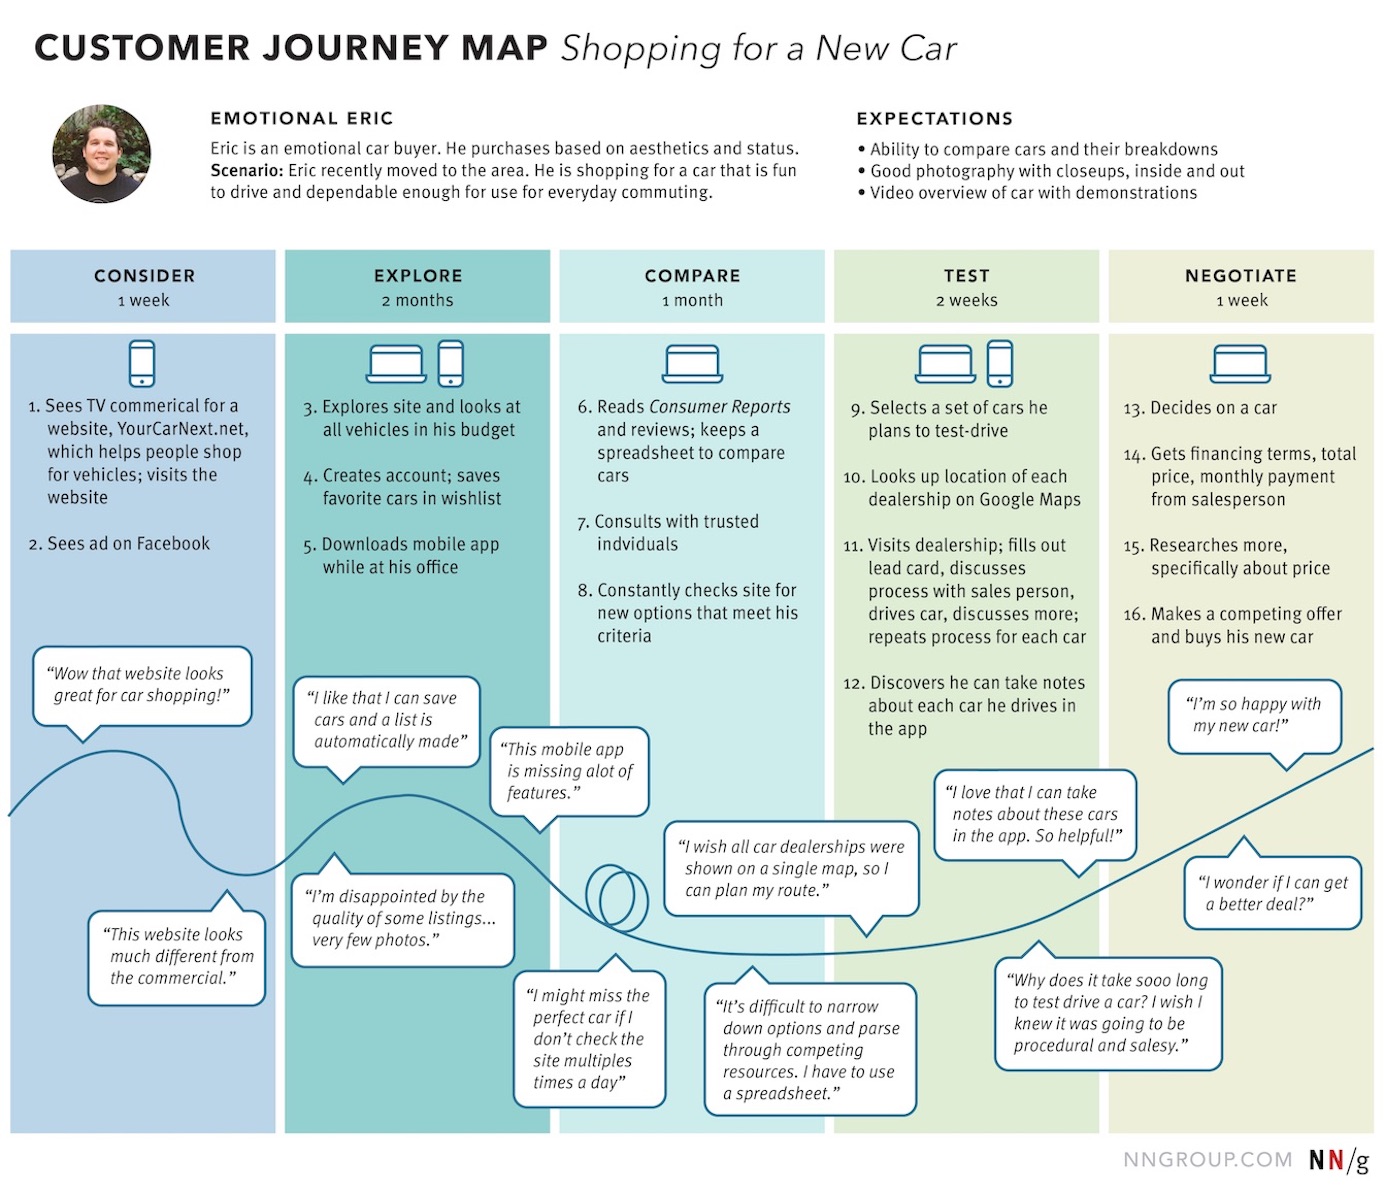
A user Journey Map is a diagram which shows the visual process of a person’s relationship with a particular brand or product over time. User Journeys maps are commonly represented in a form of timeline of all touch points between both the user and product. The timeline will include content of the user’s interaction with a particular product.
User Journeys can be used by designers to solve problems. It allows the designer to see the interaction of the client with a particular product from a user’s point of view. It can help a product team to answer the What “if Questions” and that.
At start of any user Journey Map, it’s important to review the goals of the brand/product.
There is an 8 -Step process when creating a user journey map. If you follow these steps, you’ll have no issues.
It’s important to share your user journey when created with your team.
The major benefits of a user Journey Map are:
Reflect
By researching User Journeys I feel slightly more confident when it comes to designing my own one. If you understand the users process it will be easier to design a timeline to visual this.
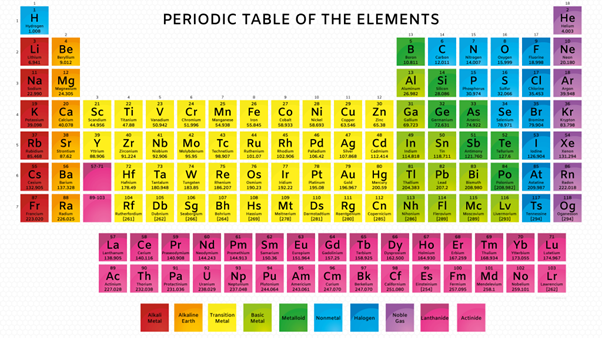
The Periodic Table is a table made of 118 elements. Its widely used in chemistry/ science classes throughout schools and college. The table is divided into rows known as periods and columns better known as groups.
It’s organized in order based on their atomic numbers starting with the lowest hydrogen to highest which is Oganesson. It is also color coded according to the element group it belongs to, making it easier to understand.
The first ever periodic table was created back in 1869 by Russian Chemist Dmitri Mendeleev. It was formatted in a specific way to do with the atomic mass. He left gaps as not all elements were discovered. The periodic table was simply done in black and white. 
The periodic today has evolved and changed a lot from then to reflect the discovery and develop of science. The periodic table is regarded as one the most significant achievements in science.
Reflection
I felt it was important I had a better understanding what a periodic table was, who created it, and what it looked like, even though I briefly learned it in science in school. It give me a refresher of what it was as it so long ago I learned about this. This research I gathered will hopefully help me with my next project which is about the elements in the Periodic Table
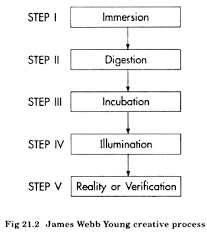
James Web Young wrote a book called A Technique for Producing Ideas. It was originally published in 1940 but it is still very popular today. It was written to help people produce their own creative ideas especially if they are like myself and are struggling to come up with ideas. In this book he developed one of the most popular approaches to creatively
James Web young famously referenced Vilfredo Pareto’s quote. “What is most valuable to know is not where to look for a particular idea, but how to train the mind in the method by which ideas are produced; and how to grasp the principles which are the source of all ideas.” “…an idea is nothing more nor less than a new combination of old elements.”
Simply try make links or connections between unrelated facts is a good way to produce ideas.
The first Step is Gather Raw materials. This may be from experience or related products
Second Step is to Digest Materials– Start of by putting your ideas together. Bringing together your data to see if it fits well. Eventually it will all start piecing together.
Thirdly Internalize Materials Unconsciously. Don’t over think too much about the problem. Take some time and Step away from the problem even go for a walk. Let your subconscious take over.
Fourthly the Eureka Moment. You may be surprised but the idea might pop into your mind out of nowhere. It could to you naturally.
The last step- bring your ideas to life. Be confident with your idea and see what other people think it. No matter how stupid it may sound take a risk. It’s important to try test your product in the world. Submit your idea and you may be surprised how good it may be. Take any feedback that comes to your help improve/ enhance your idea.
Reflection
I felt these steps were very useful. I will try these different techniques to help me produce ideas for elements project. Hopefully it will let get in the right mindset and allow to come up with some interesting ideas which I can share to others to see what they think.
Elements Museum can be found at the Ulster Museum. I will have to visit it in my own time. I found out a good bit of information just from looking at the website.
It takes a journey along the periodic table. In this exhibition you can find out what elements look like, where they were made, how they occur naturally, how we use them and why they can be dangerous! This sounds intriguing.
The exhibition starts off looking at the stunning 3D display of the Periodic Table. It’s made up on 90 elements which occur on the earth. From common to rare elements. They all have uses and many of them we rely on in our everyday day lives.
“The gallery is divided into familiar themes, such as Life and Death, Colour and Light, Progress and Technology, in which everyone will find a rich and fascinating variety of objects – artistic, historical, scientific, and even weird – accompanied by clear and simple explanations. Alongside them are stories – some sad, some tragic, others funny or surprising – that will dispel any notion that chemistry is irrelevant or dull.”
This Exhibition is inspired by book by Theodore Gray, where he wonderfully describes the elements using word and pictures. The exhibition opened back in 2014 and Dr Mike Simms hoped this exhibition could inspire both the young and the old generation.
The Elements exhibition is part of the stem program and is accompanied by a series of events, both for schools and visitors within the Ulster Museum. It is very educational. Keep an eye for any new upcoming events by viewing the website.
Reflection
Personally, I think the elements museum would be an interesting exhibition to visit someday. I feel I will have to go see this when I have time and hopefully extend my knowledge on the different elements in the periodic table. It sounds like it will appropriate for all age groups no matter who you are.
To summarise a portfolio highlights your design process and any previous work as it shows others who you are as a designer. The process of creating a UX-design portfolio allows you to reflect on your skills and achievements.
According to research carried out by nngroup.com, they asked UX professionals what type of things they look for in a portfolio.
Ideally Mangers/Employers want to see:
The people who view your portfolio could be employers, managers, or other UX designers, so it’s important to appeal to everyone and make sure it looks professional and stands out from the crowd.
Step 1: Take Inventory of All your projects. Basically, take a note of any previous projects that you have worked on. It’s important to ask yourself specific questions to help narrow down the choices. Therefore, choose your best and most appropriate projects based on the role or placements you are applying for. Make sure the projects showcase your best skills.
Step 2: Choose 3-5 Projects as Detailed Case Studies. When creating a portfolio, it’s important to have Quality over quantity. Make sure to choose a couple of better projects to showcase your work demonstrating skills etc.
Step 3: Choose Your Desired Format. It’s important for your portfolio to tell a story. Use a range of text and visuals to distinct projects. Plan the structure of your site. Designing a web-based portfolio is the most common. The website should mainly focus on your content and be user friendly.
Step 4: Create/Design your Portfolio. After you plan go on to creating your site making sure the content is all included.
Step 5: Get Feedback and Iterate. Once you create your portfolio site show it to someone and let them critic your work as they will help you make improvements. The portfolio will be a continuing work in progress.
Reflection
Portfolios are the best way of seeing a designer’s process. When I am creating my portfolio site, I will use these steps. I will ensure I highlight my work and skills in way that is appropriate and visually appealing which will in favour help me land placement job which I am currently seeking for. I will hopefully do myself justice.
During class we learned about User Persona’s as we would eventually go on to create our own by asking specific users questions to do with our next project.
User personas
A User persona is a way to represent and communicate research about a specific person who has been surveyed or interviewed in some way. User’s personas are standard users whose goals and characteristics represent the needs of a larger group of users. Its normally completed in a 1-to-2-page document. It describes patterns, end goals, skills, attitudes, and a little background information.
How are Persona Created?
User Personas can be designed using several steps.
Why it is important?
It’s important to help understand the needs of specific target audience. When designing a product its essential users are satisfied to achieve success. Personas can be good when used in right place and time. The main question to ask users is “Who am designing for?” Think carefully what questions ask the users. It’s important to consider the main needs of the audience.
The key things to include in the user persona are:
Personas have several valuable purposes such as:
Most important things to remember are to ask:
From using my own research and what I learned in, I will eventually create my own user persona’s.
Example of User Persona’s

From using my own research and what I learned in, I feel this knowledge will help me to create my own user persona’s on specific users.