Archive of ‘Animation Strategies’ category

Animation Strategies Assignment 2 Research and Reflection

At the first 6 weeks of semester 1 we were all focusing on our group projects for our assignment 1 as well as our professional practise assignments. It was until at week 7 we were introduced to our assignment 2 in animation strategies. Our lecturer informed us that will be three parts to the assignment which will involve a run cycle, a walk cycle and a mechanics cycle and of our choosing of style, type of walk/run and whether it can be 2D being hand drawn or completely 3D using Maya, if we wanted it that way it was entirely our choice to choose for this assignment.

Seeing that three of our assignments would be due in the same week before Christmas and this one would be after the holiday would give us enough time to complete it in between the other assignment and go ahead with the planning and choosing of the cycles. For me I found myself divided between the 2D and the 3D style of the assignment so I waited to see the full lectures of the cycles during class so I may decide what I am doing for this assignment.Β 

Continuing week 7’s class we had done exercise’s during class with Alec’s 2D run cycles and 3D rigs with both missing a frame in their sequence that we had to complete. That’s when he presented us the frame count and poses for run sequence and that there is always a contact, up, down and passing pose for each sequence for the character.

The Run Cycle

Analysing the run cycle and understanding the poses of contact, passing, up and down for the character running. As well as the arms and legs going opposite to fit for the front view in the lighter side and the back view in the darker side. Especially the body movements and height when running in the one direction.


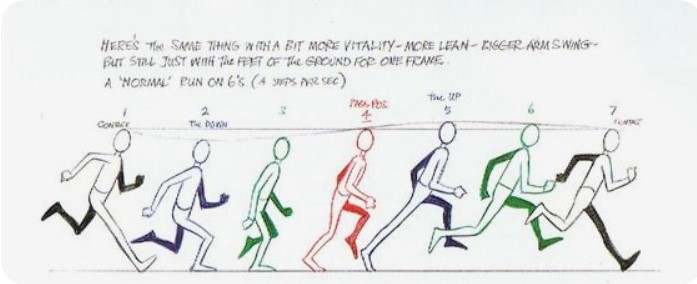
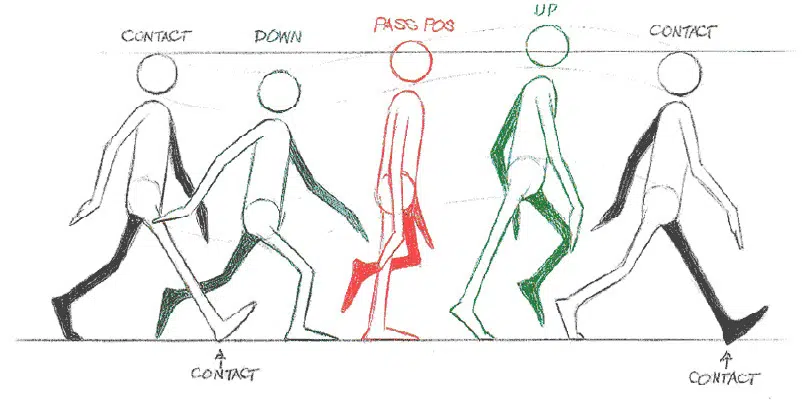
Week 8 we had moved onto walk cycles, which like the run cycles but much slower and has more poses to fill out. Same like week 7 we had to complete the exercise’s by filling the blank space of the sequence. We then viewed different types of walk cycles especially the 16 different walk cycles which includes a skip, zombie and robot walk and etc. Here are some examples I found and some blackboard for assistance.Β 

Walk Cycles Compilation – YouTube

100 Different Ways to Walk by Kevin Parry (Animation Reference with Music) – YouTube

The Walk Cycle

Here is the key poses of the walk cycles below. Looking at them like and comparing them to the run cycle with the contact, passing, up and down pose. However, they have less poses and less movement with the arms and legs as they don’t need a wider space to separate themselves from the body. The head still goes up and down and the movement is still slower with the tips of the feet’s still making contact with the ground.Β 

Two Kinds of Walk Cycles - IdeaRocket

Walk Cycle Animation Blueprint: A how to tutorial - Rusty Animator


Then for weeks 9 and 10 we finally moved onto to the body mechanics animation which the cycle is from blocking to the polish with smooth animation, which can be a specific action then just walking or running. It can be jumping over an obstacle or just the jump in general, boxing between two characters and finally moving or lifting a heavy object all across the way. It can be anything as long as everyone can have the right references for these actions. We also did six exercises with Alec and were introduced to tweenmachine script, a tool we used to help with our exercises for in-between frames and break the poses down as is it quick to make animations down faster.Β 

Here is the six exercise’s I’ve done in class with using tween machine to help support me through these class tasks. As well as the Jill jump which came in handy for one of my upcoming assignments as it served as a extra bit to do.


For the last two weeks of the semester classes leading up to Christmas, I had mainly focused onto the other assignments since they were approaching very fast ahead before the end of the year. But in these weeks I had still picked, planned and researched ways for my animated walk/run/ body animation during the group project and our CV in our class professional practice. Through my classes I had planned on what I was doing for my assignment to see what I can do efficiently and what path and style I would go. I decided to do two of the cycles (Walk and Run) in 2D style on Krita and have the mechanics in 3D using Maya, as I’m doing a bit of both since I enjoy both 3D and 2D animation from this year in ulster university.Β 

The Mechanics Cycle – JumpΒ 

For the mechanics animation cycle I chose the jack. Rig for it to be completely 3D animation for this assignment and selected the action which the jack. Rig would then perform of my choosing which would be a simple jump, but mostly a jumping over an obstacle in it’s sequence.Β  I used one specific reference for my jump and the other as a back up sequence which can be found here.

Jump Animation Reference | Jump animation, Animation ...

Here I used this reference for my Maya character to jump over an obstacle (a cuboid block), matching the arms and legs of the person from getting into position to jump (anticipation) and then lifting himself up from the ground from his feet with his boost (jump contact) from his feet and jumping over to the other side of the floor (mid-air) landing and positioning himself quickly up again for his contact pose which is after the last pose (recovery pose) then just like his pose in the beginning shot. It was a good idea to go for the jump and to use this video reference as well as going for the 3D route for this part of the assignment.

My Walk Cycle – The skip

For my walk cycle, I looked at the ’16 types of walk cycles’ with different attitudes and personality even if it’s entirely 3D or 2D these where my references and inspirations that came from this video. Watching the video and every walk type, I chose the skip cycle part for my character to be a kid (a little girl) and for her to travel and to be happy and cheerful while skipping to demonstrate her personality as a child. As well as the other below as it is completely in 2D for reference.

I also found a tutorial website to breakdown the skip cycle frame by frame. It also give me quick tips on the skip and the poses I should focus on and what to do and not to do so the arms and legs are following the movement and I’m able to identify the contact, passing, up and down poses. Using this website and the animation breakdown by Amid Amidi from Cartoon brew had been a great help to my decision for the skip cycle and is what I should be aiming for in my animated walk/skip cycle for this assignment or any other animations I will be doing for the future whether be 2D or 3D.Β 

TUTORIAL: How to Animate A Skip Cycle (cartoonbrew.com)

My Run CycleΒ 

Then finally my run cycle, which I got inspired by other animations and references for my character who is an cat-adult running and used these videos to help support me through the Run cycle animation on Krita. I also looked at the videos on blackboard from Alec’s videos from the class sessions to aid me for my animation cycle and what I am looking for to complete it in no-time. For my character I wanted them to run a serious manner as they are reaching for a goal in the end or chasing someone else to match their personality and character.


I quickly went to work on my animations which was the 2D animatics first for the run and walk/skip cycle. To get the hang of the bodies and to quickly see any improvements that needed done before moving onto the rough, eyes, clothes effect and finally the clean-up. For the 2D we didn’t have to colour them in completely or have detailed backgrounds for each animation as they gave us the choice since it might be time-consuming for us to get everything done in time for the assignment submission. Then done the mechanic jump afterwards using the references and doing the animation timing on Maya. Here are my first WIPs of the animation assignments.


Reflection

Throughout this course I really enjoyed this semester 1 with the animation cycles whether it was 2D or 3D related exercises or just lessons during our lectures given by our lecturers Alec or Henry. I liked going back to the roots of frames/poses and experimenting the animations on Maya or Krita as I enjoy both versions of software which I know my way about. I’m also glad that there were people coming in some days to show of their animation guides for pipelines and what they had worked with as it gives me ideas and opportunities I may be looking forward to in the future.

However, there had been some hiccups within the course this semester one. When it came to the other assignments like the 3D environment, CV and showreel it had been time consuming and I had little time to focus on the animation cycles. As well as getting references and deciding what I was going to do for the cycles while thinking of character designs. Well I was relieved that assignment 2 was due for after Christmas and new years for January as it given me more time to focus on the other assignments and more time to complete the assignment 2 after Christmas.Β 

Animation Strategies Final Videos

Walk Cycle – SkipΒ 

Run cycle

Mechanics – Jump


OneDrive link for mechanic jump – https://ulster-my.sharepoint.com/:f:/g/personal/maxwell-l5_ulster_ac_uk/EvSeZGvsMgtDpYmGlDZU_XUBYmN6xgnKb-Ih-nbz8rhc6w?e=mnUtzB

Syncsketch for better view of animations –Β https://syncsketch.com/sketch/YjI1NWUwMDg1/


Assignment 1 Reflection of 3D Environment

Through my course of Animation Strategies, with the last 12 weeks of working with animation and introducing us to unreal engine, while I played a part within a group project that was simply marvellous this semester. At first it seemed much of what we had done within our first year with animation group projects with 2D and 3D especially with the software Maya we have used from last semester. But it was the start with Unreal Engine and how it can be used for such stunning environments with 3DΒ  along with 2D walk, run and mechanic animation cycles.Β 

There was difficulty with group members not coming in the University for the course or being absent from the group project thinking they’ve abandoned it as well as having issues with software such as storage related items and only able to do the dungeon part. But the UV, modelling and texturing on substance painter was not too bad since I have been through them before and used Alec’s and Henry’s videos on blackboard to assist me through this project. The only issues I faced was trying to apply the models and textures into unreal and apply my video into my blog, but I soon overcame this obstacle on my own and with others.Β 

Assignment 1 3D Environment Research and Application of Theory

Faerie Dungeon

In a group of 5 there was Mary, Jack, Charlotte, Charley and me Lauren who participated together in the beginning week. We had various ideas for the concept of our 3D environment project and decided that the project should a have a twist to it. At first we had different ideas what the environment should be like robotics, nature or something terrifying. We somewhat followed one of the themes of nature but wanted to have something magical and make it more alive with vines, gemstones and glowing lights.Β Β 

For the planning of our team project we had grew with different ideas until we came with an idea from the success criteria suggestions on blackboard. The ‘Faerie Dungeon’ which comes with two levels which has the upper floor which is full of light and magical energy and the underground which is full of darkness and creepiness. It was our group plan to talk about what will be included within the project, such as props and the layout pf the environment of the levels, the art style we were going for and colours along with the model’s textures.Β 

We talked about the art style first on how the environment should look like for both levels and what style would we able to get inspiration from to fit into our project. We searched through different art styles and selected a frenzy cartoonish look that would be seen innocent and cute but then afterword’s terrifying and creepy like. The art styles we had referenced too are the following:

Zelda and Link

Β Β Β 

Animal Crossing

Sprite FrightΒ 

The theme of our project is supposed to start off with a sweet, magical world of fun fantasy which quickly becomes a horrifying glimpse of reality and how deadly it can be to crush our dreams of fantasy. The inspiration for our group project was a few movies which covers the 3 acts of the setup, the confrontation and the resolution. The films that inspired our project work were the following; Coraline, Pan’s Labyrinth and a short film known as Sprite Fright which it all starts with a happy fantasy world and later become dark and despicable. These helped us on what route we were going through for our project and how we would we plan it out for the shots at the very end of the project.

We used Pinterest to get ideas for the environment on how magical it can be to get some references and then moved forward to the layout of both environments. We then planned our presentation for Week 3 to give a brief summary of our project to the audience.Β 

References for wings and both environment.


We picked out our colour schemes for both levels to fit within the genre of the upper and lower level and what colours we should try best to avoid so they don’t overlap with each other but have lighter vs darker shades of colour where one or two are the same but in darker and lighter presence.Β  We then went through different layouts on how the floors should look like and what should be included within the areas like furniture, lights and tools.Β 

Block out

We then did a block out of the two floors on how they would look like in Maya in it’s first draft of design. Both similar with the circular walls, while shaped like a cylinder to fit all the props within but the props may not all be included within the environment but their only there for ideas on what should be included.

Assets


We had then finally discussed about the assets and props within the environment and what would be included within the floors so we don’t go overboard with the materials within the two floors. There were 4 sections and each section would a prop and then assigned to that person or they have chosen it because they want to. Since there were 5 of us within the group we broke down the sections of the floors and then went through a checklist on what we would be doing for those floors. For me I mostly did props for the Faerie Dungeon/BasementΒ  with the others taken a bunch from each category for that was weeks 1 – 3.Β 

For weeks 4 – 7, just after getting our assigned tasks we had started modelling our assets within Maya and watch a couple of videos to help with our modelling and take shortcuts to get them done faster with high quality.Β  I have done the bookcase, the fairy body, a set of roots, two jars and the dissection table with extra models as the tools, cutting board and the bloody vase. We would then try to import them into substance painter for texturing and update our progress through the weeks. We had modelled, topologized and sort out our UV’s just in time to import them into substance painter for texturing. During those weeks we had went Unreal Engine and where our projects would be exported too for our cinematic.Β  Here is the following models and their UVs which wasn’t to complicated for this course.

Here is some references I used for some of models while the rest was on blackboard to follow along:

Autodesk Maya 2019: Modeling Bookshelf – YouTube

Create Tangled Vines in Maya/Photoshop/Arnold (1/3) – YouTube

Texture a Stool using Maya 2022 and Substance 3D Painter – YouTube

Week 7 was even the start for our second assignments which involved the run, walk and mechanics animation. But are main focus was the 3D environment by then. Here is my objects that I have for their baked mesh maps and textures.Β 

After I had successfully done applying the textures onto the models, I exported the models as FBX and exported the textures into my documents so both would be ready for unreal and my OneDrive.Β 

https://ulster-my.sharepoint.com/:f:/g/personal/maxwell-l5_ulster_ac_uk/EnXxajAq215IjN4e-NrIEm0BbBiAulLpHzeT-Y6lgLyOTA?e=CnhEte

Jack as well shared his OneDrive with everyone’s assets included but here is only my assets.

For Weeks 8 – 10 while applying the finishing touches onto the models as well as doing other work for our professional practice we were ready to export them into our unreal project. It was easy at first but there were tricky parts with the translucent glasses and sorting out the textures in material mode for each mesh model that wouldn’t appear for no reason. Also making sure everyone was up to date with their models and if there was any worries we would help them. We shared our models and textures onto OneDrive so everyone would know what to add to their scene for the final cinematic.Β 

I was able to add my models into Unreal and other models from my group members to fill out my own layout in the faerie dungeon. With two floors I only chose the bottom since I had the most models for it and I had to watch out for my storage space on my laptop. But since we can do it individually we took 30 secs each for own environment with our own shots for own cinematic and chose our own music for our final cinematic.Β 

Here is photos of the environment itself.Β 

Final Cinematic (Due to the size format I moved it Syncsketch)Β 

https://syncsketch.com/sketch/OWViYTEwNmI2/

The sound I chose was ‘ Dark Ambient Horror Cinematic Halloween Atmosphere scary’ music by Dmitry Taras on this website Dark Ambient Horror Cinematic Halloween Atmosphere Scary | Royalty Free Music – Pixabay

We had watched Alec’s and Henry’s videos on blackboard to help with our assignments especially with the camera angle, lighting and rendering our scenes for our final step within our 3D environment.Β 

Animation Strategies Week 11 Rendering

We learnt about rendering and using the camera which would be our last step into our cinematic movie how we would be able to render it and export it as an animation.Β 

For our last couple of weeks we have been doing good with the unreal as I exported all the models into unreal and was able to sort out my files onto OneDrive to share between each of us and our progress is almost done as we are now setting up our environment, pick lighting and finally render out.Β 

Animation Strategies Week 10 Body Mechanics

Continuing where we left off last week, we continued onwards with the body mechanics and done six exercises in class with Alec. He showed us the ropes on mechanics with the exercises and using the tweenmachine again for shortcuts.Β 

He also checked our progress for the animation cycles and body mechanics for our assignment 2 submission.Β 

Here are the 6 exercises I have done for class last day and I have to say it was an amusing activity this lesson.Β 

For the next session of class, we were joined by Niall Doherty who had shown us his explanation of straight poses and the key is too have arcs for animation just like what he had done for his. He went around class and helped us out on our work.Β 


Animation Strategies Week 9 Body Mechanics

This class started with Body Mechanics which will also be part of our upcoming assignment in December. We were given a model by Alec on maya and was told to do a jump. He introduced us too script tweenmachine which is a handy tool to break down scenes and add movement to our animations. We were told to do the blocking first and then polish our models. I must admit this tool is really helpful towards our animations on maya.

As well as having jump references for our assignments on our body mechanics which I have chosen from YouTube.

Jumping Reference – YouTube

Here is my jump exercise I have done for class.


Animation Strategies Week 8 Walk Cycles

Week 8 we had started the basics with walk cycles with the 3D rigging jack and Alec showing us the 16 types of walking for us to choose for our assignment in January. We also looked at the 2D walk cycles with Nial Doherty explaining the spacing and timing with each frame and how he animated his characters.

Here is my 3D walk cycleΒ 


Animation Strategies Week 7 Run Cycle

Getting into our second assignment with animation run cycles with 3D and 2D. We had exercises to do which involved finding a missing frame, what’s it called and had to draw it in to complete the run cycle or both animations. Th 2D frame missing is the down frame for the character and the 3D model is missing the up frame.Β 

We also did some poses for the lesson while getting references for them

I also did the run cycles both 2D and 3D for this exerciseΒ 


Animation Strategies Week 6 Tutorial Session

We had gone over our tutorial week with our lecturers on progress of our work and if we had any problems this week. They also suggested to have group met ups or group chats for the next few weeks to get the work done faster. So, then we continued on our work and showed our progress to each other for how far we’ve come for week 6.

Concept ArtΒ 

One of the models textured

As well as models progress

1 2