Tools Used:
- Pureref (Reference Organising)
- Pencil & Sketchbook (Initial Concept Design Art)
- Clip Studio Paint (Final Concept Art)
- Blender (Organic Modelling)
- Maya (Model Creation + UV Unwrapping +Retopology)
- Substance Painter (Model Texturing)
- Sketchfab (Model Displaying)
Initial Development of Ideas:
For this project I was required to model/sculpt, texture, and present via Sketchfab, a Cute Character of your choice. The Cute Character could be anything that you find cute. Unlike the previous assignment, there were a lot more possible ideas I could explore, as long as it took the form of organic shapes. So, in comparison I had a lot more to think about and explore with my potential designs.
Concept Design Art:
Rough Sketches:
I explored a total of four ideas. One was a tentacled alien with one eye wearing a glass dome. A small tree person with a leaf hat and cape. A pirate crab. And lastly a nerdy anthropomorphic brain with glasses and a book. In the end I went with the pirate crab, as it was an easy design to communicate, and I thought it would be the easy enough to make.
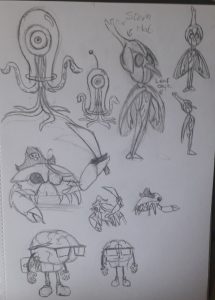
Final Design:
Here is the final design went with for the pirate crab. With the usual warm red colour you often associate with crabs and give him pirate related accessories. Such as a pirate hat, sword, and eyepatch.


Blender:
(Note: Unfortunately I fell out of the habit of screenshotting my models through the process of making it, so there are considerable gaps of the development of the model from here on out.)
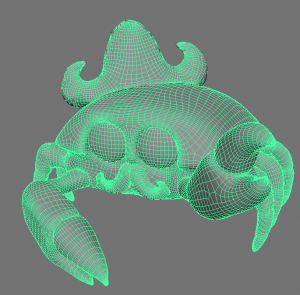
Progress:
I was very uneasy using Blender, as I never felt that I had grew accustomed to it yet as I did with Maya. This made the process of modelling frustrating at times.


I was given the suggestion of adding a twirly moustache to the character that was reminiscent of a swashbuckling pirate. I had the intention of better defining the details for the joints in the limbs, and create the eyepatch seen in the concept art, but I was too restricted on time to do either of these things. So it was then straight to Maya.
Maya:
Making the Sword:
Since I was struggling to use Blender, and the subject consisted of many hard surfaces I decided to use Maya in the creation of the sword model. Nothing worthy of note, besides the word is meant to resemble a stylised cutlass, the type you usually see in pirate related media.

Retopology:
As I didn’t have the time to manually apply my retopology I resorted to using the automatic retopology option in maya to speed up the process. The result was a mesh with a lot of imperfections, which didn’t allow loops, made it difficult to unwrap the UV, and it hid the details in the joints of the legs. The mesh also had far more polygons then what was necessary.
UV Complete:
Crab UV:
I definitely had rushed the unwrapping of the crab mesh and couldn’t take into account how I should unwrap the mesh, so I feel that the standard of the final UV is really subpar.

Sword UV:
Since the sword was made in Maya and not Blender I didn’t have to retopologise the model, so I didn’t need to do anything special for the UV unwrapping process.

Final Polygon Count:

Substance Painter:
I hadn’t touched Substance Painter since assignment 1 so I had to familiarise myself again with the software. I played with some downloaded materials and smart material until I found something that resembled the texture of the crabs shell and a leather hat. The sword was a lot more straightforward since I had the experience of working with metal textures from assignment 1, and I knew what I wanted it to look like.
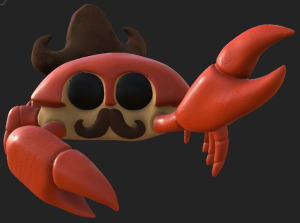

I ended up regretting including the moustache in the model, as I didn’t take into consideration that I didn’t know how I could emulate the appearance of hair without going back to Blender and remodelling it with blocky strands and other details to give the impression of hair. Should have likely left as mandibles, as that would have been easier to model and texture.


No gripes with the sword. It came out actually as I imagined it.
Sketchfab:
This part is mostly self explanatory. Besides giving it a tropical beach lighting, a sky blue background to contrast the warm coloured crab, and adjusting related settings there is not much I can say on this.
Settings:


Final Result:

References:

Here are the references I had used throughout the project, I didn’t have this much to begin with as I added more pictures when it was required.
Reflection:
I found learning Blender, and the entire character modelling process, alongside the essentials of 3D animation very difficult to grasp. Trying to learn Blender felt like I was wrestling with the software most of the time. I felt like I need more time to really learn what to do, but I managed to convince myself that going back to the exercise would only waste more time. So, I practically going in blind, which likely wasted more time. I felt I spent an inordinate amount of time on just blocking in my character and making the overall shape. I didn’t utilise references as much as I should have. The fact I neglected to take more screenshots of my progress was a major oversight on my part. I’m not as satisfied with this outcome of this assignment compared to the model, I made for assignment 1. I feel I have considerably underperformed in this assignment because I didn’t apply myself enough to learning the software as much as a should have. If I were to do this assignment again, knowing what I know now, I feel I could get a better result that more accurately reflects my ability.
Sketchfab Link: https://sketchfab.com/3d-models/pirate-crab-917bd868bfc04121ab289ac2dbe5d3ae