After the base I got some feedback from my lecturer about the base and what I could do next such as the bottom of the dress and if I want to render it towards the end and only focus on the outside of the body base like clothes, hair and amending the face. I immediately thought about the clothing of the character and what way I should cloth them for the blocking before continuing onto the facials and hair. After blocking out the bottom of the dress, I went to view different tutorials with the notes I had taken from workshops I’ve attended back previous weeks to experiment the modifiers in Blender for the dress for a more flow at the bottom.
It was interesting enough to experiment with the dress as I only started with the base mesh and started the blocking out stage but whether or not I wanted the flow towards the end with adding secondary details but having no render at all. But not getting ahead of myself I tried to leave at first so I could get more feedback after more blocking and sculpting of the character.
After gaining new feedback over the course of the week, I needed more improvements once I got my new shot included as Character B had to have more movement with the arms, expressions and a mouth compared to A. I also to fix the intro/leading scene when Character A walks into view for their legs looked off as it looks like they’re moving too fast or running in that certain shot. I later recorded myself to help with the fast walking shot with Character A and B’s movement to give it a more of a an response after I captured it so I knew the time and spacing perfectly using real life reference even by myself to capture the motion of the small walk of anger.
For minor fixes, the scene required the mouth lip syncing to Character A to match with the time they’re mouth would stop speaking which was in case to close it and more roughs and movements to their head. Character B as the same as they’re moving to much little when rotating and to make the animation more smoother after doing the roughs and smoother Arcs. Here is this weeks progress with the references I recorded beforehand.
I was able to record myself better this time for a wide shot and was able to edit both shots together using the symmetry and rule of thirds lines to give both versions space to edit with my mobile phone at a better stance to view myself but a couple of seconds had been off once added and edited together but all was good for what I had got in the end.
Finishing off my character design stage after gaining new feedback, I corrected the character sheets with the characters showing off their hands with clean up of the lines, then moved onto the colour scheme and silhouettes for the characters to match the tone and highlight the clothing in contrast for the white snake and the monk taking the primary colours as their main setup and the green snake and the doctor taking the secondary colours in a analogous combination. Once I finished the basic colours, I went ahead to the next stage of developing my skills and techniques which involved 3D Character modelling in which I picked one of the following characters, Bai Suzhen (The White Snake) for the second phase to work throughout this December and to plan the rest of my weeks while doing my other assignments and get enough feedback before the Christmas break.
I immediately went onto the blocking stage once I got my references, watched tutorial videos and uploaded my character design sheets onto Blender once I began blocking out from simple shapes. I started with the base and body to shape the person out by following the guidelines of the character sheet. Since the character looks more cartoonish and simple and not fit, I tried to make it less realistic and focused more on the upper torso and left the legs and feet only to be displayed for the height and size of the base as clothing will be added later on. Here is some shots.
Thereafter on continuing on with my project, I received more feedback for my progress from Mike instructing me to have another shot from another angle focusing on Character A then the first shot sequence to add more anticipation, staging and cinematography to the animation and characters to enhance the acting better. Even looking back at the references I’ve collected and searching the web, I’ve decided to record myself again to understand the positions and angle shots better for the characters. But that didn’t stop there as I needed more anticipation and movements with my characters like adding in an intro/leading scene for my project and with more reactions from Character B with so little exaggeration. So taking my time I started with the intro first with Character A walking in angry and frustrated at Character B for context of the scene by building up anticipation before Character A lifts and throws the plate to the ground smashing it with a slow in and out difference with both characters timings are different.
After editing the audio and extending the intro by adding an interior design by adding a cabinet, I moved onto the second shot scene where Character A is centred on the over the shoulder shot from Character B once the plate smashes and Character A giggles and laughs and brings us to the first shot angle back till the end. I mainly focused on the timing and spacing of frames matching with the wavelength of the audio and experimenting with the new shot in one file and keeping the old version together following a strict timeline as I did like both versions of the animation however the new shot grew more impact with Character A then the first animation sequence.
Here is version 1 and version 2 of the animation videos to see the difference.
It was interesting enough once I had spare time to work on more frames to make it more rough but felt it drew back my time with adding the intro and the new shot in but nevertheless and I favour both versions of the animations all together and awaited more feedback before the week of making our presentations before we’re off for the Christmas break as I’m confident to make it to the end of this module. Recording myself had a few problems in terms of cinematography for the shots as I always tried to find the proper angle for the shot with my legs and over the shoulder shot by myself as my family was to busy. But I was able to overcome this difficulty once I finally got all the angles using my phone at the correct position and shooting both characters one side/angle beside the other. After retaking shots it became stress free as I resumed my work.
For my progress in my character design after I filled out the expressions in the previous week, I went ahead to the character line ups to present each character alongside each other in height, chosen fashion and at least 4 angles of the character’s turn around to see the full view of the character as a full 3D character. The back to fronts were easy and the one side as well as made sure to see the whole character and as well as the three quarter perspective for the last one for the 3 characters. Before I started the character sheets and turn arounds I looked at a couple of references and videos to help me reintroduce the previous years of understanding character design much better and how I can improve it.
Once I watched the videos and analysed other character sheets I went ahead with no colour to see the line up of characters and seeing each perspective with the guide of the lines to shape them out. I found it way better than before as it understand it more than previous years and what I needed to do to improve myself and have a lot of understanding to achieve this task and raise my skills and techniques.
During one of our days in the workshops we did a fun activity to create a character from a specific brand or company of our choosing, right colour scheme and the most references collected for our character creation. For this activity I chose the company Amazon and experimented with references as I had many ideas for a character based on Amazon and representing them with an easy to go bright colour scheme and many characters I’ve seen on TV Shows, Movies and Playable Games to aid me on designing the character.
Moving onto the lip-Syncing and sound with the block outs, I got my most recent feedback from my lecturers Mike and Sarah on what area of my animation I should work more on before next week’s class. First taking notes for Character B as they only stand and make so little movements taken from the animatic as I took more time on A more so than B, luckily I had the time I needed to work on them before Lip Syncing. I knew I needed more anticipation to Character B as I quickly went to recap myself with the animation principle beforehand, then researched other ways on how a person or their body on reflex would react to something smashed and broken, filled with fear and being startled. I found a couple of clips on how the person would react to the other as they shield themselves with their hands up, covering themselves for protection and take a few steps back with routeing their upper torso to protect their vision and face.
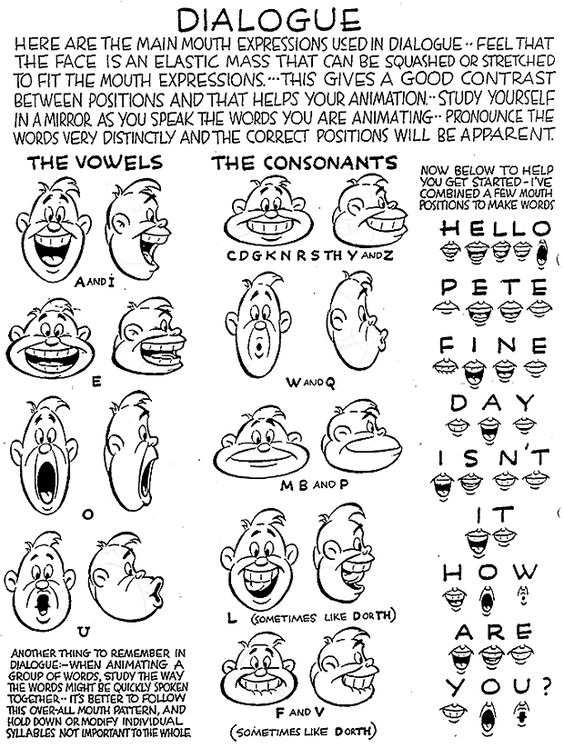
After adding in the block outs and a couple of rough sequences of the bodies movements to Character B’s arms and legs for secondary action and follow through moving onto adding in the lip syncs while following and writing out the script. I then drew out the mouth actions following each letter of each word, put all together to have myself a blueprint of the script itself and to put into the animation sequence matching with the audio watching my time and spacing to sync the body movements especially the head rotations. I used the resources from Blackboard from our lecturers which was extremely helpful for me to use for Character A as the only one who speaks in the sequence and I thought there was a better improvement to previous projects I have done. It was very helpful to aid the characters acting with only Character A speaking and having more frames/movements in comparison to Character B to make them more fluid.
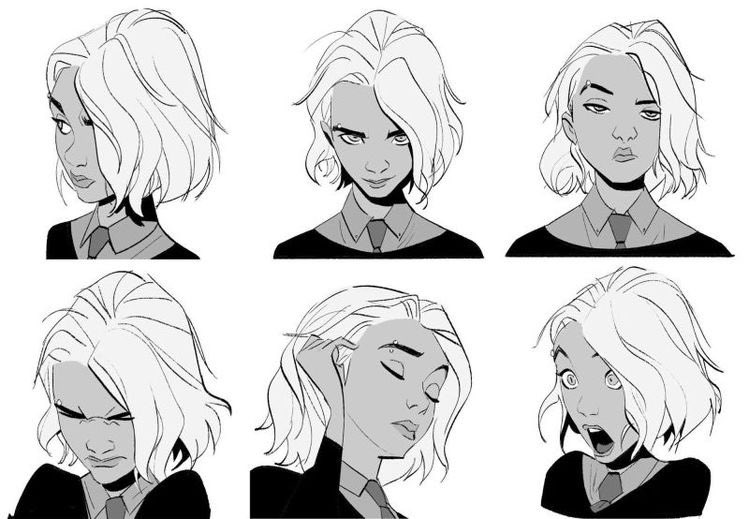
I went ahead with facial expressions after the choosing of fabric and accessories of each character from the White snake. Taken inspiration from multiple movies and shows for facial expressions, I looked into both spider verse movies with random characters facial expressions taken from their artbooks with their respectful artists and how they would display their characters matching with their appearance and personality.
With both sisters I created more expressions with them using Krita and how they would be similar but total opposites because their appearances and personality exactly like twins but expressing emotions in their on way. Especially with their hair and a snake face to toy with but found it enjoyable to explore my own characters as different versions of the original white snake movie. Afterword’s I drew the two men, the doctor and the monk with less expressions but simple enough to read them especially their roles in the story and what type of people (archetype) they are with their own morals in contrast to one another as being human. I got some feedback from one of the lecturer workshops this week who saw my expressions and really liked them but told me the tip pf watching out for line art and the sizes for outside the body line being bigger and the inside of the body lines should be smaller to highlight the character better to see the details for both.
We showcased our progress for our presentations on what skills were doing, the story we picked and where we currently stand in our progress same with the other students. For my progress I showed them I was in the Character Design stage and I hoped to get facial expressions, characters sheets, silhouettes and colour scheme done this month before December before moving onto the 3D Modelling after choosing one character to model in December. Here is the PowerPoint I have done since then.
This week I focused on my characters hair styles and clothes to see what final design I would go with the gathered resources I had in my Miro board. I also looked at online at websites exploring through character design and concept art to give me more ideas on how to expand my character design skills using these particular websites from Blackboard and a few artbooks I own such as Encanto and Spider verse to look at examples on how artists displayed the clothes for their characters and which to choose from.
Since I picked out hairstyles for the two sisters I went ahead to experiment with clothes from the tang dynasty to see which outfit which best suited with the characters appearance and personality. After I made my decision with the sisters and gaining opinions from other students, I moved onto the men afterwards with hair and clothes with less line up and their designs were limited. I did the same with the women and gained opinions on which designs they preferred and I knew I was ready to move onto the next step to facial expressions while I also uploaded them to my presentation to show my progress off to my lecturers.
After refreshing our minds with storyboards and showing our pitch videos/audios, we moved onto making a rough of our pitches/previs this week in hopes of experimenting with references we collected and putting in key frames from the start to finish with significant poses to showcase. Once I showed both of my pitches to my lecturer Sarah, she thought my second pitch which featured audio from steven universe with Steven and Spinel involved the characters mental breakdown more than the other and better acting. I acknowledged her option and went ahead to work on an animation that conveyed emotion more than the physical actions in one shot with the body and posture. So once the choice was made I recorded myself for reference of movement between two characters this week to aid me in the animation sequence for staging and to experiment with my movements put into the rough sequence with secondary action included while remembering the principle Staging for a quick recap.
But to understand the breakdown of the characters sadness and rage I went back to animated shorts, shows and movies I had watched before excluding steven universe to glimpse at different mental breakdowns and collided them together to come with their emotional collapse with overthinking and over flowing emotion act first than the physical. Also watching the breathing patterns as they try to breathe with the anxiety/fear they feel and the shaking of limbs from each different scenario of losing hope and filled with anger.
Taking my pitch idea and references I’ve moved onto my previs/animatic immediately and starting going through the process of animating the characters through pre production using the principles of animation and the skills I’ve developed from the last assignment. I started with the simple item of the prop which in this sequence is thrown to the ground in a fit of anger by Character A. For this I added an arc to the moment the plate is lifted and thrown like a ball to the ground but breaks on impact to help guide Character A’s throw and function of the arm going down. I added in more arcs for the characters rotation of the body, head, arms and the positions of the mouth, eyebrows and expressions after adding in the roughs and frames. I got references from other sources such and worked on the prop/item with Character A throwing and smashing down in anger to the floor, using an arc to help with the direction of the throw. I then focused on Character A’s rough sequence with head turns and adding a nose and mouth (but no lip sync yet).
The rough animation was fun and interesting, taking time to focus one task then the next with arcs, line of action and timing for sequences. Even when I couldn’t see myself filling in the colouring, clothes and appearance details for the characters in the next few weeks but I plan for at the end of this pipeline to make it clean and clear once I get the roughness out of the way after the final video is done.
After collecting enough resources for each character, I went on to the concept art stage and started with drawing sketches of the characters in my artbook as I found it more suitable than the digital version and made it possible to experiment with them more. I took each character from the story and started experimenting with shapes, colours, hairstyles and clothes for each one to match their appearance in my art style and above all else their personality. Back on Miro board I created and simplified their roles and personalities to help with their concept art and appearances to mesh together. I also drew a few snake doodles along the way so I could experiment with the version of the snake better if I get to the stage of character modelling better.
For next week we had to do another progress presentation like the previous ones to show the story we picked, what skills are we doing and how far has our progress been from week 3 – 4 and what our pipeline for the next for weeks will be.