This Month’s Overview
On the month of April, I will be mainly working the animation side of the task as it is the most time consuming, and it is the main element of this project. I will also be rendering out the footage (both test PlayBlast and final renders) and piecing them together in Adobe Premiere Pro. The sounds as produced by the sound student should also be ready to be send and added in. After that, I will create the title credits with what time I have to spare, fixing any errors that emerge and adjusting any elements that could improve my overall final project.
It is also worth noticing that next month is the final hand in, so I need to press on in order to make the deadline.
Animation
As stated in last month’s blog due to convenience the entirety of the basic animation work and the smaller touch ups will be described below.
Base Animation and Camera
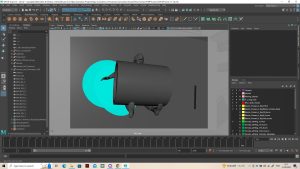
Finally I commenced with the base animation for my project which took much longer to commence than I had planned due to the delays that I have set out earlier in this blog, most notably the rigging of the organic models and the weight-painting. Additionally next month is the hand in for the whole assignment so I needed to get a great amount of work completed in a short period. This has not given me much time to test and familiarize myself with each rig. This lack of time to experiment and test the tools available for Maya’s 3D animation side would come back to bite me in the long run, as after I had animated all the movements in connection with the McGuffin Cannister to match with the character’s hands I discovered I could have bonded both elements rather than match every individual movement. When speaking of Density I put a lot of time into making sure his ability to alter the phases of his body looked clean and full of character, as his abilities to phase through walls is only shown off through base animation without additional visual effects. I was satisfied with my work in this area, with Density using his hands to pull his body through hard surfaces enabling his to go from one side to the other, through solid objects.
Despite these hurdles I am reasonably satisfied with the outcomes as I could fully animate the scene to fit my storyline and get the timing as close to acceptability that I could tweak the speeds further when in post. While I regret that Blaster Woman’s jaws were not animated to my satisfaction, the facial expressions for both Attractor and her character had worked reasonably well for the scene’s storyline. Talking of expressing emotions, for the most part every character was able to have their personality captured: from Attractor’s clumsiness and fear, to the acrobatics of Blaster Woman and the guile and fitness of Density, made especially noticeable in relation to his advancing age. One of the features I particularly liked was where the Density character stretches his back slowly at the end of the scene indicating the weariness of his muscles thus reflecting his advancing age.
An area that I know I can improve on to better demonstrate the personalities of each character is is the syncing of movement, in particular legs to direction of movement to make them look more natural. For instance I tried to demonstrate the heaviness and weight of Attractor’s equipment on his back through his movement but I don’t think I got it quite right. Also Blaster Woman’s leg movements made her look somewhat goofy’ rather than the professional mercenary I intended to depict. In general the feet at times seemed to slide across the ground rather than have a natural movement. These areas I know can be bettered if I had more time. One area that turned out better than expected was the use of my cameras, as before animation had begun I animated a camera to help me track the movement and timing of the plot. Once the animation was completed I created a second camera to better capture the action. This not only helped me capture better shots to express the motion of my characters but additionally allowed me to hide some the animation mistakes like panning the camera away when Attractor was taking his gun from its holster.
On reflection in relation to my final progress I did wish that certain things could have worked better in my favor. I wished Attractor had more control points in his pipes to better mobilize around his arms. It would have been better had I have been able to animate Blaster Woman’s hair, even to a limited form and that I knew of tools like the Physics Engine that could have saved me time when animating the movement of boxes. There are a lot of things that I could have wished for, but given the technical issues I encountered and the time constraints combined with my limited knowledge on organic modelling (plus my disabilities in general), I think the animation turned out well. I will still tweak and fix up some elements until the hand in date, Having said this I am happy even just for myself of what is done and it will be better once I assemble it together with sounds, the vfx and adjusted the timing in Premier Pro.


(See Rendering ‘PlayBlast’ for both Plain and Textured Animation).
Adding Effects
Originally, I would have VFX using a particle engine in order to create the elements like energy projectiles and the Magna Gel, but it is a lot for a PC to render and time is quite short for learning new elements, especially when the known or familiar ones are running into technical issues. So I just animated the mesh with a glowing texture and shape them as projectiles. They look great, but seeing the shot of Blaster Woman illuminated by her powers in the test image, make me wish I had the knowledge to better carry out this task.


Lighting Adjustment
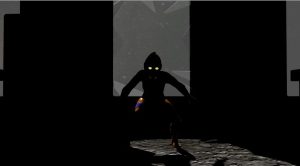
I was going to adjust the lighting this month but I will also be making some further minor as well next month. I replaced the sky box with directional lighting for the outside scene (a non-light reactive dome mesh with a texture with replace the sky). I also captured some shots as seen across the blog that are not in the final film. This is to to show off the different visual styles and takes the characters could use (eg: light up, Black and White, shadows, etc.).
Fixing Errors
While final touching up will be done next month, I would go over the whole animation in order to fix up any major errors, such as feet not touching the ground or wrists being bent in unnatural ways. More will be done next month. Especially the issue with character models failing to load along with the lights during the rendering. While not an error I did turn down the shine on Blaster Woman’s Costume based on my tutors’ feedback as it shone too much with the lighting.
Rending PlayBlast
I thought for the most part the rendering of PlayBlast would be easy and hassle free but as I quickly found out even that simply task was not immune to crashing and breaking. In two out of the seven scenes both Density and the skin of Blaster Woman would not show up or animate and one scene just kept crashing at the half way mark. Thanks to some help from my tutor Alec, I was able to make PlayBlasts of my animation (mesh only/before blast effects). I had a feeling that this would be a bad sign for when my work needs to be rendered. I would be proved right but that will be told later in the blog. For now I would created an Adobe Premiere Pro file. Using the PlayBlast, I would assemble together a cut which not only will show off my work on this blog, but it will also help with the ideal length of the animation, acting as easy place holders that can be replaced with the final renders and I can start adding in my sounds without waiting for the complete animation.


Plain PlayBlasts (YouTube Link):
Texture PlayBlast with sounds (YouTube Link):
Sounds
Near the end of the month, I finally heard back from the sound student in charge of my audio and they tell me that they can’t do it, due to timing and completed. Whilst I was disappointed at being let down so late in the project, I appreciate and accept that people do have lives and their own Uni work, but still this was an incredibly late time to be telling me. I have talked to the tutor about it and due to other animation students being similarly let down, next year’s class should be alerted to these issues so no one loses or takes an unnecessary risk.
Whilst the sound is not graded for our final animation, it still feels disappointing not having it in the final project. So for just one day, after getting some royalty free, no account sound/music websites from Henry, I would create my own sound track for my project. I even edited the audio like reversing the track, pitch shifting, speed altering and more to make it more in line with the animation. At the end I think the soundtrack is reasonable but it could have been better had I known the issues I was to face earlier in the project. I will credit the source of the audio at the end of my project and add a disclaimer at the start to alert viewers way the audio might be rough and uncoordinated (I.e. not everything has sounds, some sounds like punching are weird, etc.).
Plain PlayBlasts with rough sound placement (YouTube Link):
Extra Content
Opening
As I am close to the hand in date, I made a quick opening to my animation in Adobe After Effect. I used the dual colour format of the main Character (Density) to create a nice visual transition. I would have like to spend more time on creating a more advanced version, with a 3D ‘D’ and a smoother flow but time is not on my side and the end result is still visually strong and a good eye catcher.
Video of Opening (YouTube Link):
Texts
I added a outline over my texts to help it stand out more against the background. I would also spell check and correct the grammar of my work. Once the I felt the text was up to par with the rest of my work, I exported the final version to my Final Major Project Premiere Pro File.
Video Texts (YouTube Links):
Credits
I have updated the End Credits to name all three of my tutors for their help (and I am much appreciative of their time and assistance) in their respective areas and to credit the sites and composers for their audio and music, all of with are Royalty free.
Video of Credits (YouTube Link):
For the Last Month’s Work
The last weeks are almost here and there is still much to be done. I will render out and assemble the final animation after any reminding fixtures. The final footage will replace the PlayBlasts in the Premiere Pro file and the sounds adjusted if need be, such as with the blaster bolts. I will review my Blog one last time making sure it’s up to date, upload my whole animation and respective materials to Blackboard, before the 12th.