Assignment 2 – Animation Studies

For my study in weight and motion I thought about doing either hopscotch or a skip, after looking for some references and found there was a lot more for a skip and I wanted to do something that’s different from my emotion as I wanted to do a sad cycle so thinking along the lines of skipping it could be happier compared to my emotion.

When beginning my skip animation I wanted to get some reference of how my rig would move. I found a great video by a guy called Fiz who showed me some basic posing and timing and gave me a better understanding to how the body moves.

The main pointers he gave is that the skip is a mix between a run and a walk cycle, omitting the third step. By also understanding the differences between a run/walk cycle and a skip is important as well as it tells me when each foot should be when at the highest and lowest positions, from this I was able to understand that both feet are in contact with the ground at the same time. I also got a basic idea into the footfall pattern being 5, 11, or 16 frames per skip, making the overall length of the cycle around 32 frames.

He also showed some great key frames that will be great to use with the grease tool pencil on Maya. In these frames it shows the anticipation when landing and skipping again by leaning the character more forward and backwards.


This table of timing gave me an idea for how long each stride should be for each leg and the timing of the feet landing.

From these I started up with my Monty rig and began by giving myself 32 frames on my timeline to give me a rough idea of how much space I should be using. From this I began using the grease tool pen to give me a rough view of the key frames.

After planning the key frames I started working my way through the placement of them using the diagram shown in the video.

From these I went back through to extend the legs when jumping and landing and extending the body back slightly to emphasize the highest point of the skip and it allowed me to extend the frames to hold the jump.

When animating the leap phase of my animation, I tried to keep one leg tight to the body to emphasize the jump and give anticipation towards landing.

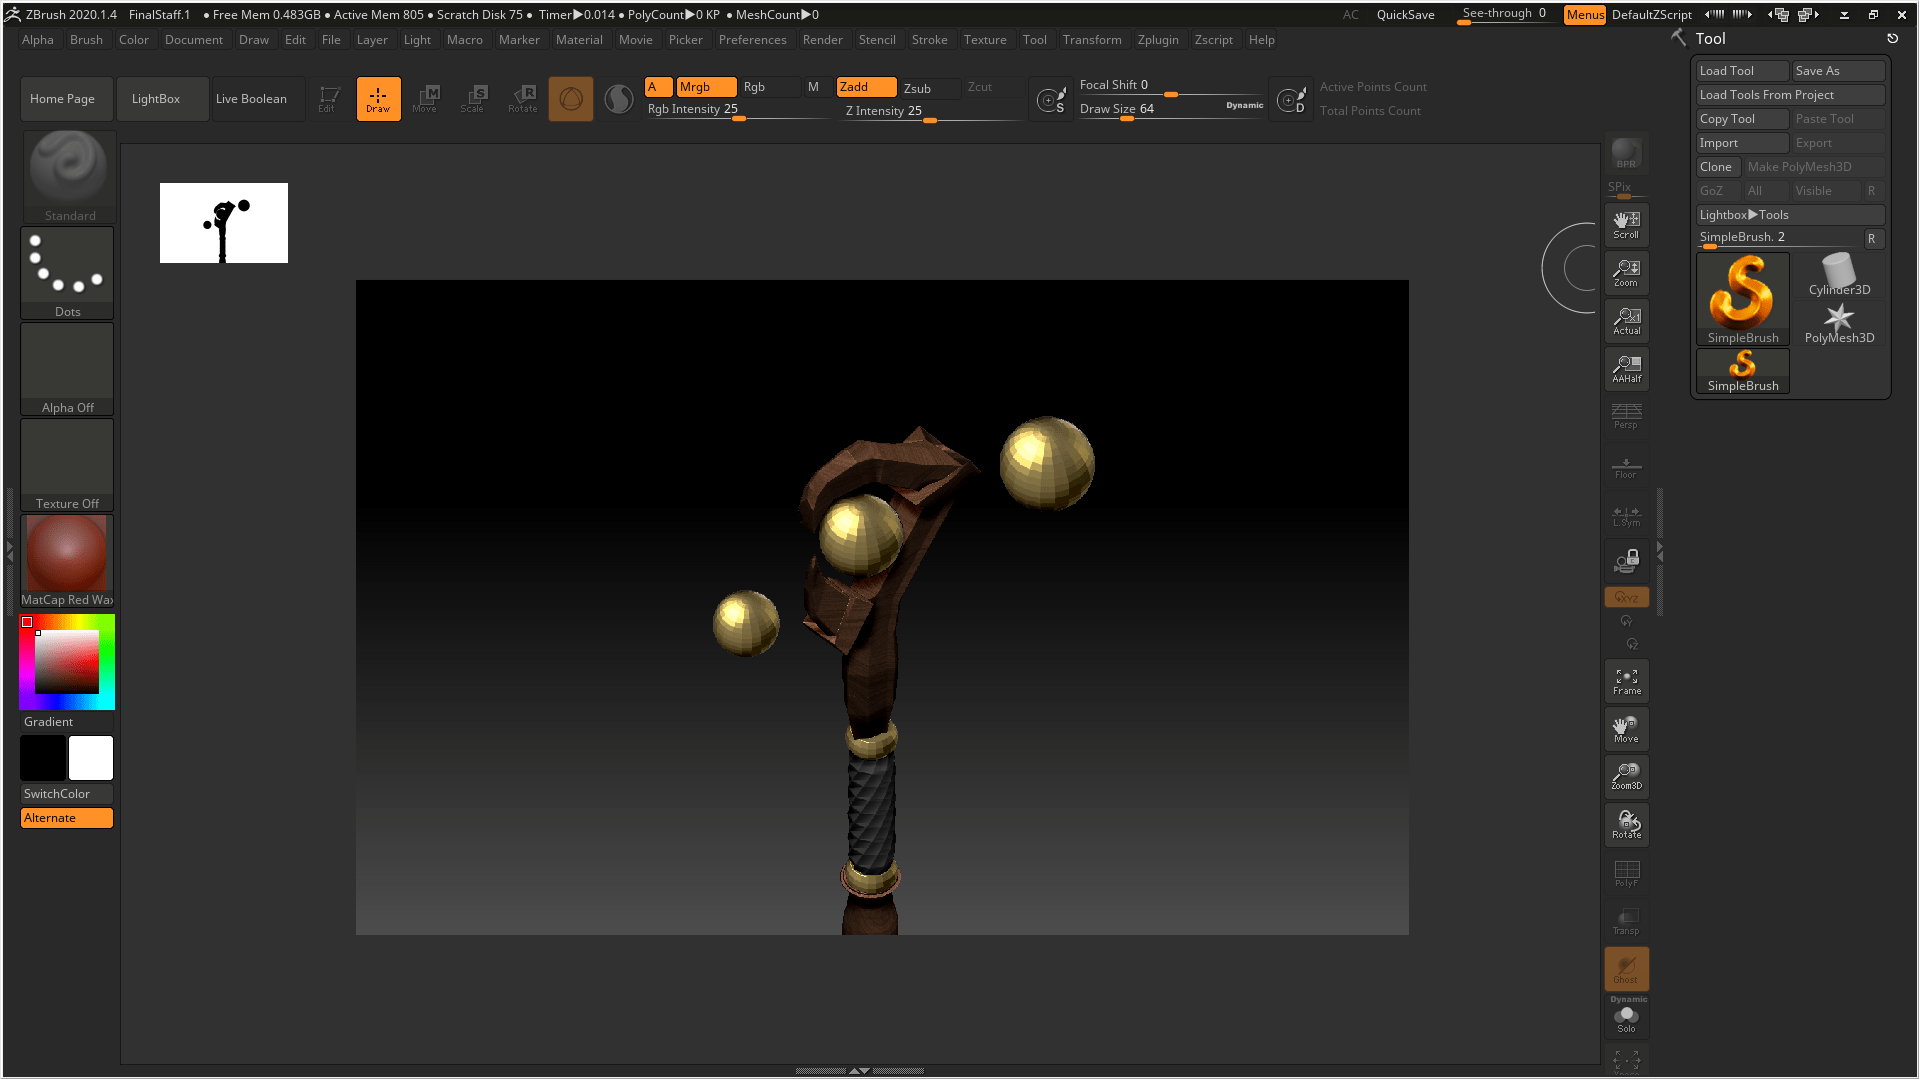
The image above shows some final tweaks such as ensuring both feet touch the ground and not float underneath the plane or above it. When moving the feet I found these settings helpful to bend the toes to give a more realistic motion of the foot, landing on the heel and taking off on the toes.

Below is my first attempt at the animation. I noticed there wasn’t enough time to show the highest part of the jump, as well as the knees bending outwards whilst jumping which is something I added to show the jump but whilst it’s playing it makes it look out of place. I noticed as well the feet whilst moving along the ground spread wider on the motion backwards and then they jump back into a more centered position. The final thing I noticed that needed to be improved is the timing and spacing as the animation just seems rushed and doesn’t emphasize the weight of the body landing and the knees needing to bend more, as well as the hold of the leap frames.

Once finished fixing some frames I was happy with the movement of my skip. It was still slightly fast but I’m happy enough with the movement of the body and the effect the weight has on the motion. I also added in some spot lighting around the character.

Moving onto my emotion animation I chose the subject of sadness. When researching towards this I came across an artist called Dan O’Brian, he was a lighting artist for the movie ‘Spies In Disguise’. Looking through some of his work on the movie he used some scenes of spot lighting where its noticeable he uses one light source. I thought this effect could be used nicely to give shadows and to create a more saddened atmosphere.

I began by following along with a video by Julia Bart. It showed me to drag the feet and keep them close to the ground, also I noticed the head was overhanging the body which I thought emphasized the mood more, as well as the tilted eyes.

Following along with Julia’s video I created my first attempt at the walk. It’s very stiff but I’m happy with the key poses and only needs in between plus more movement with the feet.

Going back through my first attempt I added more frames for the landing and the bending of the knees as they were stiff and quick to shift from straight to bent. I also went through and used the extra attributes menu to move the toes and heels, this made the bend of the foot more natural and realistic.

I noticed as well the rig had these adjustable points so I thought by using them to create a saddened face, along with the spot lighting it’ll add more shadows.

When refining my animation I focused more onto the foot movements. I went through and used the toe, ball and heel rolls to bend the foot more naturally. I also watched a video to get some references to how a foot should bend.


Outcome:

I liked how the feet bent more and made the rig less stiff, I also lowered the body further when the rig lands. I thought this would add a more effortless feel to the walk, emphasizing the emotion.

The final stage I added was two planes rotated behind the rig and underneath. I used these planes to let the spotlight bounce off the wall, almost like the character is walking under a lamppost in the middle of the night.

The final outcome I was happy with, if I spent more time on the foot movements I think it would come out a lot smoother but I’m still learning and if any spare time comes up I’ll go back and improve it for my own learning experience.

If I were to improve I would add in an obstacle such as a box or a lamppost so that the rig could interact and possibly sit on the box and swing his feet or lean against the post. I would also spend more time practicing timing and placement on walk cycles and play around with other emotions as well.

Videos & Articles:

How to create a playblast in Maya 2019: https://www.youtube.com/watch?v=ZFdaBDTDDL8

SyncSketch Tutorial: https://www.dropbox.com/s/0sgmhw3gp468twv/SyncSketch%20-%20Tutorial.mp4?dl=0

Hopscotch rules how to play: https://www.youtube.com/watch?v=fZzswQaICfM

The 6 Types of Basic Emotions and Their Effect on Human Behavior: https://www.verywellmind.com/an-overview-of-the-types-of-emotions-4163976#:~:text=During%20the%201970s%2C%20psychologist%20Paul,fear%2C%20surprise%2C%20and%20anger.

How to convey emotion with animation: Falling for a 3D bin: https://www.pebblestudios.co.uk/2017/01/25/how-to-convey-emotion-with-animation-falling-for-a-3d-bin/

Skip Animation Tutorial (Felix Sputnik): https://www.youtube.com/watch?v=l3AlUyOjNb8

Sad Walk Cycle Animation: https://www.youtube.com/watch?v=6ndB74DVpAk

Maya animation – sad walk cycle: https://www.youtube.com/watch?v=FTzzi4VTENs

Walk Cycle Reference: https://rustyanimator.com/walk-cycle-reference/

Maya Walk Cycle Tutorial – Complete | Character Animation Tutorial: https://www.youtube.com/watch?v=_8B7XYsJB6c

Foot In A Walk Cycle: https://www.youtube.com/watch?v=1awjCdGg9gM

Substance Painter/ZBrush

My next step was to then export my Maya model to substance painter. When first exporting I came into the issue of not having a FBX file to export as, I followed a lot of videos and articles on how to fix the issue but I ended up having to clean uninstall Maya and reinstall it again. However, I realized that I didn’t need to uninstall anything I just had to scroll down the list and FBX was at the bottom (facepalm).

When trying to upload my piece to Substance Painter my computer wasn’t able to load it up so I had to switch to ZBrush which I found was quite similar to Substance Painter. However, trying to learn the keys and how the software was difficult and when trying to finish up and upload to Sketchfab, it went downhill. My computer wasn’t able to load the plug ins and so I couldn’t upload to Sketchfab.

Using ZBrush was difficult to learn, I found it to be complicated and awkward how to apply textures and to maneuver around the model but I managed to create the colours and effects I wanted. I was happy with my UV mapping and it working well within ZBrush, I just wish I UV mapped the metal rings around the claw part of my model so I could apply a shiny, metal like material.

I am gutted I couldn’t fully upload my model, but to work on from now on is getting practice on ZBrush or other programs similar just incase anything happens and have to rely on plan B.

Articles & Videos: 

Exporting 3D Models from Maya into Substance Painter: https://www.youtube.com/watch?v=reuCXOiuiFs&list=PLxlrQQKwwf9fZs140wIDjrN3xaP_1EADB&index=69

ZBrush 2020 for beginners – The UI and getting started: https://www.youtube.com/watch?v=uuq8pzHToMQ

DART 153 Intro To ZBrush: Texturing Part 1 Colors And Materials: https://www.youtube.com/watch?v=tZwEKqqFuTU

How to retopologize in ZBrush using Zremesher: https://www.youtube.com/watch?v=z6iUTpZASFc

Autodesk 3ds Max, Zbrush, Substance Painter – Stylized Staff: https://www.youtube.com/watch?v=1KDCBDKzgnI&list=PLxlrQQKwwf9fZs140wIDjrN3xaP_1EADB&index=43&t=549s

Stylized Purple Amber Dagger – Autodesk Maya, Zbrush, Substance Painter and Marmoset Toolbag: https://www.youtube.com/watch?v=x_5sO_fTl4I&list=PLxlrQQKwwf9fZs140wIDjrN3xaP_1EADB&index=44&t=371s

Final Design

Beginning this module I had very little experience with 3D modelling, but over the past few weeks I feel I’ve created a successful model. The class material provided was great to look back on and it provided a lot of info on how each section should look. With the use of both class videos and online videos I feel it’s a great variety of topics covered and allowed me to find the best way to do different tasks. However, the only area that I really struggled with is UV mapping, the videos provided were great it was just hard to get my head around but I hope with time and practice I can use the software and understand it much better. It’s great to look back now at UV mapping and produce something I can be proud of. Moving on from this I feel I’ve a better knowledge and understanding of the software’s we used. A lesson I’ve learned as well from this module is to learn to walk before I run and go back to basics if I’m struggling to understand certain software’s and build up from there. I hope with future modules I complete I become more experienced and can move onto more difficult techniques.


Modelling

From my initial designs, I then moved on to modelling my final one with Maya.

So after about a day of watching tutorials and messing around with commands I came up with a basic model of my staff. I really struggled with making the wooden layers at the bottom and so I dragged faces to get the layered effect. I then tried to extrude the top section and somehow it turned into spikes. I was however able to create the leather wrapped around the center by following a online tutorial, it was difficult and awkward but it came through in the end.

However on Friday the 26th, I had a talk with Michael about my model. He told me about keeping my objects and polycount low, to extrude surfaces for the claw instead of creating a new object, the knife tool, to texture the leather straps instead of modelling them and how control edges work. He did also tell me how to create the edges of the wood piece but I didn’t get all the notes down on time and so I had nothing to build from.

With Michaels help I was able to navigate Maya easier and restart my model. I think this one came out a lot better. Below are some images of the basic look I was going for, I just need to smooth edges more and focus on the wood section at the bottom. One part of my model I am really proud of is the twist which is the handle, I was able to get Henry’s help on our 1 to 1 session where he showed me a few ways I could achieve this. The easiest way was to go onto Deform – Nonlinear – Twist. The menu that appears on the right was easy to use to get the twist I wanted. Another feature I’m happy with is the metal rings around the claw, instead of creating a new model and trying to adjust it, I simply extruded a ring of faces and adjusted it to stand out from the wood.


However, after trying to achieve the wooden edges I wanted I couldn’t get the hang of it and so had to alter my design to make it simpler and achievable. I changed the bottom section to another orb and defined the wooden section as the straight piece won’t look nice with the other features. To improve on this I would design a more symmetrical object to make things easier for myself and do more research into creating a cleaner looking claw and to also figure out how to create the wooden effect I was looking for.


Moving on from the modelling, I began my UV mapping. When watching Alec’s tutorials in week three I thought UV mapping wasn’t that difficult, but was I wrong when I came to my model. Some parts were simple, such as the spheres, flat surfaces and cylinders. However, the claw was the most difficult, I had to separate it and UV map parts of it at a time. I don’t think I created them the correct way but I feel I done the best I could on my claw and will definitely invest more time into UV mapping.

I was able to stay consistent with UV mapping once I knew what to do, I got used to using the cut and sew tools as well as learning to unfold shapes. I watched a lot of videos as some spoke of one way to do it and then another saying to do it a completely different way and so it took some time to figure out the easiest and most effective way for me to learn.


One thing I did learn from UV mapping is that smaller portions of a section of model works much better than trying to model the whole section. I also learned about the layout option when using UV that organises it for you which saved me a lot of time trying to organise each UV map individually.

Articles & videos:

Maya Tutorial for Beginners 2020 | Introduction: https://www.youtube.com/watch?v=PjpF3phtpHg&list=PLsPHRLf6UN4k0_AfrTzLmK4iDV9J97-qR

How to UV a Complex Object In Maya | UV Map Tutorial: https://www.youtube.com/watch?v=EpTezpLOXQw&list=PLxlrQQKwwf9fZs140wIDjrN3xaP_1EADB&index=77&t=917s

Maya Beginner Modeling Tutorial – UV Unwrap: https://www.youtube.com/watch?v=VHUJ-kte1n8&list=PLxlrQQKwwf9fZs140wIDjrN3xaP_1EADB&index=76&t=274s

unfolding a ball: https://www.youtube.com/watch?v=vlIKWFi5VmU&list=PLxlrQQKwwf9fZs140wIDjrN3xaP_1EADB&index=73&t=3s

How to unwrap the UV’s of a cylinder in Maya 2018: https://www.youtube.com/watch?v=qkMEk591sIg&list=PLxlrQQKwwf9fZs140wIDjrN3xaP_1EADB&index=72&t=114s

Unwrapping UV’s on Complex Cylinder Shapes in Maya 2019: https://www.youtube.com/watch?v=7GkcTzabxiM&list=PLxlrQQKwwf9fZs140wIDjrN3xaP_1EADB&index=71

Maya 2014 tutorial : Wood texturing tips ( Subscriber request ): https://www.youtube.com/watch?v=98E-L163fC4&list=PLxlrQQKwwf9fZs140wIDjrN3xaP_1EADB&index=67&t=245s

Speed Modeling | Priestess Staff from Goblin Slayer | Maya 2019: https://www.youtube.com/watch?v=Qh_0pES7CNU&list=PLxlrQQKwwf9fZs140wIDjrN3xaP_1EADB&index=66

Maya Quicktip: Modeling a claw /nail: https://www.youtube.com/watch?v=GTuxkPATLzA&list=PLxlrQQKwwf9fZs140wIDjrN3xaP_1EADB&index=64

How to model a Twisted Candle Stick in Maya 2018: https://www.youtube.com/watch?v=UEa1DWcn62s&list=PLxlrQQKwwf9fZs140wIDjrN3xaP_1EADB&index=62

Maya Non-Linear-Deformers – for modelling or animation: https://www.youtube.com/watch?v=CdCwE_m1WhE&list=PLxlrQQKwwf9fZs140wIDjrN3xaP_1EADB&index=61

UV Map Anything in 5 Minutes with Maya: https://www.youtube.com/watch?v=t5Co6SuzoQw&list=PLxlrQQKwwf9fZs140wIDjrN3xaP_1EADB&index=59

Design

Moving on from my research I began designing some staffs, on Adobe Illustrator, with different features I liked on them. I played around with size, width and style.

I began with some traditional tribal features onto a staff, keeping the theme of glowing orbs/skulls. I thought these came out great and allowed me to see what I was capable of doing and what I’m not.

With the first three drawings complete, I assessed what I had done and decided any of these would be too much for what I could do, with the feathers and the hanging assessories, and so I crossed these options out.


Moving on to the second set of designs, I really loved the dragon piece I thought with the right texturing and layering it would come out amazing but for the timeframe and experience I had I thought it would be too much to achieve. However, the other two pieces I liked as well but there was nothing that stood out and the final piece wouldn’t look appealing or interesting but I did like the use of the orb and the shaping of the staffs.


For my final designs I loved them both, I used a previous staff from my first designs and added detailing along the bottom with the use of metal discs stuck onto the staff. However, I didn’t like how much they stuck out and the model didn’t look eye catching enough, as well as the placing of the handle which didn’t look right to me. The last design on the right is what I liked the most, it kept with the tribal theme and made sense to me with the placing of the handle and the proportions of the staff. The glowing orb in the center is what interested me the most with the claw shaped wood curved around it, it made it feel mysterious and powerful. However, I don’t know if I will stick to one orb, the possibility of a couple more floating orbs around the staff might work well.

Articles & videos:

Autodesk Maya 2020 _ Stylized 3D Magic Staff Modeling in Maya 2020: https://www.youtube.com/watch?v=aQO6-KHbaM8

3D Modeling Voldimus’ Staff- Speed Modeling: https://www.youtube.com/watch?v=nC4_PiJKKjw

Vase

My first weekly challenge was to create a vase in Maya, below is my reference image.

I used Maya before during my Foundation Degree year, I created a small city in Maya and added in a camera. However, I did watch a tutorial on Linked In that covered a lot of features in Maya by George Maestri. I found the tutorial very long but I think I’m more comfortable now with understanding the software and it’s endless features.

I managed to finished just the basic shape of vase, for not using this software in over a year the shape is pretty smooth and I found the controls pretty easy. However, I did manage to create ngons on my vase which messed up the next stages. But I learned that pressing 1 turns off smooth preview and will help for future reference.

I found creating the vase was simple, using the multi-tool button, but I did struggle when creating the inside of the vase. Using the bevel tool was a bit confusing at first but after a few tries I managed to create an even width of an inside. Using the wire frame view made seeing the inside much easier and allowed me to make sure the circle stayed consistently round and not uneven.


The final vase came out really good, I managed to add more smoothness to the rim of the vase since it looked very sharp. I’m really happy with the outcome and I have boosted my confidence working with Maya.


Videos & Webpages:

3D Literacy – DES132 – Intro to Maya:   https://www.linkedin.com/learning/collections/enterprise/1~AAAAAAIe0ZQ=968203?trk=share_ent_collection_url&shareId=a652b0e9-e277-4ea0-bc25-a015f215536a&accountId=35574164&u=35574164&success=true&authUUID=yskrsFW3T3WzPRSxDTLHcQ%3D%3D

Maya Tutorial for Beginners – 2020: https://www.youtube.com/watch?v=PjpF3phtpHg&list=PLsPHRLf6UN4k0_AfrTzLmK4iDV9J97-qR&ab_channel=GameDevAcademy

Pixabay: https://pixabay.com

3D Literacy – DES132 – Intro to Maya: https://www.linkedin.com/learning/collections/enterprise/1~AAAAAAIe0ZQ=968203?trk=share_ent_collection_url&shareId=a652b0e9-e277-4ea0-bc25-a015f215536a&accountId=35574164&u=35574164&success=true&authUUID=yskrsFW3T3WzPRSxDTLHcQ%3D%3D

Kitbull

To start off our Animated Narratives class, I was given the first assignment, to produce a presentation based upon analysis of a Pixar short – Kitbull. My group consists of Megan McColm, James Greer, Samantha Savage and Curtis Girvin.  In the assignment overview, we had to cover the elements of Narrative structure and its relation to the Hero’s Journey, Mise-en-scène, Cinematography, Sound, Editing and Discovering intent – How it evokes a reaction from the audience.

During the first class, we were split into our groups on Blackboard. We all then watched through the short (almost in tears) and set up a word doc to put down any ideas. We all didn’t agree on a part to give each other but we all just started analyzing anything that stood out.

I decided I was going to focus on Cinematography. I began with some research on cinematography on what it is and how it can be used effectively through lighting, framing, composition, camera motion, camera angles, film selection, lens choices, depth of field, zoom, focus, color, exposure, and filtration.

From the research I came up with a script for my section of the presentation;

Cinematography in any film is fundamental, without it the visual mood, atmosphere, and sense of meaning lacks for the audience. Cinematography is important for every element of the narrative and needs to be cohesive and support the story. In Kitbull the cinematography varies widely, from high angled shots to close up shots, sunny days to thundery nights.

Most of the shots in Kitbull are at the same level to our main characters. This gives us the atmosphere that the producers want us to see their world and struggles through their eyes and cut out the importance of humans. In the beginning these close-up shots emphasis loneliness and selfishness of the kitten, supporting itself and keeping away from humans. This could tell us that the kitten was possibly abandoned and feels no trust with humans, however it does show of this pink elephant. The close up shots of the toy is seen as a comfort to the kitten, whenever it becomes scared its first reaction is to the elephant.

However, as the story progresses, the elephant becomes less important and is replaced by the pitbull and by the end when they both escape, no thought is given to the elephant and is left behind but instead the dog becomes the comfort to the kitten. The lighting shown when the car pulls up seems mysterious and unusual. Its bright orange light isn’t normal to this kitten and shows a somewhat evil arriving. It links well with the orange lid the kitten and dog end up playing with as it shows contrast from evil and good, through the building of trust this lid gives them both and the lack of trust the orange lighting the humans are given.

We then see in the next scene that the lighting has changed to a dull grey, showing us a storm could be on the way and what does it mean for the kitten and the dog, could something bad happen? The next scene shows us that evil orange light again but this time inside the mysterious building. Along with the sounds of barking and yelling, we notice the dog being kicked outside in the rain with the contrast of the orange light and the dark blue and black lightning sky. It shows us the pain and sadness through both the kittens and dogs eyes and that this night brings change.

The next scene shows a gloomy blue sky, showing us the calm after the storm, and the dark kennel the dog is placed in shows us pain, sadness and hurt, maybe just wanting to be left alone. Nearing the end, the orange light appears yet again showing that more hurt and sadness can come. It acts like a warning to them both to get out while they can, through the trust they’ve built together.  In the final few scenes, it is seen as a bright day, showing the kitten and dog are happy together and free. The close ness of the camera shows us the close bond they have for one another and are changed towards humans. Them both appearing from the shadows shows that they are ready to step into the light and trust this human that has tried to comfort them before.

From my script I then created my slides, I thought that leaving out text would make my slides look less cluttered and more simplistic to avoid the viewers being distracted by what’s on screen rather than what I’m speaking about.

I feel that these slides came out well and were able to relate to my script, the way the images were laid out I feel that the viewers could follow my voice with them.

After Samantha’s final edit our presentation came out really well and flowed great. To improve, I would suggest that we planned out our sections more and gave each other more feedback whenever we finished our slides or our recordings etc. but overall I enjoyed working with my group and I’m happy with the final piece.

Videos & Articles: 

Kitbull – Pixar SparkShorts: https://www.youtube.com/watch?v=AZS5cgybKcI

Film 101: What Is Cinematography and What Does a Cinematographer Do?: https://www.masterclass.com/articles/film-101-what-is-cinematography-and-what-does-a-cinematographer-do#what-is-cinematography

Cinematography: https://u.osu.edu/animation/cinematography/#:~:text=Cinematography%20describes%20the%20process%20of,is%20also%20a%20key%20factor.

Planning Animation Cinematography and Shot Structure to
Communicate Theme and Mood: https://web.stanford.edu/dept/HPS/154/Workshop/KennedyKevin%20Planning%20Animation%20Cinematography%20and%20Shot.pdf

Cinematography for 3D animators: https://www.creativebloq.com/3d/cinematography-3d-animators-8069687

Vogler, C. (2007). The writer’s journey. 3rd ed. LA: Michael Wiese Production.
Wallis, T. and Pramaggiore, M. (2011). Film – a critical introduction. 3rd ed. London: Laurence King Publishing.

Campbell, J. (2008). The hero with a thousand faces.   3rd ed. Novato: New World Library
Katz, S., (1991) Film Directing Shot by Shot, Michael Wiese Productions

Research

So, after a long break we’re back and to start things off we got the handbook of what this semester is all about. Our first assignment is to model, UV unwrap, texture and render one of the following:

  • Windmill
  • Mantel Clock
  • Treasure Chest & Treasure
  • Sword & shield
  • Sci-Fi Door
  • Old Well
  • Magic Witch / Wizard Staff

I then began to research all of the objects to see which one appealed to me the most. 


I done some of my research on Art Station, it gave me some of the best designs and encouraged me to like the staff idea. I like the tribal feel to them with the skulls and the feathers and their magical/mysterious atmosphere about them.

I researched some images of tribal staffs:

For my staff I’d love to add different elements seen in the images above. Using a leather and wood handle and the accessories with bright colours and lights.

I did find some skulls that would look really cool as the main piece on top with added lights or a smoke effect coming out of the eyes and mouth. Another idea with the skulls is a ram skull, I think the horns would be cool with feathers etc. hanging from them.

When researching skulls I came across Sea of Thieves skulls, the lighting and design caught my eye. Since these skulls usually have no bottom jaw it would be much simpler to model, giving me more time on my other accessories.

I found an image on ArtStation which is something similar to what I was imagining for my staff, I think the use of colours and lighting would work really well.

From these ideas I decided to focus on a simpler staff, having basic knowledge of Maya and Substance Painter it made me realize a simpler design would be more realistic for my deadline. I’m going to stick to a tribal themed staff, with a simple orb in the center, I think my staff will come out well once the textures have been applied.

Articles & videos: 

3D Literacy – DES132 – Intro to Maya:   https://www.linkedin.com/learning/collections/enterprise/1~AAAAAAIe0ZQ=968203?trk=share_ent_collection_url&shareId=a652b0e9-e277-4ea0-bc25-a015f215536a&accountId=35574164&u=35574164&success=true&authUUID=yskrsFW3T3WzPRSxDTLHcQ%3D%3D

Maya Tutorial for Beginners – 2020: https://www.youtube.com/watch?v=PjpF3phtpHg&list=PLsPHRLf6UN4k0_AfrTzLmK4iDV9J97-qR&ab_channel=GameDevAcademy

Pixabay: https://pixabay.com

3D Literacy – DES132 – Intro to Maya: https://www.linkedin.com/learning/collections/enterprise/1~AAAAAAIe0ZQ=968203?trk=share_ent_collection_url&shareId=a652b0e9-e277-4ea0-bc25-a015f215536a&accountId=35574164&u=35574164&success=true&authUUID=yskrsFW3T3WzPRSxDTLHcQ%3D%3D

Glowing Skull Staff: https://www.artstation.com/artwork/99RDO

Portfolio

Week 1 – Form & Shape

Week 2 – Composition & Perspective


Week 3 – Tone & Value

Week 4 – Colour


Week 5 – Character


Week 7 – Animation Introduction

Week 8 – Storyboarding & Animating with Forms


Week 9 – Animatics & Secondary Actions

Week 10 – Reflective Blog& Animating Animals

Week 11 – One to one feedback & Animating 2D effects

Final Animation


Week 13 – Submission

Finally, it’s the last week. Below is my final animation. I am very surprised I managed to get it done but I do feel the overall appearance could’ve been improved but for the next semester I hope to not work so much and produce work that truly reflects me. I didn’t get to neaten up my lines or add in the cat for the first scene, I didn’t expect it to take so long. Some colouring of the character is messy but not noticeable from a distance, however I did make up for detail in the closer parts of my animation.

However, I am proud of the end product and think it is a massive improvement from my foundation degree last year. Its been a great semester and I am very excited for what’s to come.

The final animation our group completed looks amazing! We are all proud of what we’ve done and hopefully next semester our work will be even better.