End of Year Show

3D Artist/Rigger

CV

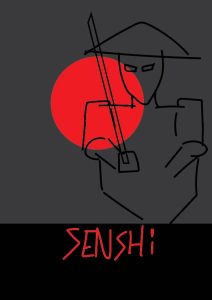
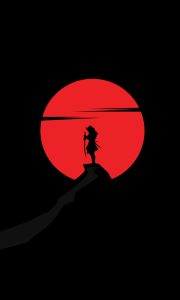
From my feedback of my rough designs I wanted to make sure I kept more consistency between my CV, Poster and Buisness Cards. One main theme I kept throughout was the red sun, this linked everything to my Japanese inspiration.

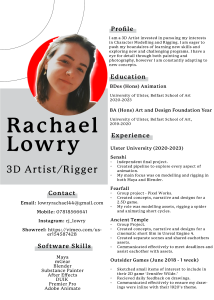
For my CV I did change the layout, however I did keep some influence of my previous. I liked the main body of information on the right, with my contact and skills focused on the left. I was going to keep the section to include my hobbies however I felt that this made the page too cluttered and compact. From my previous I also shortened my profile to main points and to allow more room for more related experience.
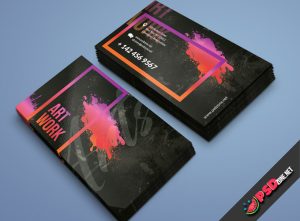


Business Cards

Keeping with the Japanese theme I used a silhouette idea and the use of the red sun again. I did change my idea completely from my previous however I feel that in keeping with the Japanese theme I also like the minimalist theme of the Japanese people too and so I tried to keep it as minimal as possible and used a QR code to link to my showreel on Vimeo.

A couple of issues I did discover once my cards had been printed are that the font was too thin and so once printed it makes it harder to read, this too with sizing. As well as this I should’ve been more consistent with my title as in my CV its stated 3D Artist/Rigger and on my business card it states 3D Character Rigger/Modeller.
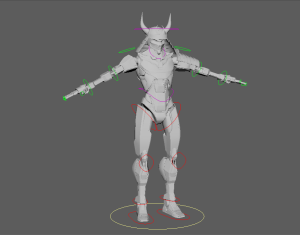
Showreel

For my showreel I like the content that I had within it however I do want to add in more in depth videos of my rigs and a cleaner background for my models. As well as adding better transitions between content.


Social Media

For my social media presence I created an Instagram account to upload and receive feedback on my models and rigs. I also set up a LinkedIn page as well as beginning to upload my models to Sketchfab.

Poster

When creating my poster I did like the silhouette theme, however when rendering the scene to create my poster I ended up keeping the main character lit. I played around with camera angles, most facing side on to the character and only showing half of the model, however I wanted to show the characters glowing red eyes to keep with the theme of both my CV and Business Cards. I also tried to incorporate the red sun in the background just above the temple.

Portfolio Artbook

For my artbook I want to show the breakdown of each model and some arial shots of my scene. However, they weren’t printed in time and so I presented some smaller images of my models both wireframe and textures, as well as some landscape renders.

Display 

For my display I ordered some obvious Japanese items such as a bonsai, katana and cherry blossom. I also had a small frame with glass that I was able to use for a larger QR code that links to my showreel.

I preferred the last layout with the cherry blossom weaving between the frames, I hope to get another frame for my poster to hold it in position better, and to add a landscape image of my scene.


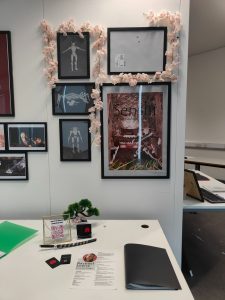
My three rigs I printed however the quality wasn’t the best and so they are quite pixelated and so for the industry night I hope to have better quality images.


Conclusion

To improve on my work I will be posting my work to my socials and also working on improving my rigs for my showreel, as well as adding more rigging practice. I would also make my font both larger and thicker for my business cards as well as changing my title to keep it consistent with my other pieces. Finally, I will be printing my shown work to a higher quality as well as adding small sections of text to explain each part.

Creative Futures

3D Modeller & Rigger

Poster:

For showcasing my work I decided I would be sticking to a Japanese theme and so I kept this in mind throughout my design process. Firstly, I used PureRef to gather some images of Japanese posters that I liked. I chose these images as I liked the simplicity of the silhouette against bold and vibrant colours. I found the game Ghost of Tsushima a great reference as it included a variety of characters and objects to add some parts of the story to the poster, making it seem more curious however keep its simplicity. I also liked a poster from Trek to Yomi, which is a game that stuck to the original black and white samurai films. This also furthered my likeness for simplistic silhouettes.

From these references I got some feedback from Henry, he suggested possibly adding in maybe my other characters in the foreground or background to add a bit more story and information about my animated short.

From this feedback I looked into some movie posters that had simplistic silhouettes and bold colours, I found the following images my favourite, especially ‘Harakiri’ for its bold background, the bright red sun and black and white character. From these images I did a few rough sketches of my character in this poses and build up a better idea as to which one’s I like more than others.

Below are my (very) rough sketches:

To do: 

So far I only have some rough sketches of ideas, from these ideas I’d like to create more variations of colours and layouts with more detail such as mountains/trees/torii shrines in the backgrounds which would suit the scenes in my short.

Business Cards:

I gathered some inspiration for my own business card designs. From the ones I selected I loved the idea of possibly showing a model I have created on the front, possibly with half mesh and half fully modelled, like the example below.

With the above three images I like them all and would like to experiment with a combination of them all. However, I would like to experiment more with the two guns design as I think it could be unique to use possibly a samurai helmet or katanas together.

I also liked the business card shown below as the idea of a playing card that’s been designed to look like me holding a pencil or a katana, which would suit my theme better. I really liked the messiness of the background of the front of the card, however I don’t like back as it does look quite plain. To solve this I will be sketching ideas like the next image below, experimenting with drawings of myself or of samurai. 

Below are some sketches of my own designs, in Photoshop and Illustrator, inspired by these cards, as well as some experiments with font to determine which would suit best with both my general Japan theme and my own interests.

C.V. Design

For my CV I looked through some of the previous years examples. From these I really liked the look and simplistic design of Dermotts, however I do want to keep some of my Japanese inspiration.

I was able to find a previous CV I had created last year, I do like how it already looks however I would like to downscale the large circle for my logo to provide more room for my text and apply any feedback received from tutors.


To do:

To get my CV finished up I will be moving on to researching more CV’s similar to Dermott’s and adding my own twist. As well as this I will look watch the following YouTube videos on understanding CV design better to improve my final design.

Design Deck Ideas

So far with my design deck I want to create an artbook containing mainly my environment, models and rigs as this is what I’m interested in after University. I have gathered some videos about designing my artbook.

I also have taken some inspiration from ‘The art of S.O.S.’, their artbook adds an even amount of both text and images giving the reader a good understanding as to what is shown. As well as this, I like the stylisation of Jack Foleys Geronimo and Heatstepper’s artbook. The boarder and colouring suit the theme of the animation well, this could be incorporated into my artbook with the Japanese aesthetic.

Conclusion

My next steps in my design process is to finish variations of my business cards, making sure to experiment with how I want the character shown as well as experimenting with the layout of my name and details. Following this I will move onto choosing a specific design I like for my poster, then narrowing down options involving colour and layout. Next, I will be simplifying my CV and adjusting to any feedback I recieve from tutors or other classmates, and finally I will focus on sketching out what I would like to see in my artbook and a rough idea as to what I’d like to say to clarify each page.

Overall, I feel that I need to get my rough designs done as soon as possible and get as much feedback as I can to get everything ready for testing and experimenting with sizing and finding somewhere to print. I’m looking forward to the challenge of getting things finished off and hope to get my personal branding finished up and ready for the end of year show.

Assignment 2 – Animation Studies

For my study in weight and motion I thought about doing either hopscotch or a skip, after looking for some references and found there was a lot more for a skip and I wanted to do something that’s different from my emotion as I wanted to do a sad cycle so thinking along the lines of skipping it could be happier compared to my emotion.

When beginning my skip animation I wanted to get some reference of how my rig would move. I found a great video by a guy called Fiz who showed me some basic posing and timing and gave me a better understanding to how the body moves.

The main pointers he gave is that the skip is a mix between a run and a walk cycle, omitting the third step. By also understanding the differences between a run/walk cycle and a skip is important as well as it tells me when each foot should be when at the highest and lowest positions, from this I was able to understand that both feet are in contact with the ground at the same time. I also got a basic idea into the footfall pattern being 5, 11, or 16 frames per skip, making the overall length of the cycle around 32 frames.

He also showed some great key frames that will be great to use with the grease tool pencil on Maya. In these frames it shows the anticipation when landing and skipping again by leaning the character more forward and backwards.


This table of timing gave me an idea for how long each stride should be for each leg and the timing of the feet landing.

From these I started up with my Monty rig and began by giving myself 32 frames on my timeline to give me a rough idea of how much space I should be using. From this I began using the grease tool pen to give me a rough view of the key frames.

After planning the key frames I started working my way through the placement of them using the diagram shown in the video.

From these I went back through to extend the legs when jumping and landing and extending the body back slightly to emphasize the highest point of the skip and it allowed me to extend the frames to hold the jump.

When animating the leap phase of my animation, I tried to keep one leg tight to the body to emphasize the jump and give anticipation towards landing.

The image above shows some final tweaks such as ensuring both feet touch the ground and not float underneath the plane or above it. When moving the feet I found these settings helpful to bend the toes to give a more realistic motion of the foot, landing on the heel and taking off on the toes.

Below is my first attempt at the animation. I noticed there wasn’t enough time to show the highest part of the jump, as well as the knees bending outwards whilst jumping which is something I added to show the jump but whilst it’s playing it makes it look out of place. I noticed as well the feet whilst moving along the ground spread wider on the motion backwards and then they jump back into a more centered position. The final thing I noticed that needed to be improved is the timing and spacing as the animation just seems rushed and doesn’t emphasize the weight of the body landing and the knees needing to bend more, as well as the hold of the leap frames.

Once finished fixing some frames I was happy with the movement of my skip. It was still slightly fast but I’m happy enough with the movement of the body and the effect the weight has on the motion. I also added in some spot lighting around the character.

Moving onto my emotion animation I chose the subject of sadness. When researching towards this I came across an artist called Dan O’Brian, he was a lighting artist for the movie ‘Spies In Disguise’. Looking through some of his work on the movie he used some scenes of spot lighting where its noticeable he uses one light source. I thought this effect could be used nicely to give shadows and to create a more saddened atmosphere.

I began by following along with a video by Julia Bart. It showed me to drag the feet and keep them close to the ground, also I noticed the head was overhanging the body which I thought emphasized the mood more, as well as the tilted eyes.

Following along with Julia’s video I created my first attempt at the walk. It’s very stiff but I’m happy with the key poses and only needs in between plus more movement with the feet.

Going back through my first attempt I added more frames for the landing and the bending of the knees as they were stiff and quick to shift from straight to bent. I also went through and used the extra attributes menu to move the toes and heels, this made the bend of the foot more natural and realistic.

I noticed as well the rig had these adjustable points so I thought by using them to create a saddened face, along with the spot lighting it’ll add more shadows.

When refining my animation I focused more onto the foot movements. I went through and used the toe, ball and heel rolls to bend the foot more naturally. I also watched a video to get some references to how a foot should bend.


Outcome:

I liked how the feet bent more and made the rig less stiff, I also lowered the body further when the rig lands. I thought this would add a more effortless feel to the walk, emphasizing the emotion.

The final stage I added was two planes rotated behind the rig and underneath. I used these planes to let the spotlight bounce off the wall, almost like the character is walking under a lamppost in the middle of the night.

The final outcome I was happy with, if I spent more time on the foot movements I think it would come out a lot smoother but I’m still learning and if any spare time comes up I’ll go back and improve it for my own learning experience.

If I were to improve I would add in an obstacle such as a box or a lamppost so that the rig could interact and possibly sit on the box and swing his feet or lean against the post. I would also spend more time practicing timing and placement on walk cycles and play around with other emotions as well.

Videos & Articles:

How to create a playblast in Maya 2019: https://www.youtube.com/watch?v=ZFdaBDTDDL8

SyncSketch Tutorial: https://www.dropbox.com/s/0sgmhw3gp468twv/SyncSketch%20-%20Tutorial.mp4?dl=0

Hopscotch rules how to play: https://www.youtube.com/watch?v=fZzswQaICfM

The 6 Types of Basic Emotions and Their Effect on Human Behavior: https://www.verywellmind.com/an-overview-of-the-types-of-emotions-4163976#:~:text=During%20the%201970s%2C%20psychologist%20Paul,fear%2C%20surprise%2C%20and%20anger.

How to convey emotion with animation: Falling for a 3D bin: https://www.pebblestudios.co.uk/2017/01/25/how-to-convey-emotion-with-animation-falling-for-a-3d-bin/

Skip Animation Tutorial (Felix Sputnik): https://www.youtube.com/watch?v=l3AlUyOjNb8

Sad Walk Cycle Animation: https://www.youtube.com/watch?v=6ndB74DVpAk

Maya animation – sad walk cycle: https://www.youtube.com/watch?v=FTzzi4VTENs

Walk Cycle Reference: https://rustyanimator.com/walk-cycle-reference/

Maya Walk Cycle Tutorial – Complete | Character Animation Tutorial: https://www.youtube.com/watch?v=_8B7XYsJB6c

Foot In A Walk Cycle: https://www.youtube.com/watch?v=1awjCdGg9gM

A little about me..

Hi all,

I am Rachael!! A 20-year-old animation student. I love to game, although I am not a PC gal, I prefer my Xbox. I have loved the Assassins Creed games since Brotherhood back in 2010, to the upcoming Valhalla in November 2020, which I am super excited for. I’m a huge fan of Call of Duty, all the way back to Mason and those numbers. However, my love for travelling conquers all. I hope someday I get to visit Japan, once of my favourite cities on earth, and experience their culture and atmosphere. I also hope to see some attractions of Gudetama, one of the cutest cartoons I’ve ever seen!! One country I visited was Ethiopia, I visited last October and is an experience I’ll never forget and hopefully someday when this is all over, I can revisit again. I’ve also just became a fan of JoJo’s Bizarre Adventures; however, I never knew how good the story telling and smooth animation is. I love the designs of Hayao Miyazaki, zombiebass, John Lasseter, Gabriel Soares, Quentin Chesné and Te Hu.

I hope you all enjoy my work!!