Category Archives: 3D Digital Literacy

What I did during the summer

During the summer, I worked on several models of characters for my own personal work. I first made a model of an OC of mine, Notch the Blacephalon, and rigged it for animation.

I created a few animation tests of Notch, including a walk cycle and an idle animation.

I then modelled a small scene of an alien forest for my model, while following a tutorial to create an atmospheric forest, creating models of a tree and grass to use as particle effects for the main scene.

(2) Create an Atmospheric Scene in 10 Minutes (Blender 2.8 Tutorial) – YouTube

I then created an animation of Notch walking in the scene, only to be startled and run behind the tree it walked out from behind, also using some stock nighttime noises, grass step noises and editing Blacephalon’s cry into the scene. I am very happy with the final result, as I used a lot of the skills I learned from my first year at Ulster University.

Notch, the trees and Grass were all fully hard modelled, and the trees were hand textured by me, as well. I hope I will be able to improve upon my current skills in the second year.

3D Digital Literacy- Asanbosam development and Reflection

I had very little time to complete my assignment for Mike’s module due to procrastination and persistent focusing on other modules. Over the course of a single day, I set to work on multi-resing, texturing, rigging, and posing my Asanbosam character.

Before I started modelling my asanbosam character, I had to conceptualise her first. She was originally designed with wings and would have had them modelled using planes and solidified beizer curves, but that would have proved to difficult to rig and develop. So I replaced them with hands with iron claws as many illustrations of asanbosam were depicted. Her overall design was also simplified for further ease of modelling.

Blocking out the model was generally easy as I simply had to block out my character’s  body using primitives such as cylinders, planes, Spheres and cubes. Sculpting the details was also rather fun as was multi resing the details later on.

The first pothole I got stuck on was how to apply the armature to the other side of my model. Due to the way my model was placed, the symmetrising always ended up wrong.

I later learned that I needed to rotate my model 180 or so degrees, and then apply the symmetrise there, and it worked.

The next pothole I ran was the model resetting when I applied the armature. I realised I had to move the armature to be the first thing on the modifier. I then had to join all the parts up so that they could all be exported as a single FBX file.

This is the final result of my model.

Asanbosam – 3D model by InkLightning (@InkLightning) [180dd5f] (sketchfab.com)

Over the course of my time with Mike’s module, I learned a lot about taking references from other sources. I largely get my ideas from my head, so trying to get refs from Gennedy Tartakovsky made me think about how to conceive my ideas.

I found the retopology part the most frustrating and difficult part of my modelling process. It was rather annoying trying to link all the polygons together and ensuring not one was our of place. putting all the parts together properly for export was also rather difficult, as was the armature.

I enjoyed texturing the most out of the process as it was a reprieve from the mapping and retopologising that came before. Multi resing was also  quite fun and not as stressful as I thought it would be.

Overall I would like to 3D model again, but next time, limit myself to simpler shapes so that I have more experience for modelling more complex shapes.

Week 11- Rigging

Today in Mike’s Module we learned about Rigging with a preretopogised character he made a few years back. We first create an armature bone and position it between the chest and pelvis area of the model, and then extrude ot extra bones and then position them into the various places of the model, such as the head, neck and limbs.

Then, we parent the armature rig to the character and then we bake it into the mesh, and then apply automatic weights. We can then pose the character in anyway we want.

I found this task much easier and less fiddly than the retopology, so i hop I can be able to reach far enough with my won character to make use of rigging.

This is what I did with Mike’s character.

Week 10- Multi-res levels and detail adding

Today we learned about how to add minute details to our models without raising the polygon count to machine breaking levels, By using a tool known as the Multi Res modifier, we can create maps what add details to a model without making the polygon count too large for our machines to handle.

First, we take a pre retopologised elephant’s head and add a multi resolution modifier. Sub dividing the model results in a new iteration of that model and keeps track of them. In HD animation, all the details are kept on these levels ad will be all rendered after going back to the base mesh.

Multiple levels from around 5 -7 can slow down your computer.

I opened up a UV shader editor window and created a new 2k 2048×2048 texture, and then created a new shader editor and changed the image space to RAW.

I then plugged the file and projected it onto model, and changed the render properties to cycles, and then baked for multi res to generate the maps. I then pulled the normal map from the sculpt.

The resultant normal map has less polygons and is simply a texture that can give the illusion of depth to a sculpt.

We can then export this normal map and its model into Substance and see how the details look in there.


Week 9- Sculpting

I decided to do more work on the sculpt of my asanbosam character. I created the limbs using several modified cylinders and spheres, and then used cylinders with added centre vertices to create the pointed fingers of the character.

When it came to sculpting, I used the clay build up and strip tools for the main body and then smoothed them out.

Using the polygon fill tool, I created clothes for the character and then extruded a belt.

The hair was created using a primitive sphere and was the hardest part of the model for me. I had to extrude and modify the shape of the hair several times before I could consider it done. making the knife and sheath for the model was much easier.

Week 9- Topology

Today we were taught a way to make modelling easier- Retopology. Retopology makes low polygon models that are easier to animate and model than the original meshes they were based on. A way to aid topologizing a model is to use the polygon fill tool, which involves taking an edge of a place and automatically creating a new polygon to fill out the model. By tiling up these polygons, you can, though rather a time-consuming process for it, create a new low polygon model that will use less of your computer’s processing power!

We had to use the polygon fill tool to retopologies an elephant’s head as part of the classwork. I found the process quite fiddly and long winded, and merging the edges correctly was quite a chore, as well.

We also learned about UV mapping the elephant’s head, starting with a projected plane using the projector modifier, and rotating and applying the rotation to the plane as needed, the UV viewer will show the retopologised head.

We then add our seams using Mark Seam such as around the ears, the base of the trunk, etc and then unwrap.

In addition, I learned about the various types of layers I could use to help with the look of my character.

A wetness layer can be used for accents. By creating a layer with metal and roughness as their material channels. I can select a mask on top with blur to reveal it in spots.

Blur layers can help with blending and give a painted feel.


Week 8- Sculpting

In Mike’s Module we practiced preparing a character for sculpting. I blocked out my practice character using several different primitives, such as spheres, a cube with subdivision surface applied, cylinders and cones. I then attempted to remesh the model, but I put the number of pixels for remeshing so small that it ended up crashing the software.

When I next went back to the test sculpt, I decided to base the character on one of my OCs, a robot named Selene. This was about as far as I got with the test sculpt.

The hair, ears, nose and eyes of the character are all separate from the main body.

As for the final character, sticking with using the Asanbosam of Ghana legend, I revised her design so that she didn’t have wings, figuring they would be rather difficult to sculpt and would therefore be made in a similar way to Zubat’s wings, using planes, meshed Beizer curves, and a whole lot of fiddling.

I wanted to have a design that would be easy to sculpt while also not be too boring. I changed the asanbosam’s proportions, so she was more in line with a child’s proportions, which would in theory be easy to sculpt. Her eyes are kept large to fit in line with some of Genndy Tartakovsky’s female characters and she has iron claws on her hands to compensate for the loss of her wings.

Going with the idea of the knife, I gave her a belt with a knife sheath so that she can wield it in self defence. This is the finished reference I will use to sculpt the asanbosam.

And thus, I have begun the process of blocking her out.

Week 7- Genndy Tartakovsky

This week for Mike’s Module I had to do research on Genndy Tartakovsky as well as draw out some designs for a hypothetical character in his artstyle who would appear in Hotel Transylvania.

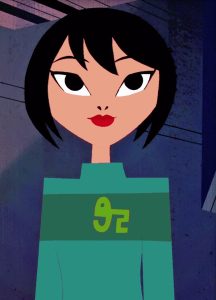
Gennedy Tartokovsky is an award winning animation visionary director and a legendary name in the modern day animation industry, known for creating Samurai Jack, Dexter’s Laboratory, Primal, Sym-bionic Titan and Star Wars: The Clone Wars.

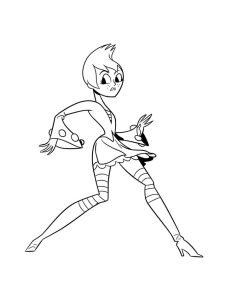
Upon doing research into his art style, I came to the conclusion that it is very simplistic, with little to no details on the clothing and mainly utilises heavy stylisation, with heavy use of basic shapes into a lot of the characters he creates, such as squares for Samurai Jack, round circles for females and child characters. His art style is unique to the point where its noticeable in many of his other works, such as Primal, and the subject of our homework, Hotel Transylvania, of which he directed.

After reading a comic that he made, Cage, about a black superhero who possesses extremely tough skin who goes to investigate the recent disappearance of several superheroes, I took note of how detailed and dynamic his art style can get during key scenes, such as when he’s fighting some villains or the opening scene with two bandits stealing from a bank.

His art style has become a lot more simplistic in terms of details between Cage and his more recent work and Hotel Transylvania, another work of which I did several designs for hypothetical characters that might come to the hotel.

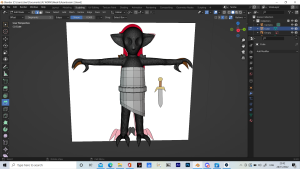
The first was a Garkain of Australian aboriginal legend that was taught to young children to teach the importance of good manners. The creature had leathery wings and suffocated victims with its horrible stench. These creatures are actually represented in the game The Witcher 3, which is part of the inspiration for this design, though they do not have wings in the game.

Here is a design for the Garkain along with the inspiration for its design.

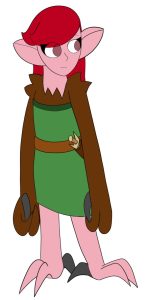
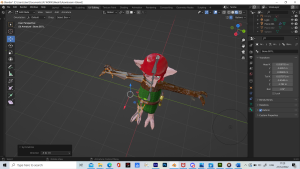
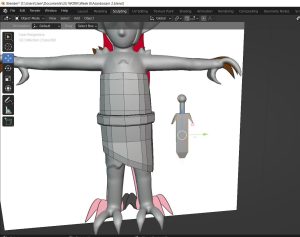
The second is a creature from Ghana legend called an asambosam, from Ghana legend. like the Garkain it had large wings that can reach 20 feet in length. They are described as having red hair, pink skin, with iron teeth and hooks for feet. They usually live in trees and take many traits from bats.

Unfortunately, asambosam are usually portrayed as being sloth like creatures, so I chose to create a design closer to the original legend.

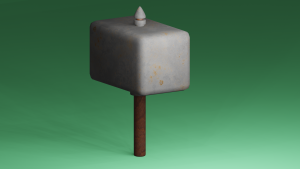
Thinking about props for the characters, I decided to give the garkain a smoke bomb, to play more into his ability to kill using stench and also to give him a way of confusing his enemies should he be confronted and the asambosam and a knife for the asambosam to stab her opponents with.

3D Digital Literacy- Completed Models, Textures and Animations

Blender Animation Portfolio – YouTube

Week 1

Week 2


Week 3

Week 4


Week 5

Before I started at the University, I had very little knowledge on Blender, though I did have experience using Maya to animate and rig models, but that knowledge had since become dormant and lost in places.

In addition, I had not made 3D animated content in Blender before. Now, I have learned a lot from using Blender, not just in animating simple characters, but in modelling and creating objects like tables and swords.

In addition to this, I learned a great deal of techniques that can easily make my models look professional without any effort.

For example, the bevel edge technique can easily smooth out angular edges and make believable parts of a model. The subdivision surface tool can subdivide the blocky polygons of a model without affecting the original piece, so you can edit the original model and it would change the subdivision in kind.

Finally the mirror tool can create perfect replicas of your model and you can edit the original and the mirror can be affected.

I had some experience with Substance Painter when it came to my previous college work, but I was rather clumsy at it, using a single layer with various brushes for my character’s textures.

Now, with knowledge on using multiple layers, with multiple masks I could use the Polygon fill tool on and creating UV maps that can be unwrapped and still look good, any future projects that I may do will come out looking a lot better, both in terms of UVs and textures.

I had acquired knowledge of using HDRI textures through using Maya, which I applied to some of my projects in Blender for this course.

3D Digital Literacy- Reflection

Before I started at the University, I had very little knowledge on Blender, though I did have experience using Maya to animate and rig models, but that knowledge had since become dormant and lost in places.

In addition, I had not made 3D animated content in Blender before. Now, I have learned a lot from using Blender, not just in animating simple characters, but in modelling and creating objects like tables and swords.

In addition to this, I learned a great deal of techniques that can easily make my models look professional without any effort.

For example, the bevel edge technique can easily smooth out angular edges and make believable parts of a model. The subdivision surface tool can subdivide the blocky polygons of a model without affecting the original piece, so you can edit the original model and it would change the subdivision in kind.

Finally the mirror tool can create perfect replicas of your model and you can edit the original and the mirror can be affected.

I had some experience with Substance Painter when it came to my previous college work, but I was rather clumsy at it, using a single layer with various brushes for my character’s textures.

Now, with knowledge on using multiple layers, with multiple masks I could use the Polygon fill tool on and creating UV maps that can be unwrapped and still look good, any future projects that I may do will come out looking a lot better, both in terms of UVs and textures.

I had acquired knowledge of using HDRI textures through using Maya, which I applied to some of my projects in Blender for this course.

During my time at the University modules, I learned a good deal about how I approach the design of my characters. For example, I should never get the ideas for my designs from my own head, and that I should do research into the designs I wanted to tweak. A lot of ideas I have come from my own head, and I feel it is important for me to always reiterate designs I want to make. I did this by rolling up my character’s sleeves and making her wear red more pronounced on her body. I also adapted to any changes made to our project, such as removing the subplot where my character had to overcome her vice.