We went back to basics of body mechanics like last week with the moving block and jumping flour sack but this time experimenting with a basket ball throw on Blender using the origami boy to throw a basket ball into the hoop. We went onto references for any type of basketball a person would do regularly and explain how they do it and I went back to the basics of body mechanics with weight and flexibility with Richard Williams survival kit as the aim was to focus on the balance, weight and line of action.
It was very difficult personally for me as I had help from both lecturers to help with the process of the body mechanics and the arc and stretch and squash for the basketball which that part was easy enough. I even made sure to have anticipation in when the model takes a step and jumps.
Using blender and Action editor I was able to get the keyframes inserted to the original model and went ahead for in-betweens for both models and action. I would often forget about the FK-IK switch and how to join or release an item from child constraint as rigging isn’t my biggest strength. I tired to anticipate the actions, watch the timing and add mechanical movements till the end while I would wait for feedback on improvements I needed.
For this class we were introduced to another new lecturer called Rachel Dixon who presented the topic Body Mechanics which involved the basics of mechanics with the body with weight, line of action and blocking. We were given 3 exercises to complete which involved a robot arm, a flour sac and a origami man pushing a very heavy stone.
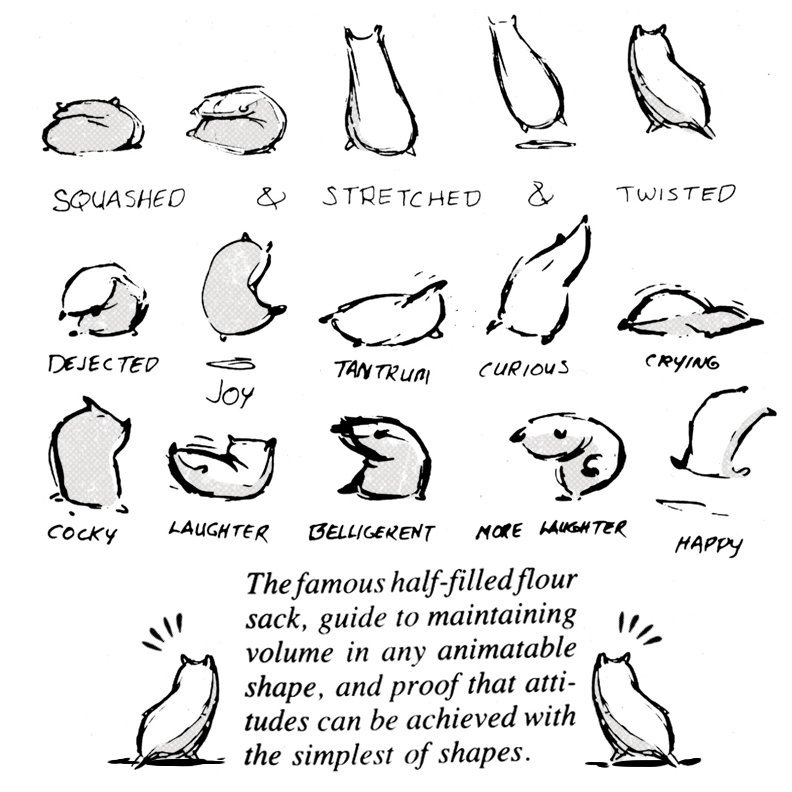
This first exercise involved the flour sac, which we had to animate poses with blocking to think what the sac would do while animating with a start and finish sequence with the help of Rachel to guide us each step of the way. I gathered references through images and videos especially blackboard on how the sac would look through multiple expressions and the squash and stretch for choosing poses and blocking sequences to help with mass and balance of the flour sack.
The second exercise included a robot arm which we had to animate to bring the claw arm to grab the cube object and bring in to the other side and place it down. This is where we got introduced and refreshed on the topic of rigging which included the bones and constraint. After blocking the arm, we were guided on how to connect both the arm and the cube together and how to turn off the connection. I learnt how to key frames with the claw grip and constraint the cube to the bone options which I found very easy enough to animate then turn it off with the inverse options.
This next file brought us to the very end where we had to bring the origami boy to push the stone with is strength and show his struggles which I found the hardest this exercise as rigging isn’t my biggest strength to animating. I took it as a challenge and went ahead with Rachel’s aid as I struggled at points with the IK/FK switch and connecting it the stone itself. I later went back to blackboard looking at the finished version and went online looking at 2D examples poses and line of action along with videos to help give ideas when pushing the block. Overall rigging isn’t my biggest strength in skills and I don’t see myself in the future with this kind of role but nevertheless I enjoyed this lesson and exercises to help with my assignment with mechanics.
At the beginning at my 3rd week, we refreshed our minds with the run and walk cycles on creating and animating a figure to run or walk in a simple cycle flowing smoothly. We had to do both cycles and I decided for myself to animate 2D for the walk cycle and 3D for the run cycle as both are my biggest strengths. Before animating I went on blackboard to see Mike’s 3D tutorials and Aodhans 2D videos on how to animate to help me rewind my mind. I also went back to my animation book by Richard Williams on the topics of the walk and run in different poses and the number of frames I will use for both.
I first did the walk cycle in 2D using Krita by following Aodhan and Richard Williams advice by using a simple approach of doing it in 2’s than 3’s since I didn’t want it to look choppy but fluid with the flow. I did a normal walk cycle mechanical to get the jest of the walk and think about timing, frames and arcs since the body was in one place the whole time. I found it easy once I understood the purpose of the walk.
Later on I had to make one walk with more personality since it could’ve been anything from a kid, a women or a man walking differently to their persona and to be more emotional. Looking through various videos for references, I went for the choice to do an elderly man for the walk by looking at the 100 ways to walk take on an elderly person walking. At first glance it looked a little complicated for it didn’t have enough personality for it so I researched more and found the 16 walk cycles each one transmitting a lot emotion into each character which I thought then that I should do a combination between the old man walk and the angry panda walk for the character. Animating it in 2’s and watched my arcs and timing between each frame and filling in the in-betweens.
Afterwards I focused on the run cycle in 3D with blender with the origami boy rig from blackboard and Mike’s tutorial advice and tutorial videos. So again I went back to Richard Williams note’s on the runs and remembering runs always work best in 1’s than 2’s or 3’s. I quickly looked at other cycles on YouTube and live action references with any runner or athlete with a good perspective with their runs and analysing their contact and poses each step. I started by getting my mind on doing the normal mechanical walk with the rig and started there with Blender coming out with a normal vanilla run.
Soon after that exercise and experimenting with the runs with other references and resources, I figured the run needed more roughness and determination with the rig with it’s run giving it more perspective and lifelike poses with it’s run. I gave the arms more inwards actions and kept the head straight on with the legs following the moments when one foot leaves the floor. I watched the timing as the run was only in 1’s but complex. I found it enjoyable to go back to this but I think I should give the walk more perspective than staring at the either side instead from front to back or a 90 degree angle.
Beginning Week 2 we went straight ahead to the next major principle “Pose to Pose/Straight Ahead”. Where it involves key frames are drawn from the start to the end with picked poses at significant points whereas the in-betweens are drawn between poses to give a full breakdown of the animation and control over the 2D and 3D animation. It is another way to have a strict timeline of production planned out in a way to show storytelling of the character’s storytelling.
In our module we were given the task of animating a character with 3 – 4 poses that lasts 2.5 secs, strict timeframes between the 2D and 3D and consider anticipation, fellow through and overlap and blocking breakdowns. Using the resources from blackboard I downloaded the Rain. Rig from blender studios and saw Mike’s videos on the Origami boy rig and how he demonstrated the blocking and anticipation within the whole animation and poses. Afterwards I went back to the principles to look more closely and have understanding of the anticipation/exaggeration, pose to pose and overlapping.
After downloading the rig for Blender, I quickly looked and sketched poses for the model and went ahead by adding the poses into the model. I first had some problems with the IK FK Switch as I did them without adjusting the rigs as I ran into glitches and tried to solve the problem, luckily Mike gave me the insight I needed with the bone collection of the main controls which logically and physically made it possible for the armature to move like a person instead of moving it too freely. Whereas I continued with poses and researched ways on how to make it more anticipation with secondary action and follow through with the blocking for one part of the frame to move from A to B.
I collected random poses here above to give the rig more gesture and emotion (without facial expression) and looked at more videos on better posing and blocking with the assistance of the line of action and body shape once the main body, arms and legs to fit the rest of the poses with more emotion for the rigged character.
Later on I moved onto the overlapping action and in-betweens with other parts of the rig which involved the feet, hair, eyes, hands, fingers and clothing. I focused on the feet to make sure I knew how to get to point A to B with keeping the initial location of the rig and made movement a step or hop for exaggeration. I did the hair next which I gave it an arc for having the flow and weight side to side to make it life like than it was the hands and eyes to make sure they followed through with the moments. Whereas I went on Graph editor to clean it up with the curves and frames especially the hair movement following an arc.
I finally finished it and I reflected how how it was for rigging isn’t my biggest strength in 3D but after reviewing this week I’m glad we refreshed our memories of it here on Blender to make our animations smooth and fix problems were facing with IK/FK switch and the graph editor as I always forget near the end of the animation stage. Here is my final video of the exercise.
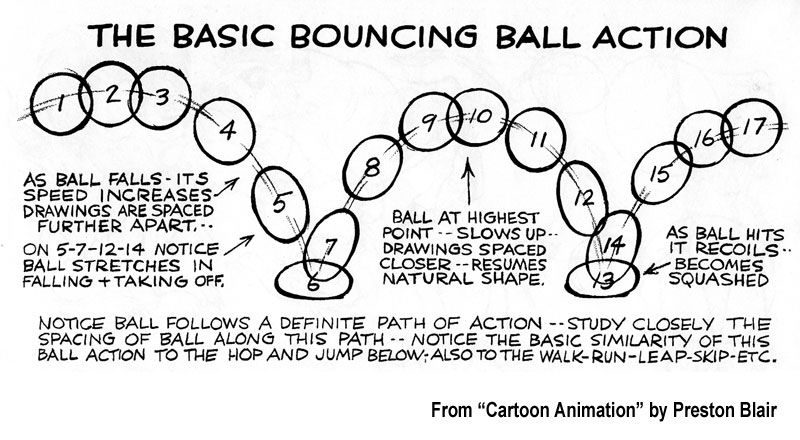
On our very first week with our lecturers’ and the courses, we were introduced to the module ‘Timing for Animation’ which has taken myself back to the first few years of being an undergraduate when I learnt how to animate the 2D and 3D animation. This week our lecturer gave us an explanation of the assignments this first semester and what we need to do to break it down. This refreshed my mind from the previous years and gave me the realisation I needed to think back and go forward on making improvements to my skills and work on my strengths, weaknesses and experimentation. This week we were given the task on animating a bouncing ball in our own style and to think more and understand each specific principle of animation, especially addressing the principle ‘squash and stretch’.
To make sure I fully grasped the concept of the principle, I went back to my resources which included the Animator’s Survival Kit by Richard Williams. Afterwards I looked for similar specialist animators such as Preston Blair and Ken Harris for the similarities and differences they had presented the basic bouncing ball action which involved the principle but as well as contact to make the ball have more life in it. I then went online for various examples of the squish and squash to get my head around this to make the ball ‘lifelike’ with each bounce.
Soon after researching and collecting resources, I decided to go with the 2D direction for this task with Krita, where I simply outlined the concept of the curves and distance for the first step then relocated the ball at it’s starting point and thinking on what frame per rate should I work with. So I had gone with the 2’s fps for the whole sequence as I could’ve picked the 1’s or 3’s but picked the 2’s as I always spaced the frames so I could do the in-betweens every 2’s fps.
Once I finished the direction, the contact’s from start to finish and each squash and stretch I animated the ball and got feedback from my lecturer once I looked it over for any mistakes and improvements needed to be made. He informed me that the last two bounces should be a bit slower and less squash and stretch since there won’t we much power in the ball’s bounce towards the end. After finishing the bounce I thought more about how I missed that detail but knew I needed someone to look over it and share there knowledge for I to understand more.
I also took my own free time to animate other balls, especially different types like a Bowling ball, Tennis ball and a Kickball animated together but at different frame rates to experiment the squash and stretch, time and spacing for each ball to understand how each one performs and logically fall or bounce off the ground due to weight.
Bonus: Shorty after, our lecturer gave us another task exercise where we had to download a blender file and animate a small ship going through a maze to reach for the exit. It was to teach everyone and myself about the follow through/overlapping and the anticipation principles to get a glimpse of making the ship animated with realism, it’s actions and secondary action with the laws of physics for other parts that move accordingly overlapping at a different frame rate. It took a while for it to render and edit frames but it was overall a fun exercise.