Reflecting back for this assignment, I found it extremely fun and satisfying this semester, as I felt more independent and creative free for myself choosing any audio with two characters acting from any based scenario. As I got the chance to experiment more with the emotional response of the characters to make them feel more real in this specific scene finding it very enlightening. I truly believe I’ve improved much better in my art skills and techniques this semester with the knowledge refreshed in my mind from previous years and gaining a lot of feedback from both Sarah and Mike to guide me on what I needed to accomplish. My drawbacks for this project is not going in the direction of making the characters detailed as actual fictional characters with other details such as hair, clothes and eyes as I only went for the shapes instead. I also found it difficult in the clean up stage trying to make it more smoother and clean from the lines for the final video and adding more anticipation to Character B as I felt should’ve been more. Overall, I enjoyed this assignment and my animation scene for my portfolio for the future.
For our final module class before the Christmas holidays, we presented our most recent progress after our last feedback previous week. I made a presentation with my most recent progress after adjusting the last improvements and what is my plan for this week and the next before posting my submissions on the 19th December. Here was my latest update where I had made my last improvements with the leading scene walk, lip syncing and more movements with character B. Using the inspirations I’ve recorded I was able to greatly understand and gained knowledge of what I was missing for that scene to acknowledge it more in any common sense.
Afterwards I got only a few notes from my lecturer Sarah as my animation was coming along much better for this week, as I only needed to change the staging a bit for Character B’s position to move closer to the centre of the scene closer to Character A. Another was to watch the timing when adding in between frames and the actions of both characters and finally the composition with the references I have recorded for one or two of the shots I have recorded for inspiration. My goal is to gain the feedback I received from my module class and send off my last update the following week before submissions if I needed anymore support and guidance just before the Friday. I also did a presentation for week 12 to show what’ve I’ve done, referenced and the pipeline.
Here is most recent version for the post production phase once for a few in-between frames and clean ups down below. Once I showed Sarah this for any final feedback once we were off for the Christmas break for my most recent improved scene. She gave me feedback on Discord saying “in terms of the animation the steps once she picks up the plate and before she smashes it feel really fast and the second character feels a little static at the end but as time is limited don’t worry too much about the steps but I would focus pre on getting more reaction from the second character”. Taking in her feedback I became confident in my skills and techniques for me to make these improvements in my limited time then add in few minor movements to them, finally making it to the clean up stage to create the characters more see through and better looking when I reached to my final video stage.
After gaining new feedback over the course of the week, I needed more improvements once I got my new shot included as Character B had to have more movement with the arms, expressions and a mouth compared to A. I also to fix the intro/leading scene when Character A walks into view for their legs looked off as it looks like they’re moving too fast or running in that certain shot. I later recorded myself to help with the fast walking shot with Character A and B’s movement to give it a more of a an response after I captured it so I knew the time and spacing perfectly using real life reference even by myself to capture the motion of the small walk of anger.
For minor fixes, the scene required the mouth lip syncing to Character A to match with the time they’re mouth would stop speaking which was in case to close it and more roughs and movements to their head. Character B as the same as they’re moving to much little when rotating and to make the animation more smoother after doing the roughs and smoother Arcs. Here is this weeks progress with the references I recorded beforehand.
I was able to record myself better this time for a wide shot and was able to edit both shots together using the symmetry and rule of thirds lines to give both versions space to edit with my mobile phone at a better stance to view myself but a couple of seconds had been off once added and edited together but all was good for what I had got in the end.
Thereafter on continuing on with my project, I received more feedback for my progress from Mike instructing me to have another shot from another angle focusing on Character A then the first shot sequence to add more anticipation, staging and cinematography to the animation and characters to enhance the acting better. Even looking back at the references I’ve collected and searching the web, I’ve decided to record myself again to understand the positions and angle shots better for the characters. But that didn’t stop there as I needed more anticipation and movements with my characters like adding in an intro/leading scene for my project and with more reactions from Character B with so little exaggeration. So taking my time I started with the intro first with Character A walking in angry and frustrated at Character B for context of the scene by building up anticipation before Character A lifts and throws the plate to the ground smashing it with a slow in and out difference with both characters timings are different.
After editing the audio and extending the intro by adding an interior design by adding a cabinet, I moved onto the second shot scene where Character A is centred on the over the shoulder shot from Character B once the plate smashes and Character A giggles and laughs and brings us to the first shot angle back till the end. I mainly focused on the timing and spacing of frames matching with the wavelength of the audio and experimenting with the new shot in one file and keeping the old version together following a strict timeline as I did like both versions of the animation however the new shot grew more impact with Character A then the first animation sequence.
Here is version 1 and version 2 of the animation videos to see the difference.
It was interesting enough once I had spare time to work on more frames to make it more rough but felt it drew back my time with adding the intro and the new shot in but nevertheless and I favour both versions of the animations all together and awaited more feedback before the week of making our presentations before we’re off for the Christmas break as I’m confident to make it to the end of this module. Recording myself had a few problems in terms of cinematography for the shots as I always tried to find the proper angle for the shot with my legs and over the shoulder shot by myself as my family was to busy. But I was able to overcome this difficulty once I finally got all the angles using my phone at the correct position and shooting both characters one side/angle beside the other. After retaking shots it became stress free as I resumed my work.
Moving onto the lip-Syncing and sound with the block outs, I got my most recent feedback from my lecturers Mike and Sarah on what area of my animation I should work more on before next week’s class. First taking notes for Character B as they only stand and make so little movements taken from the animatic as I took more time on A more so than B, luckily I had the time I needed to work on them before Lip Syncing. I knew I needed more anticipation to Character B as I quickly went to recap myself with the animation principle beforehand, then researched other ways on how a person or their body on reflex would react to something smashed and broken, filled with fear and being startled. I found a couple of clips on how the person would react to the other as they shield themselves with their hands up, covering themselves for protection and take a few steps back with routeing their upper torso to protect their vision and face.
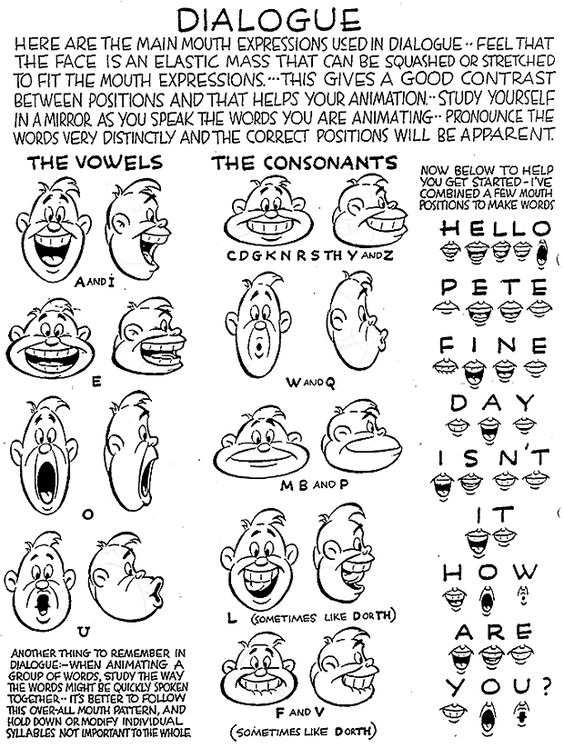
After adding in the block outs and a couple of rough sequences of the bodies movements to Character B’s arms and legs for secondary action and follow through moving onto adding in the lip syncs while following and writing out the script. I then drew out the mouth actions following each letter of each word, put all together to have myself a blueprint of the script itself and to put into the animation sequence matching with the audio watching my time and spacing to sync the body movements especially the head rotations. I used the resources from Blackboard from our lecturers which was extremely helpful for me to use for Character A as the only one who speaks in the sequence and I thought there was a better improvement to previous projects I have done. It was very helpful to aid the characters acting with only Character A speaking and having more frames/movements in comparison to Character B to make them more fluid.
After refreshing our minds with storyboards and showing our pitch videos/audios, we moved onto making a rough of our pitches/previs this week in hopes of experimenting with references we collected and putting in key frames from the start to finish with significant poses to showcase. Once I showed both of my pitches to my lecturer Sarah, she thought my second pitch which featured audio from steven universe with Steven and Spinel involved the characters mental breakdown more than the other and better acting. I acknowledged her option and went ahead to work on an animation that conveyed emotion more than the physical actions in one shot with the body and posture. So once the choice was made I recorded myself for reference of movement between two characters this week to aid me in the animation sequence for staging and to experiment with my movements put into the rough sequence with secondary action included while remembering the principle Staging for a quick recap.
But to understand the breakdown of the characters sadness and rage I went back to animated shorts, shows and movies I had watched before excluding steven universe to glimpse at different mental breakdowns and collided them together to come with their emotional collapse with overthinking and over flowing emotion act first than the physical. Also watching the breathing patterns as they try to breathe with the anxiety/fear they feel and the shaking of limbs from each different scenario of losing hope and filled with anger.
Taking my pitch idea and references I’ve moved onto my previs/animatic immediately and starting going through the process of animating the characters through pre production using the principles of animation and the skills I’ve developed from the last assignment. I started with the simple item of the prop which in this sequence is thrown to the ground in a fit of anger by Character A. For this I added an arc to the moment the plate is lifted and thrown like a ball to the ground but breaks on impact to help guide Character A’s throw and function of the arm going down. I added in more arcs for the characters rotation of the body, head, arms and the positions of the mouth, eyebrows and expressions after adding in the roughs and frames. I got references from other sources such and worked on the prop/item with Character A throwing and smashing down in anger to the floor, using an arc to help with the direction of the throw. I then focused on Character A’s rough sequence with head turns and adding a nose and mouth (but no lip sync yet).
The rough animation was fun and interesting, taking time to focus one task then the next with arcs, line of action and timing for sequences. Even when I couldn’t see myself filling in the colouring, clothes and appearance details for the characters in the next few weeks but I plan for at the end of this pipeline to make it clean and clear once I get the roughness out of the way after the final video is done.
For this assignment, we were given the task to create an animated scene between 10 – 15 seconds which should have two characters interacting with each other and one prop involved. After completing our last assignment and going over the principles I knew I had to pick the 2D animation for this project to help improve my techniques for the future and the 3D option would’ve been good too however the 2D was mush simpler for this project while using Krita.
Once we had the task at hand, my head was swirling with ideas but I had a deep think of the pitch idea as I needed to know what type of project I would focus on especially the theme whether it was going to be action, comedy or emotional. For myself I wanted to focus differently with the characters than mere action but something deep and personal with their emotions and how I would want to express them through this animation. I went ahead to gather audios from scenes I have collected from memory which I remembered were moving to the audience which included clips from Steven Universe the first with pearl and steven audio and the 2nd with Spinel and Steven having a major mental breakdown after the fight and the other watching and deciding whether they should comfort them or not.
It was a difficult decision to choose audio from both animatics, especially the theme I would go for instead of the physical actions. I wanted to go for something more emotional between both characters and practise more on lip syncing so I may improve myself this semester to sync with audio and mouth shapes. I had to understand body language and posture when it comes to sadness and depression for the following sequence between these sequences. After reviewing both scenes I pitched my ideas and brainstormed on doing both to see what direction of acting and staging I would be taking and which scene fitted more. I didn’t want to add any character details or work to much on appearance as I was only experimenting the movements first and foremost and left their appearances made up of shapes for better quality.
After going back to basics from what I learnt in first year and doing each animation every week for the last 6 weeks this masters. I have seen a significant difference between previous years and up till now in my skills and animation exercises, which I believe have gotten better as I was able to handle the principles much easier, as I’m overjoyed with the outcomes I’ve made. I could’ve improved the most difficult problems I was facing with the FK-IK switch when rigging or the animation when it came to anticipation while refining previous animation exercises.
I even hoped for more time to experiment more with the other animations but I’m relieved in what I have done with all my best effort put into it, thanks to the lecturers and the feedback they gave me. I learnt a lot more this semester and especially with the Blender software as previous years Maya was always my main app for the 3D exercises so I’m glad I came around it with many resources to instruct me on how to use. If I were to change anything this assignment, I could’ve mad the animations more fluid and spend more time on each one watching my timetable every week to expand more and improve my errors.
In my mid-semester, we were given the information for our next assignment and were given the time to look back on our previous exercises which were due soon at the end of October. I used this time to finish my exercises and let my lecturers view my work and to give me significant feedback on what I needed to do to make the animations better and how to expand more with the animation instead of being basic and plain.
Using my time this week, I reflected on my work and looked out for more reference and videos on the critical animations I needed to work on to make them more refined and offsetting a few of the animations I had to redo and go beyond pushing the limit.