An Ode To Sciophobia – Verticle Slice Project Blog
Introduction
During semester two of my second year at Ulster University, we were tasked with working alongside a group of game design students to produce a “verticle slice” of a game project. As an animation student, it was my job to work with the other animation students and game design students to produce assets for this verticle slice demo.
This blog will cover the work I produced, both used and unused, for the verticle slice project Sciophobia, a first person horror game.
This blog will cover the development of the assets produced, as well as my own thoughts, feelings and critiques.
Animation Work
While I finished the animation work first, I believe that it would make more sense to cover this aspect of the project first. This section will cover both the first person animations as well as the final mocap clean-up animations, how they were developed and my overall thoughts on the process.
Test Animations
Initial animation test with block camera
These initial animation tests were completed right at the beginning of the project using a rig by Mattias Kirsten, a gameplay animator working at EA DICE. This was my first time doing a first person animation project so the first thing I wanted to do was check to see if I could find any tutorials or info on how first person gameplay animation is created. Luckily Harvy Newman, an animation director at Build a Rocket Boy, had a tutorial breaking down the process of first person rigging. To make it even more useful, he was using the exact same rig.
I always like to begin any project by first checking out tutorials, even if I had watched them before or if I’m confident in what I’m doing. I feel like it always gives a good refresher on what I should be focusing on and allows me to get into the mindset of what I should be doing and maybe even remind me of some techniques I may have forgotten.
Once I had the rig in the scene, it was just a matter of hiding the guns the rig comes with and getting to work. To begin, I created a very basic block camera model to substitute as the final camera model which had not been made yet. Then I parented it to the hand and got the posing to where I wanted it and began animating.
For reference I initially began looking around for different first person examples, but I couldn’t find any where the person was holding a camera. I would have liked to record reference myself using some form of gopro, however the only two people I knew who owned wide angle “first person” cameras no longer did. My dad broke his in a motorcycle accident in France a couple of years ago and one of my best mates had his stolen after he had lent it out to another friend for filming. My next idea was to look at the game, OutLast, but while Outlast does have a camera and a first person perspective, the camera does not stay in frame and simply either goes up or down depending on the player’s input. There are a few cutscenes, but they weren’t overally useful for this test project. It did, however, give me a jumping off point for camera lifts. I’ve linked the clip I found most useful for reference below.
In the end, I focused a lot on looking at my own arm while animating, trying to mimic the movement to get a feel for how the arm should move. It was quite an interesting experience, I had seen before in documentries that classical animators used to use mirrors a lot to get facial expressions or would stand up and act out the movements themselves while animating to get a feel for how everything should move. I’d even seen the method used by 3D animators in a documentry series covering the development process of Riot Games, but it wasn’t something I ever really tried or rather relied on myself.
Once I got the basic movement down, I began focusing on the weight of the camera. To replicate this with my own arm, I simply grabbed the closest thing I could to a cameras weight and began acting out the motions again. The moments I found this to be most important was the initial camera lift and the camera up and camera down motions. For the looping idle animation, I felt that while it was important to still maintain the weight of the camera in the animation, it was just as important to keep the player character “alive” with a kind of breathing motion. For this I mainly looked at different first person animations to see how I should approach it. For this, I mainly looked at the work of Ranon Sarono (aka “hyper”), an animator at Infinity Ward.
There’s quite a big difference between the first person animation in Call of Duty and a more slow paced horror game, but I took particular notice of the small little details in how the guns are held in the showcase. With first person shooters being accuracy based, it wouldn’t make sense for the gun to move around a lot while standing still and simply holding it, plus it would make a lot less sense if the crosshair remained in place the entire time. However with a horror game, you can be a lot slower and more deliberate, so I decided to add more obvious motion when standing still to make it seem like the character was breathing or their arms were adjusting to the weight of the camera, unable to keep it completely still.
The final thing I focused on with these test animations was the timing. As it is a game, I knew I wanted the animations to be a lot snappier as I wanted the animations to react to the players inputs without much downtime. I later reverted this with the final animations as I thought the slower feel to the animations felt better for the horror style of gameplay, but for the initial tests I thought that having snappier animation would suit the game better. I’m still unsure as to whether reverting this was the right choice, but I will get into this more later on.
When the animations were finished, I exported them for Unreal Engine and passed them to the game design students and there was almost immedietly an issue.
When exporting the rig itself, for some reason it had a lot of duplicate names in the geometry which was causing issues for the import. The fix itself was easy, yet incredibly tedious as I had to sit on a discord call going through every single name, searching it in Maya and renaming each duplicate. A valuable lesson was learned in ensuring that everything is named properly when it comes to my own rigs on that day.
At the time I was pretty happy with these test animations, although I do think I could have added a bit of extra variety and the camera definitely took up far too much screen space but for tests, I was happy with the work done. There were certainly a lot of issues that would need ironed out though. For one the thumb was awkwardly placed and was clipping into the camera. The thumb itself was awkward to use as the rig was designed to be used for holding guns and would look extremely weird and broken if adjusted too much to support the hand holding the camera. I also feel like I could have worked on the weight of the camera within the animation a lot more as the camera lift and camera lower animations feel far too light. I also could have done more with the fingers as I feel like they simply stay in place far too much. The wrist is also in a bit of a weird spot throughout the animation and makes it look pretty uncomfortable at best and broken at worst which could have been fixed with a little more time spent on posing the character.
Test animations with final camera model
When I recieved the final camera model, I quickly imported it to the animation scene and replaced the old camera model I was using. I had to adjust the grip of the camera but aside from that almost nothing was changed from the previous test.
Changing nothing in this part of the process was a huge mistake on my part, as the wrist especially looks far more broken in this version of the test animations. The camera is also constantly leaning to the right which is something I hadn’t noticed while animating, but upon reflection looks absolutely horrid. As before, the camera also takes up far too much screen space in this version and is a massive distraction when the player should be focusing on what is going on in front of them.
It was at this point in the process that I also realised I hadn’t fixed the camera’s FOV to match the camera in Unreal Engine, which made the animations look even weirder in game. This would be something I would have to fix later though as at this point I had moved onto figuring out how to rig the characters for the game.
Upon reflection, while these animations were intended to be quick just to help get the proof of concept started for the game, I feel like I could have spent a lot more time focusing on really refining these. Especially as I had planned to use them as a base reference for the final animations. Particularly the version with the final camera as it is glaringly broken with the camera leaning far too much at all times. For a first stab at first person animation I certainly don’t think they were horrible, but I know I could have done so much better.
Final First Person Animations
Final first person rig and animations with final camera model
These animations were completed far later in the production than initially planned due to poor planning on my end. I had spent so much time working on the main monster rig that I had neglected both the final first person rig and final animations. That being said, I will discuss that later in this blog. For now, let’s focus on the animations themselves.
The most obvious difference between these animations and the test animations is the inclusion of two new animations. I initially wanted to add more, but time had other plans. The two extra animations were a “start of game” inspection of the camera, introducing the player to both the first person perspective and the main tool they would be using throughout the game, and the death animation which while does not show the arm rig or camera, uses the first person camera as a guide for how I envisioned the death animation would work along with the “grab player” animation using the enemy rig.
For these animations, I adopted a different way of working. For the mocap, I was using multiple files to work on each segment individually and so I wished to do something similar with the first person animations. This turned out to be an absolutely horrible idea as while I tried to make the animations relatively seemless using the same poses I had initially done for the idle, it didn’t work very well. A better approach would have been to stick to the same method I used when creating the initial animations and make everything in the one file to ensure that I had the seams properly ironed out so that everything smoothly transitioned.
Aside from that glaring issue, I had also slowed down the animations considerably, making them far less snappy. I’m honestly not sure which I prefer, but I think I am leaning more towards the slowed animation as I think it suits the horror genre more as the player will be focused less on precision reactions and more on immersion and what is going on around them. I also took note of Outlast’s camera animation that I discussed above which was considerably slower than the retimed animation I had done for the tests.
In retrospect, I think the idle animation moved a little too much. I certainly could have toned that done considerably as the idle is simply there to keep the character from being glaringly unmoving and distracting, however I think I went too far in the other direction and made the idle itself distracting from what the player should be focused on.
I went out of my way when creating these animations to fix the issue I had before of the camera taking up too much screen space and I think I did a decent job. The camera is still clearly visible but is relegated to the bottom right of the screen, leaving the majority of the viewers attention on what is going on around them.
I really enjoyed this part of the animation process. It was great to get to animate with one of my own rigs and because I was working with my own rig, I was able to fix any problems on the fly and adjust the weight painting when I found that the geometry wasn’t deforming the way I wanted it to. I regret completing these so late in production as I would have liked to spend a lot more time on them and really refined them further. It should also be noted that these animations are not in the game as when they were completed, we were focusing on getting the AI working and those animations into the game and working. As such, we ran out of time and were unable to add these animations to the game.
Final Enemy Mocap Animations
Final Enemy Animations
To say I’m not happy with these animations would be an understatement. I ran into a lot of problems with the mocap data that began right when we recorded the mocap. We had been recording for a few hours and we all needed to head on so we decided to save the files and export them so that I could reopen the files later on and apply the filters as we had 50+ animations to go through and it would take far too much time to do it then and there. It wasn’t until I got home and tried opening the files that I realised, you cant reopen rokoko studio files, or at the very least I have no idea how to do so.
This meant that all we had was the mocap data without any filters applied aside from treadmill, which made the clean up process incredibly difficult. When making the rig, there were issues I ran into that I will be covering later in this blog that caused the rig to break when put into specific poses or if something was pushed too far. I had added extra controls to attempt to fix this or rather counter it, however when it came to the mocap clean-up, some files were simply too broken to be fixed, while others just ended up looking pretty messy regardless as the mocap data would cause weird issues with the rig that I wasn’t able to solve.
My process for cleaning up the mocap was relatively simple, aside from the issues mentioned above. I had already set up the rig with HumanIK so it was a simple matter to retarget the mocap animation data to the rig. From there, I used animation layers to adjust how the rig was moving and the weird and broken movement found in many of the files. I ran into a weird issue where the bones would be completely seperated from the controls, but switching my animation evaluation mode from parallel to DG fixed that issue and snapped the bones back to their respective controls.
As I mentioned above, I’m not happy with these animations at all. I feel like I could have done so much better even just by hand animating everything. With the time constraints, I didn’t get much time to polish the animations aside from just cleaning the mocap as best I could and moving on. I feel like if I had even just spent more time polishing, the animations could have came out a lot better. One of the major issues is that the animations don’t loop properly. I tried to make them loop as best I could but it felt like a fruitless endevor at times and it is clear that they don’t actually loop properly.
I certainly learned a lot about mocap during this process, but I think I would be hesitant working with mocap going forward without proper preplanning and knowing exactly what I had to do to set it up to work as best as possible with both the rig I plan on using and the game in general.
Below I’ve linked some of the videos I used that helped me with the mocap cleaning process.
Animation Reflection
I wish I had done more animation work throughout this process and focused less on rigging as I feel like I shot myself in the foot both with my time management and planning. Overall I think theres a lot that could be improved on and I’m not particularly happy with the outcome. I think I could have done a lot more for this project and done it to a much higher standard.
I suppose that we learn from our mistakes, and I’ve certainly learned a lot from this animation process that I will carry with me going forward, but alas the work is done and while I may not be happy with it, I am happy that I got it completed.
Rigging Work
First Person Test Rig

FP Test Rig

FP Test Rig (With Bones)
The first person test rig was an early rig I created near the beginning of the process. I was pretty new to rigging, having only briefly touched on it in first year and had no idea how to approach a first person rig.
As always, I first looked for online tutorials and while I didn’t find any specifically for first person rigs, I did come across some excellent tutorials by Jason Baskin on rigging FK and IK arms plus a switch. From there I grabbed the Unreal Engine mannequin arms and got to work on my first proper joint based rig.
The rig itself is relatively simple, only containing an FK/IK arm switch, FK/IK arm controls and finger controls, with a camera parented to the control hiearchy. Even so, this test rig took quite a while to finish as I found things breaking a lot and I had to rebuild it a couple of times to get everything right. Even then, I messed up the joint orientations and while it does still work, it’s awkward to move and animate with and has issues with gimble lock. I would eventually fix all of these issues in the final first person rig, but I’ll get to that in just a bit.
Next came weight painting, which also took an incredibly long time as I, for the most part, just started messing around with the tools and slowly figured out how everything worked and how it affected the rig. I also was unaware of the “mirror weights” option at the time, so ended up weight painting each side individually which doubled the time I was at the weight painting process.
In the end, I had a functional rig, and while it was far from perfect, I was quite happy with my progress and felt ready to start diving deeper into rigging.
Final First Person Rig
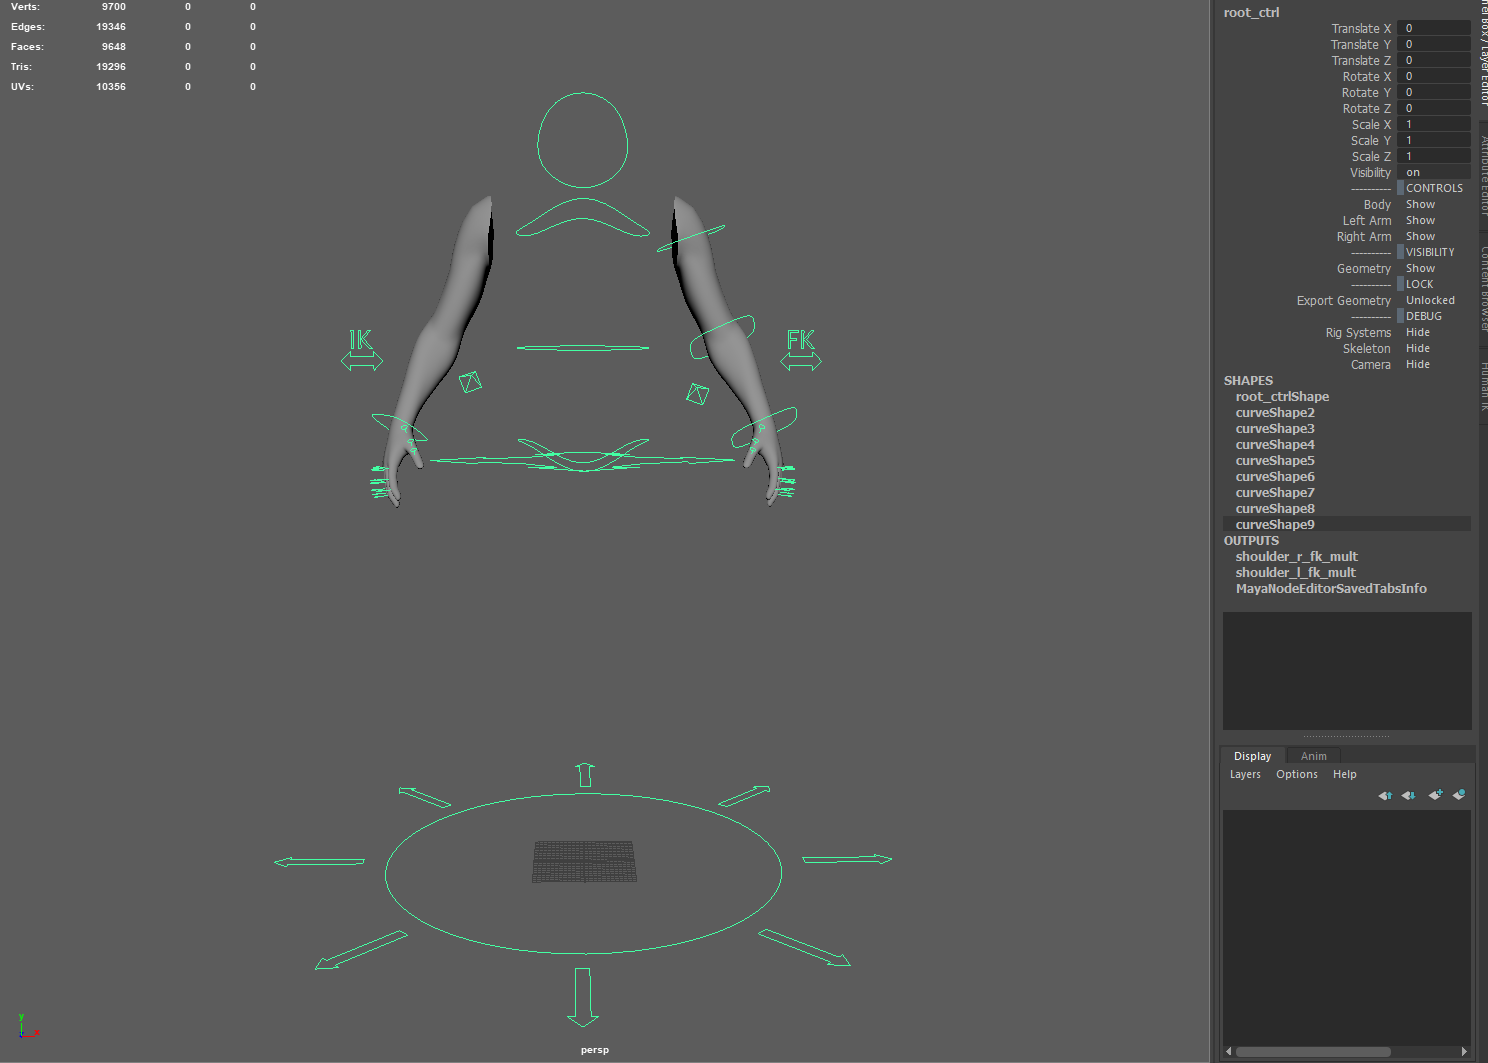
Final FP Rig

Final FP Rig (With Bones)
If I was talking about these in order, this rig would be the last I would cover, but as theres a lot less going on with this rig I thought it would make more sense to tackle it first.
This rig, while far more complicated than the test rig, was completed a lot faster. At this point, I had a good grasp of rigging and how to set up a full rig, so I got to work creating a brand new first person rig. At this point in the process, I was running out of time and needed to just get the rig done as fast as possible to start animating so I had to scrap the WIP arms I had been hard surface modelling and downloaded an arm model by “printable_models“. This made the process much faster, but there was still work to be done with the model.
To start, I decimated the model to a much lower poly count as the model was extremely high poly and would be a waste of resources within the game, plus it would make weight painting far more tedious. Once I had the model around where I wanted it, I began going through and editing the edge loops of the model, adding and removing where necessary to ensure that the model would deform correctly. I then cut out the top of the arm and mirrored it to get the two arms needed for the rig. I also quickly UV unwrapped the model so that a texture could be applied later on.
From there it was a simple process of rigging the arms. I kept it pretty simple, primarily just using FK/IK controls without any fancy stuff like I added with the main enemy rig, but I did make sure I added proper twist joints so the model would deform realistically. I also added a visibility switch to the FK/IK text so that it would display what mode the arm was in to make it easier to work with. When all that was done, I added some visibility and lock controls to the root and added the camera.
The camera set up is relatively simple, I added a control where I wanted the camera to be, created the camera and parented it to the control. I also added the option to hide the camera to make animating with it easier.
Finally I added a simple IK spine for more control over the rig’s movement in space so that it could pivot and rotate realistically. Then I locked everything down, ensuring that you could only select the controls when click dragging everything, and labled the controls accordingly.
When comparing the test rig to the final rig, a lot has changed and improved. I spent a lot of time rigging this semester and I’ve loved every second of it, and I had a really fun time going back and redoing the first person rig as it shown how far I’d come. I enjoyed animating with it as well and while I would have liked to add a lot more in terms of controls and options, I think it served its purpose pretty well.
Final Enemy Rig

Final Enemy Rig
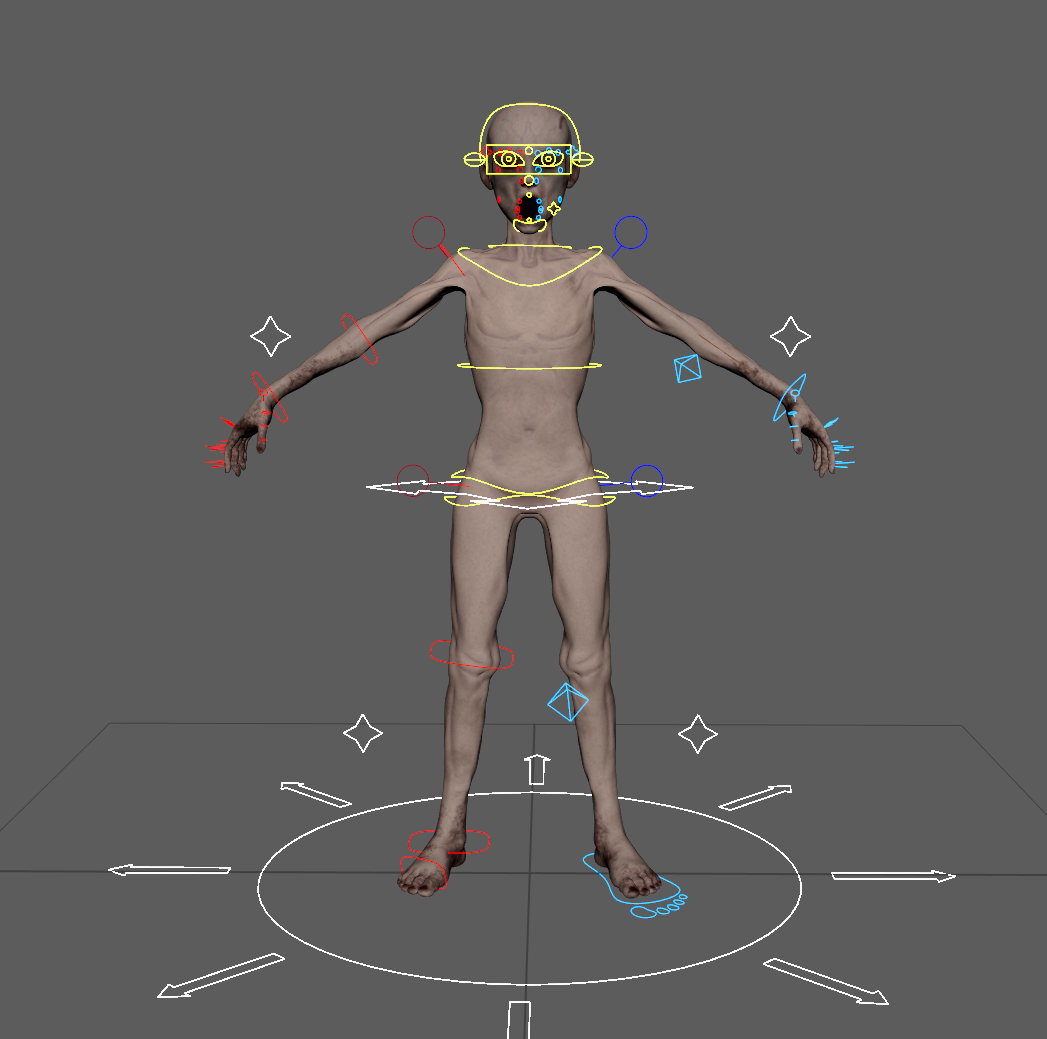
Final Enemy Rig (With Textures)
This rig was my magnum opus of the semester. A combination of everything I had learned about rigging since January, this rig was the biggest task I had taken on and I intended to complete it to as high of a standard as possible. Of course, like Icarus, I flew too close to the sun and went absolutely overboard, causing problems later down the line of production, particularly with the animation side of this project.
In the final reviews, I had recieved the criticism that the rig was overcomplicating things, and I completely agree in hindsight. If I had simply created a far simpler rig, something akin to the final first person rig, I likely would have had an easier time animating, and had less time issues and stress near the end of this project. Most of the rig was unnecessary for its intended purpose, yet I still can’t help but be proud of the work put into it. Theres far too many controls to go through one at a time, so instead I will cover the general building of the rig and the issues I ran into.
This rig was started later than we would have liked. Initially the model was to be made by someone else in the team but due to unforseen circumstances, Darren took over and sculpted the model used in the rig. When I recieved it, I got to work looking at different parts of the model to see if there would be any issues with deformations and luckily there didn’t seem to be many. I would later run into issues with the face, but I will cover that a bit later.
When it came to doing a full rig, I had a feeling that the few videos I had found by Jason Baskin, while great resourses, wouldn’t be enough. So I began to dig, and came across AntCGI who had posted multiple full courses on rigging. The one I found to be the most useful was his “#RiggingInMaya | Realtime Alien” course, as it was geared for use in Unreal Engine.
Going through the course, I learned a lot about rigging and how to set up the many different systems found in the rig such as stretchy limbs, full rig scaling, follow controls, reverse foot systems and many more, and I was able to jump between this course and his “#RiggingInMaya | Biped” course to complete every task I had set for myself when creating this rig. However I did run into many issues that I had to figure out solutions for that weren’t immedietly obvious, plus I threw in a few extra controls for good measure.
One of the big issues I ran into was with the roll and twist joints. I hadn’t set up the skeleton properly by removing all of the rotations, so adding these extra bones and controls caused a lot of issues with random twisting and breaking of the rig. I was far too deep at this point to go back to an earlier save file and start a new, so I powered through looking for a solution. I deleted parts of the rig, disconnected the systems to freeze the rotations, rebuilt parts of the skeleton, almost everything I could think of and yet I still couldn’t get them to work properly. Eventually I found out that the constraint I was using could be changed slightly to fix the issue for the most part and I ran with it. I didn’t have time to dwell on it and once again it would later come back to bite me.
I found later on in the process that if the rig was rotated, some of the twist joints would begin rotating weirdly and cause the geometry to twist, which I didn’t want. Eventually after a lot of tweaking, changing and even deleting and redoing, I got it basically right with minimal twisting. This was still a problem though so I created additional “Twist Adjustment” controls that could be used to counter the issue. It wasn’t ideal, but it worked.
When it came to the face, I ran into another issue. I knew how to rig a mouth that was closed, but open I had no idea what I was doing. I began by simply doing what I would do for a closed mouth and simply adjusting it as I went along to match the open mouth. This worked okay until it came to weight painting which was a bit of a nightmare. Eventually with a lot of trial and error, I got the mouth working okay, it didn’t shut properly but at this point there wasn’t much I could do as I needed to get it done.
The next issue I ran into was with the eyes, which were closed in the model I was sent. Getting these to open and work properly didn’t take as much time as the mouth, but still took a bit of forward thinking when placing the joints and controls. I found that the eyes didn’t have a proper seam in the model, so I had to manually go in and delete some of the faces inside of the head to create the seam that would allow the eyes to open. From there, it was just a matter of messing around with the weight painting (which I had luckily learned could be mirrored at this point) until I got them working the way I wanted.
The rigging process for this rig was long. Very long. I was learning through multiple courses and google searches and when it came to applying what I had learnt, implimenting it was easier said than done. I ran into many bugs and issues along the way that I did my best to sort out but even so some still remain such as an issue with the left IK handle which sometimes will stop working and need to be deleted and undone to get it to work again.
I think that if I were to build this rig again, or something similar, I would be a lot faster and be able to create a much better rig now that I know generally what I’m doing, but even so I can’t help but be proud of it. It was a long time in the making, too long honestly, but I feel that I learned the most from this process.
Below I’ve linked the courses I followed as well as some development screenshots of the rig. The set up is the same throughout all of the rigs I’ve created with varying levels of complexity so I thought it would make more sense to simply show the most complex one.

Reverse Foot Controls

Face and Mouth Controls

Stretchy Limbs

Skeleton and Rig Systems
Space Locators

Full Nodes

Twist Nodes

Stretch Nodes
Project Reflection
That was a lot of text, yet it feels like I said so little. I could talk for hours about this project, both the good and the bad so condencing everything down seems almost wrong. I suppose that makes the task of writing a conclusion to my many thoughts on the topic even harder, but I’ll give it my best shot.
This project was a combination of what I would consider to be both my worst and best work that I’ve done throughout my time here at Ulster University and I can’t help but feel conflicted on the whole thing. On one hand I feel that I absolutely could have done more on the animation side to bring it to a standard I could be proud of, yet on the other hand I fell in love with rigging and produced what I would consider to be some of my best work throughout this project.
I think the game itself suits this dilema almost perfectly. It’s like a horror. The stress of this project was immense and I am hesitant to say that I would go through it all again, not due to the project itself but simply due to the outside factors that affected my work and time this semester. I know the saying goes “nothing good comes easy”, but this was tough. I’ve learned a lot of valuable things, not just within the realms of 3D, but in my own personal life as well.
I wouldn’t call this project fun. It was a stressful time and as stated above, I produced what I would consider to be some of my worst work this semester and I always maintain that you will be judged by the worst work you produce rather than your best, but I’m glad I did it all the same.
As I was primarily working on rigging and animation, I didn’t have much collaboration with the others in my group outside of feedback and making sure stuff worked when importing to Unreal Engine, but I feel like it would be wrong to not mention them here. The group I worked with this semester was wonderful. They are all really passionate about what they do and did their very best to produce every aspect of this game and I couldn’t imagine doing this project with any other group of people.
I think if I were to sum up my thoughts before this word count gets much higher, I would say that while this project was insanely stressful, I learned a lot and at times had a blast doing it. I’m looking forward to what the future will bring and I cannot wait to dive deeper into my new found love for rigging.