Animation Strategies – Assignment 2 Blog
Introduction –
This blog will cover the thought process behind the three animation shots made for this project.
I enjoyed this project a lot and it was great to go back to basics and just animate, only with a more complex rig and body mechanics.
I hope that this blog and conclusion will give insight into my research and thought process throughout this project.
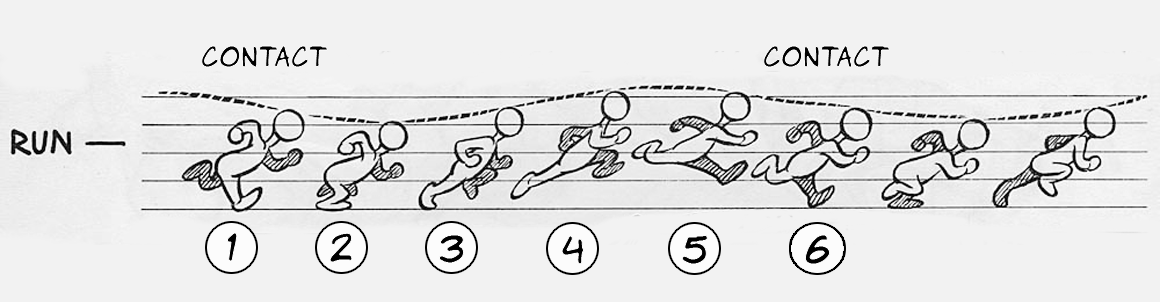
Run Cycle –
I started with the run cycle as I felt like I had a good jumping-off point with the exercises we completed during class time.
I initially began by further refining the run cycle using the Jack rig that we did in class, however, I just couldn’t nail the timing with it and so I decided to go back to basics and check out some reference footage and tutorials to see if I could figure out where I went wrong.
When I went back and had a look through the Animator’s Survival Kit by Richard Williams and Cartoon Animation by Preston Blair, I noticed that both books had far clearer posing than what I was currently doing, so I decided I wanted to try pushing my poses further and going for a more cartoony run.
For the more cartoony run, I looked at some classic chases from cartoons such as tom and jerry to get an idea of timing and posing. It was a really interesting experience to not only rewatch these old classics as an adult but to view them from an animation perspective, going frame by frame to watch the cycles as they were drawn.
For reference for the animation, I decided to stick mainly to the examples provided in the books, with an additional reference created by Chiara Porri (linked below).
I decided to switch from the Jack rig to the Animation Mentor Stewart rig as I loved the cartoony feel of the rig and thought it would suit the shot well. It was also pretty light on processing power which made it ideal as I was primarily working off of my laptop throughout this process.
For feedback, I initially got some excellent feedback from my lecturer Alec Parkin for the initial Jack run variation which I took onboard to the final run cycle. During the feedback, it was pointed out that the timing of the run cycle was quite fast and the poses began to get lost through the run. There was also an issue with knee pops throughout the animation that would need to be fixed.
Going into the final run cycle animation, I decided to focus primarily on my poses, turning off the default lights in Maya to get a silhouette view of my poses to help really push them and to make them clear.
I began to play around a bit more with the timing throughout this process as well and wanted to have more hangtime during the run to further add to the cartoony style of the run.
For additional feedback, I talked with my mentor Sir Wade Neistadt who gave me excellent feedback for the overall posing and helped with my use of the Stewart rig, pointing out additional controls I could use to further push my poses throughout the run.
Finally, for polish, I went through the cycle and fixed some knee popping, further added some movement throughout the body and cleaned up the graph editor spline.
Final Shot:
Reference:

On reflection of the run cycle, I feel like I should have spent far more time on polish and that I lost some of my initial posing when polishing as I began animating the body to avoid a lot of counter animating. On reflection, there were controls that I could have made use of that would have made this easier such as the “follow align” control for the head.
I also wish I had spent a lot more time animating the arms as they are really unpolished, particularly when viewing from different angles.
I also feel that the run would have felt a lot more powerful if I had spent more time animating with the front view camera as I wish I had put more emphasis on the side to side motion of the run as at the moment it’s very straight up and could have felt a lot more cartoony and polished if I had just added some side to side movement.
Overall I’m happy with the progress I made with run cycles, but I feel like this one could use a lot more work, as the upper body is still quite stiff and I feel that I could have pushed the upper body posing further with just a bit more foresight and preplanning to give it a more arched look with some squash and stretch in the torso to further emphasis the cartoony style.
Additional videos and references can be found at the bottom of the blog.
Body Mechanics Shot –
For the body mechanics shot, I wanted to go with a classic lifting of a heavy weighted ball.
The planning for this shot was regrettably weaker than the other two shots as it was the last shot I made. I left this shot till last as I was initially working on a completely different shot that I was unable to complete due to a mixture of being too ambitious, as well as my laptop not being powerful enough to handle the file, causing a lot of crashes during the process. As such, I opted for my backup shot plan.
I’ve always loved the mechanics of lifting weights, there’s so much that goes on within the body during a lift that has always fascinated me.
With so much to break down, I decided that I wanted to do as much research as I could into the mechanics of lifting a weighted ball. I found some excellent videos and articles on the topic as well as a quick course that I picked up for the price of a coffee. All of which are linked below.
For the shot, I decided to once again use the Animation Mentor Stewart rig. I was pretty familiar with the rig at this point and thought it would be best to avoid trying to learn a new rig while animating a shot with so much going on.
I was initially concerned with the switch between FK and IK for the hands as I wanted to have the lift itself animated through the ball to avoid any jitters in the animation that would break the illusion of weight, however in the end I opted to stick to IK for the full shot.
For reference, I looked at different examples of weight lifting animations and different hand-drawn references taken from books such as the Animators Survival Guide.
The process of animating the shot was difficult, I once again spent a lot of time focusing on the posing and timing, opting to keep my keys in spline mode to ensure my timing was fine and using shortcuts on my keyboard to flip between my frames as if I was on stepped mode.
The reference I used was a mixture of checking the timing of different animations and looking at the posing breakdowns provided in the different articles I read.
For feedback, I once again went to my mentor Sir Wade Neistadt and got some really good feedback on my general posing as well as my timing. I also got a lot of feedback on the general mechanics of a weight lift to try and implement what was missing in my initial animation such as the anticipation and how the body would react and bend when lifting the object.
During the polish stage, I focused a lot on trying to refine the timing for the lift of the weight itself and cleaning up the keys. For this shot, I decided to avoid adding animation in the polish to attempt to keep my initial posing as clean as possible. However, I did make use of TweenMachine to favour certain poses for the breakdowns.
Final shot:
Reference:


On reflection of the weight lift animation, I feel like there are several errors within the animation itself that I should have fixed such as the elbow pop at the end of the animation. I feel like the amount of force needed for such an extreme change in the posing of the arms wasn’t shown in the final animation. With the body moving back and trying to pull the ball up with it, the ball should have dropped for a few frames dragging the body into another down pose rather than going straight up.
I also feel like the whole animation feels far too tweened. This is partially due to a lack of breakdowns and in-betweens that I could have used to help further offset the different parts of the body, but also simply down to my lack of foresight when it came to making the offsets work for this animation.
The whole animation also feels like it’s missing some key mechanics that would make a lift like this work such as more anticipation with the hips and reactions to the weight of the ball. To me, it almost looks like the ball gains weight after the initial few frames of the lift. It may have been better to further refine my posing and timing with this section to avoid such issues.
Overall I think I’m happy with the weight lift for now, but this is an exercise I plan to revisit in the near future as I think there is so much I could improve.
Additional references and resources can be found below.
Walk Cycle –
I completed the final walk cycle last. Once I had received feedback for all three shots, I went back to fix and polish them, however, as I got the most detailed feedback on the walk cycle I decided I wanted to leave that till last as I felt I could do a lot more with it.
Walk cycles are fascinating. There are so many different aspects to a walk cycle that go mostly unappreciated by the general viewer, but something as simple as a change in posture can have a massive effect on how the character is perceived. Even simply shifting the weight of the character or putting the focus on the weight can change so much about the walk.
I wanted to keep my walk cycle relatively simple. My primary goal was to create something believable with a relatively neutral walk. As with the previous two animations, I decided to go with the Animation Mentor Stewart rig.
Similar to before, I put a lot of focus on the Animators Survival Kit for reference. Richard Williams has been one of my favourite animator’s for a long time, and I’ve always been fascinated by his mastery of body mechanics and believable movement. His many walk cycles are iconic and show just how much you can change about a walk cycle simply by changing the posing or timing of the walk.
Feedback wise I got a lot of excellent feedback from both my lecturer Alec Parkin and my mentor Sir Wade Neistadt. Both of these took place at different parts of the process but were extremely helpful in creating the walk cycle.
One thing that stood out to me a lot from the feedback was the stiffness of the upper body. I had put so much focus on getting the general poses, arms sway and feet. I had neglected the upper body so much and despite having some rotation, the whole posing of the character felt really stiff which made the walk cycle very robotic. A walk should be the character essentially falling forward and catching themselves with their outstretched foot. I still feel like I could have added more forward motion in the upper body for this shot but I’ll discuss that more in the conclusion. Other notable parts of the feedback were with knee pops in the animation and some of the general movement that I was able to fix up pretty quickly.
The process of animating the walk cycle was pretty easy I found. I focused on creating appealing silhouettes for the key poses and breakdowns, then moved on to blocking out the general movement of the body, arms and head once I was happy with the legs. I kept the entire animation in spline to ensure the timing was solid and flipped between the keys until the blocking was done.
During polish, I cleaned up the splines and make sure it all looped seamlessly, and I also added in an eye blink for a bit of secondary action.
Final Shot:
Reference:


I’m pretty happy with the walk cycle, it’s by far the most polished out of all of my shots and I spent a lot of time on it. There are still a lot of things I’d have loved to clean up, such as the general arcs of the foot that I feel aren’t all that good and the height of the walk.
I also feel that I could have reduced the sway in the body or at least make the stride wider to make up for it, but my biggest criticism is in the top half of the body. I feel that on the side view, the upper body still feels very stiff and could have used a little more lean in its movement.
I’d love to return to the walk cycle to start experimenting with different kinds of walks as well as playing around more with cartoony and realistic walks to really nail down the body mechanics as despite being happy with the outcome, I feel that I could so much better now with the hindsight of what went wrong.
Additional resources can be found below.
Conclusion –
Overall I enjoyed this project a lot. The stress of hardware limitations was far less prevalent than the environment project and I’ve always enjoyed just animating. It was relaxing in a way. Aside from when it came to playblasting the final shots, as for some reason Maya would continuously crash every single time I attempted it, however, I was able to render the shots using Hardware Render 2.0 so it wasn’t too bad in the end. I do wish that the hardware fog would show up in the renders as I put a decent amount of time into lighting not only the character but the fog in a way that was complimentary, but alas it will have to wait for another project.
I think that my biggest issue with this project was that I went into a lot of the shots just looking to start animating right away. I didn’t spend as much time as I would have liked really planning out the shots or coming up with more interesting shots for this project which is something I’d like to rectify in the near future. I also feel like I was lacking in my blocking plus, particularly with my run and body mechanics shot, as both could have used some extra keys to really sell the motion and make them a lot smoother. I also wish I had spent more time offsetting keys and making everything seem a little more unique.
I plan to return to all three of these exercises as I feel that I could redo all of them to a higher standard now with hindsight, and I’d love to spend more time really exploring the timing and spacing of each shot to really push the animations. I also feel that I could spend so much more time really getting into the intricacies of the body mechanics and begin adding squash and stretch within the character which was notably missing from these shots, as well as more anticipations for each movement, particularly with the body mechanics shot.
I suppose I’ll never truly be happy with any shot I do, there will always be more I want to add or change, always more I want to tweak or try, but at some point, a shot must be called “done” and I must move on to the next one.
I’m looking forward to spending a lot more time animating and exploring more complex shots with bipedal characters, and I’d love to begin challenging myself with stuff like changes in momentum and movement through 3D space rather than simply in place movement.
I hope to look back on this blog in a few months and be able to compare to see just how much I’ve improved since.
All SyncSketch links for the animations (with all views) can be found on the portfolio section of this blog here:
Additional References/Resources –
Run Cycle Tutorial by I Want To Be An Animator:
https://iwanttobeananimator.wordpress.com/2017/02/15/ref_run-cycle_02/amp/
Preston Blair Deciphered:
Animating Run Cycles by Alan Becker:
Five Ways To Fix Knee Pops by Alessandro Camporota:
Knee Pops – What Are They and How To Approach Them by The Broken Tangent:
Animating Weight by Jahirul Amin:
http://www.jahirulamin.com/animating-weight
Animating Weight by Cave Academy:
How To Animate Weight by Animschool:
Two CRUCIAL Weight Animation Tips by Jean-Denis Hass:
Animate A Weight Lift by 3D Animation Hub:
How to Make Characters Grab Objects – Parenting Constraints by Sir Wade Neistadt:
Walk Cycle Tutorial by Rusty Animator:
Walk Cycle Inspiration by School of Motion:
https://www.schoolofmotion.com/blog/walk-cycle-inspiration
How To Animate A Walk Cycle by Alessandro Camporota:
Walk Cycle In 15 Steps by I Want To Be An Animator: