Week 5- UV Mapping

We had a refresher on UV mapping which offered a more in depth and surprising guide to making good UV maps by practicing on a watering can. UV Mapping is usually represented by a square on a quadrant, and whatever image you give will be comvered in that quadrant. The better you retopologise your model, the better the UV Mapping will be and the easier it will be to UV unwrap it, as will the way you cut the UV map, as well.

The quadrant is cut up into Texels, which serve as the resolution for your UV Map. If the UV map is small and you increase the texture resolution to 4k in Blender, it will be taxing on the software, especially in games.

So think about the size of your UV shell, export your plane as is to substance, keeping it as a 1k texture, the default.. Bring in the resolution texture first, as it has a massive influence on how textures will behave on the rest of the model. Higher resolution textures will behave much better, and you can easily get a 2k texture that looks good without going up to 4k.

Textile resolution is very important for games, and it’s rendered in real time, so the GPU is constantly calling for those textures. This causes a lag and potentially crashes, so I have to think about how many textures I want to add and their resolution.

When it comes to UV mapping the watering can, you should keep it simple to avoid overcomplicating the UV map.

Retopology can make UV mapping very difficult and to remedy this, consider a clothes reference to look at the seams as a way to help.

When planning the UV maps. consider the following:

  • Focus on the angle, making a couple of poses with your character to plan out the maps
  • UV map the hair and keep the hair as separate meshes
  • Keep the hair proportionate to the size of the model
  • In games models have one single quadrant.

When mapping my watering can, I learned of an interesting way to create a sharp edge, marking sharp. this tells the UV map where to create a sharp edge, and I found that very useful to create parts of the map that give the illusion of being sharp.

Week 5- Walk Cycle Improvements and Nathan McConnel’s work

We met with someone who worked on Guardians of the Galaxy 3 among many other shows and movies in his portfolio. Guardians 3 was a massively complex film, having 230,000 assets submitted in the 1 and a half work added to the film.

50 animators could be working on Rocket Racoon, who was conceptualised at every stage of his life, from a little racoon kit to a full fledged grizzled, physically modified adult, and even had walk cycles at every stage of his life. All the animators were well versed in the principles of animation, and some sequences had no references, and the animators thought how to best use the reference if they have it.

Being involved in the project from the beginning makes the process smooth and can help tell a story from the start to the final ending. Face performance was looked at and making Rocket’s ears and tail move to serve as emotional devices helped make Rocket more expressive. The animators needed to combine all the elements to make Rocket as expressive as possible.

Nathan McConnel also worked on The Golden Compass movie and the BBC His Dark Materials movie. Technology is constantly evolving, and what worked 10 years ago may no longer work now. Nathan worked on a single shot on the Golden Compass for 5 months. Nathan used Maya, the industry standard for the kind of filmmaking he worked on, though he also worked in Unreal and Blender.

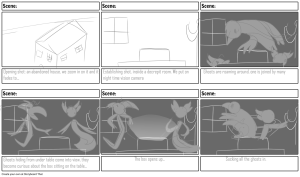
I worked on my walk and run cycles with personality as well. When it comes to making walk cycles, I have to consider several things. One of them is getting references for my characters, and have them grounded in what I want to do, and get used to the timing/weight/personality etc.

There are lots of references online for run cycles and walk cycles with personality, and following them can help improve mechanics and timings, and I can even choose to store said references for future reference, which can prove to be very useful for my assignment.

When it comes to making runcycles, they can differ greatly from normal walk cycles. For example:

  • They tend to be faster than walk cycles.
  • The timing between poses is shorter.
  • The character leans forward more than in a walk cycle
  • there is an extra pose, both feet leave the ground
  • less overlap from the arms and body and even the feet. It all depends on the style/ weight of character.

I then started work on my personalised cycles.

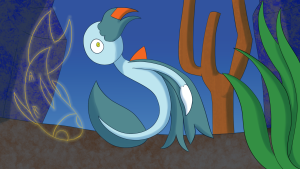
I chose to do Ecolo from Puyo Puyo for the personalised run cycle.

Ecolo is a rather playful if brash space wanderer who would easily bury the world in rainbow jellies if he wanted to. I wanted him in the run cycle to be morbidly curious, with one arm behind his back and the other close to his mouth, as if intrigued by what he is seeing. As I was working on him, my teacher gave me some advice on how to make him more floaty, as Ecolo is a very bouncy and light creature made up of space matter.

Trying to think of a character to do a personalised walk cycle was more tricky. I couldn’t think of anyone to draw walking, but recently I watched a short called The Amazing Digital Circus, and one character caught my eye- Jax.

Jax is a purple rabbit creature who is smug and self centered. He acts borderline sociopathic towards a lot of his collegues and generally has no qualms about being a circus being. The creators of the short, GLITCH Productions, uploaded a video of all the characters’ walk cycles, including that of Jax, which gave me the perfect frame of reference for my walk cycle for Jax.

Doing my own live action frame of reference for both Jax and Ecolo was instrumental in how to do their arms in the animations.

Run and walk cycles have to have everything broken down into key poses. You would probably have everything on 1s, but you can have it be on 2s if you want. Changing poses can give a slightly different style of walk or run, as does the timing and position of the arms or how the character leans. All cycles have a minimum of 7 poses, but a run cycle can have as many as you would like, though bear in mind in 2D avoid the foot coming down. Ideally the contact pose should be a little different, and make sure its not exactly mirrored or it will get flickery. And not all arms arcs need to be left to right. In fact sometimes only one or none of the arms need to be swinging in an arc. They could be planted on the hip, or on their head.

Week 4- Retopology

We did an exercise in retopology today. Our teacher asked us to try to retopologise the face of a sculpted head by using polygon build. getting a plane and snapping it on to the head’s surface, we tried our best to make a low polygon version of the face. This was as far as I got with the retopology.

I also did more of my model after a lull. I realised that I was procrastinating too much and needed to continue more actual work, so I finished the blocking for my model.

Week 3- Walk Cycle Double Bounce

Today we worked on an exercise task set by our teacher, we had to finish off animating a walk cycle in which the character double bounces. The teacher posted a ref to help us fill in the blanks.

In addition, for our coursework submission, we have to do four different walk cycles-

A vanilla Walk cycle

A vanilla run cycle

A walk cycle with personality

And a run cycle with personality

All the cycles can be done in 2D or 3D, But if they are being done in 3D we have to use the Rain or Snow rigs we were given in an earlier week.

I actually started a vanilla walk cycle following Richard Williams’ tutorial before I started this year, which I then finished off and I do plan on submitting that as part of the final coursework. The animation is of Sig, a character from Puyo Puyo.

Week 2- Blocking out a Model

We blocked out a model of a generic creature to fashion into a model of a horse. we first followed a diagram for a generic animal and used primitive cubes to block out its features.

Then, looking at the skeleton and musculature of a horse, we re- positioned the blocks and then created a low poly sculpt out of it.

I started work on blocking out my character, as well, creating a mesh out of a path for the wing bones, modifying a cylinder and using other primitives for the rest of its features.

Week 1- Walk Cycles- Toon Boom Harmony

We had to download Toon Boom Harmony and learn about walk cycles for 2D animation class.

When it comes to walk cycles, we should start by animating theĀ  body and how it goes up and down first, then the legs, and then the arms. Arcs plat a huge role in walk cycles. When a character walks, they are basically falling and catching themselves, which is why they move in an arc. The shoulders and hips and wrists and ankles also move in an arc. The best and easiest way to break down a walk cycle is to use a video reference and find the contact pose. The leading foot goes down, and the back foot toes go up. To begin a simple walk cycle, we started on the contact pose.

We also played around with a 3D rig of Snow and Rain to get started on a 3D walk cycle. I have some knowledge on walk cycles in 3D having developed my skills somewhat with a digitigrade rig. That means the creature walks on its toes. But the human rigs are plantigrade, meaning they walk with their whole foot.

We also looked at the different poses that go into a walk cycle.

Contact pose- dictates the difference between steps.

Down pose- where the legs take the weight of the body. the more they go down, the heavier the character is.

Passing/Middle Pose- takes place between contact poses.

Up Pose- dictates how long your character stays in the air as they walk.

We also looked at breaking the arms in a animated walk cycle. Breaking the arms adds vitality and life to the characters. We start by doing the basic swing of the arm but at some stage break the elbow and at the edge of the arc add another frame, always thinking of wrist of leading force, and let hand flap behind the wrist.

And then we broke down the animation of the legs.

Feet are the first thing to come down on the contact pose. Toes drag behind the ankles, so we leave the toes dragging behind the ankle and leave them on the ground. Pay attention to the arc that the ankles will be moving in.

We also as a warm up to Toon Boom Harmony had to animate balls in our first week, using arcs as part of the animating process.

Week 1- Character Creation

Our first class on Character Creation introduced us to general designing a character for a given environment. We were asked to:

  • Define and understand the theoretical requirements of Character design
  • Explore various approaches to designing characters and creatures
  • Explore various ways to visually communicate a narrative through a still character
  • create a character that makes functional sense

Anatomy is important in creating a character that works in their given environment, and we were asked to think about adaptation ideas when creating our characters- what makes sense within a certain set of rules? Do they live in the oceans? if so, they will need blowholes and flippers, be more streamlined in terms of their bodies.

I struggled with figuring out a concept for my creature, so a friend of mine recommended an artist for me to look at called Sam Fennah, who specialises in a lot of fantastical creatures with animal designs. However, I noticed many flaws in his character creation, such as giving his characters too many tails, ears and useless appendages that do not serve their biology. Other characters have long winded teeth that stretch past their cheeks, biologically impossible in our Earth system.

(7) Amygdala – Book Trailer – YouTube

While they did serve inspiration to what creature I wanted to make, I had to look elsewhere to get inspiration, such as what the creature would be like in a forest.

if they lived in a forest, they would need camouflage, a prehensile tail, curved claws to climb up trees, dextrous arms and legs.

So in the next class, I looked into what functions would be well equipped to a forest environment.

I found:

  • Retractable claws for climbing- Pine Marten
  • Folding wings mid flight to squeeze through tree gaps- Goshawk
  • Third eyelids to protect against thorns- Goshawk
  • Compact size to take advantage of tree crevasses- Red Squirrel + others
  • Hard, curved beak to catch insects hiding in crevasses- Tree creeper
  • Strong feet and curved claws- tree creeper
  • Long tails for balance- red squirrel
  • Striped fur for camouflage- Boars
  • Highly sensitive ears to detect low frequency sounds- deer
  • Strong legs to avoid predators- deer

I used these traits to create an early version of my creature, one that embodies most of the traits required in the environment it lives in.

I also looked at certain stylised pictures of bats to get an idea of the cute but shy creature I wanted to make.

What I did during the summer

During the summer, I worked on several models of characters for my own personal work. I first made a model of an OC of mine, Notch the Blacephalon, and rigged it for animation.

I created a few animation tests of Notch, including a walk cycle and an idle animation.

I then modelled a small scene of an alien forest for my model, while following a tutorial to create an atmospheric forest, creating models of a tree and grass to use as particle effects for the main scene.

(2) Create an Atmospheric Scene in 10 Minutes (Blender 2.8 Tutorial) – YouTube

I then created an animation of Notch walking in the scene, only to be startled and run behind the tree it walked out from behind, also using some stock nighttime noises, grass step noises and editing Blacephalon’s cry into the scene. I am very happy with the final result, as I used a lot of the skills I learned from my first year at Ulster University.

Notch, the trees and Grass were all fully hard modelled, and the trees were hand textured by me, as well. I hope I will be able to improve upon my current skills in the second year.

Animated Narratives- Reflection

Over the course of my first year in my Animation Course I connected with so many people who were also interested in making art and animations like I was. I learned a lot about using 3D software such as Blender and how I can create stunning effects on my models using tutorials and learning through the videos our teachers sent us. I enjoyed hanging out with my friends through private meetings and through the classes we had.

The people in my group were Cor, Sean, Shane and Chika and I had a great time with each of them, talking with them over how to approach the prompt we were given and what our concept should be about. I laid down my ideas and helped them get out of a tight spot in conceptualising the project.

I found it very fun interacting with the rest of the group over Discord. Talking to my peers was a good deal of fun and we were able to decide and lay out who was doing what in the project. We also organised independent study work meetings on days that we weren’t in to help each other out in the project and also to hang out.

Overall I found this semester to be very good as it allowed me to properly connect with others and share ideas and opinions with them and develop a good friendship with each of them. They were able to get a lot out of my contributions and I had a lot of fun animating and working in this module. At the start of the year I was timid and did’nt really engage all that well with my peers, but after collaborating and working with them I have become a lot more open and able to engage and interact with people and work with them on creating an animate project.

Animated Narratives- Portfolio

This semester I had to do a 30 second animated project focusing on escape with several other collegues. We first settled on an idea concerning ghosts escaping from a ghost hunter. My ghost is inspired by fantasy creatures and sea butterflies as well as the pokemon Flutter Mane, a paradox Pokemon from prehistory, with a slight inspiration from the Ultra Beast Blacephalon.

Here are the initial concepts and designs for my ghost, along with inspirations for the character.

I also worked on an early storyboard for the 3d animation that was later revised and expanded upon.

I then worked on creating the model of my character and applying knowledge I learned over this year to his creation. the character was 100% hard modelled in Blender and textured using Photoshop, and then given a ghostly emission effect from following a tutorial on Youtube.

The model went through several iterations and many troubles trying to get the eye sockets properly created for the eyes. I found I can use a cube and subdivide it, cut half of it away, mirror it, and then delete faces to create eye sockets and then used Loop Tools to change the shape of the hole. Then, I extruded out sockets for the eyes, and then subdivided the sphere again.

I then applied an armature to the model and did several tests before animating each of the scenes we were given.

By using Blend Shapes, I also created facial expressions for my character. By creating copies of the basis head and modifying them, I was able to create different poses for the eyes and give my character emotions. Shown down here I created a very good demonstration of what my character is like.

I also did previs work on the project, creating several previs models of rooms to use in the project along with a model of a picture, which I made original art for, using a tutorial of making a picture in Blender.

And now, here are the animations that I made for the project: