3D Digital Literacy- Asanbosam development and Reflection

I had very little time to complete my assignment for Mike’s module due to procrastination and persistent focusing on other modules. Over the course of a single day, I set to work on multi-resing, texturing, rigging, and posing my Asanbosam character.

Before I started modelling my asanbosam character, I had to conceptualise her first. She was originally designed with wings and would have had them modelled using planes and solidified beizer curves, but that would have proved to difficult to rig and develop. So I replaced them with hands with iron claws as many illustrations of asanbosam were depicted. Her overall design was also simplified for further ease of modelling.

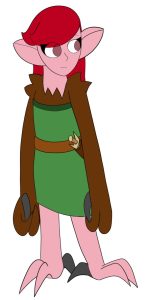
Blocking out the model was generally easy as I simply had to block out my character’s  body using primitives such as cylinders, planes, Spheres and cubes. Sculpting the details was also rather fun as was multi resing the details later on.

The first pothole I got stuck on was how to apply the armature to the other side of my model. Due to the way my model was placed, the symmetrising always ended up wrong.

I later learned that I needed to rotate my model 180 or so degrees, and then apply the symmetrise there, and it worked.

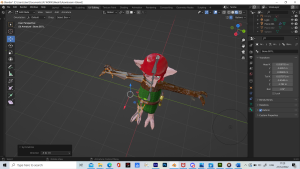
The next pothole I ran was the model resetting when I applied the armature. I realised I had to move the armature to be the first thing on the modifier. I then had to join all the parts up so that they could all be exported as a single FBX file.

This is the final result of my model.

Asanbosam – 3D model by InkLightning (@InkLightning) [180dd5f] (sketchfab.com)

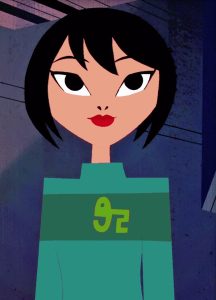
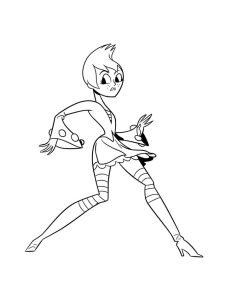
Over the course of my time with Mike’s module, I learned a lot about taking references from other sources. I largely get my ideas from my head, so trying to get refs from Gennedy Tartakovsky made me think about how to conceive my ideas.

I found the retopology part the most frustrating and difficult part of my modelling process. It was rather annoying trying to link all the polygons together and ensuring not one was our of place. putting all the parts together properly for export was also rather difficult, as was the armature.

I enjoyed texturing the most out of the process as it was a reprieve from the mapping and retopologising that came before. Multi resing was also  quite fun and not as stressful as I thought it would be.

Overall I would like to 3D model again, but next time, limit myself to simpler shapes so that I have more experience for modelling more complex shapes.

Animation Studio- Reflection

Working on my project in Sarah’s module had a lot of really interesting topics on offer for me to learn from, and overall I had a lot of fun with it. It was fun planning out my storyboard and then creating an animatic out of the shots I created for it, and it was also interesting seeing how our project has developed this far into the semester.

Communications between our team was very poor online, and was heavily reliant on physically meeting each other for things to really go anywhere. However we did do a lot of development into our project when we did meet up. Even then, we had to be really close to each other in order to communicate efficiently.

What worked well in our project was the idea of using instruments as weapons against the enemy. I chose to make my character use her guitar as an axe and swing it down on some enemies, and I felt that this could create some rather cool action shots. Originally, it was going to simply be music competitions against the enemy, but using them as weapons seemed a lot more fun.

When it comes to creative team work, I learned quite a bit about cooperating with other people’s ideas. I showed them my ideas for the project and input my own ideas for what the project could potentially have in it. Another thing I liked was drawing everyone’s characters in my own art style, and getting a sense on how everyone draws their characters as well as my own in their art style. Everyone has their own approach to an art style, and has helped me a lot in analysing my own art style.

If I were to restart the module again, I would endeavour to be a be a lot more active in providing input into the group project, as I was quite passive in the overall direction of the project.

One of the things I really took away from this semester was thinking how lighting affects the shading of my objects. Doing the lighting exercises and getting feedback on them made me think about how to accurately portray the lighting on the objects and how their shadows are cast because of the lighting.

What didn’t really work was the idea of having the characters face their personified fears. We realised that too complex a concept for our project meant more planning and time wasted on how to have them face their fears. While I did make a few illustrations based on this concept, I felt that simplifying the storyline to just OCS or self inserts facing pop culture icon characters was a good call. What was also forgone was the backstories of our characters. Bridget Fletcher was conceived as a passionate girl who was too lazy to do work, but that was forgone along with the complex nature of the original story.

What I might change about my project is the timing of some of the shots. I feel the animatic I have created doesn’t spend enough time on some of the shots I have created for it. I want to remedy this in the final animation. I also changed the concept of what my character was fighting. The initial storyboards had her fighting original, but rather bland creatures alongside Luca’s character, who used his voice to fight. The revised storyboard, as the story was revised to fight against pop culture icon characters, now had Pokemon from different eras and spaces, Blacephalon, Scream Tail and Iron Bundle, with the former one being slightly modified to give a more unique look. I also plan on making the shot where Bridget swings the axe down on the monsters more dramatic and showy.

This is the current WIP for the animation.


Week 11- Duik in After Efects, Cel Action and Others

Today we had a quest who actually did his course at Ulster back in 2014, Paul McGra, who works in 16 south studios and actually worked on his own show, Bee and Ladybird. and actually also worked on Happy the Hedgehog, a property by Paper Owl Studios which I actually tried to apply for as a trainee animator.

I actually have experience with using Duik with an assignment back when I was studying at the Belfast Met.

Paul created a character out of individual rectangles in their own separate layers in Photoshop and Illustrator, and recommends labelling Left Hand elements A and right hand elements B. He then creates a new composition in After effects and puts it in 16:9 Format and sets it to 25fps.

Duik can be installed by going to the scriptUI folder and copy paste it into Script UI panels. located in the scripts folder in the support files folder in the file After Effects.

There is another piece of software we can use called Celaction. By importing elements from Photoshop by going to File->image file->import to bring in sims.

We can change the mode to wireframe mode to aid animating.

Week 11- Rigging

Today in Mike’s Module we learned about Rigging with a preretopogised character he made a few years back. We first create an armature bone and position it between the chest and pelvis area of the model, and then extrude ot extra bones and then position them into the various places of the model, such as the head, neck and limbs.

Then, we parent the armature rig to the character and then we bake it into the mesh, and then apply automatic weights. We can then pose the character in anyway we want.

I found this task much easier and less fiddly than the retopology, so i hop I can be able to reach far enough with my won character to make use of rigging.

This is what I did with Mike’s character.

Week 10- Seconday animation test and Animatic Work

We did more exercises on flour bags with secondary animation today. Alec asked us to animate a secondary animation on a premade animation of a flour bag.

I drew some hair on my own flour bag and animated it being pulled by inertia and gravity as the bag jumped in the air in the exercise. The hair should be falling back from behind the flour bag as part of the follow through as the bag falls back to the ground.

I was taught that I should keep my line art sketchy and rough to get my key poses and in between, and then spend some time on the line art once I’m happy with how the rough sketches are turning out.

I also created a new version of my animatic. Since the concept was now to have our characters fight against pop culture icon characters such as Marge SImpson, my idea was to have my character fight against Paradox Pokemon Scream Tail and Iron Bundle from Pokemon Scarlet and Violet with an older Pokemon from two generations prior, Blacephalon. I looked into for part of it how a Blacephalon moved while it attacked using Mind Blown, and modified it due to the Blacephalon depicted being partially handicapped.

I went ahead and started animating and rendering out an early animation test of my individual shot for my group project.

For the scene where Notch, the Blacephalon fighting alongside my character, runs into view, I applied him reacting to inertia as he stops, showing him as a bit brash and clumsy as he awkwardly stops in place, and his frill still going as he stops shows I’ve applied follow through as well. The way I’ve made Notch squeeze his eyes tight adds a bit of appeal to his movements. The recoil from the inertia Notch feels also employs slowing out of his movement.

Slowing in and out is a very important principle to making characters feel expressive and life like, and very few things lack this feature, such as robots.

To utilise slowing in and out in 2D animation, we take two extreme poses, add one in-between and then draw multiple in-betweens between the extreme and the first in-between and then draw closest to the extreme until it looks good enough.

Correct slowing in or outs would be the whiplash a gun gets after shooting a bullet, or a ball bouncing back up after it his the ground.

6. Slow In & Slow Out – 12 Principles of Animation – YouTube

5. Follow Through & Overlapping Action – 12 Principles of Animation – YouTube