✨ Concept Art ✨
For my cute character assignment I knew I wanted to get a little bit ambitious with my design, and I was tossing around the idea of modelling one of my existing original characters to have a version of them in 3D which I thought would be really cool!
I began throwing out ideas into a mindmap, and sketched up some really rough designs of my OCs to see which one would be the easiest to translate into 3D, and which one’s design I liked best! I drew these up on my old PC on Paint Tool Sai 2, and since moving to my new PC, I haven’t been able to open these files, and when I went back to try and open them on my old PC, it kept freezing over and over before I could get them up. They do exist I just simply can’t get at them as of right now unfortunately.

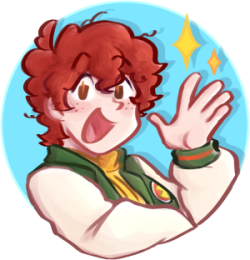
The design I went with was of my OC Vann Lux, seen below!

His design is based on a turkish van cat, which is where the name comes from! I gave him slightly different markings than you would normally see on an actual van cat, mostly just as a stylistic choice. Here’s some actual turkish van cats below that inspired his fur colours and heterochromia!


From his base design, I redrew him in a much mose simplistic chibi style to make him easier to model and to also make him look cuter, I wanted to make sure he had huge big cat eyes so I really exaggerated them in the simplified design.

When that was finished, I sketched up a quick turn around and breakdown of his body shapes for modelling in Blender!

⚝──⭒─⭑─⭒─⭑─ 💫 ─⭑─⭒─⭑─⭒──⚝
✨Sculpting in Blender ✨
My first go at modelling Vann was using the metaballs like Henry showed us in our class tutorials when we modelled the dog, my idea was to build up the base of the body and then sculpt the clothes on top.


I felt that I was heading in the right direction, until I had my one-on-one with Michael, and he heavily advised that I should scrap this and start again using the hard surface modelling tools instead, he showed me and example where he built the head from a sphere, and used cylinders for pretty much the entire rest of the body.
It seemed really simple when he demonstrated but when I tried it muself, it was actually pretty complicated manipulating the shapes how I wanted as I was so used to using Maya.

I wound up with something like this, which was fine until I started trying to model onto the bandana and the shirt and it completely broke! Seriously had no clue how it happened, and I didn’t take any pictures unfortunately as I scrapped it and started again for a third time.
Third time definitely seemed to be the charm, as I started with the head instead and actually got his face looking really good! I was especially proud of his snout, it looks amazing from the front and the side!

Using the head to get me used to Blender, I was able to model the bandanna fairly easily this time and it didn’t completely break apart which was great! After the bandanna I modelled the hair using the snake hook tool and the clay strip tool to give Vann those very big cartoon-y anime hair flips and some hair-like texture. Below is a picture of me getting the eye sockets into the right shape, but it also showcases his hair fairly nicely!

Next I modelled his clothes. The shirt was fairly straight forward as I just had to poof it out a bit and add some folds where it tucked into his belt, but I had no idea what I was going to do with the belt in the first place. I felt it’d be easiest to include this pelvis peice when sculpting his legs, so I could turn that into the belt! The idea was to sculpt his pelvis and then make folds where that part met the trouser legs.

In theory this was a great idea, but in practice it looked like my character was just wearing his underwear on the outside of his pants, which was really silly looking, but not what I was going for at all.

I still used the pelvis piece for the belt like I planned, as it worked great, but I sunk the rest of it back to be hidden inside the pant legs, which did a better job of giving me the seam I was looking for.

He was looking really great so far! I just had to finish his arms and legs!

Tada! I slightly changed his pose from my original reference, as I was worried it was too bland looking initially. I think the hand on his hip definitely gave him a bit more character! I think if I had some extra time I’d love to model him a prop, like a sword or something!

⚝──⭒─⭑─⭒─⭑─ 💫─⭑─⭒─⭑─⭒──⚝
✨ Retopology ✨
For retopology, I followed along with the in class tutorials for Vann’s face, using the PureRef files to help guide me as I went! Some things were different, like his mouth and his nose but I think I retopologised his face really well!


When it came time to do the hair I was at a bit of a standstill, I wasn’t actually sure how to go about retopologising a cartoon-y anime character’s hair. I turned to other models on sketchfab and on youtube to look up tutorials, but almost everything I could find was tutorials on retopologising bald heads (which wasn’t super useful to me), or sculpting videos like this, where they build the character up with hard-surface shapes.
I found that any anime models I could find on sketchfab also seemed to be modelled this way as wel. 

I couldn’t use this tutorial for my model, but I did find the shapes that these artists all used for the hair a really great jumping off point! I tried to copy it into my own work, trying to retain those big curvy cartoony hair spikes as I worked.

However, as I continued retopologising my mesh, it became more and more difficult to keep even edge loops without sacrificing details I’d sculpted, or specific shapes or folds in the clothes that I wanted to carry over. Working around the bag strap was especially challenging and as you can see below I took a lot more liberties when it came to the clothes.

I knew I wouldn’t be able to perfectly retopologise him so the most important thing for me was just trying to get the new retopologised model as close to the sculpt as possible with as few polys as I could. I did some research after I’d mostly finished the retopo, as I felt I wasn’t working in a very streamlined way and I found a bunch of cheat sheets like this one that wouldn’ve helped me if I just did some research before diving right in.
 I think going forward I really want to look into retopology more to try and make sense of it in my own head so I can make less messy meshes!
Once the retopo was finished, I got rid of my initial sculpt from blender and checked him over to make sure he was looking right! My next step was making the eyes.

I wanted to do something kind of fun with them, I had holes in the head so I’d either have to put a sphere or a plane of some kind in his head. While I was thinking them over I remembered stumbling across a fursuit tutorial on twitter on how to make eyes that follow the direction you’re looking at the head from, and I was really curious to see if I could translate this into my model!
After looking up a quick tutorial and a few example images, I realised the way it worked was to just have eyes that are sunk back slightly into the head rather than being flush to the eyelids.

I made a cylinder and sunk the inside in to make this cup shape just like the image above, duplicated it and set them inside the head with as little space between them and the face as possible.


It seemed to work! Though, I wouldn’t be completely sure until I got into substance painter and put some pupils on him. Around this stage I also used the soften edge option on my mesh to get rid of the polygonal texture, and then went back and selected harden edge on certain parts that I wanted to keep the definition on, such as the eyelashes, the mouth, and where the hair met the face.
Next I got cracking at the UVs! Thankfully, everything actually unwrapped with little to no hassle! I took every separate object apart and put it into it’s own UV. I’m not entirely sure if it was necessary but it helped me keep things right when it came to texturing!


⚝──⭒─⭑─⭒─⭑─ 💫─⭑─⭒─⭑─⭒──⚝
✨ Texturing ✨
The final stretch! Texturing! Woo hoo!

One of the first things I did was get some pupils onto my model to see if the eyes actually worked how I wanted, and thankfully they did! They turned out really great I was super pleasantly surprised with the result!

As I continued to texture and mess around with my model, I was deciding on if I wanted to use smart materials or not on my model. I knew that they’d give me a really amazing result, as I used it on his bandanna for that cool corduroy effect, but I was having doubts about doing this with every part of my model, I didn’t want to make a really simplified chibi character with realistic textures as I thought it’d look really jarring. This was a really big issue with the hair, as I had no idea how to go about texturing it. I was running in a circle of, “Realistic hair would look really off, but solid colour would look really boring.£
I took a while to think over what my options were. My first thought was to give it a cel shaded look, similar to games like Hades or Legend of Zelda Windwaker. I thought it’d be a really charming way to give my character some texture while still keeping it simplistic and cutesy.

I also knew that if I wanted to add more details later, I’d be able to keep building that up with cel shading, similar to how they texture characters in Hades, where the shading isn’t blended out and instead built up in layers. Pretty much just really fancy cel shading!
With these techniques in mind, I got to work on the hair. It was extremely tedious but once I began to add the shading I began to really enjoy the results! I was feeling a lot more confident heading in this direction for the rest of the model.
Viewing him with only base colours was really cute, I really love this sort of lineless cel shaded yet 3D look and I’d love to explore it more with future models if possible!

Here’s him with all his materials on so you can see the definition of his face and clothes better!

From here I just kept working the same way, cel shading the places I wanted to put shadows and matching him to his original non-chibified reference! I added some shaded parts where I found the shadows looking a bit too harsh, and added some extra details on his face and in his eyes!

And here’s the final textures but only with the base colours after I added more shadows to bring back some definiton.

⚝──⭒─⭑─⭒─⭑─ 💫─⭑─⭒─⭑─⭒──⚝
✨ Final Model and Evaluation ✨
Overall, I enjoyed this assignment quite a bit. I think my favourite part would be a tie between the sculpting and the texturing, which is surprising as the sculpting was initially giving me a lot of trouble in the beginning! I was always interested in learning Blender, so im glad this assignment gave me the opportunity to develop my skills with the program, I’m feeling a lot more confident going forward using this program.
The part I struggled most with was the retopology for sure. It was extremely tedious as I don’t believe I was working in a streamlined way, my mesh is a real mess and I know I should’ve done a bit more research prior to this stage.
I also struggled with keeping on top of my workload. My main priority coming up to the end of the year was to focus on the 30 second animation, mostly because I was struggling in the beginning stages, and as such I was cutting it really close to the deadline when wrapping this assignment up.
Regardless of these drawbacks, I really enjoyed this project and I’m so happy with the end result. This year really taught me a lot, I’m so much more confident using programs I was completely new to, and I can see my skills improving more and more, especially when comparing this to the sword and shield modelling assignment from the start of the semester. I’m super excited for second year!
Here’s the final model below! I hope you like him as much as I do, hehe!