
✨ Portfolio ✨
You can see all my assets by themselves here!
⚝──⭒─⭑─⭒─⭑─ 💫 ─⭑─⭒─⭑─⭒──⚝
✨ Idea Generation & Concept Art ✨
As a group, we all decided that we really wanted to create an observatory and off the bat everyone had dozens of really different and unique takes on it, the more we spoke the more I realised it’d be benefitial to have all those ideas written down somewhere. We took notes in Neaves notebook to keep track of everything that was bringing us inspiration, while some of us took to one of the whiteboards to begin sketching out ideas that popped into our heads!

This is my section of the whiteboard, I worked on everything that’s orange marker!

After class we immediately got onto a Miro board, gathering reference photos from real life, video games and animation. As a whole I think we were all very into the school-type/cathedral sort of feeling for our observatory to help it stand out as we didn’t want to just make a big room with a big telescope in it, a lot of our real life references reflected this direction!

You can view our Miro board here!
As we moved on to start creating concepts for our assets, I thought it was important to make sure everyone knew what sort of details had to be included in a prop sheet. We discussed before hand that we were aiming for a Legend of Zelda BOTW feel, so not super realistic, but not too cartoony either. I sent these pictures to the group to make sure their concept art would be as clear as possible, and that they knew how to block out rough colours!

⚝──⭒─⭑─⭒─⭑─ 💫 ─⭑─⭒─⭑─⭒──⚝
As we continued to discuss our plans, it was apparent that we were struggling to get a cohesive idea for what the observatory should look like, and I thought it’d be a good idea for us all to draw what the observatory looked like to us, and that after we blocked it out we’d be able to take our favourite one or combine aspects of everyone’s designs into one. I looked to our Miro board for references for my design, and I sketched a few different concepts up.

One was a more traditional observatory shape that took on a fantasy tower sort of look. Another I tried to incorporate greenery and trees into as Neave was really interested in including a big tree somewhere in the observatory, going full fantasy vibes. I however, was really interested in leaning fully into the cathedral feeling with tall ceiling, pillars and an hexagonal shape, with large stained glass windows detailing the planets, sun, moon and stars!


After this, I looked to sketchfab to help get an idea of how I wanted to design the assets for the scene. I felt it’d be important to gather 3D references at this stage so I could get a feel on how cartoony or realistic I wanted to take it and then jump right into modelling them.

For the telescope, I actually worked from one of Neave’s designs, they wanted this big cartoony shape. As it was going to be a really important asset, I thought the idea of going in a more exaggerated direction actually worked really well and would draw more attention to it than if we modelled a realistic telescope. After Neave showed me their design, they asked if I’d be willing to model it, which I was! I redesigned their concept with a few changes that I felt would look nice and drew it from a side on perspective to help me when modelling.

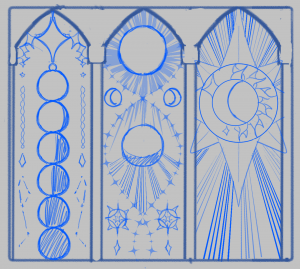
I also offered to design some stained glass windows with Joseph, my reference images were taken mostly from google images as I didn’t want to design something too overly detailed as it’d just make things more complicated during the texturing stage. I was a big fan of using the sun and moon in my designs, and I really liked the long sunbeam lines in the top left reference photo, I used them wherever I could in my concept art!

⚝──⭒─⭑─⭒─⭑─ 💫 ─⭑─⭒─⭑─⭒──⚝
✨ Blocking Out the Room ✨
When blocking out the room, I used my original concept art as a base and basically just traced it in Maya!


I didn’t include a roof as I admittedly had no idea what I wanted a roof to look like, but overall I was really happy with this shape! I felt that the balcony was a really nice touch that I wanted to carry into the final room layout.

⚝──⭒─⭑─⭒─⭑─ 💫 ─⭑─⭒─⭑─⭒──⚝
✨ Modelling Assets ✨
Because I gathered up some 3D references for my books, modelling them was super simple! Something I took notice of was that I didn’t want my books to look like bricks, so I added curves to the pages and made them gend in where the sides of the pages are. Even on the closed books I bent the side of the pages in, however it’s a little hard to show it.
I wanted to create a few variations so we could fill desks and shelves without them all looking too same-y. When modelling I was really struggling with connecting the feather to a quill nib and I decided to exclude it from the model, I’m a little disappointed that I couldn’t figure it out, but I really like the raised page I decided to model instead!

Here are my UV’s!

And here are all of the modelled books! The closed books were pretty much just copies, but one has that golden bevelled edge that I drew up in my concept art.

I also modelled a floor base for the room based on Una’s floor plan as it was the design we wanted to stick with for the finalised building after the blocking out stage!

Next I modelled the telescope, it was honestly really straight forward as it was essentially just one big cylinder that I continued to extrude, bevel and use the multicut tool on. I did admittedly get stuck on making the base, but my groupmates stepped in to help and Joseph modeleld the base for me instead!

Below is me using my original concept art as a base for the model!

The blackboard was an afterthought when I was just finishing my modelling, and as such I didn’t have any concept art for it, however all I really needed was some reference images and I modelled it up in a day! The actual chalkboard was kept separate to the legs, so we could rotate it in unreal to make it look like it can spin around on the joints.


⚝──⭒─⭑─⭒─⭑─ 💫 ─⭑─⭒─⭑─⭒──⚝
✨ Texturing Models ✨
For texturing, our group made a few textures that could be used universally across everyone’s models, such as the wood and marble textures. This helped us to keep all of our textures and models consistent and cohesive! Joseph made the wood textures I used in the blackboard below!
I textured the rest of it myself! I wanted to create an alternate version with writing or symbols on the board, but unfortunately I ran out of time for texturing and had to move onto the next stages of the projects.


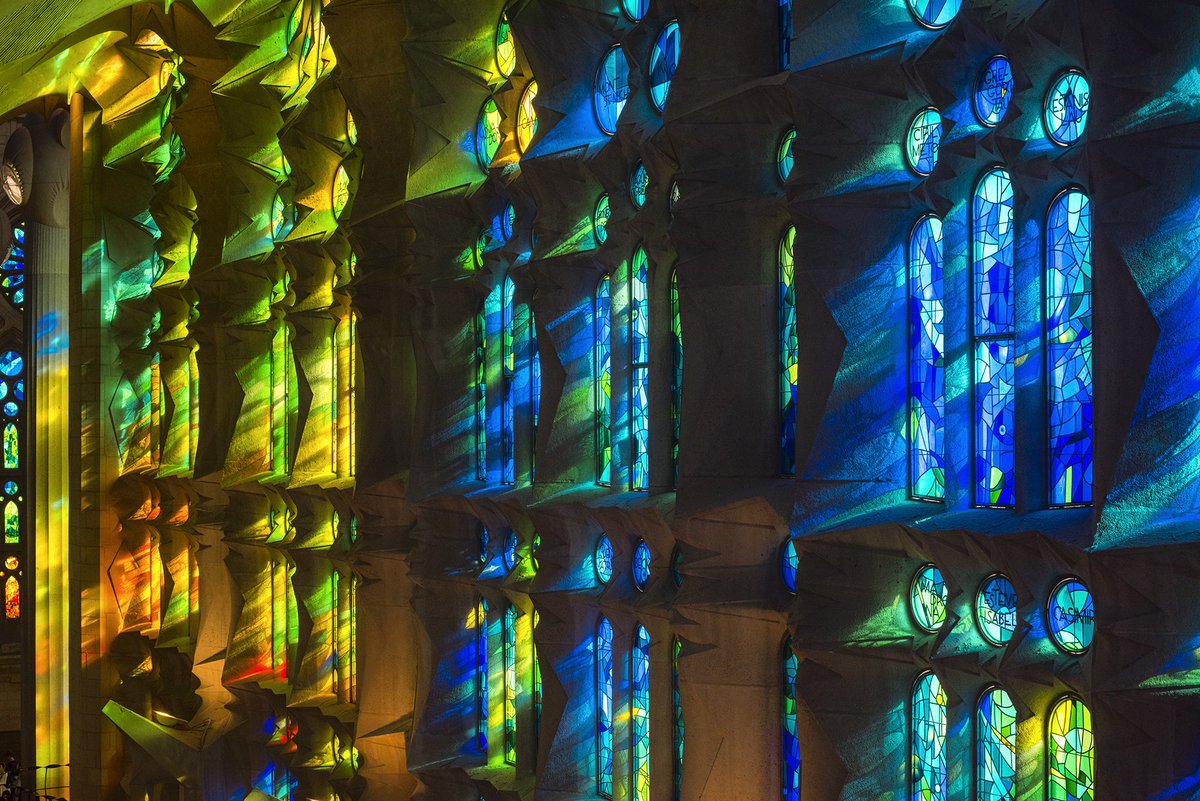
One of our biggest references and inspirations for the cathedral windows were the stained glass windows in La Sagrada Familia designed by Antoni Guadi, and so I knew when I began texturing that we needed the windows to be as colourful as possible.
For the tall windows, I used gold textures with a raised height maps as the stand ins for the lead strips that hold together real staned glass windows! I used the stamp tools available in substance painter, and my original references while making this window to create the stripes for sunbeams, the sun, moon designs and for the colours I used!

I tried to make the stripes look like sunbeams at the top, fading into a sunset and into night towards the bottom! The small star at the bottom references the second stained glass window I designed!

I believe that Neave’s stained glass windows resemble those from La Sagradia Familia more closely, but I’m still super happy with how mine turned out!
For the circular windows, I went back to my references once again for the design. I was making it to fit inside Joseph’s window frame with the diamond shape, so I created this big cross in the middle for the window frame.
The raised and bumpy texture was intentional on my part, as I was hoping that when the texture was in, it’d make the gold look like it was welded into the frame, as seen in the second picture.


Next I moved onto texturing my books, I took the closed books and offered my open books for other group members to texture. For both of my closed books I gave them the golden parts on the spine, and added a bit of grunge to the cover of the book to show wear on the book.
Where the books differ is that on the book below, it has a leather binding, a gold edge on the top of the cover and a label that I created with height maps. I used the triangle stamps to create a design on it that mimicked text.

I also created multiple copies of the book textures and recoloured them so we could fill the shelves with bunches of books that looked varied.

Here’s a picture from later in the project of all the books put into a bookshelf just so you can see how they looked together!

⚝──⭒─⭑─⭒─⭑─ 💫 ─⭑─⭒─⭑─⭒──⚝
✨ Building Scene In Unreal ✨
Eventually, we were all ready to start building our scenes in Unreal! We uploaded all of our FBX’s onto a shared onedrive, downloaded all the models and textures and began to put the room together. This is where we all split apart and began to design our own layouts.

For example, neave used the panels around the dome to create archways in her building, and I used the balcony’s railings to create fences on the floor!

Another photo from when I had my scene mostly filled with furniture, excluding small details!

⚝──⭒─⭑─⭒─⭑─ 💫 ─⭑─⭒─⭑─⭒──⚝
Next I began to plug in my textures, I used Henry’s videos to help me do so, creating a master material that looked like this.

I created instance materials from this one, seen below.

The room really started to come together as we plugged in our textures, the whole group was really excited to see the room coming together into our cathedral-esque observatory!


After our presentations on week 12, our lecturers pointed out that our scene looked overly white, due to the floor and walls and pillars sort of blending into eachother, however at the time none of us had the carpets, banners and stained glass windows in yet. We were really glad to see that once we added these pieces into the scene, it really started to bring the place together and brighten it up!

⚝──⭒─⭑─⭒─⭑─ 💫 ─⭑─⭒─⭑─⭒──⚝
✨ Building Lights ✨
When my room was basically entirely built, I got a little impatient and decided that I wanted to see how my lights would look with the stained glass windows in.


My first light build went like… This. Before I realised that I forgot to check this on.

However, once I fixed these checkboxes, and rebuilt the lights, this was the result! I used post processing to add a golden orange glow to the entire room as I wanted my observatory to be set at sunset and I wanted that golden hour glow to fill the room.

Henry also helped our group to use atmospheric fog and directional lights to create these god rays.

⚝──⭒─⭑─⭒─⭑─ 💫 ─⭑─⭒─⭑─⭒──⚝
One of the final touches I wanted was that I saw my other group members using these fireflies to fill their scenes. I thought they looked really pretty, but I didn’t think that fireflies would fit my scene, however I had another idea for where I could put them.
I followed along with the video to create the particle system, making little dots that flickered like fireflies!

Once I got that far, I placed them around my crystal ball and shrunk them down really small, I also editted some of the settings myself to keep them in a smaller radius before turning the fireflies blue to make blue twinkling sparkles around my crystal ball!

⚝──⭒─⭑─⭒─⭑─ 💫 ─⭑─⭒─⭑─⭒──⚝
✨ Cameras, Shots & Editing ✨

I also used the sequencer curves window to edit my camera, just like how we were taught to use the graph editor in Maya.

Unfortunately, however, for some reason or another my clips weren’t rendering right, once I hit a few seconds into the clip, my camera bugged out and gliched under my map. I couldn’t find any way to fix it and one of my groupmates said a similar thing happened to them and they had to just remake the cameras. All of my shots did this, and I believe it’s because I copied the same camera over multiple times.
I didn’t have time to remake 18 shots, or I wouldn’t have enough time to get my video rendered and submitted, so instead I did my best to work around this. I made the camera move faster in Unreal, to capture the movement I wanted before it glitched out a few seconds in, you can see the keyframes above and below are different.

My plan was to then slow the camera shots down in Premier Pro, using the clip speed option. It did work, however it decreased the quality of my clips. It was the only way I could work around it within my time constraint, and when I take that into consideration I’m alright with the slight quality drop as the final result is still pretty! Even still, I wish it came out looking like my original shots.

In Premier Pro I also used some colour corrections, added some transitions and faded the music in and out! I use these techniques for our group presentations, so this part was all pretty straight forward!

⚝──⭒─⭑─⭒─⭑─ 💫 ─⭑─⭒─⭑─⭒──⚝
✨ Communication ✨
Throughout the entire project, we used Discord to primarily communicate, we created our own server that we could keep track of all our links and files in, as well as keep eachother on track and discuss assets, textures and models!

We also created an Excel sheet with our week by week plan. We also created an asset list that helped us keep track of everything that was modelled and textured before we moved on to building our scene in Unreal!

As well as this, we met up in uni every wednesday to do work and collaborate in person, which I felt was super beneficial to keep everyone on the same page especially coming up to deadlines!
⚝──⭒─⭑─⭒─⭑─ 💫 ─⭑─⭒─⭑─⭒──⚝
✨ Evaluation & Final Cinematic ✨
Overall I do have some mixed feelings about this project. I really enjoyed working with my group, we all had really similar ideas and I think we all work really well together and all of our models and textures and our finals rooms looked so awesome. Despite us all using the same room shape, everyone had a different take on the final layouts of their furniture and windows, which I think really helped set everyones work apart! I feel that I could’ve done a bit more modelling or texturing though, as some of my models never got textured in the end and there were probably a few more smaller assets that we could’ve included to help decorate the place. That being said, I think if I did so I would’ve run out of time as I already cut it very close to the wire when finishing my scene.
As much as I enjoyed the final product, I’m extremely burned out on 3D assignments, as my last big assignment in 1st Year was also a 3D animation. I’d really appreciate if I could focus more on a 2D project in the next semester, as I found myself multiple times getting demotivated and burned out with this Unreal project. I consider myself decent at 3D but I realise that creating scenes like this really isn’t where my passions lie, which is good for me to know going forward! Regardless, I am genuinely really happy with my rooms despite minor hiccups with the shots rendering at the end, and I’m super proud of my group for pulling this all together!