We were given the assignment to create a game prototype in collaboration with games design students. We were each assigned roles in the group, for example I was given the roles of Animator and Rigger, any other help to contribute towards the projects overall outcome is to be done also. The group members from our Animation course consisted of John, Dayna, Simas, Daniel and James(me) and the group members from the Games Design course are as follows, Matthew, Patrick, Turlough, Filip and Adam.
There were 16 weeks of this project, we had to complete a presentation to show at the beginning of each week based on what work we had all done individually. Instead of breaking down this blog post into each individual weeks, I decided it would be best to show all of the work I have completed in the from of different sub sections, such as Modelling, Animation and Rigging.
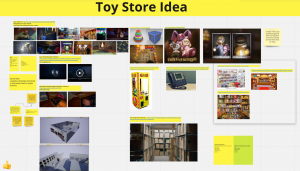
To begin this assignment, we had to come up with original ideas or concepts to create a game concept with. We started off by using Miro to create mood boards with references and ideas to take inspiration from for the final game prototype idea. Our ideas changed over time however, we decided to first pursue the idea of a horror/mystery game taking place in a train where each carriage represents a different time from the past and future and murders have been committed in each time, leaving it up to the player to solve the mystery of the train and escape its grasp. We created a Miro board from this, where each group member placed imagery for inspiration to what the game could look like in its completed state. A screenshot of this original mood board is seen below.

Another one of these Miro boards was created for brainstorming what the game would be, for example, genre, inspiration, theme/look and setting. This brainstorm board is seen below

We moved onto another idea however, this was an idea based on the theme of Pediophobia. Pediophobia is a fear of inanimate objects that are meant for children which can look real, such as dolls or teddy bears. The games story begins with a child, Benjamin, who has a troubled family and being taken care of by his strict Auntie. His Auntie doesn’t allow him to have some of the experiences that the others children his age do and therefore doe not allow him to visit the opening of their towns new toy store, which is that night. The toy stores name is “Toytopia”, this was made the games title as well. Benjamin runs away from his Auntie and reaches the toy store on his own. He quickly gets trapped inside and has to make his way out of the toy store, running into some not so friendly faces along the way. Using the character movement and puzzle solving skills, it is the players job to help Benjamin escape the horrifying “Toytopia”.
The idea board on Miro for this game idea is seen below.
We then thought it would be best to keep each other up to date and happy with the work that we were all doing on a weekly basis. this thought turned into the idea for tea meetings. We made a team meeting spreadsheet on our Miro page, with each group ember and each day of the week with multiple time slots for certain days. This was so people could say what days or times on each day that they were free, giving us our weekly meeting times. This table is shown below.

In order to start the work for each of our roles, we created an asset list so that people could assign them selves to a relatively equal amount of models each. we made multiple asset lists over the weeks that the project has lasted for, but the one shown below is the most recent.
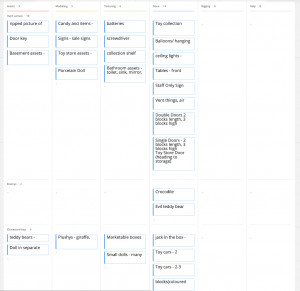
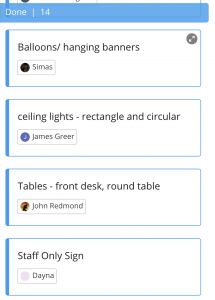
We could visually assign each others names to a model on Miro, which was extremely helpful for having everyones list in one place or if anyone forgot how many they had to do. An example of this is seen below, where I have assigned my name to one of these models in the asset list.
Even with my roles not including modelling, Since concept work had been completed and no characters were complete yet to rig, I decided to allocate models for myself to help the process of creating assets in order to fill out our blocked out scene in unreal. My models I created are as follows;
–Warehouse crates (Three separate types/versions)
-Concept flashlight
-Rectangular ceiling light
-Circular/Dome ceiling light
-Toy car design
-Hand and Arm model
I was also assigned plush toy designs to place around the toy store and warehouse but these were made by another group member in the end.
Warehouse crates
These Models were fairly straight forward and didn’t give me any hassle when creating them, they are shown below.

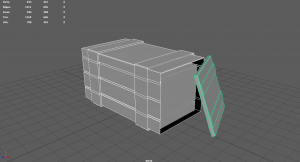
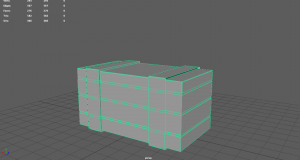
The software used to create these warehouse crates was Maya. The main technique I used was extruding using edge loops that I measured and made equal distances from each other on each side of the original mesh. The other examples of the warehouse crates that I made were created by cutting faces off and making them look like detached lids of the crates, as if they has been ripped open by warehouse workers.
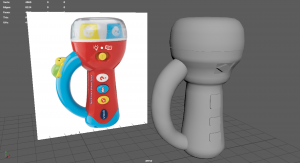
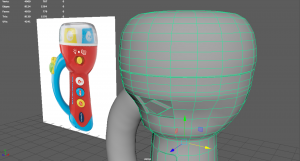
Concept Flashlight
This Model posed some problems for me as I found it difficult to shape the curved handle as I extruded it from the side of the main part of the flashlight itself. This made the uv’s difficult to map and the shape wasn’t fully symmetrical. But as a first concept for a possible squeeze operated flashlight, it was good to give a first example of what it could possibly look like. This model is seen below.

Toy Car

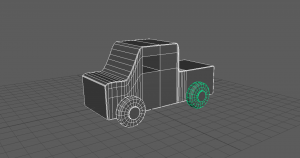
The toy car design was based off of a wooden truck design, to give certain toys in the game a slightly old fashioned look. This was modelled using Maya and the main technique used was adjusting the hight and width of edges by adding edge loops to certain areas of the model to give it a smooth, sanded look. Bevelling was used to create the smaller centre section of the wheels which were then extruded.
The reference used for this wooden toy car model is shown below.

Rectangular/Dome shaped Ceiling lights
These models were both easy and challenging depending on the shape, the first example is the rectangular shaped light, seen below.
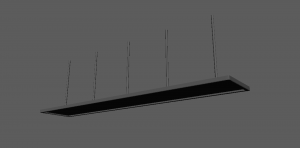

The model seen above was already a simple model to begin with, using a simple reference of a ceiling light I made the rectangular shape and extruded the space which the light would project from, bevelling the edges for a more finished effect to the product. The reference I used is shown below.

The next modelled ceiling light was a more modern looking dome shaped light, giving the room it will be placed in a lot more of an ambient lighting setup, due to its 180 degree coverage for light in a darker space. This was greatly needed in some areas of our game. This dome shaped light is seen below.
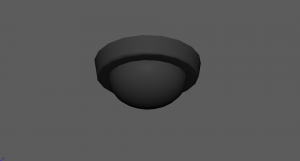

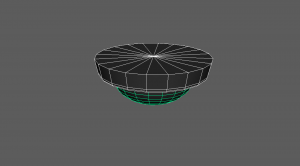
This model was also created on maya and the main techniques used for it were extruding to allow space to place the dome shape, cutting of faces to create the half sphere shape to place in the centre as the dome, bevelling edges to create a more finished look and the bevelling of a single vertex, creating the circular face in the bottom of the light which was then expanded and used to extrude into the centre of the model.
My reference used for this dome ceiling light is shown below.

Hands and Arms model
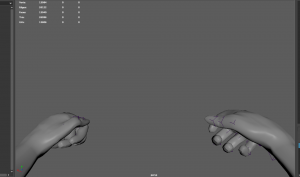
This model was going to be the most important and time consuming one yet as I needed it to be accurate to the way a real persons’ arms and hands would move once I started animating them. This model turned into the arms and hands of the main character and would be shown in a first person format. The original model is shown in progress below.

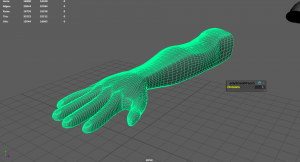
As seen above, the model started off by giving me a few problems while creating it. I thought it was a smart idea to create the hand first, separately from the arm of the character. This was to make sure I got the detail and shape of the hand right first, without worrying about whether or not It matched to the rest of the arm. My idea was to then bridge the two edges of the arm and hand, joining them. This gave me multiple errors and never joined successfully, resulting in my solution to extrude the arm out from a face I created at the base of the hand and use edges on the arm to match the shape and size to the reference I was using for the model. This reference is seen below.

Rigging
The completion of my most recent model of the characters hands and arms came with the beginning of the rigging process for this project, which was one of my main roles. The two models that I had to rig in order to animate was the arms and hands, and one of the main enemy characters in the game, Good bear.
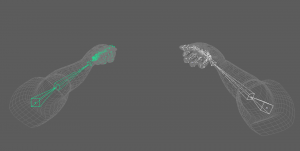
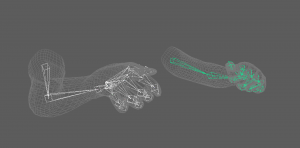
The arms and hand rig was created by making a simple skeleton rig. I didn’t use any controls for the characters arms and hands because the skeleton rig I created was complicated enough to allow movement in three sections of each finger and/or thumb on the characters hands. As well as the hands themselves, the wrists, elbows and the base of the arms towards the shoulder. this allowed up and down movements to be made in animations such as running, pushing and pulling.
The arms set in their first person POV position is seen below.

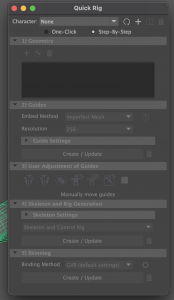
The skeleton rig was made by using Maya’s quick rig plug in, and allowed enough joints to be binded to the skin of the mesh for fluid first person movements. The skeleton rig is seen below alongside the quick rig Maya plug in.


The next Rig completed was the Good Bear character’s rig. This posed more challenges for me as it needed to be a more complicated rig with controls, Ik/fk controls included. This rig was completed using the Advanced Skeleton plugin for Maya which I downloaded from their website. This website is linked below.
https://www.animationstudios.com.au/advanced-skeleton
The advanced skeleton rig was extremely helpful and laid out in an easy to follow step by step format. Using a tutorial online, I completed this rig within a few days of starting it, but ran into some troubles with it shortly after. The rig didn’t save the same progress on the computers I used in the university campus as it did my own personal Laptop for home use. This required me to complete certain steps of the rig again on both computers in order to save the same progress. This proved difficult and resulted in me completing the rest of the rig and animations from my laptop at home. The tutorial video used to create the advanced skeleton rig, alongside the rig itself is shown below.


Skin weighting
The main problem with this rig was discovered when I began animating, that certain parts of the body on the goody bear model were deforming as I moved them into different poses. After discovering what the problem was, I used a tutorial video on youtube and the help from my lecturers to fix the skin weights and hold these body parts in place throughout the animations. The youtube videos used are linked below, alongside the finished skin weights that worked the most successfully for me in my animating process for this character.

Animation
The animations I needed to complete in this project has proven to be the most time consuming role I had, as I have spent the past 6 or 7 weeks completing all of them to my best ability, alongside other university projects. The animations that I completed for each model are as follows;
Arms:
-Two handed idle/resting animating,
-pushing animation,
-pulling animation,
-one handed idle/resting animation,
-sprinting/running animation,
-Falling (arms out) animation.
Bear:
-Idle/resting animation,
-walking animation,
-running/chasing animation,
-sleeping and waking up animation,
-jump-scare animation,
-spotting the player/pointing at the player animation.
Arm/Hand Animations
For the arm animations, there was one challenge which threw me off to begin the animations. Since I didn’t include any controls, I had to key frame each part of the arms/hands individually, this meant I had to highlight/select all joints on each hand and arm at once and then save a key frame in order for it to successfully save. This made each animation take slightly longer but it didn’t make the overall process any more difficult in terms of animating the arms and hands.
I used references from games I have previously played, such as Call of duty and dying light to get a sense of where the arms or hands should be in relation to how far they should reach out or how fast/slow. I also used these references for what style of movement certain animations should have, for example, the sprint animation from call of duty was a big inspiration to the style of movement in my animation fro the main character, alongside the free running movements from Dying Light. Examples of these references are seen below.
time: 2:20 – finish
Good Bear Animations
For the good bear animations, I wanted to achieve a very stumpy/limped style of movement, to me this evokes the fact that the bear has no bones or muscle tissue and whatever is keeping itself alive is struggling to help it stay that way. This was a challenge at first due to the unusual style of movement, but using references such as the movement in the game, “Poppy’s Playtime”, I was able to create a more accurate version of the physical swaying and limping of body parts such as the arms, legs and head. A video example of poppy’s playtimes’ main antagonist is below.
While completing these animations, the most challenging for me was to match certain physical movements with how other body parts would react, in order to give it a smoother look when the animation was complete. I solved this problem by using some references of my own by taking videos and photos on my phone of me walking in specific ways to mimic how the character would be moving in response to certain body parts and their movements.
Clips of these animations will be shown in my Portfolio which is linked in my submission. I have had trouble with Unreal engine and have not been ale to use it in recent weeks as it has been crashing on a very regular basis when being used on my macbook at home. Without a car at the moment, I am unable to regularly go to and from university campus and therefore my final animations will be shown as play-blasts from Maya and also in the final full play-though of the game, which will be linked in my portfolio.
Conclusion for this project
This project has been an amazing way to improve my team working skills as well as my social skills when it comes to meting and working with new people. As an animator, modeller and rigger it has improved my skills significantly and opened new opportunities in future projects due to my new liking for rigging, as this was one of my weak points before completing this project. However, now I have a considerable amount of experience in this role and would be confident in taking on a challenges like this again in the near future.
I have enjoyed working with the games design students and would love to work with them again in future projects and have learnt a lot from them with softwares such as Unreal Engine. Everything in this project has also helped me prepare further for my work placement at GRAHAM that I have secured for my 3rd year of university, as all of the roles I have worked as, modeller, rigger and animator will be extremely useful in the job role I have in their company for the next year.
Overall, I have enjoyed branching out with others to create something like a fully working game prototype and it has broadened my vision for the future I have in the animation industry.