Animation for the Creative Industries

Portfolio
To start off the portfolio I will be showing all the finished and or finalised at this moment all of the pieces, textured Items and models that I have made along with videos on the game and the pieces that I made for the final product along with a lot of images and scenes that have been properly light and furnished with everything that we have made and I can’t say enough that I am very proud of myself and my fellow team members because that have put an ungodly amount of time and effort into our game and it was a blast.


Videos:
Here are some of the videos of the game itself its pretty good the game dose take quite a lot to run from my computer so some of the videos might look a bit sketchy but hey at least the games is fun. I especially love the lighting of the rooms such as the starter room it gives it a very ominous feal to the locations it barely illuminated so the mood gets set at the very beginning for me.
What I think the positives are first it’s that the game itself runs rather smooth for me I think at least that we could have added something mor for the rooms in terms of obstacle that fit the theme. The negatives for me are that we went able to finish the games we just ether didn’t know how long thing would take or we just weren’t on the ball for it.
This is that start of my blog I will be showing, presenting, and finalising everything that I have went over from my project here. I want to display everything work note that I have made that I like to a certain extent, but I will say that everything that Has been happening in terms of practice, classwork and much more has been extremely eye opening for me.
Along with that here is the character model form the game developer unreal start that we hare basing everything on so that we can see all the different sizes and what not for the rooms. We decided on the diffrent siszes large is 3.62, medium is 1.81 and finally small is 0.376.

To start off I will be showing all the different modular pieces that I have made for the rooms and what not I have different sections for all the pieces and I will be listing them accordingly so that it is not very confusing.
Rooms:
To start off with the rooms I will show all the basic rooms that I got from the original basic ideas these rooms were originally for just the presentation, but the team thought that some of the could be used in the end we took them apart and used the best modular pieces for them. The basic rooms I tried to make as complex as possible but at the end after all the different pieces I realised that I want a level that is a sort of trait shoot so that the player know the direct path but also let them explore a little bit.


The next is the modular piece from the first rooms that I have made It helps to look back at them are study how the separate pieces that can come together for a proper full pieces.The old pieces really did lack a cohesive structure, but I still like them very, much.
My thought process when making all of this was that for most if not all of them, I made them from a single cube and from that I extrude, grew, insert faces and much more because I must say that I am not a very creative person when I think about an idea on the spot and the whole process of this was really encouraging.


Now after the basic overview of them Ill show the various groups and their and all of the pauperisesr the peices that were form the beggining to thoses that are very recent. But they are all to me very necessary because the old ones gave me inspiration for further pieces, and they were all pretty fun to make.
Doors:
Here are some of the designs for my doors I tried to variate them as best as I could they shift from things like a sort of safe door to a kind of tech lab door but I will say that they can look a bit bland.
The first door that I made was far too cartoon and I think that with the rest of them I tried to focus more of making it a more tech oriented piece I started using the mirroring tool after making a single part of the piece and connecting it.


Walls:
Here is the design of the doors I will say that they quality of the earlier ones can definitely be seen in who they are structured unlike the later one that at least seam a lot better put together in my opinion.
The structure of the doors can really feel simplistic, but the problem is that wail some of them are fitted for their own locations like the rat/ hamster room was essentially Daniels idea and the wall also the only different for me as multiple extrusion for a sort of construction development.


Floors:
The floor design I will say are definitely bland to an extent I wanted them with a bit more bulge to them, but I was told that it wasn’t very [practical in terms of someone walking on and that without a doubt was very correct. For the floors and vent surfaces are simply mad for the simple purpose of showing a very smooth transition of locations.


Post and Stops:
The post and stops I like and dislike very much because wail they can accentuate the walls and doors in a developed manner for the player to see for a split second and never think about again which to be fair is the goal. I cannot help but not like them though its like the on their on its an eye sore.
But what cannot be denied they really help make the room feel far more cluttered and wail they are an eye sore they’re a needed eyesore.


Roofs:
The roofs for me were the most fun to make and I like them the most to wail the beginning they were annoying but by the end I very much like to make the I really like giving them points, bulges and indents. My main problem that came to mind for me when making the roofs was that they are too similar Innes to make something different I don’t know if manged that but hey I tried.


ETC:
The modules you see here are the ones that I did not really categorize for the fact that they are miscellaneous pieces such as the wires I do not believe that they were actually used in the game because they weren’t really something that would fit the theme of the environment unless there was like some kind of server room. The next are the monitors they are self-explanatory they are just for display the game mostly gave pop uses for the player, but they are cool. The final it is just a basic frames that are used to accentuate doors and seat that are for more lounging about environments.


Image Refrences:
The image references that I was looking at were environment a science fiction theme know I that it is not an overly complex analysis to begin with, but it gets very overwhelming from movies like, ‘Alien’ to ‘Wall-E’ all have very certain characteristics to them. The environment of the science fiction genres consistently shows mostly how illuminated the locations are it is a very sleek locations mostly clean, smooth, and sterile. The fact that the very structures are somewhat like a demagog because ether the flattened to a very smooth plane or bulky with instructions of different kinds of tech.


![]()
Next is by far the most frustrating part for me I will say that I should have tried to communicate in a more streamlined and attentive fashion, but it got done the best degree that we could. The next part is the visuals that we made to shoe mw the layout for the rooms that I would be building I will list and show everyone of them now
Room size that we calculated buy Scoot and Kealin:

The first room that was diagrammed here by Scott It is the starting room where the character escapes from his test tube/ chamber it is two room one a room for observing the test subject and the test room lest from tow doors one to the hallway the other to another.


The second room that was diagrammed here by Scott It is From the hallway leading up to a big by area a sort of pool/ experimentation field that the player depending on the player can travers in or not.


The first room that was diagrammed here by Scott It is From the hallway leading up to a big by area a sort of pool/ experimentation field that the player depending on the player can travers in or not.


Next is the Rat/ Hamster room Designed By Daniel we couldn’t really agree on it but ether way the player traves through a tunnel; after the vent shaft and they are able to see that room from a tunnel above.


Next, I Kellins turret room this room was one that was this room is one with multiple bulging edges such as the room as many hiding spots for the player to move into to avoid the shots as it a sort of test of time and survival.


Finally, this is the killans glass case view room which I am pretty sure we didn’t use the environment that I bult for it and instead made a different room which wail I will say was disappointing it also to be fair was somewhat badly design and it was probably for the best. Although with all the new modular pieces they were finally able to use the all the modular pieces I made for the final two levels.
New Turret Room

Style Bible that we used
The style bible was something that we all at least on the animation side had to follow to the best degree that we could and I will say that eve I had a little bit of trouble with it but I tried my very best with it and I think that from the development of the modules and the finishing of their looks in substance seem pretty good.


Presntaion:


Starter Room
Old:
Starting off with the basic design of the starter room the changes were very enveloping to the environment it keeps itself but the old design is fairly simplistic. The room is like an over envelopment of the frost lounge room of the basic builds.


New:
After the reworks the rooms connections to one another was somewhat finalise at the time so the stops, frames and whatever else was need was added.


Big Room
Old:
For the big pit room, the initial design was pretty well set through and through and I’m glad that from that because that meant all that was left from it was to polish it good pieces.

New:
The new walls that I made for the room is my favourite part of the room personally for me it gives it a kind security location feel to it and the pit is very mesmerising for me


Hallway:
Old:
The Hallways pretty feels explanatory in the beginning there was a different floor and wall plan, but it was changed to which extent I can understand but to be fair the different pieces we fine too.


New:
The Hallways walls we made just for the hallway I kind of which that I had use them more in different environments. The floor plane was changes to a different design because the grates were enveloped with to many vertices.

Vent Room
Old:
The vent room original design is pretty similar to the to the final set but ether way the design for the vent room which was made by Scott was very sweet because the hiding point leave a challenge with the enemies in the vent system.


New:
The final set of the vent room I will say that I like this room the most out of all of them really nice to look at and the rumbas brings it all together I think that the bolts on the vent walls are a bit bulky and should have been smaller.


Turret Room
Old:
The turret room I like was unfortunately changed to one that I didn’t make myself so I can’t really say much on the make of it beside the pieces from my modular kit.


New:
The turret room here is big changed as seen from the image of the landscape that I was making until I was told that they would just use modular pieces. But I can definitely agree with opening up a bigger opening the are to a more open location because with the original design it was fairly closed in.


Hamster Room
Old:
The Hamster/ Rat room is pretty cool I think that it gives of a sort of entertainment, comical and intriguing view of the laboratory for me.


New:
I believe that the room would not have the railing in the final level because there were different more suitable one eve made. I had too change the florr set cause of the vertices again.


Substance
Finally, here I will be explaining and printing out the different substance pieces that I have made the good, and the bad and believe me there is plenty of both.
Floors:
The floors for me we fairly simple in design I didn’t really have a key in on what I wanted for them is just something that really boggles my mind but hey its looks at least thematic memorizing but its probably too colourful.


Walls:
I don’t really know much about phrasing that I am going to use because some of the was fit and others don’t not only from the look but the design along with some of the walls such as the arrow wall had to be redesign along with plenty of other pieces because it just pocked out to much.


Roofs:
The roofs are something that you would think that the player would look that much at because seam to focus more on what is in front of them but sometimes even from me, I get paranoid and check for items or enemies above me.


Doors:
The Doors and frame pieces I really liked I worked fairly hard on them cause doors are the type of set pieces that the player would have no choice but to focus on. The doors do look pretty high tech and jock like at the same time. I wanted the doors to pop out for the viewer so that everything would lead them toward the followed objective.


Stops:
For the stops and post I will say that I didn’t really hit the mark with them it really just sams somewhat comical to me. I very much think that at lest the bulk of them can be used in a very supplementary fashion. I think that I wasn’t as creative as I could have been when it comes to the paint designs for them.


Supilentary Pieces:
The substance work for the floor’s variant by a very large degree for me because I wanted to set them apart to a very large degree from me I will say that some of the designs older ones aren’t that great. I do at least like the their uses for the rooms that some of them are in.


Self-reflection:
I can say that I am somewhat sad that I did not have that much of an effect of the character I don’t know if I even would be that good at the character animations for it but at the very least I glade I got to make most of the levels with all the modular pieces that I made it was surprising fun. I will say that I should have tried harder with my communication with those in my team I can definitely say that some of them were a lot easier to talk to than other but I can attest that I didn’t put in a hundred percent with getting their point of view and that my fault.
I would have to say that I didn’t like some of the paint work for my substance work I tried to keep to the colour scheme and for some pf the pieces just didn’t work out that well and that falls back on me because of my lack of knowledge especially for programs like substance painter. I will also say that my time management was great at the beginning but started to slip more and more as time went on which is a flaw that I have been trying to shake off but I never really manage to the best of my efforts and I let the team down on that regard.
I have to say that my main problem above all the other which also leans into the problem that I had along with the time management is that I lack focused with a lot of things that I do I am continuously unable to properly hone in on the main objective I have a problem involving my focus. I need to remind myself of my objective even properly and continuously if it’s something that is minute and simple I need to constantly tell myself what it is that I need to do repeatedly.
Finally, I will be pointing out and look at the design of my modules which I can say is my strengths and weaknesses because the main problem is that some of the modules are very well refined for and some of the others are just too clunky and overbearing. I liked the development of the rooms I made that I couldn’t have even begun to properly develop on my levels and It all thanks too Scoots level design and the communication with him was very, very helpfully with all the different aspect of the level design especially the size modelling along with its efficiency.
Kellins Video:
Scotts Video:
Onedrive and Others:
https://onedrive.live.com/?id=E83FE7B04497B39E%2124644&cid=E83FE7B04497B39E
https://ulster-my.sharepoint.com/personal/jones-e19_ulster_ac_uk/_layouts/15/onedrive.aspx?isAscending=false&FolderCTID=0x012000C57B856E9718EB4AB774E441DE51EDFB&id=%2Fpersonal%2Fjones%2De19%5Fulster%5Fac%5Fuk%2FDocuments%2Fanimation%5Ffor%5Fcreative%5Findustry&sortField=Modified
https://blogs.ulster.ac.uk/b00847228-bdes-animation/wp-admin/post.php?post=857&action=edit
Refrences:
“How I Quickly Create 3D Environments in Unreal Engine 5 | FULL WORKFLOW.” Www.youtube.com, www.youtube.com/watch?v=YZ4gSKZh6do.
“The Key to Realistic Environments in Blender.” Www.youtube.com, www.youtube.com/watch?v=md8mbgTEfIk&pp=ygUgYmxlbmRlciBjcmVhdGluZyBhbiBlbnZpcm9ubWVudCA%3D. Accessed 26 Apr. 2024.
“How to Create Beautiful Environments in Blender.” Www.youtube.com, www.youtube.com/watch?v=Y1bOokHzEAk&t=304s&pp=ygUgYmxlbmRlciBjcmVhdGluZyBhbiBlbnZpcm9ubWVudCA%3D. Accessed 26 Apr. 2024.
“EVERYTHING You Need to Know about SUBSTANCE PAINTER!” Www.youtube.com, www.youtube.com/watch?v=uBgdLmvK_U8&pp=ygUac3Vic3RhbmNlIHBhaW50ZXIgdHV0b3JpYWw%3D. Accessed 26 Apr. 2024.
“Designing Sci-Fi Environments: Workflow Tips.” 80.Lv, 13 July 2020, 80.lv/articles/designing-sci-fi-environments-workflow-tips/.
Sterling, Bruce. “Science Fiction.” Encyclopædia Britannica, 17 Jan. 2019, www.britannica.com/art/science-fiction.
Liebling, Rick. “Elements of Design in Science Fiction.” The Adjacent Possible, 12 Dec. 2018, medium.com/adjacent-possible/elements-of-design-in-science-fiction-8396a0c04dd8.
* Coursework 1: Presentation on Academic Papers
Reflection : The min thing that I thin that I was not able to properly convey during the presentation was that there were a large array of different manners of animation form Disney I was only able to scratch the base of it because I was fairly fluster in front of the whole class I should have displayed what I had learnt in a far more professional and eloquent manner that truly show my understanding of said topic that would have won over the crown in a mor informative way.
Now to start of I think that we will go off on what we were looking at the very beginning of the project to start off with we started to look at some characters that we fairly miner in the stories narrative to proper pinpoint what could pinpoint and understand what make them a non-focus
To start off the very foundation of the animation world is a very compacting of characters that fill out the background of whatever seen that can be found in a story. The very underback of the story itself is something that needs to be focused on but must also not draw too much attention.
The next issue is that If you look at the presentation It had some typo’s that were embarrassing and I tried to fly past quickly so that the crown wouldn’t notice and that was very foolish and stupid of me to do and I will try my best to improve in the future.
I think that the presentation went off relatively without a hitch from what I can tell if think that it was a really well formed presentation that went to a place that the viewer wasn’t expecting and Id think that Its something that ca be assumed is that my performance wail somewhat emphatic was mostly ad-libbed so that is something that I can really tell is a strength or a weakness for me. None the less I will say that the presentation was super fun.
Presentation
Skull and bones_ Background character’s Disney animation (1)
Pear assessment:
Oliver Ferguson :20%
I think Oliver did a great job with his slide his slide was very entertaining and I think the audience was able to be grasped easily
Tori Howells :20%
Tori was incredible with her opening of the presentation and her slide was super informative and I ham glade we had her.
Ellie McKeever :20%
Ellis slide directly focused on the author of the article itself which was fantastic because most if us didn’t focused on her that well
Cor Mcgettigan :20%
Cor was fantastic on her work because she was super innovative with the gifs that she used and with that the audience was very entertained
Bibliography:
Taylar (2021). The History of the Evolving Animation Styles of Disney. [online] The Disney Classics. Available at: https://www.thedisneyclassics.com/blog/animation-styles.
Bright Side — Inspiration. Creativity. Wonder. (2019). 12 Disney Characters Who Were Based on Real People. [online] Available at: https://brightside.me/articles/12-disney-characters-who-were-based-on-real-people-794142/.
Anon, (n.d.). How to Write Minor Characters – All Write Alright. [online] Available at: https://allwritealright.com/how-to-write-minor-characters/#:~:text=Minor%20characters%20act%20upon%20the [Accessed 16 Feb. 2024].
Monteil, A. (n.d.). 17 moments in Disney movies that haven’t aged well. [online] Business Insider. Available at: https://www.businessinsider.com/moments-themes-in-disney-movies-that-havent-aged-well-problematic?r=US&IR=T#the-siamese-cats-in-lady-and-the-tramp-are-racist-caricatures-of-asian-people-8 [Accessed 16 Feb. 2024].
Animation for the Creative Industries P1
The beginning of the research with the Ideas we went over a tremendous amount of ideas for this project I believe ether forty of slightly more than that at least you can say that our team is not sort of creativity but i will say that wail we are brimming with topics the quality of said ideas varies. I will say that I would not have it any other way I have had a huge amount of fun with my group working on the project and getting to know them.
- Balancing ship game
- Factory platform jumper
- Drunk walking simulator
- Bomb planting
- Balancing on ice platformer
- Riot platformer game
- Riot prevention game
- Building danger runner
- Zombie apocalypse
- Stock crashing cookie clicker
- Bat rabis attack
- Fishbowl escape
- Space survival shooter
- Death tug of war
- Adventure survival
- Falling tiles puzzle game (Indiana Jones)
- Weather disasters survival
- Apocalypse skateboard game (balance danger avoiding)
- Drug addiction game
- Avoid responsibility
- Divorce court settlement
- run predator game
- House envisions
- Poaching game
- Sandbox
- asylum survivor
- Quiz game show
- Prison escape
- Border climbing
- Grapple shooter adventure game (Uncharted)
- Apocalypse space station falling apart (escape)
- Circus stunt game
- Survival escape (Little nightmare game style)
- Strategy apocalypse (Plague Inc.)
- Animal crossing & do not starve: Reference
- Mario platformer
- Bike escape / Days Gone
- Swimming
After that we started to brake down what we wanted to focus on before making any kind of presentation.
Sub-Section:
- Black Whole escape ship runner
Sub / Main:
- Bull riding game with quick time events and button clicking post-apocalyptic the quick time events that get progressively harder as time goes on. The bull changes as time goes on turning from a Calf to a Bull and finally a Minitour. You must press different keys as the game goes on getting faster.
- Spaceship black whole escape trying to reach a planet. The game has a top-down view. Ship time puzzle survivor game trying to fulfil tasks before the ship shuts down and falls into the black whole
- You are playing as a vampire waking in their coffin trying to get your daily dose of blood. As you sculk about his castle, village, or forest to find people to drink from. The vampire is trying to avoid peoples view and sunlight
Image references:


The presentation that I put together with image references and some of Danial’s sketches wail the presentation that we put together wasn’t that comprehensive I will say the we put it together on he spot so at least we can say hat we work well under pressure.


The first idea know as the “Rodeo” was personally my favourite but I will say that the wasn’t much variable content that could be found in the game just the mine buking of the bull but even sow I did like it the best. The way that the game would play it would be simple weather it was QTEs or button mashing or any other sort of game coordination. The manner of the games difficulty is that the difficulty goes up as the player manages to stay on the bull itself speeding up, bucking, jumping, tussling and mush more the bull itself would start as a young calf and through time wound transform into a bull.

The second idea is “Space Escape” the space escape game takes place in the interior of the space ship traveling at a blazing speed away from the black whole sucking the ship into it. Th players main objective is to trovers around the ship fixing the different parts of the ship that has been damaged from the the exterior debris etc.

The final Idea is that of the “Vamp Sun Run” this idea was something that was an idea that on further introspection would defiantly take a lot more work than some of the others the main idea is that the vampire is waking up from his slumber rising and is hunger. the player the must trovers different locations to eat and drink the blood of the innocent and not get caught.
Mood Board


The mood bord that I have here we all ones that involved or from what I personally felt was escape from undesirable locations that would bring about harm to the people that found themselves in said location.
Next here are some of the blender scenes that I have made the first here is one that was themed as a sort of bad scientists lab that the main character is escaping out off fleeing for their life. The feedback that I got for this was that it was too dark and is obscuring too much view.

The next scene that I made in blender is a sort of industrial made prison that the player is trying to escape from its far more cold, mechanical and sterile its just a location that pressure you in a forces you to revaluate.

The next blender environment that I made was something that was just a sort of spit balling I just wanted to make something that sort of changed the mould a evil torturer in medieval time has you in their clutches.

The next is few are some environments that that I made for the presentation a sort of clean set spec of locations that have a very simple and childish expression about the wail still keeping a kind of science based theme.


What is bellow are the bare bones of the blender environments that I made it is just to show the way that the levels of the display for the levels it is without a thought something that need to be taken into account of the for the final project he different environments that I made mainly focus on closed of spaces like hallways and rooms with a science fiction astatic.


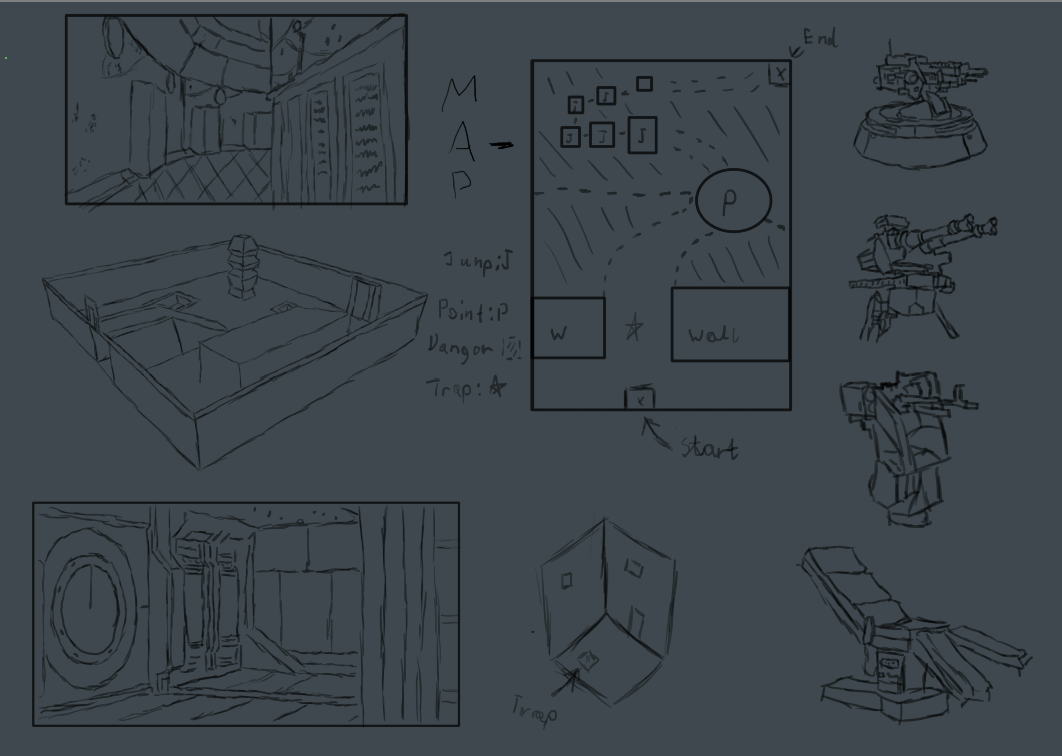
The next were simple sketches that we made as a sort of retrospection on that kind of environments that I was researching all the different environments that I found and creatin all these sketches really helped me in the processing stage of my blender environments. The other aspect of the sketches we some of the objects that I found interesting such as turrets but unfortunately coding and modelling multiple turrets that may only be used for a level is to time consuming and will probably not be that benefitted from it.
 u
u


The next Image bellow is a sort of compiling of information and style guid that I made its very simple and doesn’t have colour but i thin that It compiles that basics of what we are gong for rather easily or from what I view from it.
Some evidence of the group sessions

Class today
My part:

The Team:
Slide


Style guide:


- I had a fee environments added to this above

- Just turret drawings for the props here above


- Just a mood board of mine added here

One drive
Bibliography
www.youtube.com. (n.d.). Video Game Environment Artist Job. [online] Available at: https://youtu.be/Opn3mhFjDyI [Accessed 2 Feb. 2024].
www.youtube.com. (n.d.). How to Become an Environment Artist for Games. [online] Available at: https://www.youtube.com/watch?v=uPtJMke4LRE&pp=ygUXZ2FtZSBlbnZpcm9ubWVudCBkZXNpZ24%3D [Accessed 2 Feb. 2024].
www.gamedeveloper.com. (n.d.). The Difference Between Environmental and Level Design. [online] Available at: https://www.gamedeveloper.com/design/the-difference-between-environmental-and-level-design#close-modal [Accessed 2 Feb. 2024].
www.youtube.com. (n.d.). The BEST environment design EXERCISE for BEGINNERS. [online] Available at: https://youtu.be/mhvtuZIEV_Q.
www.adobe.com. (n.d.). Environment Concept Art: The Ultimate Guide | Adobe. [online] Available at: https://www.adobe.com/uk/creativecloud/illustration/discover/environmental-concept-art.html.
PS; Apologies for the unhelpful submission I was having problems with submitting files and whatnot along with there not being able to resubmit anything if this take way points I understand I will try t avoid this in the future.
Character Creation & Animation strategies

Introduction and walk cycles 3D & 2D
During this class we have been going over a very many different amount of methods and topics of the blender modelling and rigging program. the first thing the we went over was the methods on which we are able to frame and pose different character’s. I mostly used the rain model and tried multiple poses with the rain model. I unfortunately not able to use toon boom because the account never really planned out the seemed to bee some issues with the my email. the animations bellow are very basic and are pretty bare bones but it was a nice learning cure for me it lead to the latter of my understanding for y projects.
Final walk animations are something that I am pretty proud about but I will say that it was very stressful but still I think that they went fairly well I tried to simplify it down during the initial beggining of the project i was fairly unmotivated with the process of the whole thing but after finally getting into it I started to realise that the animation can come together in a spectacular way. The basic walk was even harder the the personality walk because it was a lot less easily structure more human and less exaggerated but without a doubt the time management of my time for the project was to be fair pretty lacklustre,
It was very fun coming up with all the different ideas and ways that I was able to change and form the character posses. It was pretty difficult at the beginning it was very confusing handling Th FI/IK in the different was that the limbs and body stiffens and loosens.
The next step was making the character move in a somewhat convincing manner like walking its not that great but it still need to work on it to make it smooth.


The walking animations that I was working on are very linier and stiff but it something that I can fairly grasp wail I still do not have the capabilities that would transmit to a great project I’m trying and I hope in the future I will improve. the main problem that I found was that when I fully rendered the animation itself it did not have all the different textures or maps that were needed.
As for this one you can see that the timing is a little bit off to the extent that it seems a little choppy and that goes for the both of them. The problem with then arms is that they linger in the space and are a but too rigged and that I should have been switched to FK instead to give more detail.
Reflecting:
The first thing that comes to mind on this reflection if that I have not been focusing on the target the maain goal was to create a full length and properly developed walk cycle and unfortunately it may be that is just that my finished product may be finished but it is defiantly not flushed out enough. The second problem that I can find in what I was trying to achieve is that I did not have enough foresight in terms of the incredibly frustrating blog entries I think that I should have been focusing on the blog day after day to stick to it as hard as possible and not dillydally.
The result of the projects is defiantly not something that very satisfied with the timing is off and that the character is looking subpar. The assignment was really rewording even though my time management during this whole project has been very untenable so that is something that I really need to work hard on in the future to change about myself so that I will not run into the same brick wall repeatedly. The best thing to come out of this whole assignment for me at least is that now I can properly understand the various movements of the body and of characters.
The first Krita walk cycle that personality one a lot simpler that the basic walk cycle and I know that it may sound like a contradiction but the personality on was a lot easier because when the character is simple and not incredibly detailed in is form like the second one the cat had bulging but smooth legs, a sharp but fluffy tail and body so the only semi detailed thing about its form was its hair and head. The walk was kept to two separate lines walking to the side wail the basic ne do not so that give the personalized one a set path and guidance that I could easily follow, mimic, and predict. The biggest problem I found during the cat was the movement of the cat’s hair and its counterflow.
The second was the real pain, it was something that required never-ending attention to detail because with the second animation the movement of the character was finite and a small ever-changing hard to see when you do not get the whole picture of it. The movements of the character were mostly focused on these points the hair, the sword, the cap, the arms and finally the sword all those distinct aspects were overwhelming but when it goes together it can create a very convincing moving picture of no stop dynamics flowing in and out if the figure which is the most satisficing part of the project for me.
The basic walk character is a sort of wandering warrior with a pelt flowing side to side on his back along with a huge battle sword resting on his left shoulder as he walks with an intimidating presence of dominance the very opposite of the personality walk which is a high stepping anthropomorphic cat with a pep in his giant step without a care in the world it was very interesting thing to work through that kind of simple dichotomy of my characters. The basic walk characters walk had a lot of difficulties that weirdest part of it was that the movement of the feet and legs was the easiest, but everything upward was absolute agony for me from the constant changing of the pelt/cape that had its own weight and shifting pattern at time against the body which may look good but is a pain to keep tract of but it is extremely imperative that it is focused on because it the same with his cloths and hair the move on their own with the factors of weight, distance and air.
The war sword that he carries in simple enough they can only move to the extent that its weight is against his and is force upward and downward with gravity, so it was quite simple sowing that in his walk with the sword flying up with a delay if the upward step. The arms are the tricky art he only arms that move is his right arm that constantly swaying back and forth, side to side, in and out not as listless as the pelt/cape but not as well formed and structured as the sword always disappearing behind the back but never completely out of sight and unnoticeable.
The Blender project I will not lie are very fifty-fifty with me the posing of the character is spot on but I was not able to understand that the weight and movement of the character over time and what I mean by that is that once the character is rendered it move in a static and direct way not hovering with and against gravity as one would. The main fault is mine and my computer instead of using he computers at Uni I just tried to use my one computer which as not as powerful as the Unis, so the project had a lot of setbacks form the render times, to the fps strain of the blender characters movements and just how slow everything goes so I will try my best to avert that in the future because it was just very stupid of me very, very stupid.
The bender basic run cycle was for starters ridiculously hard to describe is that unlike the Krita projects I am not very eloquent in terms of understanding of the project, so I guess I’ll just start with what I simply know this was all possible because I was able to use the rain and snow blender character rigs that ere integral intake of a whole lot time and agony not unlike the character creation with the wacky of scary creature character’s that we are currently mulling through with sculpting, cutting, shading and retapologising.
The basic run was very well posed it was something that I was obsessed with the different points on the molded such as the rigs knees, ankle, neck, and waist were all different joining points that were very time consuming changing and spotting the differences that were constantly not lined up well enough. The maps and whatever else were initially missing from the rig in the beginning of the walks and runs so the first renders that I published look covered in pink so that was a bit of a mess up, so I will try my best to avoid such simple mistakes in the future. The personality run in a fast-moving ninja that is holding his katana at his hast with both his hands laying ng the sword at the left side of his waist as he dashes forward with an angered expression that is just scream animosity.
The basic run is just a simple cartoony jumping run with a very rigged body movement that is to be fair a little too over exaggerated but hay at least it is not too overdramatic so I will just state how it is first the legs at the height of the run jut and very finely spread forward and back to just an extent it’s almost like he is flying. The main problem with this blender projects was my inability to remember the differences and uses of the IK/FK the info from the feedback day on the project was that needed to change it up with the arms because it was a bit too rigged and to change the setting from the arms which a will admit I didn’t do because I was a too lazy and unmotivated to change things up what I had already planned because that thought of it was too intimidating and that I am very ashamed of personally which I will try my best to change in the future.
The assignment was very eye opening for the 2D and the 3D aspect of character animation when it comes to its movement to which I mean who do you covey movement with a humanoid drawing or rig. The animator must remember an endless number of factors such as when a character starts to lift its leg to start the prosses it is not just the leg it is the ankle, knee, thigh, waist and even more the very basis of the gyration the arms when the arms start ist back and forth sway, rush or almost figure eight of the arms movement that sets that character movement step by step. The arms move, the torso reacts, the waist shifts as the legs bend and stretch at are the fundamentals in a very dumbed down sort of way
The project has been incredibly fun it has also been a giant pain in the ass that took a never-ending effort to finfish at the level that it even with that I had a lot of fun so I will say that the basses of animation when it comes to movement has really sharpened my mind on the aspect of the animation world which was super entertaining
Part 2:
References:
AlanBeckerTutorials (2015). ALAN BECKER – Animating Run Cycles. YouTube. Available at: https://www.youtube.com/watch?v=jggdbxTJPG4.
www.youtube.com. (n.d.). How to Animate Run Cycles. [online] Available at: https://www.youtube.com/watch?v=nKvBYXzRszw&t=1s [Accessed 23 Oct. 2023].
www.youtube.com. (n.d.). Easy 2D Character Walk cycle Animation – After Effects (NO PLUGINS). [online] Available at: https://www.youtube.com/watch?v=HiidRWF8rv4.
Ward, C. (n.d.). Walk Cycle Inspiration. [online] School of Motion. Available at: https://www.schoolofmotion.com/blog/walk-cycle-inspiration.
Pinterest. (n.d.). 13 WALK CYCLE FRONT ideas | animation walk cycle, animation reference, animation tutorial. [online] Available at: https://www.pinterest.co.uk/maslanype/walk-cycle-front/ [Accessed 5 Nov. 2023].
Becker, A. (2015). ALAN BECKER – Animating Walk Cycles. YouTube. Available at: https://www.youtube.com/watch?v=2y6aVz0Acx0.
Image Reference:


Body Mechanics: For the body mechanics we went over some of the things that we could create and manage when it came to the body’s movement.

 .
.
Here is a quick animation of my character trying to lift something I have been trying to understand the different meaning and processes of body movement involving animation. Body movement animation is a complex and nuanced process that requires a combination of technical skill, artistic vision, and attention to detail. It involves creating lifelike movements for characters.

We have started out our lip sink and sine I wasn’t able to use toom boom I had to try it out on Krita and unfortunately the audio doesn’t match up as well as I would have hoped. My problem is that I wasn’t able close enough attention to the principles of animation, such as timing, weight, and anticipation, to make the movements look natural and believable.
Mp4 converter website: https://wave.video/convert/youtube-to-mp4-330
Th video: https://www.youtube.com/watch?v=CtOEig1l8SA
Jump: Jumping animation is a popular and versatile technique used in video games, films, and other forms of media. It involves the creation of realistic or stylized movements of a character jumping off the ground, typically with the purpose of conveying a sense of dynamic action or movement. This technique has evolved over the years and has become an essential element in the world of animation, captivating audiences and providing a sense of immersion in the virtual world.


The setting of shape key in total of this was done fairly poorly and erratically I also should have to consider the limitations and capabilities of the software I was using, as well as the technical constraints of the final output, whether it is 2D or 3D animation.
Reference:
www.youtube.com. (n.d.). Parkour Tricks for Beginners. [online] Available at: https://www.youtube.com/watch?v=Qd0huoFLLqI&list=PLE8B13B193ADED7C2 [Accessed 6 Jan. 2024].
www.youtube.com. (n.d.). Vertical Jump. [online] Available at: https://www.youtube.com/watch?v=j260zYfRz8Q&pp=ygUOanVtcCByZWZlcmVuY2U%3D [Accessed 6 Jan. 2024].
www.youtube.com. (n.d.). Precision Jump – American Parkour – Parkour / Free-running. [online] Available at: https://www.youtube.com/watch?v=CgSn0qa0H2g&list=PLE8B13B193ADED7C2&index=3 [Accessed 6 Jan. 2024].
Weight: The process for me when it cam to weightlifting is involves breaking down each movement into key poses, which are then filled in with smaller, in-between movements. The animator must pay close attention to the principles of animation, such as timing, weight, and anticipation, to make the movements look natural and believable.


The environment Itself give off a sort of empty glow that can portray a rave like mood but in addition to movement animators also have to pay attention to other details, such as hair, clothing, and environmental elements, to create a fully immersive and believable world. This requires a keen eye and ability to focus in.
Reference:
www.youtube.com. (n.d.). CLEAN and JERK / Olympic weightlifting. [online] Available at: https://www.youtube.com/watch?v=9HyWjAk7fhY&pp=ygUYd2VpZ2h0bGlmdGluZyByZWZlcmVuY2Ug [Accessed 6 Jan. 2024].
www.youtube.com. (n.d.). Animation – Lifting a Heavy Weight. [online] Available at: https://www.youtube.com/watch?v=xJV-sdJpZ5I&pp=ygUYd2VpZ2h0bGlmdGluZyByZWZlcmVuY2Ug [Accessed 6 Jan. 2024].
www.youtube.com. (n.d.). Weight Lifting Animation. [online] Available at: https://www.youtube.com/watch?v=7OSmJOssu0w&pp=ygUYd2VpZ2h0bGlmdGluZyByZWZlcmVuY2Ug [Accessed 6 Jan. 2024].
Lip sink: Body movement animation also involves creating facial expressions and lip-syncing, which adds another layer of complexity to the process. Animators use a variety of techniques, such as motion capture, hand-drawn frames, or computer-generated algorithms, to achieve realistic and expressive facial movements. They also have to match the character’s dialogue with their lip movements to make the animation look seamless. Unfortunately wail I was able to create a somewhat dynamic display ad environment for my character I wasn’t able to properly create a lips sink on amount of the problems that had with my computer but I should have worked around that to create something better.


Above is some of the key framing form the near end of the project. In conclusion, wanting to improve on 3D animation is a natural desire for many animators, whether they are beginners or professionals. The animation industry is highly competitive, and to succeed, one must continuously strive to improve their skills.
This can be achieved through practice, taking courses and workshops, learning from others, and staying updated with technology. Wanting to improve on 3D animation is not just about staying ahead in the industry; it is also about personal growth and development.
Reference:
Thanks to this video it I was able to properly sink up the audio to a more accurate degree envy though its still not that good at the very leas it can sink up at least. In conclusion, body movement animation is a highly technical and artistic process that involves a combination of skills and techniques. It requires creativity, precision, and attention to detail to bring characters to life and make them feel like real beings with their own unique personalities.
www.youtube.com. (n.d.). LipSync Animation | Arcane | Blender 3D. [online] Available at: https://www.youtube.com/watch?v=ztXOW8MD-Ec&pp=ygUTbGlwIHN5bmMgcmVmZXJlbmNlIA%3D%3D [Accessed 6 Jan. 2024].
www.youtube.com. (n.d.). The Process of Animation (Lip Sync #3). [online] Available at: https://www.youtube.com/watch?v=mr-81px-zgw&pp=ygUTbGlwIHN5bmMgcmVmZXJlbmNlIA%3D%3D [Accessed 6 Jan. 2024].
www.youtube.com. (n.d.). The Process of Animation (Lip Sync #2). [online] Available at: https://www.youtube.com/watch?v=q4Zu-CABTeM&pp=ygUTbGlwIHN5bmMgcmVmZXJlbmNlIA%3D%3D [Accessed 6 Jan. 2024].
Reflection:
Body animation is a technique that is used to create lifelike movements in animated characters. It involves using a combination of software, hardware, and artistic skills to bring digital characters to life The different aspect that cand be seen form the char tore that you are making can with a proper amount of persistence and work. This technology Blender has been widely used in the entertainment industry for creating animated movies and video games. However, it has also found applications in other fields such as medicine, education, and advertising. With the advancement of technology, body animation has become more sophisticated and realistic, making it an essential tool for creating immersive and engaging experiences. In this paper, we will explore the process of testing out body animation and its importance in creating high-quality animations.
The process of testing out body animation involves several steps that are essential to ensure the quality and realism of the animation at the very least that was what I was going for with my animation. This involves outlining the storyline, characters, and key scenes of the animation. It is crucial to have a clear understanding of the characters’ personalities and movements to create realistic animations but thankfully the character that I was using was already rigged.
Testing out body animation is crucial for creating high-quality animations. It allows animators to fine-tune the movements of the characters, making them more realistic and believable. It also ensures that the animation is in line with the concept and vision of the project. Moreover, testing out body animation helps in detecting and fixing any technical issues that may arise. This could include problems with the rigging, lighting, or rendering. By testing the animation, these issues can be identified and resolved before the final render, saving time and resources.
This is done using specialized software such as Maya or 3ds Max. The model is then rigged, which involves adding a digital skeleton to the model. This skeleton serves as the framework for the character’s movements the animator uses keyframe animation techniques to create the character’s movements. This involves setting key poses at specific frames and letting the software interpolate the frames in between to create smooth movements. The animator also adds facial expressions, gestures, and other subtle movements to make the character appear more lifelike.
Additionally, testing out body animation helps in creating a more efficient workflow. By testing the animation at different stages, animators can identify and fix any issues early on, preventing major problems later in the process. This results in a smoother and faster workflow, saving time and costs.
Once the animation is completed, it is then time to test it out which is always in my opinion is a soul crushing process. This is done using a process called iteration, where the animation is reviewed and refined multiple times to achieve the desired results.
In conclusion, testing out body animation is a crucial step in the animation process. It involves several stages, including concept development, modelling, rigging, animation, and iteration. It ensures that the animation is of high quality and meets the desired standards. By testing out body animation, animators can create lifelike and engaging characters that captivate and entertain audiences. As technology advances, the process of testing out body animation will continue to evolve, making it an essential tool in the animation industry.
Next is the manners in which I did myself over with my lack of time management time management is a crucial aspect of any project, and this is especially true in the animation industry. Animation projects require a significant amount of time and effort, as well as a well-planned schedule to ensure that deadlines are met and the final product is of high quality. However, despite its importance, time management in animation projects can often be a challenge, leading to numerous problems that can impact the overall success of the project. In this paper, we will discuss the main problems with time management in animation projects and their potential consequences.
One of the most common problems with time management in animation projects is poor planning. Many animation projects start with a great concept and a talented team, but without a well-defined plan, they can quickly fall behind schedule. This can happen due to various reasons, such as underestimating the amount of time needed for specific tasks, not accounting for possible delays, or failing to allocate enough resources to the project. Without a detailed plan in place, it becomes challenging to track progress, identify potential issues, and make adjustments as needed, ultimately leading to delays and missed deadlines.
In conclusion, time management is a critical aspect of any animation project, and poor time management can lead to various problems and consequences. These include missed deadlines, increased project costs. To address these issues, it is crucial to have a detailed project plan, effective communication and collaboration, and a contingency plan in place. By addressing these problems, animation projects can be completed on time, within budget, and with high-quality results.
3D animation has become an integral part of the entertainment industry, with its widespread use in films, TV shows, video games, and advertising. The demand for high-quality 3D animation has increased exponentially, and it has become essential for animators to constantly improve their skills to stay relevant in the industry. However, wanting to improve on 3D animation is not just limited to professional animators; it also applies to students, hobbyists, and anyone interested in the field. In this paper, we will explore the reasons for wanting to improve on 3D animation and the various ways in which one can achieve this goal.
Script Analysis
The fist thing the we took part in was an analysis of different characters and the manners in which people can structure the character sheets like in video games, bord games, tv shows and movies.
Script analysis
Example 1
The First I would draw with a magical sort of malaise that encapsulates the whole of the background along with many assorted kinds of insects that waft about the trees and the main character. The lighting for the scene should be illuminating with rays of light bursting through the trees, branches, leaves and vines to give it an overpowering fantasy feal.
The wildlife would be plentiful as well and what I mean is that there would be a large array of bird species with a vast stretch of colour that gives a mesmerizing feal of. Finally for the main character itself it would naturally show on itself an indication of his age and how worn down it is. The breaches would almost drag on the ground along with its fauna developing into a beard.
The tree hominoids eyes with semi luminescent that are not overbearing so the colouring of the eyes is light not hardened to present a sort of calming that radiates prestige and knowledge. The tree humanoid is in the middle of moving towards the foreground of the drawing with one arm pressing against a tree for support with pieces of wood shavings, incest, birds and other miscellaneous pieces and objects falling off. The creature is focusing visually on some branches in front of it as the branches hanging before him part leaving a clearer path before him showing that he has a certain amount of control of nature.
Example 2
The illuminating environment has a twilight moon cascading over the deep forest bathed in shadows and mystery bringing forth questions of light and darkness. The environment should spark wonder and terror for those who are foolish enough to wander into its depths. The creature’s energies form the shadows and foliage as exotic birds with dazzling colours burst forth in all directions in a mesmerizing dance.
The forest thing that can be noticed is the eyes overwhelming with the parsing the very land Infront of it with cascading moonlight as the festering, glowing disgustingly devilish tendrils wave across touching, grabbing and piercing whatever it can find. The ghostly figure dances back and forth throughout the forest with such a mesmerizing, loving explosion.
Character Script
Character: “Serpent Eternal”
Ext. Neptune- Among the stars
A calming overview of the stars so very peaceful and quiet as the camera pans across showing the galactic mystery of water and ice Neptune the planet, the mystery and God of the see. The scene then changes to the event horizon of Neptune itself just above the stratosphere as shown the sea waving in a majestic rhythm with current spreading into vortexes across the planet. Clouds covering distinct parts of the planet, storms, hurricanes covering in and out of the great seas.
The Gigantic morosity slowly creeps up emerging from the sea with an elongated figure from underneath it rises our form the depths and shows itself a titanic snake slithering side to side though the water leaving a continues vortex behind it. The next thing that can be seen is the two other heads that are by their side following the main head’s lead. The camera then cuts to a high aerial shot of the snake so magnanimous that it still covers a sizable portion of the screen. The monster is drenched in blood at its mouth and holds a whale-like creature with more eyes, fines and radiant colours.
The eyes open showing one eye towards the camera it opens it fist stet of eyelid then the other underneath presenting a haunting glow of dark red which has no depth and the snake eye hellish black but radiates a yellowish illuminating glow. The snake’s length is nearing 100000km (about 62137.12 mi) with a width of 500km (about 310.69 mi) and a height of 250km (about 155.34 mi) the scales are about 1km long. The colure of the snake is illuminating the scales of the snake is deep black and some of the scales shine so bright that you would think that they were stars. The size of the snake is so gigantic that it can reach out of the stratosphere.
The serpent’s glowing eyes illuminate whatever it focuses onto will a ray that can hold a creature or object in place or lift it which helps it tremendously with hunting down animals. The camera zooms off to a medium shot showing the snake violently thrashing around the prey throwing blood everywhere and leaving a red most which splashes onto the camera soaking the screen in red. The camera linger on the shot as the audience hears a deep, piercing hiss.The blood slowly washes off small parts of the screen showing the galactic serpent rising out of the water in the stratosphere and into space.
EXT. Neptune atmosphere
Story References and Images:
Miller, S. (2019). SCP-3000: Anantashesha Part 1. [online] The Kaijuologist. Available at: https://www.thekaijuologist.com/post/scp-3000-anantashesha-part-1#:~:text=Description%3A%20SCP-3000%20is%20a [Accessed 1 Oct. 2023].
Miller, S. (2019). SCP-3000: Anantashesha Part 1. [online] The Kaijuologist. Available at: https://www.thekaijuologist.com/post/scp-3000-anantashesha-part-1#:~:text=Description%3A%20SCP-3000%20is%20a [Accessed 1 Oct. 2023].
Image References:


Mood Bord:


Concept art:


Character Testing:
The modelling in this class was extremely fun what we undertook was take it step by step. The different parts of the body was first organise that methods in what we were build up the animal build.
so we first started wit the basic outline making shapes that match the basic outline of the horse body. It was not that important to get right than just the very outside of the horse itself.
The next step was to sorn the outline of the organs that don’t have that much effect of the very outer shell of the horse. The last was making the very outer of the horse adding veins and blemishes. The veins and muscle are a very difficult effort but it can be very visually stimulating to get right. My project has come along very well to an extent its a three headed hydra of galactic proportion
Image Reference:


Today we took part in some UV mapping of a can and we informed of how we can change the mapping of our bult characters. Here is the cans The I added the different types of the texture on substances. The water can project was instrumental in what I was trying to do in my final project. The basics oft is that we simply pulled in the FBX after baking the mesh and through this process we were properly able to apply the details in substance and finally use the materials in Unreal.


Some of the anatomy references:


Some of these were instrumental in what I was doing for my character such as using the dragons outing in the beginning of the black dragon but once I realised that I was to complex for what I was going for so I decided to focus on the proper snake model and got ride of some of the dragons features.
Hair Mapping:


Unfortunately or somewhat for fortunate considering ones perspective is that didn’t need to use any hair maps and what not for my snake if it was more dragon like I would have added a sort of main like a lion but luckily I just wanted horns added.
Introduction to unreal:
For today we went through different means of texturing the water can through substance painter and bringing said textures in unreal. Thee follow up on the paint can changing all the different colours and textures. The first step was to properly bake the mesh maps so that you can bring int the can along with UV’s.


Here we were working on the different shadings that the material build upon making multiple material that were made in substance so after I made two different cans I then brought in the RGB’s and applied them into the two materials.


Retopology: I have moved on to finishing the retopology and will soon pass on to the mapping for the character. The multitrees modifier properly used can give a very helpful for planning out every knock and cranny of the Blender retopology model but I will say that the only place that the retopology didn’t work out best as on the tongue there as a small spread around the top middle of the mesh that didn’t connect properly witch was a bit of a paint to get over.


Here is me finalizing the retopology on the second image the only other retopology was the tong on a count that I wanted to add plenty of detail to it tongue itself which hopefully ended somewhat well enough.
Now I have started on my uv mapping and what it can properly turn into it was and incredibly taxing process but UV mapping is a process that can sometimes take longer than expected. It is an essential technique in 3D modelling that involves unwrapping the surface of a 3D object but at the very least the map was sort of well organised.


References:
www.youtube.com. (n.d.). How To Retopologize ANYTHING in Blender in Less Than 6 Minutes. [online] Available at: https://youtu.be/sCdhkLUCV8A [Accessed 26 Nov. 2023].
www.youtube.com. (n.d.). A new approach to Retopology. [online] Available at: https://youtu.be/7AR9-LxY6AQ [Accessed 26 Nov. 2023].
www.youtube.com. (n.d.). Retopology A Detailed Guide – What is Retopology & Why Do We Need It? [online] Available at: https://youtu.be/S4YNiImIgPs [Accessed 26 Nov. 2023].
www.youtube.com. (n.d.). UV mapping basics l uv mapping explained. [online] Available at: https://www.youtube.com/watch?v=MNaqB_z03Pk&pp=ygULdXYgbWFwcGluZyA%3D [Accessed 4 Dec. 2023].
www.youtube.com. (n.d.). Krita How To Add Audio Tutorial. [online] Available at: https://www.youtube.com/watch?v=RzV_7M-Urs8&pp=ygUUVXNpbmcgYXVkaW8gaW4ga3JpdGE%3D [Accessed 4 Dec. 2023].
www.youtube.com. (n.d.). Blender – Completely Rigging A Character (5 MINUTES!). [online] Available at: https://www.youtube.com/watch?v=X590IZeyT1s&pp=ygUZYmxlbmRlciByaWdnaW5nIHR1dG9yaWFsIA%3D%3D [Accessed 20 Dec. 2023].
www.youtube.com. (n.d.). Rigging for impatient people – Blender Tutorial. [online] Available at: https://www.youtube.com/watch?v=DDeB4tDVCGY&t=330s&pp=ygUZYmxlbmRlciByaWdnaW5nIHR1dG9yaWFsIA%3D%3D [Accessed 20 Dec. 2023].
Unreal environment:

Here is a start of my use of the planets materials such as the transparency of the planet and then multiplying the emissions of the atmosphere to give a better aur. Creating a planet in Unreal Engine can be a complex and challenging task, but it offers numerous benefits. The engine’s advanced graphics capabilities allow for stunning and realistic planetary landscapes, with detailed textures and lighting effects.
The final outcome of the us the texture for the planets such as the image textures, the emissions and the rotation of the planet itself.


This the final product of the tools that I used for the sun but fortunately Unreal Engine’s lighting system is highly advanced, allowing for dynamic and realistic lighting effects. This can greatly enhance the atmosphere and mood of the environment, making it more engaging for players.


Creating a sun in Unreal Engine can bring a realistic and immersive experience to your virtual environment. By adding a sun, you can simulate the natural lighting and shadows that occur in real life. This can greatly enhance the visual quality and overall atmosphere and lighting of the sun really gives the space a mystic feal to it.
Here are some of the textures that I used from: https://www.freepik.com/free-photos-vectors/space-textures


The start of the character in substance but it was a very fun process because Substance Painter offers a vast library of pre-made materials, allowing artists to easily apply and customize different textures, from metals to fabrics. I started with the tongue trying my best to make it as grotesque as possible.


Here is a look at the texturing for the teeth and horns but horns are a unique and fascinating part of an animal’s anatomy. They are often associated with strength, power, and dominance. However, what many people may not realize is that the texture of a horn can reveal a lot about an animal’s lifestyle and behaviour. I deliberately made it look damage to show experience.
A further look at the snakes uv maps the snake is known for their elongated, cylindrical bodies and their unique ability to slither and move without limbs so I textured it jet black like a black mamba. 
The final out come of the planet set The environment works very well because space is a harsh and unforgiving environment, with extreme temperatures, radiation, and microgravity. These factors make itdifficult for humans to survive and thrive in space without proper protection and support systems.


The cosmic aspect such as the Lovecraftian horror often centres around the idea of ancient, otherworldly beings I wanted to have the creature to be overwhelming in the view of the vast emptiness of space. The character is simply a threat portrayed as malevolent and indifferent towards humanity, with their mere existence posing a threat to the existence of mankind.
www.youtube.com. (n.d.). Unreal Engine 5 – Create Planets. [online] Available at: https://www.youtube.com/watch?v=nxEluE1s3Xk&pp=ygUVdW5yZWFsIHNwYWNlIHR1dG9yaWFs [Accessed 21 Dec. 2023].
www.youtube.com. (n.d.). Unbelievable! Make a ‘Black Hole’ in UE5 – Tutorial. [online] Available at: https://www.youtube.com/watch?v=jmXM07nHoQg&t=2154s&pp=ygUVdW5yZWFsIHNwYWNlIHR1dG9yaWFs [Accessed 21 Dec. 2023].


The rigging process is a process which is crucial in animation and is essential for creating lifelike movements and poses for characters. The rigging process involves several steps, starting with creating the skeleton of the model by placing bones in strategic positions. These bones act as the framework for the character’s movement, and they are connected through a series of joints and constraints. Once the skeleton is in place, the next step is to add control objects such as IK (Inverse Kinematics) handles and FK (Forward Kinematics) controls. These controls allow animators to manipulate the model’s movement in a more intuitive way, making it easier to achieve desired poses and actions.


As you step into the virtual world of Unreal, you are transported to a vast and infinite space environment. The scene is set against a backdrop of shimmering stars and galaxies, with a massive planet looming in the distance. The darkness of space is punctuated by beams of light from distant stars, creating an otherworldly ambiance. The serpent weaves its way across the stars as the reached monstrous tool flings out of the mouth and starts wrapping around the earth bringing doom to the once beautiful world.
References:
www.youtube.com. (n.d.). Snake ground matching rig and animation in Blender. [online] Available at: https://www.youtube.com/watch?v=SXjDOSdk0jo&t=146s&pp=ygUgYmxlbmRlciByaWdnaW5nIHR1dG9yaWFsICBzbmFrZSA%3D [Accessed 21 Dec. 2023].
www.youtube.com. (n.d.). How To Model Rig And Animate A Snake – Blender Tutorial Part 3. [online] Available at: https://www.youtube.com/watch?v=g2kFjzN5raA&t=598s&pp=ygUgYmxlbmRlciByaWdnaW5nIHR1dG9yaWFsICBzbmFrZSA%3D [Accessed 21 Dec. 2023].


References:
www.youtube.com. (n.d.). Unreal Engine 5 – Create Planets. [online] Available at: https://www.youtube.com/watch?v=nxEluE1s3Xk&pp=ygUWdW5yZWFsIGNyZWF0aW5nIHNwYWNlIA%3D%3D [Accessed 5 Dec. 2023].
www.youtube.com. (n.d.). SUN in UNREAL ENGINE 5. [online] Available at: https://www.youtube.com/watch?v=PavDvyb5Viw [Accessed 11 Dec. 2023].
Summer project
Disney’s 12 Principles of Animation
When it comes to the ramifications of the animation world understanding of creating and reshaping the manners in which animation industry and the capabilities of future artists. With the further development of technology, tactics and talent and understanding the basics of animation may have been turned on its head but they still must follow the basic twelve basic principles. The principles were first creatin in 2982 first published in the stated “Illusions of life: Disney animation” written by animators Olive Johnston and Frank Thomas.
The animators made abundantly clear from scanning over Disney’s leading workers projects of the 1930s and managed to break it down to twelve simple principles of the animation world. The principal research shows that at the veery least you will at least need to use them as a starting point for your animations.

https://www.creativebloq.com/advice/understand-the-12-principles-of-animation
Squash and stretch: the basic property of the animation bounce and excursion which shows the animators capability to show the lack of rigidness of the animation to make sure that the character, item, place, or effect is simply stationary
Anticipation: the manner of anticipation shows that the manner of the effect of the object or character shows that you can see that steps can be taken before, during and after.
Staging: It is the simple practice of showing the focus of the viewer’s eye presenting and emphasizing what you want the viewer to be focusing on in the animation whether you use colour, effects or movement.
Strait ahead action and pose to pose: The pose to pose and straight-ahead method are the two types of drawing animations that can be used for one’s animation, but they are usually combined for a better project unless its specific
Follow through and overlapping action: with this method it applies and shows the means in which you can show momentum of the character and the fluidity of the actions that they can take giving weight and weightlessness to the characters movement
Slow In and slow out: is effective in showing that the object has momentum such as when it takes an equal amount to start as it does to stop so that the viewer can see that amount of impact.
Arc: The arcing that the character or object presents shows that it is not stationary or rigid in its movement to give a more robust and impactful manner of movement.
Secondary action: the means of secondary action applies a subtidal or large emphasis of the focus such as the characters movements adding to the originals movement.
Timing: The use of timing is impeccable for the narratives or simple the manner of how comprehensive the animation is going to be it needs to be taken account of the number of frames that is needed so that the animation is viewed with a bit more of a higher quality
Exaggeration: Exaggeration is something that can be used in a manner to personalize and add character to the object of subject of the animation even adding personality to objects.
Solid drawing: The drawing of three-dimensional objects and characters need to be drawn in a solid and semi well-designed presentation because that is integral for a well-made animation.
Appeal: The appeal of the subject of the animation needs to stand out for the viewer of else that person viewing would lose interest.
Colour Theory
Colour theory is the study and the vast colour palette and the numerous ways that it can affect the viewer of the said video, animation, art, or display. The colure variety of many, many things have been shown to present different amotions in people. Designers consider of the pallets that can be used in whatever project that they are undertaking form colure wheels, psychology, and collective human understanding from focus groups.
Sir Isaac Newton invented the colure wheel in 1666, stating that colure is from a human perspective, not absolute light wavelengths.
1.Primery (red, blue, yellow)
2.Secondary (Mix of primary coolers)
3.Tertiary (or intermediate- mix in primary and secondary colour’s)
The next step in the findings was that the advanced method of differing colour properties into two forms such as print/ paint and screen/ light which all has taken holes from art to astrology.
- Hue- how it appears
- Chroma- how pure it is aka if it has shade if anything was added or tones
- Lighting- how pale or saccharate it is
It is stated that the temperature and colour scheme can create a sort of design harmony with whatever project that you are currently creating. Where red, green, and blue are the primary colours they need to be meshed and swapped together to create a temperature sheet that wafts all over different perspectives as to be more optimized to create a more attractive interfaces for high visibility.

https://www.canva.com/colors/color-wheel/
Character Design
The character design that II am looking at is that of a planet and or celestial body that has human trats such the earth with a face. I was at first thinking about making fish characters swim upstream, but I then realized that that would be rather bothersome to animate so I went with another idea. I am thinking of an earth-like planet that gets hit by a meteor.


In terms of what the character I was looking for, it could be monstruous or homely and friendly looking kind for a more comedic story. The thing that I would like is to use the simple faced kind looking planet because it would lees of an issue to animate, and I can focus on more outward than inward because I would like to add more detail to the meteor hitting said planet than the planets’ reaction to it.
Storyboarding and Animatics
The story begins with an establishing shot of the planet itself with a simple innocent face with a dumb expression. The scene then slowly back up wail focusing on the planet and the ever-changing space around it. The scene will the how the expression of the planet changes to concern and exclamation points along with question marks appear too. The next step is to show the planet in the corner and the developing danger that is coming from the asteroid headed for the planet. It will then change to an over the shoulder shot of the asteroid headed to the planet. Finally, the asteroid hits and the planet is completely annihilation.

The animatic is something that I would say that I do think that wail it is very bare bones, the concept is a little silly and it needs plenty more detail, but it is highly creative. The main problem is that the main character, the planet, does not look too great, but it is just the beginning of what I plan to do. Ideally the final animation will be between ten and fifteen seconds long and not a second longer.
Creative Design Thinking
What I was think form can be seen for early design and what not at the start. I wanted to make it just a planet but then as time went on, I was going to start off with a presentation of the planet that showed it as a detailed and very characterized features. I would say that though simple planet idea was something that would have been interesting but it discourage the characters movement and personality.


As time went forward it started changing the viewing of the character from a stationary planet that moves to a sort of gas planet and or galaxy at move from place to place and all-round seem very energetic. The characters to be fair are not that detailed as they could be but the animation is pretty hard so I’m trying to move away form the need of complexity.


Animation Pipelines
The main step that was founded by me was that the very concept itself had to be at the very least entertaining for whoever was going to be watching the final animation. The few ideas I produced were as such Dinosaurs, Sea, and space I was able to focus on the space concept.


The next step was the forms of research that I was to move on towards was the research of the various elements of space and my character. I focused on the background to begin with the forms of stars, gas, plasma, and planets that I could add into the background. It as pretty simple for the background only using black to white of the colour spectrum to convey as sort of complexity of the plane itself.


The next was the Character designs that I was able to produce such as I was focused on a sort of stick man that was ether made of gas or stars, but I also made a planet that was characterized with personality. I can defiantly say that I really like designing for the environment and character from the pretences of space it was creatively challenging to make a planet more human so i just focused on making the character out of stars or gas.


The next step was the animatic for the animation the first problem that I found out was that the animatics and the animations that I make as well are always too fast I needed to slow down of the prosses itself to let the audience catch up and process what it is that they are viewing .
The pre finally of the animation had the same problem as the animatics is that the animations were too fast wale that I was trying to present the animations with as much detail and fines that I could muster up which to be fair was not much. The animation was entreating, a little disjointed but pleasing to the eyes to an extent It still is moving to fast.
The final video is one that I will say that I am somewhat disappointed with the amount of time that I was given I would have that I would have been able to add as much detail as I would want but it didn’t work out as planed. The Final animation is not too different rom the Bata version just with a few touch up and regrettably I didn’t have enough tine to add sound and music.
Reflection: The problems that I was able to find from this project itself are the same that I found from the original assignment that I failed is that I find myself losing focus. The fundamental issue is the lack of tact that I have most of the time predicting the problems that I will be facing, and I will try my absolute best to change that in the future. I must contest that I am pretty gutted that I was not able to properly add in sound effects and music to the final project in the future I will try to mange my time and use more intuitive video editing software because the on that I am currently using “Product.hfp” is serviceable but somewhat confusing. I have been putting in a better effort in the way that I have researched the project, informed on the project when I am able to, wrapping up my blog in the manner of the information that needs too bee presented and I hope but I am still not sure of the quality of my animation whether it has improved or not but as long as it is at the very least somewhat better I’m content.
Reference:
Coron, Tammy. “Understand Disney’s 12 Principles of Animation | Creative Bloq.” Creative Bloq, Creative Bloq, 9 Dec. 2022, https://www.creativebloq.com/advice/understand-the-12-principles-of-animation.
The Interaction Design Foundation, Interaction Design Foundation, 6 June 2016, https://www.interaction-design.org/literature/topics/color-theory#:~:text=Color%20theory%20is%20the%20collection,%2C%20psychology%2C%20culture%20and%20more.
inward. Planets of the Solar System Drawing Easy | How to Draw Planets in Solar System Easy Idea. YouTube, 26 Mar. 2022, https://www.youtube.com/watch?v=9zMxMekVqGg.
Alan Becker Tutorials. 12 Principles of Animation (Official Full Series). YouTube, 30 May 2017, https://www.youtube.com/watch?v=uDqjIdI4bF4.
Chiu, Bobby. “Black and White Drawings: 9 Top Tips | Creative Bloq.” Creative Bloq, Creative Bloq, 24 Jan. 2020, https://www.creativebloq.com/advice/9-black-and-white-drawing-tips.
Portfolio


Final poster
Here is the blog for the developments of the poster and what not. I would say that the poster was the most fun out of all the projects that I had been through it was something that was constructed form a little bit of curiosity and benevolence that made it something that I really loved to an overwhelming extent.
First the different forms of the poster during the development some of which are mine others of which are denials and to that part of the project I would say that even though it may not be the best poster it is one that at the very least catch’s that readers eye:


Here is the pre final poster something that we got a lot of constructive feedback for because it was thing that needed a lot of improvement because what you make at the beggining necessarily isn’t the best you need to consistently go over what was created and see if it can be improved on:

The animation
For the final production of the animation for the parts that I was involved in will will present below which the part in what I have today first is that the final project exceeded my expectation and was phenomenal to present. As for the final render below it was phenomenal something that I had no ideas that it could possibly be more well shaped and cohesive that this
Next are the part that I was involved in for the for these parts I will start of with the enshell render of my game world and the character that I simply flying ad bouncing around as too be expected as it was inspired form space invaders. So i tried to keep it as retro stylised and illuminating as possible:


Next is the final render of my part of the render when the character jumps out of the screen and starts to jump and pounced about the area drawing away the the gamers attention.
Here are some of the other example of the anecdotes for the blender such as the ideas, concepts and more. The first is the basic idea or representations of how the ghost character would bounce out of the tv. The next is a visual of the area was finalised and just the base leave of it.


Using Shape Keys and Drivers
For this week we though our hats in for shape keys and the drivers I will admit it did stump me for a wile but hopefully in the future I can grab the hang of it. Below you will the some of the effected locations of the key and the effects that the can have such as within the face and the keys closing, shifting and expanding.


Down bellow is the keys that we being stated on the different parts of the head and the manners in which I was trying to stet the kye on the faces was quite the challenge but I was at the very least curious to learn some of the basics and understanding for the that final projects.

With this video I at the time thought during class I was at the very least I could grasp the understanding of the ways in which I could use facial shape keys and the vectors within the face but I can defiantly say that I can not proper understand and master the process.