Assignment 2 – Animation
For this assignment we were all tasked individually to make our own animations, one animation of a walk cycle, a run cycle and some body mechanics animation be it lifting up a box or some other kind of movement involving the environment. When doing my animations I wanted to split them between 2D and 3D animations so I decided to make my walk and run cycle in 2D and do the body mechanics in 3D. For my programs I used Adobe animate 2021 for my 2D works and Maya for my 3D one.
Walk Cycle:
First off I started with a walk cycle, I knew right off the bat I wanted to try and make a large character with a sort of slow and lumbering walk cycle and so before even starting my animation I went off to get a couple of references. I found two different walk references, one of a large overweight man and another of a mature woman both of which were provided by Endless reference on YouTube, using these I was able to study how a couple of people with larger builds carry themselves when they walk.
References:
To start off I made a rough guide of what shape I want my character to look like with different shapes, one each of his head, pelvis and fists, then from there I drew out some lines to represent the arms and legs, I had also made sure to separate each part into head, hand/arms, chest, pelvis and leg / feet layers so that I need to make any changes I wasn’t effecting the whole character. After I was satisfied with the shape and portions of the body I began to draw out the keyframe poses, them being the passing pose, up pose, connect pose and down pose, and repeating that one more for the other side so that the animation can loop. When doing poses for the chest and arms I kept in mind that the chest obviously has to rotate when moving and so I made the chest expand and retract to make it seem like we can see the chest and back, to help sell that I had the shoulders move along with it as well . Once satisfied with my keys I spaced them all out for my initial timing pass which had 6 frames between each key giving the slow sort of stride I was trying to go for.

Once that was finished I began to move onto the in-betweens for the skeleton / guide for the body. I wanted my animation to be on 2’s so I had space for two in-between frames between each key. When going from one key to the next I thought that doing the in-between right before the next key would work out best for me to keep my animation feeling smoother, it also just felt more comfortable doing an in-between, then going back 2 frames to fill in the gap, keeping in mind the spacing of the animation so that the animation doesn’t look like that there’s a hard ease going from key to key.
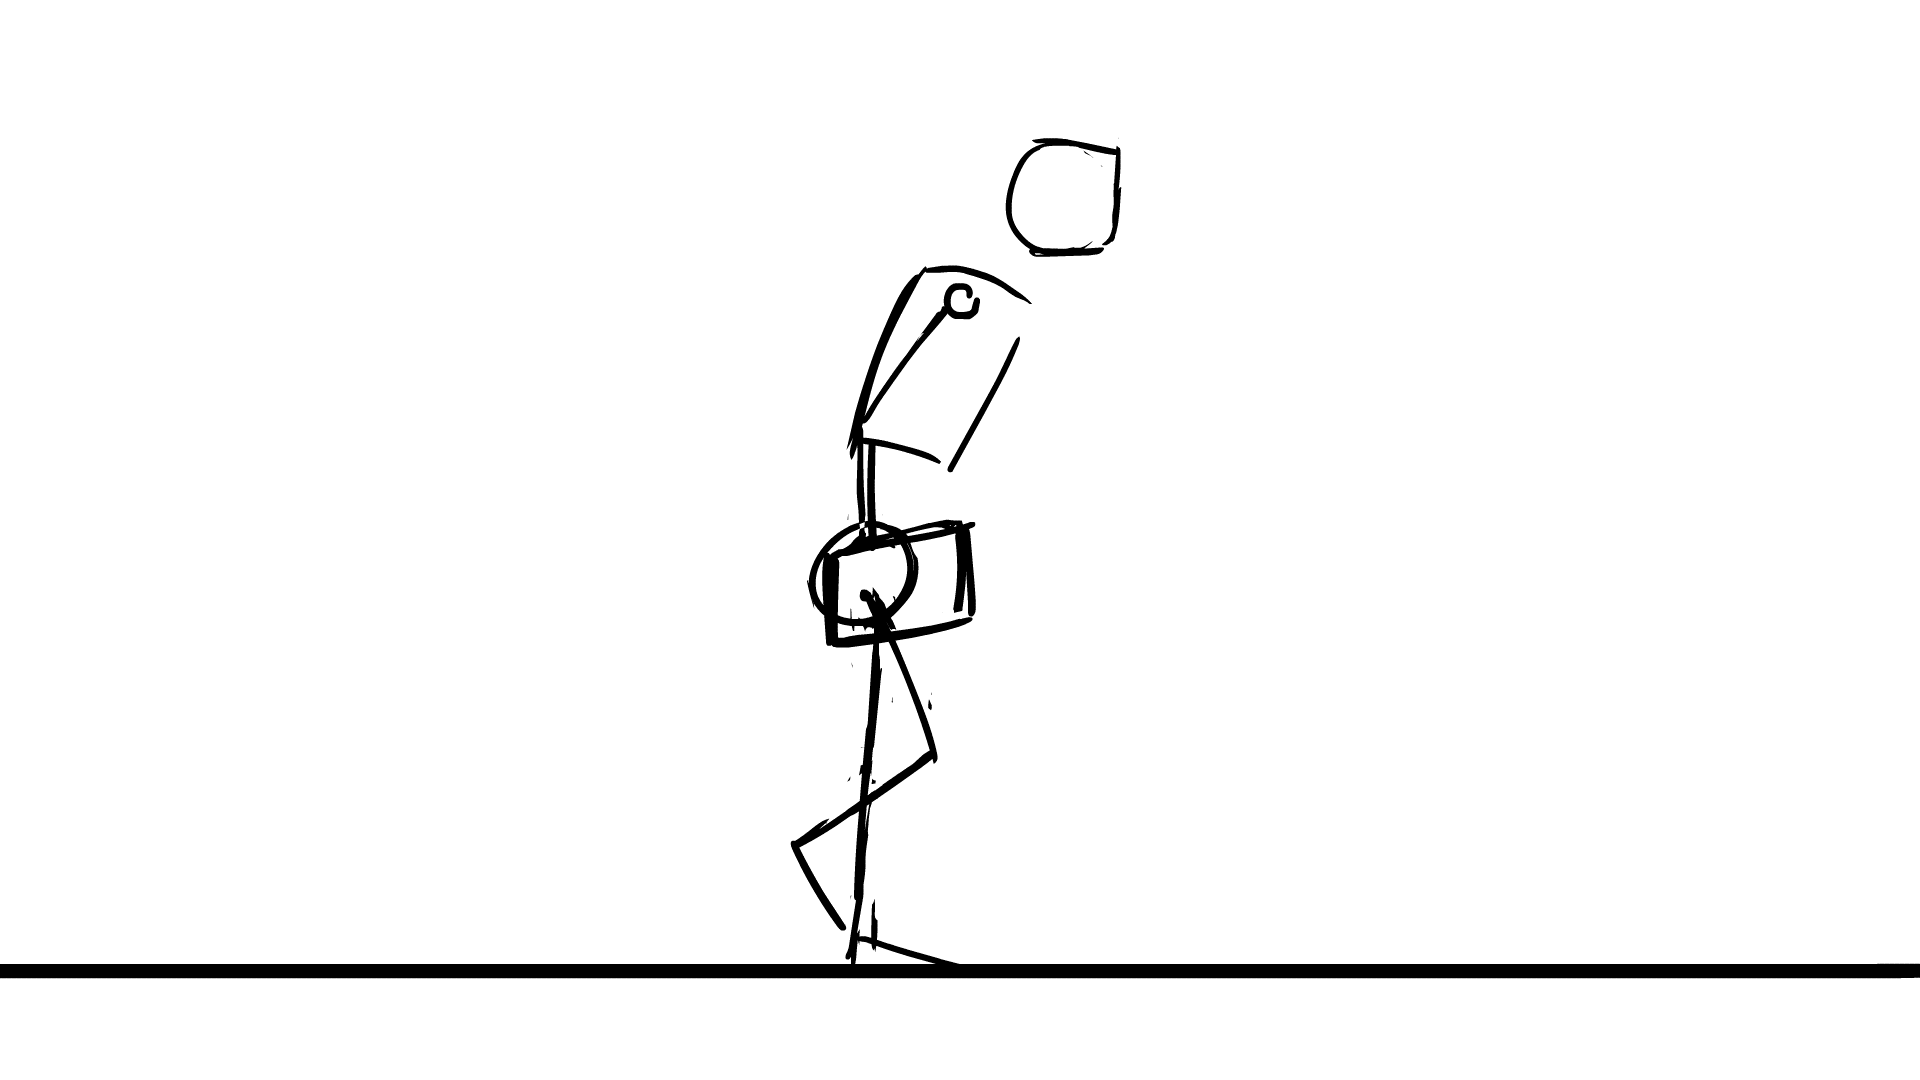
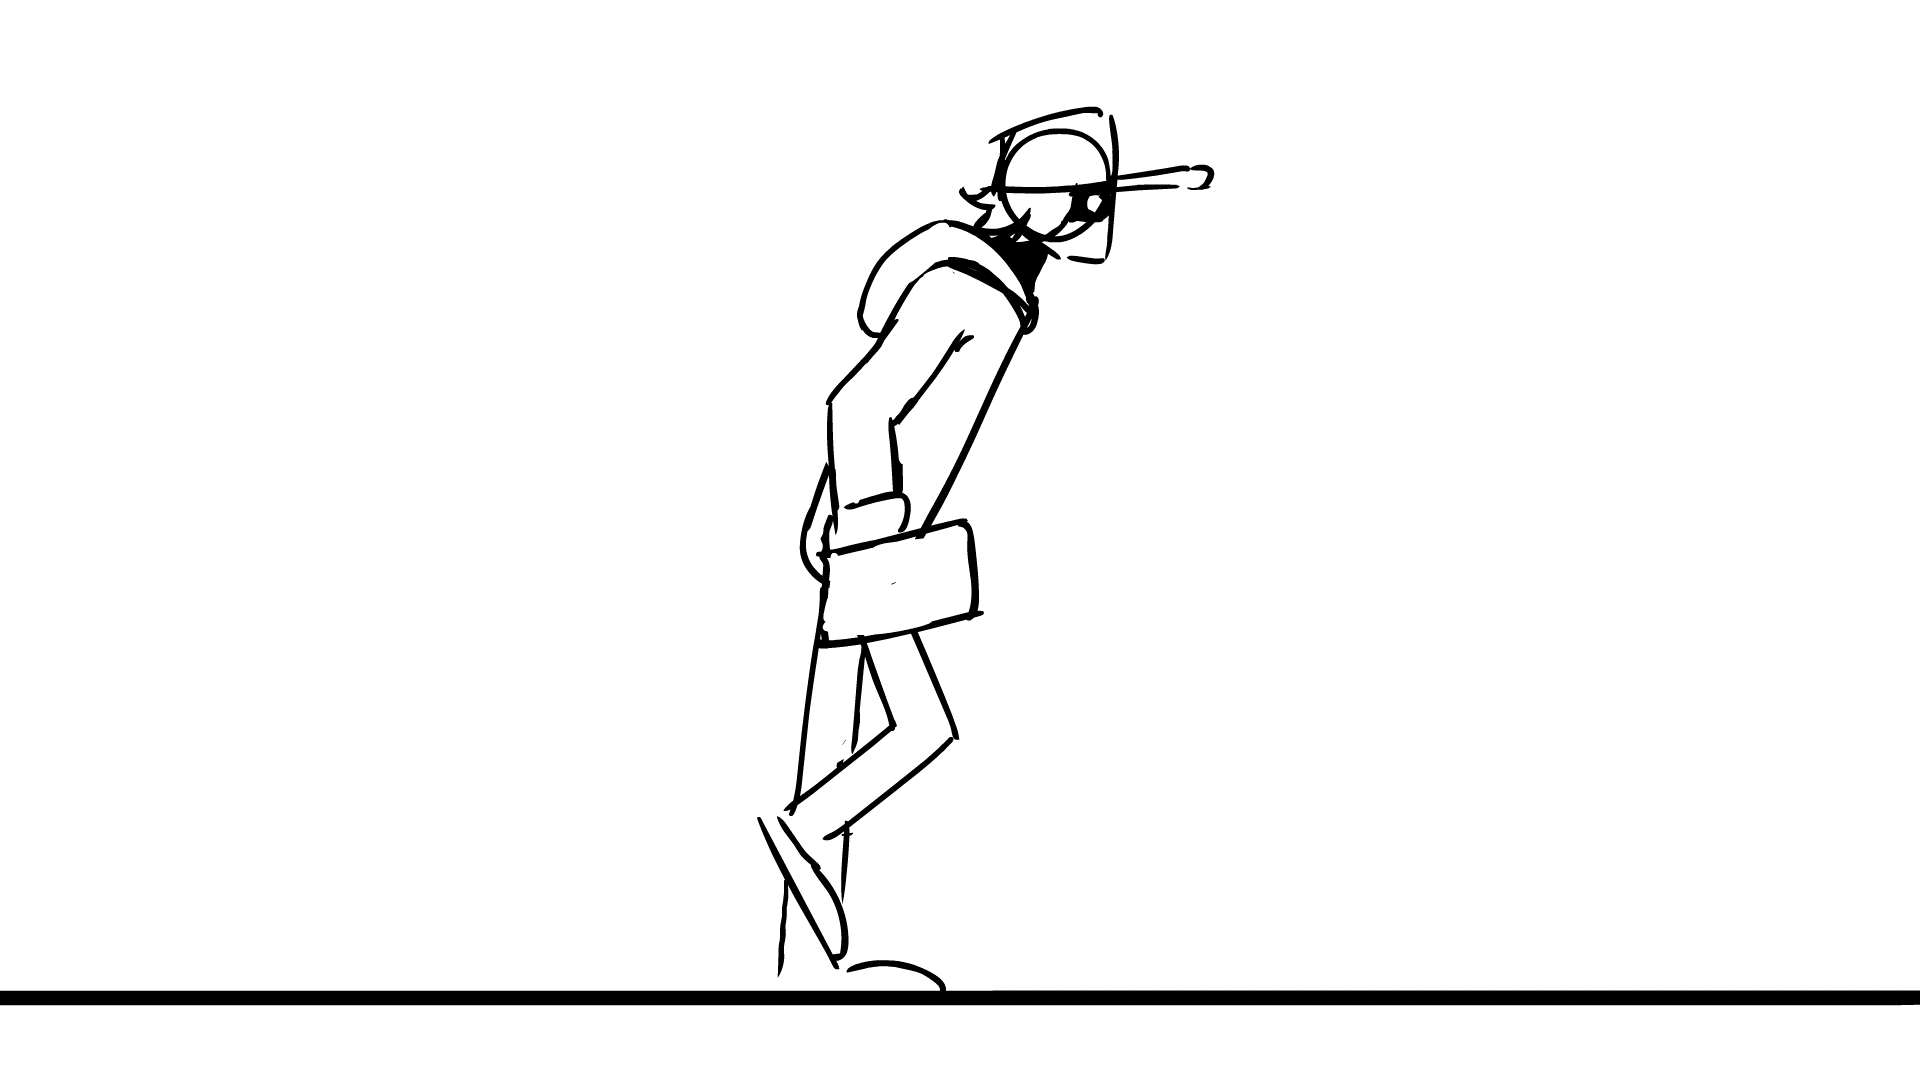
Next up was the rough animation. Using the guide I had just made, I used it to draw out a rough shape of the body on the first frame, however I had noticed that the portions where a bit off, the legs were a bit too short for my liking and so I made an empty graphic symbol and copied my leg animation into it, from there I was able to freely move and manipulate the collection of frames to where I was happy with the body again. After re-doing the proportions I began to use the framework I had laid out beforehand to make a rough animation of the full body, giving him a full body that’s connected together along with some clothing, a face and hair.
Run cycle:
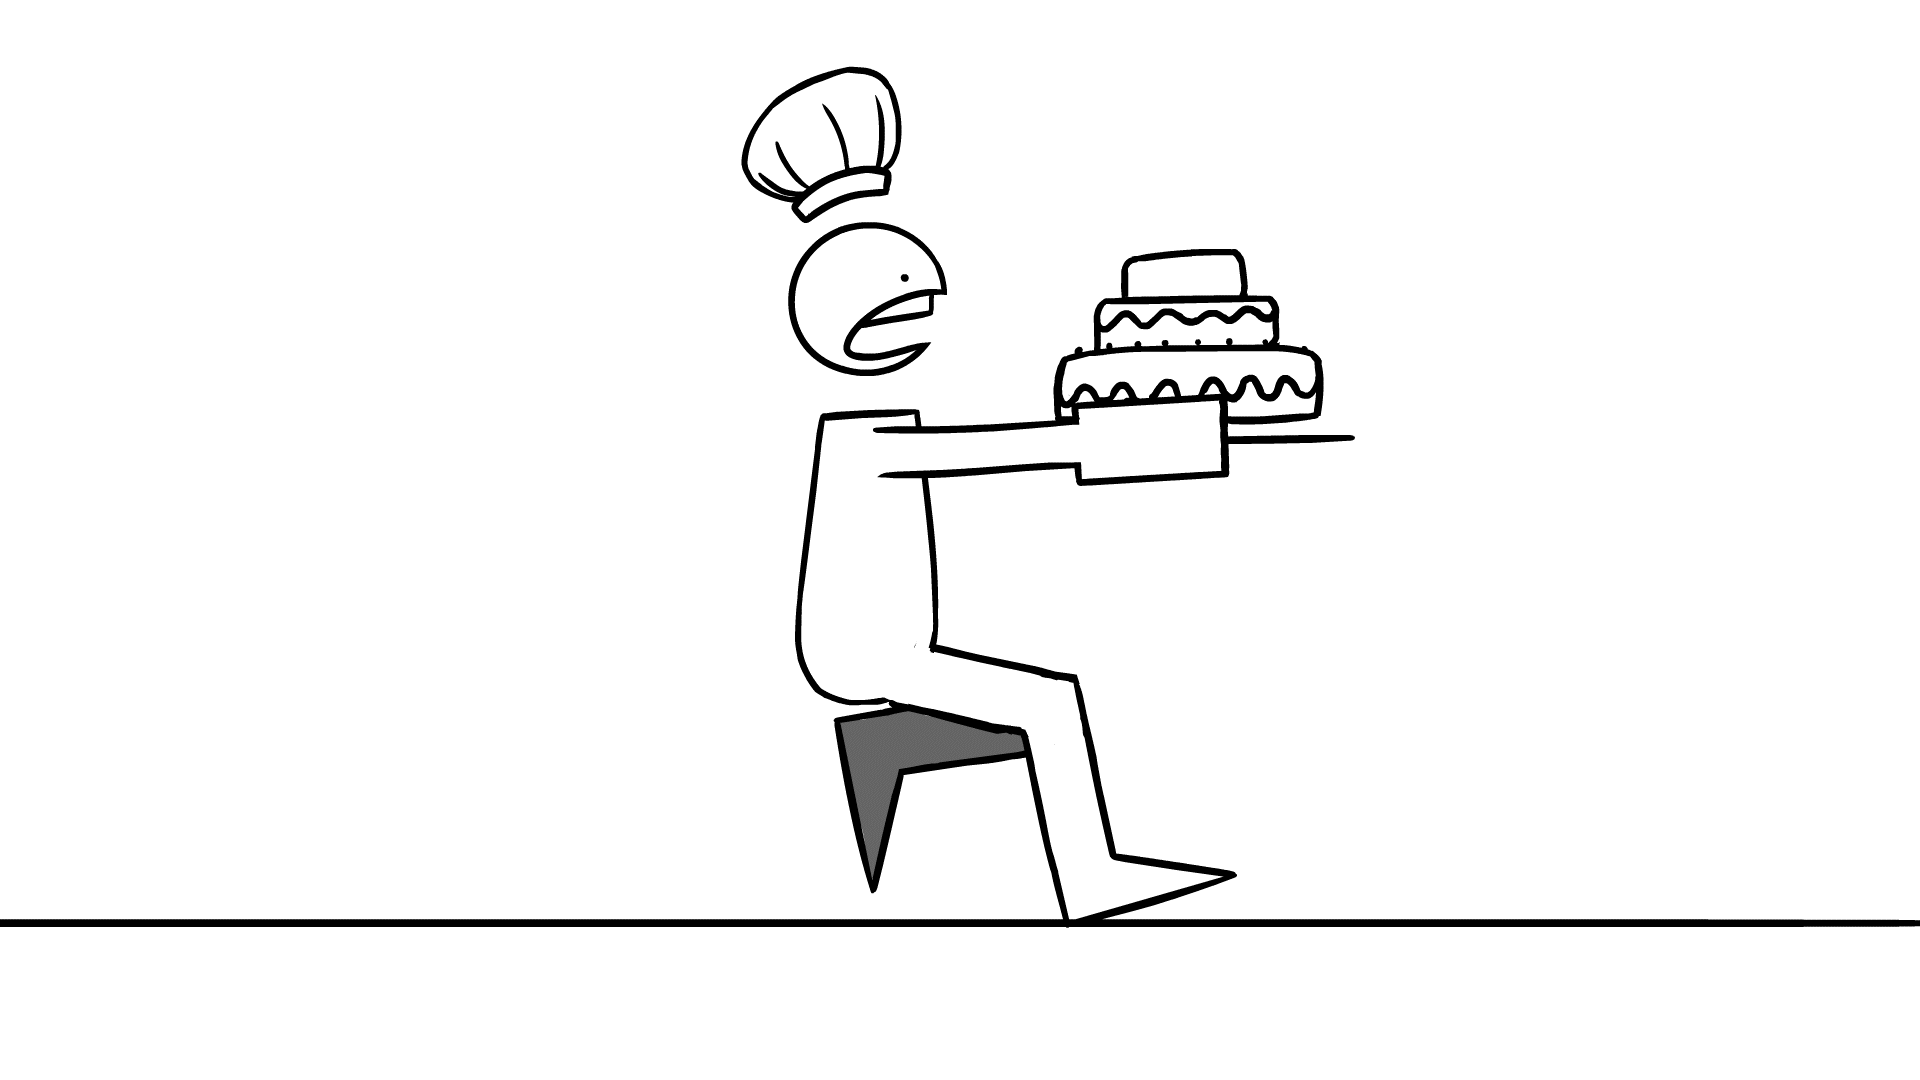
For this run cycle I wanted it to be more cartoony and move really fast as opposed to the animation I had done for my walk cycle and so for this I gathered together a couple of references from both other animations and real life. As for the character I wanted to have them have something on them while they were running, something to hold to make the run seem a bit more interesting, and so I ended up coming with the idea of a baker running with a tray holding a cake.
References:
https://www.behance.net/gallery/77710179/Run-Cycle
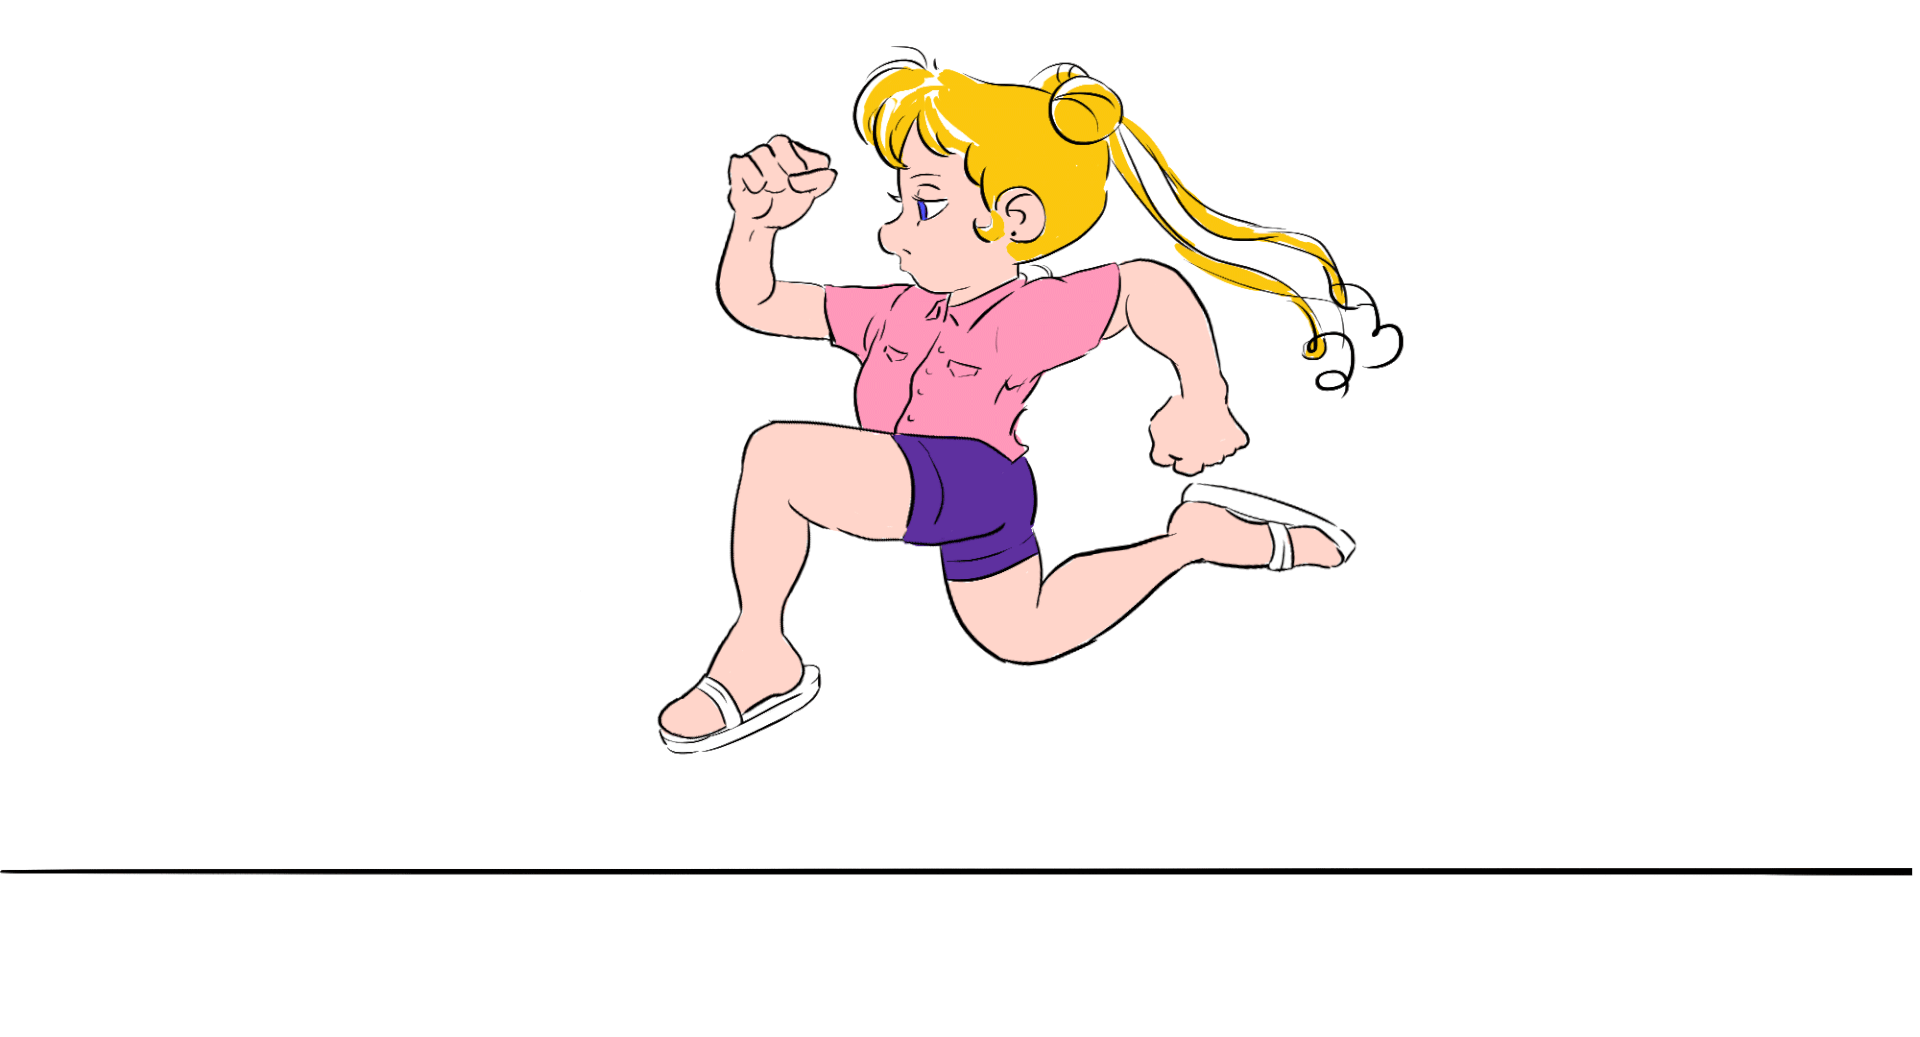
To start off I did the same thing I did with my other animation, I blocked out what I wanted the character to look like using shapes, but this time I made them a bit more exaggerated and cute compared to my other character using round shapes for the head and body to make him appear more friendly. Once I was happy with the shape of the character I moved onto the key-frames, Since this was going to be a fast animation I took inspiration from one of the references I got and only did a passing pose, an up pose, a falling pose and a landing pose which turned out really well for conveying the speed of the character once I had timed out my keys. All in all it looked pretty good on 2s, however I felt like there could more room to make the animation look less choppy and so I decided to use 1s while the character was landing and added a 1 frame smear for the legs going from the passing pose to the up pose, doing this not only helped smooth out the movement but also helped sell the fact that this character is running at a high speed, making it look like he’s spending more time in the air than the ground. I had also done a little animation with the cake, having it lift up into the air after the character takes each step.
Once that was finished, I spent my time going over my animation on a new layer and skipping the rough animation and just headed right into the clean linework since the character was so simple. Another benefit to with the character being so simple, I was able to just copy and paste different parts of the body and just move them on a pivot as if the character was rigged.
Body Mechanics:
Finally the final and most complicated animation of them all, the body mechanics animation. For this animation I wanted to try and make the character do some sort of parkour move in 3D. Before I began to animate I did some research online to find some sort of parkour references and that’s when I came across a video called “Spider-man in Real Life / Best Parkour of Shane Griffin” from PKFR TV. In the video at 0:46, there is a move Shane does where he runs to a wall, jumps off of a wall to reach the bottom of a balcony above him and then flip himself up onto the balcony, after seeing something like that I really wanted to remake it in Maya.
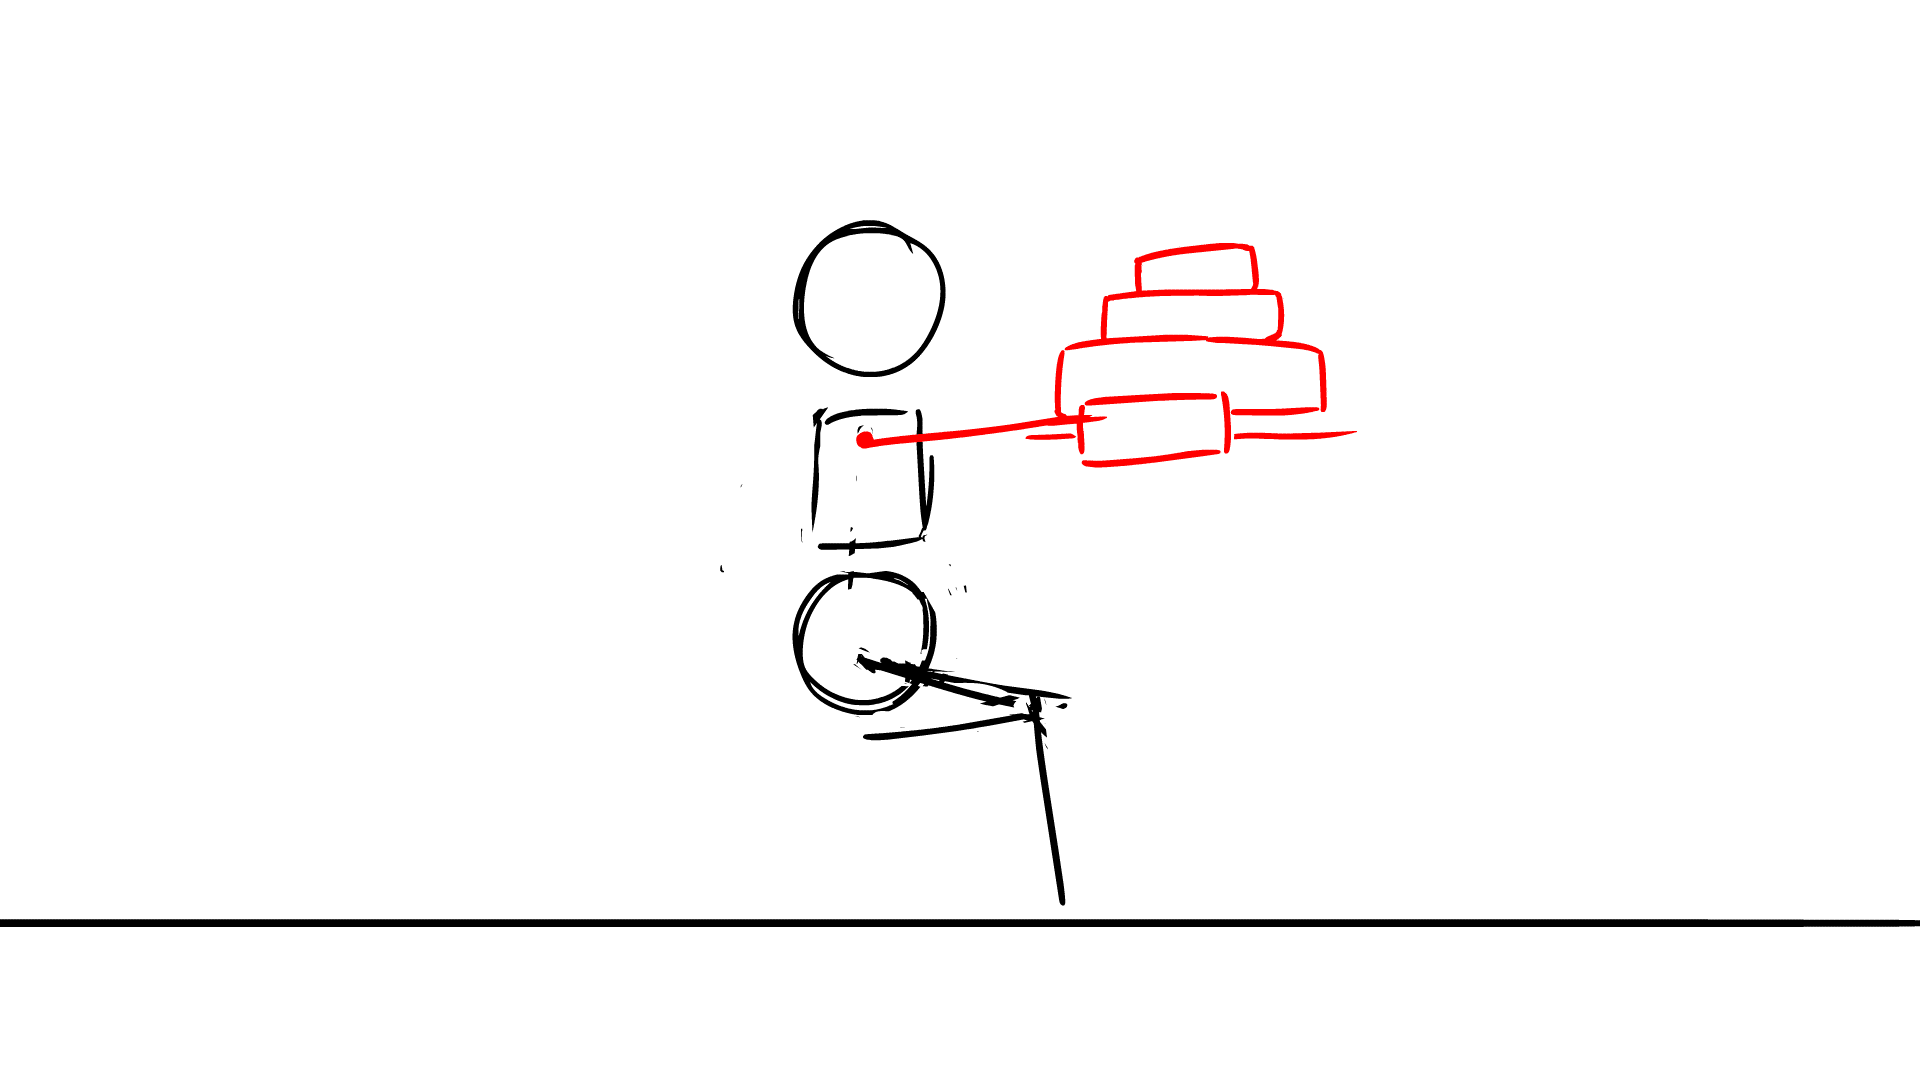
I started off this process by making basic version of the environment he used to preform the move he did, this was done simply by creating blocks in Maya and reshaping them to make a wall with a hole, a balcony with a guard on the front, a door frame, platform and a block to resemble the thing Shane uses to launch himself onto the balcony.
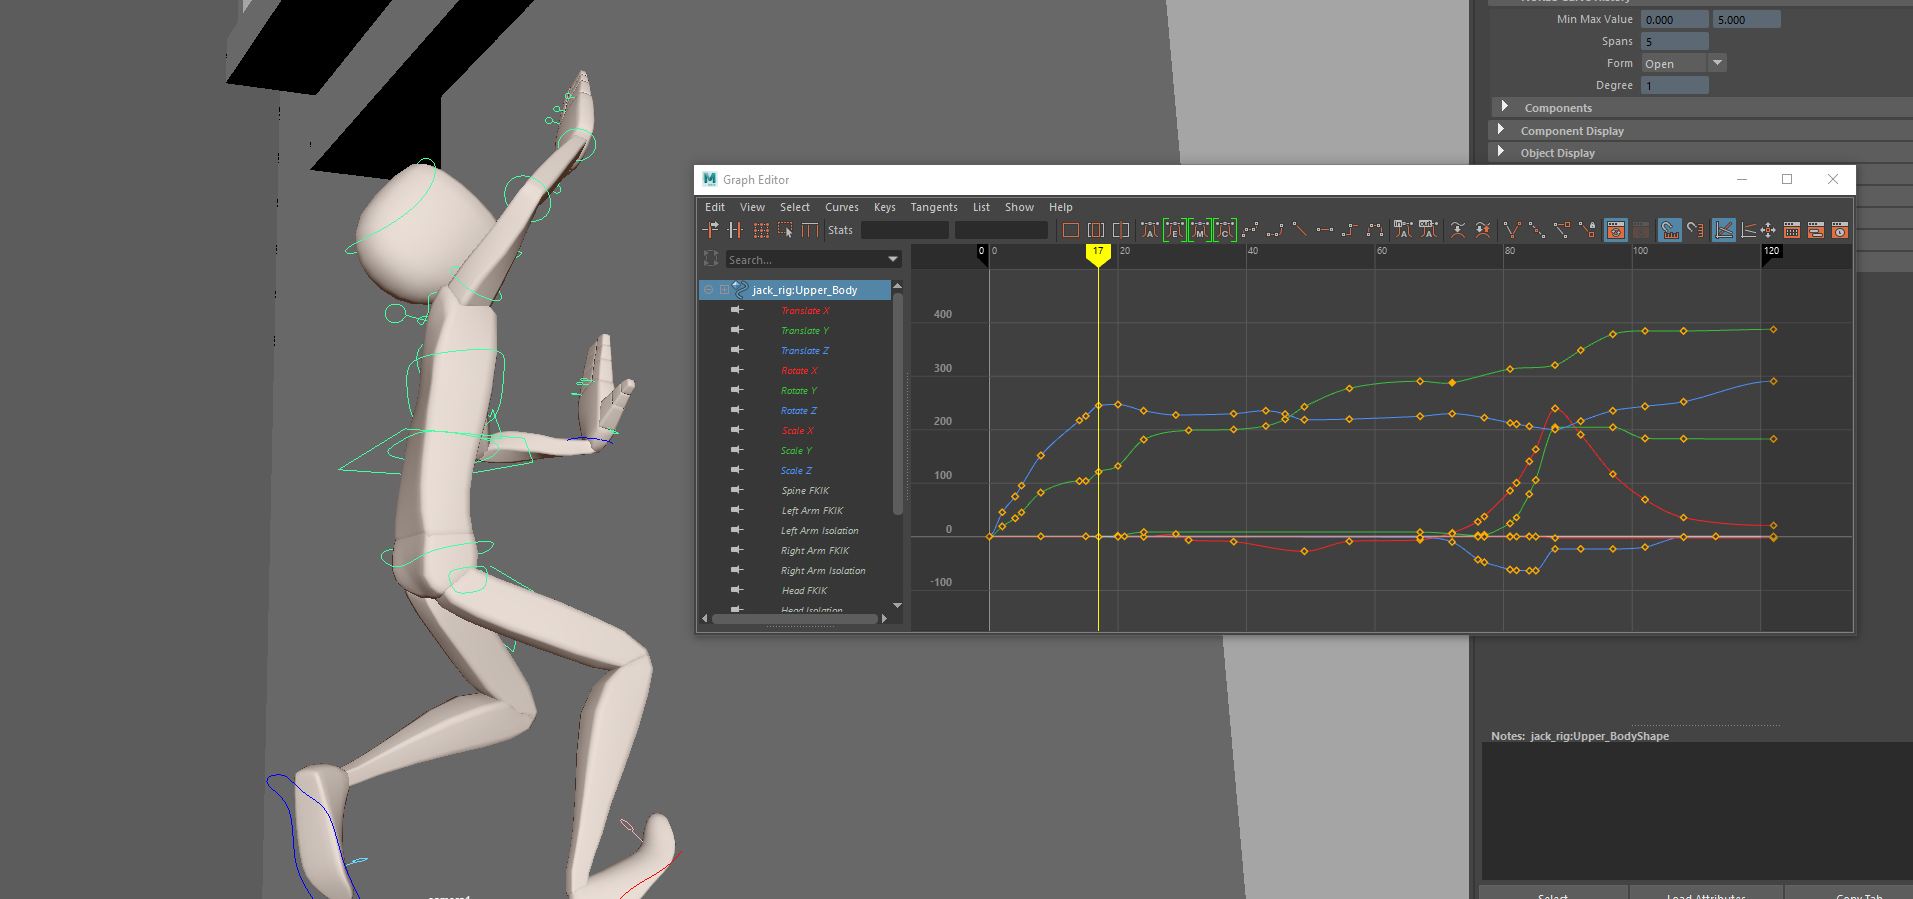
After setting up my environment, I started laying out my keys. I had taken screenshots of the YouTube video I referenced and used them poses as a sort of guide for my keys, doing so really helped me out a lot as it showed me all the weird and intricate way the body moves when having to do the sort of complicated movement that Shaun has to do to pull himself up and over a guard rail the way he does, kicking himself off a wall and using the momentum to swing both of his legs up and over his head and rail.
Next up a saw the the animation was very janky and robotic just going from pose to pose the way it does and so I had to put in some in-betweens to help try and smooth out the movement and push the computer to give the animation arcs where it just wants to go in a straight line from pose to pose. While doing this I also was also doing my first timing pass, moving the keyframes and fixing the movement by adding in some in-betweens where I’d find faults, like the character clipping into itself or the environment in a distracting way or if I noticed a body part moving in a way that I didn’t intend.
Once I was satisfied about where my animation was, I started moving onto the smaller details of the animation like the toe of the foot curling up when pushing up against the wall, fingers grasping the railing or the leg swing done to help get the momentum to get him over the guard rail. While doing this I was also making tweaks to the keys and adding some overs to help with the fluidity of the motion.
After all that was finished it was time to move onto the graph editor, there I picked out the more important parts of the body for the movement and cleaned up any excess in the graph editor and edited the keys left in order to get a smoother and more fluid transition between poses.
All in all I don’t really know how I feel about this project, I really wish I was able to preform better and get the work I needed to do done, but for me there were many outside sources that were preventing me from doing my work effectively or at all. If I had more time I would spent it going back and doing the clean-up work for my walk cycle and spend some time cleaning up my 3D animation, making thing more fluid and get rid of that CG looking movement for some of the poses. There were a couple of things I did like however, I really like how the movement in my walk cycle came out even if it was just left to roughs it still somewhat gives the slow menacing walk feel I was trying to achieve, and the cake bouncing was a nice touch in my eyes. Obviously not the most complicated animation, but I really enjoy subtle touches like that in animation.
Unfortunately due to unforeseen things happening, I wasn’t able to have my animations ready for a review to get feedback on and so I couldn’t work off of feedback on this assignment.