Walk and Run cycle

This section will cover a walk and run cycle, both fundamental to the art of animation as it uses multiple principles together to create a perfect loop. The examples found show the process of it, Preston Blair’s Run and Richard William’s walk were used to help figure out the basics of each of them then references were use to help fix any of the missing pieces of the two cycles.

preston blair deciphered – ANGRY ANIMATOR

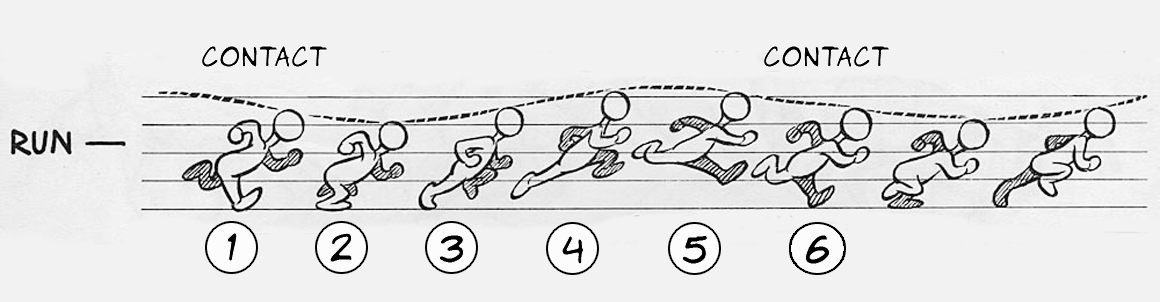
There are typically four to six stages of a run and walk cycle, but both have Contact, down, passing pose and up and potentially extras depending on the run.

The endless reference video of a walk showcases a lot of about a walk that needs to be consider when creating it, the way the hips sway and follow the upper body’s twist and the arm motions while traveling between each stage. Arms and Legs always seem to move opposite from each other one moves forward and the other is behind etc, small things like the head following the body, up and down motion and bend of bodies are all important movement factors to consider.


Similar to a walk the run has equal amounts of important details, a lot of similar however a big thing to factor is how when running at least visually feet don’t always touch the ground compared to that of a walk and typically the body is further position forward to emphasis speed and aerodynamics.

The walk animation, a very old timey style of walk with his arms up in a fisticuffs type of gesture, while strolling about. Making sure to use the principles such as arcs, squash and stretch, timing and spacing, easing in and out, overlap and follow through making sure the loop is true.

Follow through and overlap help give the bounce of the ears and the arc of the hips always helps give it a solid bounce and similar helps the feet move correct manner.

This was the first attempt at a running animation and it sadly it’s more like a power walk than a run, as the feet connect to the ground and the movement overall feels a little too slow to be considered a run. Adjustments for this would be needed for it to be considered a run and a big one would be to adjust the back as its currently facing forward. When running the back is typically arc’d forward and not back as it is here. Overall speed too could be faster.

This run was similar to the previous attempts however I adjusted the back, sped up the overall cycle and made sure the legs followed a quick turn around. However it does appear to be a run I think there are minor aspects that are holding it back, mostly the lack of a body sway of overall body movement to help give it a bit of edge on a run compared to a walk.

Compared to previous attempts as well there isn’t a lot of overlapping action and follow through on parts to give it some extra motion during, which might of helped conveyed a sense of speed compared to the results here were ears and the tail are stiff. Something to consider for next time.

Flour Sack

The animation exercise is to create a personality for a sack of flour by using the principles to create a personality with emotion by acting and not having any facial expressions to help show the emotion.

Principles such as squash and stretch, overlapping action and follow through, arcs, timing and spacing, easing in and out as well as other principles help elevate the performance to give the character a sense of purpose.

Flour Sack Reference - Animator Island

This example shows all the potential ideas that could be done with a flour sack in 2d as its flexible and simple shape allowed for a lot of malleable possibilities, sadness, joy and a lot of falling has high potential with the flour sack.

The first attempt at the flour sack, starts with a simple hop and tries to keep his balance then falls over and gets back up. Showing off a positive, clumsy personality. This first attempt while a solid premise needed some real life reference to help make the posing of the fall more believable. Reference is a good way of understanding the posing and where limitations of the human form lie as well as help figure out certain transition between poses.

Using my phone camera I performed out the scene to show off how someone losing balance would look to help understand the way balance and how the core of the body looks as well as the arms and legs behave during such a motion and then regained my footing. I believe this helped understand the positioning and balance of forms throughtout.

Second attempt, adjustments were made to have the character double their pose to seem like an over balance however I don’t think the pose was pushed far enough and reviewing the reference again the limbs have an almost overshoot appearance.

This attempt was similar to the previous although in stepped and showing a different type of anticipation for the second part of it to try and suggest a struggle however I don’t believe it helped convince the movement of a struggle and more a minor twitch, some adjustments would be needed for it to be a convincing struggle to maintain balance.

Lastly the final version, removing the extra twitch and giving a more pronounced overshoot would help push the posing of the flour sack and give the effect of a struggle however the flip and roll of the character could do with a stronger arc and perhaps more squash and stretch to help push the flour sack-ness and maybe slow down some of the pacing to give the weight of the flour sack a higher prominence.

The final pose has a strong silhouette which helps with appeal and a clear view of the emotion of the character and his attitude.

Character Pushing Box (Weight)

This section is for the character pushing a heavy object/box and is to showcase the idea of weight and body mechanics, an important part of this process is to be aware of the line of action as Timing for animation showcases the idea of weight and strength to help have a solid form while pushing or being pulled. Squash and stretch, arcs, easing in and out, timing and spacing are all always very important to the overall process of pushing weight.

Throughout the process of creating the weight push a big factor was to trying to make sure the line of action was strong throughout, a lot of S’s curves and C’s to help push the line of action. When pushing it was important to keep the pose looking solid too. Another important tip was making sure feet stay planted firmly on the ground as form is just as important as line of action. Exaggeration was used throughout the scene too to help push the cartoony aspect of the rig. Follow through and overlapping action helped on arms and legs to give a moment of relief as well as help show the speed and shift in weight when Tom moves around.

A big concern through the scene was the character standing up from the ground so footage was recorded to help understand the mechanics of leg placement, body shifting, center of gravity changes and potential use of principles to help elevate the process. Arcs are everywhere from how legs are placed and move and offsets to body parts is also important as not every part of the body moves together. Drag in areas and followthrough, such as the head and arms to create the weight of the body getting up from an exhausting position.

First version of the animation, the major differences from this and the final is that a bit smoother in areas and his fall is complete, also him getting up off the ground has a bit more understanding and isn’t just guess work, lastly how the character pushes the object away has a bit more weight and adjustment compared to the final version. This version overall has several uses of Arcs, anticipation, exaggeration and such however what it could potentially have more of is squash and stretch to help push some of the fleshy aspects of the character. An example could be the use of it when his arms hit the wall to suggest him pushing his full weight onto the wall.

The final version, this one smooths out a lot of the animation work previously and adjusts the lift and push to the solid object, mostly fixes. The biggest adjustment is the character’s body being pressed against the object as it now feels more like the arms reach first then the body this gives the character a strong form when pushing the against the object.

Some of the arcs of initial step into the shot need to be adjusted as well as the foot placement as it walks into the scene, the push and the rock’s movement could be adjusted too to help adjust the weight. Anticipation is in the rock’s initial movement but could be adjusted to be more exaggerated.

Character with Ball: Bounce, Jump then throw

This exercise is to have a character jump and throw a ball into a hoop, the intent is to figure out how to effectively convey body mechanics with the 12 principles. A mixture of squash and stretch, arcs, anticipation, easing in and out, follow through and overlap, and combine these to create a character who can jump and shoot.

The first thing to do was to find reference that can help understand the body mechanics and break down the process of dribbling a ball and then jump shooting it into a hoop.

The dribble for example has anticipation and arcs with squash and stretch for the ball to give the the push of the hand on the ball and the weight of the ball. The form of the body is also important making sure the line of action is pushed into a C shape for a solid form. Easing in and out is also important to ensure the speed and bounce has the right energy from the force.

The second part of this was the jump shot, and how it has an anticipation and follow through to help with the understanding of throwing the ball, the anticipation is one of the most important aspects of the throw as it helps produce the power and speed of the ball as it leaves the hand as well as direction. Secondary action would be the trousers swaying which could help with understanding pieces of the rig should have it to convey the aspect of weight of items and the feeling of movement.

Even though these videos were used as reference, its okay to push the limits on what can be done with the understanding of bouncing and throwing a ball. Originally the plan was to create a very by the books animation following the reference.

The first attempt at this was created with the intent to follow the references closely, but it was suggested to add some exaggeration to push the poses and to make it be an action that tom himself would do and not just a by the books jump and throw.

The second attempt this time the latter poses were redone and tweaked to emphasis the exaggeration and follow through, giving it a much more toony scene of Tom throwing the ball and the ball hitting him an action with reaction moment.

More principles were used and smoother arcs were considered throughout to try and make the follow through and overlapping action a little more expressive, squash and stretch has been used for the ball and the model itself, arcs were studied throughout to make sure they have a smooth transition.

The final version this one slightly different from the previous with adjustments to the ball’s movement and the impact moment, were it hits him this one removing a few frames to try and speed up the process.

Overall: the scene successfully conveys the goal of the principles, it uses a lot of squash and stretch, arcs and overlapping action and follow through to help push the piece further some secondary action might help give an idea of items on him that are lose such as whiskers could be affected while jumping which in term helps with the feeling of him moving through space.

The Bouncing Ball

In this post I’m going to be discussing the principles of animation with research and practical examples to show my understanding of animation. This first part will be the bouncing ball, a simple task used to help with the fundamentals of animation, using; squash and stretch, timing and spacing, arcs, ease in and out, pose-to-pose and exaggeration. These together create the fluid motion of a ball bouncing and falling down.


Richard William’s Survival Kit and Timing in Animation by Harold Whitaker, John Halas both were used in figuring out the general timing and understanding of the bouncing ball, taking the idea of spacing, timing, squash and stretch and Arcs to put together the stages of the animation. The ball eases in when it reaches it peak and then eases out, the arc contains where the ball goes with squash and stretch helps emphasis the the ball when it squashes and stretches. These methods can be applied to other examples like someone jumping and a mallet moving. Richard William’s also uses the example of a coin and shows spacing in how that impacts the movement of the object.

Putting these together helps create the illusion of an object having a smooth enter and exit. Which creates the illusion of a ball bouncing.

lucasdegani: Class 1 - Week 3: The Bouncing Ball


After looking at the Animator’s survival kit and Timing in Animation, I created some rough ideas of what the potential movement for these would be like, similar to the book’s suggestion. The ball arcs, squashes and stretches and moves. The other examples here are used for potential weight changes, a lighter ball like a ping-pong ball and a slower, heavier, bowling ball.

Another example found for help with researching this was “Bouncing Ball – How to make an animation” by Puuung 퍼엉

This example shows off their way of creating a bouncing ball and how it uses similar ideas from the Survival kit and timing in animation, squash and stretch, timing, spacing, easing in and out and other principles.

Once the core concepts were created next was moving onto the bouncing ball, creating a sphere and a floor in maya I used a mixture of Translate, Rotate and Scale to help use the ball into the direction of animation I wanted, the ball’s scale can be adjusted for squash and stretch, translate helps move and rotation to add an example spin to a typical ball.

Final bounce animation, showing the principles in action. The ball animation itself showcases the principles I have outlined however for next time I’d try and make the ball move faster as of right now it has a slight “float” to it that feels like it makes the ball lighter than I would of liked, changing the timing to be faster or having the air time be less might of allowed for a more solid overall ball.

Another animation of the ball, a sort of alternate idea with a smaller, lighter ball and having it bounce in a similar manner to the previous example but have the air time intentionally longer as the weight has changed from a standard bouncing ball to a more rigid and denser item.

The first bounce could of been adjusted to have a more solid looking bounce as is, potentially pushed higher as its a very light material and the first bounce should shoot further up however the bounces after the first do have a solid bounce overall.

The graphic editor  for the ball bounces, the graph editor is adjusted for each version of the ball bounce. Translate Y, Translate X, Rotation Z,  and Scale Y were all adjusted here to create this graph and creates this pattern.

Some parts of the graph needed to be cleaned up however the main areas of the animation are perfectly useable as is.

Conclusion:
Overall the bouncing ball exercise was a success as it demonstrated the principles in their most clearest ways, a good starting exercise to help us get back into the groove of animation. Helps get us thinking about squash and stretch, easing in and out, Arcs and the general principles overall. The bouncing ball exercise helps build on the foundations of the principles, most likely the reason Richard Williams and the Timing for animation book both have them.

What I’d do for next time is try and figure out how to make the ball’s mass feel solid and keep the volume consistent to hopefully make the ball feel like a solid ball and not a more malleable mass. Even though Solid drawing wasn’t a principle that was possible with 3D, certain ideas can be taken from it to create the idea of realism when it comes to an object.


Digital Portfolio

Week 1: Bouncing Ball

Week 2: Pose-to-pose exercise – Ball with Tail/Wave

Week 3: Walk and Run Cycles

Week 4: Flour Sack

Week 5: Body Mechanics: Heavy Box/Heavy Object

Week 6: Body Mechanics 2: Character bouncing a ball and throw

Skip to toolbar