This is the portfolio project and began as a continuation of the presentation from previous semester, and began with taking the original concept and adjusting it to more finely fit with a piece designed for a portfolio piece designed to show off the technical skills we’ve achieved over the year. The goal is to fit nicely within a 3D animation pipeline and potentially find work post-university.
Within the pipeline there are several steps needed before going into full production, creating the idea, roughing out storyboards, animatic/previs then creating the models, scenes and having everything ready before the start of this semester so animation work can be done for the entire project.
Due to having completed the earlier stages and having a strong basis to begin the project from the previous semesters’ project would be used for the project. This project was an idea for a short film about a Rat graveyard keeper and a ghost and the rat having to tell the ghost the truth about his demise. This was choice as it was easy to take the emotional performance from the idea and translate that into a portfolio to show a character emoting and acting. The focus of this portfolio piece is to create a scene that can be used for a portfolio having a 3D character be expressive and be understood with what emotion they are going through. Another reason is to create a piece to show studios that the capabilities shown match what they’re looking for.
The goal for the project is to create an animated piece that conveys emotion and showcases the current skill level of animation to hopefully allow for employment.

Influences for the project, looking at a range of media that helped with the animation style, look and atmosphere of the project. Keeping the ghosts small and simple to make animating two characters easier. A range of 2d, 3d and stop-motion visual styled were looked at, simple shapes for paranormal characters helps keep them from being actually “scary” however they present a challenge with conveying enough emotional information that people understand how they are feeling.

A schedule has been created to help guide the process of the animation and where things should be. However the schedule couldn’t have been followed one-to-one due to changes in the pre-production to make it fit better with the portfolio’s goals. A re-done schedule might of been needed to figure out the scope better.


Rough sketches of the original concept for the rat character, looking at different shapes and sizes while trying to keep it fairly humanoid to make animating the character easier.


These are the final concepts for the characters, the rat having some aspects of his original rat like self with the haunches, tail, nose etc. and the ghost having a simple “soft” ball-like design to keep him easy to animate, rig and potentially be expressive during animating.


Full body shots of the character, using a more realistic humanoid shape and proportions rather than smaller. This was done to see if it was worth pushing the character close to a full humanoid and keeping the animal aspects to a minimum or going further in the opposite direction.


Creating some rough expression sheets of each character, showing off the potential facial expressions and what is expected of their models. The rat has a fully structure face so its capabilities were a lot more advanced than that of the ghost however if given enough adjustments and forethought into the design the ghost could of been extremely expressive.

The final reference sheet of the main character, Duncan a rat grave keeper. Keeping his overall original concept but adjusting body proportions to accommodate aspects of the design. Too big haunches for example made making the leg hard or would collide with other parts of the body that are unintentional. Keep sizes and shapes to a reasonable size help allow character’s to be pushed further later.


The 3D sculpt process, from rough shapes to eventual higher detailed sculpting then lastly putting together clothing to have him not completely nude. Aspects of the design had to be further adjusted here, facial shape and nose shape were adjusted. Slight asymmetrical ear to try and keep his design not overly symmetrical.

Similar process for background assets, bring into Zbrush, do a rough pass then give it details and finalise it.


The character retopologized in maya and textured in substance painter, making sure to take influences from the original reference sheet and adding a few extra details such as markings and 2d sketch lines to add a bit of original cartoon flair to the design. Overall the model sticks to the original design sheet closely however some aspects of the design had to be adjusted such as feet and some parts of the mouth to help make animating those two areas easier. A problem with the design in general is the sizes of specific body parts (feet) as they might lead to issues when walking.
Once the textures and model were finished next was the rigging. This test animating was done to showcase the facial movement and possibilities for expressions and general body mechanics. Squash and stretch and some other principles are baked into the advanced skeleton rig an example of this is the controllers on the head, as they allow for pulling and squashing the head however it most likely uses a deformer or some sort of maya exclusive aspect that doesn’t translate to blender as bringing the rig as-is to blender causes some major movement problems when adjusting the head.


 ]
]
The character’s rig, posing and adjusting aspects of him to see how far the rig can go. Overall the adjustments and fixes from advanced skeleton took a lot of fixing as advanced skeleton’s system is extremely usable but its only a starting point to the rig. Overall the rig is extremely expressive and shows off a lot of potential character moments with emotion however some parts of the model are rough such as the tail and some parts of the mouth, as even when adjusting those parts more work is needed however what was ready for animating was good enough for what was needed.
Rigging the character and making sure he’s capable of animating correctly and expressively.
Creating the rig for the original ghost design, with mouth expressions and capable of moving around. The original model and rig for the ghost had a simple squash and stretch control, with the ability to change the mouth shapes on the fly with an attribute. Although the design is simple its problems come with the lack of eyebrow controls as that is an important aspect to full body animating and acting, aspects like that might limit its range of movement and emotion, however its simple and cute design helps give it appeal in terms of design.
An additional expression tests for both of the models, testing out what the emotional range of each of them can achieve. The rat’s capable of a vast amount of detailed and subtle emotions, eyes, lip movement, brows etc. however some of the bones and weight painting need adjusting to ensure that no unusual clipping happens when pulling the face. A problem with the facial rig of the rat is that the cheeks with the hood don’t expression the same and can clip into each other.

Using an asset list for both the foreground elements and the background were roughed out to figure out what was all needed for the scene, a rough estimate what maybe needed however while planning out the layout and background elements it was considered that not everything had to be made and a lot of assets could be borrowed from other places.
Before the start of the semester the background work had been roughly layed out, a table, fireplace, windows, etc. all placed and textured to do some background tests with lighting. The placement of the backgrounds elements was most important, however the assets themselves will most likely be updated and changed for the final version as there are elements with the assets that come off as incomplete.
Aspects of the background themselves were solid enough pieces for the scene, the candle in particular held up well giving an almost gloomy atmosphere vibe. However a lot of the assets didn’t fit the overall aesthetic of the scene so fixing everything to be more in line with the style would most likely have helped keep things aesthetically similar.


After assets were placed in the scene the next thing was to test out some lighting, taking into account the idea of warm inside, cold outside to contrast with each other.

The original concept had a similar vibe inside and out but the lack of contrast felt like it didn’t compliment the scene and also visibility might of been even harder. Sadly that is the most obvious problem with the shots and lighting, they’re far too dark and make it difficult for anything to be seen within the scene.
Researching lighting helped figure out the basics when it came to blender’s rendering system, how to use lighting etc. and some tips on using false colour to figure out what was exposed. However these aspects could of been implemented more into the construction of the scene which might of helped figured out the lighting problems that came with the scene. Given more time potentially the lighting problems could be figured out and a much clearer more atmospheric design could of been established.
21/07/25
For the first week back, progress was shared of what was ready to go for this project.
What was presented was everything previously spoken of, plus some additional aspects that Mike had addressed during a call before the start of the semester.

An additional expression sheet was put together to help figure out what range of emotions that was needed for the character, slightly toned back but what the rig was capable of without additional work and fixing.
This helped establish what the rig was able to achieve and given more time, being capable of pushing the expressions further and maybe some additional parts of the body such as eyebrows etc. might of allowed for more clearer understanding of the face.

The original script for the story was drafted up before everything else during the roughing out stage. However this wasn’t presented until the following week as some boards and rough ideas needed to be put together to help complete the pre-production stage. The script itself felt slightly hollow and was difficult to convey all the information needed to help create a narrative that felt like it had emotion behind it. With guidance and help from the tutors this underwent several reworks.
28/07/25
The original storyboard, a rough establishment of the short. The visuals helped figure out what was being aimed for with the short, however the tutors struggled to grasp the entire story due to some of the story elements feeling cluttered and the characters not fully being established. Mike gave ideas, and suggesting to do follow ups on the storyboard as a previs as it’ll help keep the animating faster due to being able to jump straight into the animation work once the previs was completed.


Looking into the idea of a previs helped figure out what was needed for one, an extremely rough, early shot of what was going to happen even if it wasn’t 100% accurate the idea is to figure out shots, layout and where/what is going on in the scene, even a scratch track on top can help figure out what helps with the scene. Refinements can come later when all of the elements have been established. This was taken into consideration as the weeks went on and implementation was done throughout with these concepts

The original boards created to help establish the narrative of the story, showcased for others to see and understand. Even though the illustrations helped figure out what was going on with, the narrative was barely there and the entire concept wasn’t fully implemented together. Mike had difficulty understanding what was going on and what was the emotional hook of it all, while Sarah enjoyed the character designs. These two aspects helped rework the script and Mikes suggestions on re-starting helped. The second draft’s beginning was a solid opening however the middle section struggled to figure out were the emotion came from and was confusing at times.

The third draft of the script after mikes notes relating to aspects that needed reworking, needing an establishment of normal before going into chaos and having a character be a “Fish-out of water” is a good way of helping figure out complex worlds and concepts and how aspects of the world work. These were implemented to this final draft of the script and some elements were adjusted further to help connect the character that was changed for the ghost.

Lastly was a change to the character, as the original ghost design as cute as the character was didn’t have complete range of emotions that was needed for acting and the use of a face/body language, so reworking an older model was done. This shark character helped figure out the basis for implementing more nautical parts of the story and helped influence the script by giving some elements to help establish a motive of a past life and bring a theme to aspects of the story. His character design itself was changed to give some blue elements similar to the original design of the ghost, then his own colours were adjusted. Down the pipeline the character would most likely become more transparent and spiritual but for this part it was fine to have him in a more opaque look.
04/08/25
The first previs of the project, this one followed the script closer and was done to cut down the time needed for having to re-do 2D sketches and go straight into layout, and rough poses and emotions for each of the scenes. This part the timing and composition of the scene were rough. Talking to the tutor’s it was established that everything was overly in the middle, similar to a wes anderson film. This was a bad habit that was done due to wanting everything to be within a scene to be seen, body language etc. This comment then led into a conversation about rule of thirds and a 3 by 3 grid to help the placement of composition within a scene.
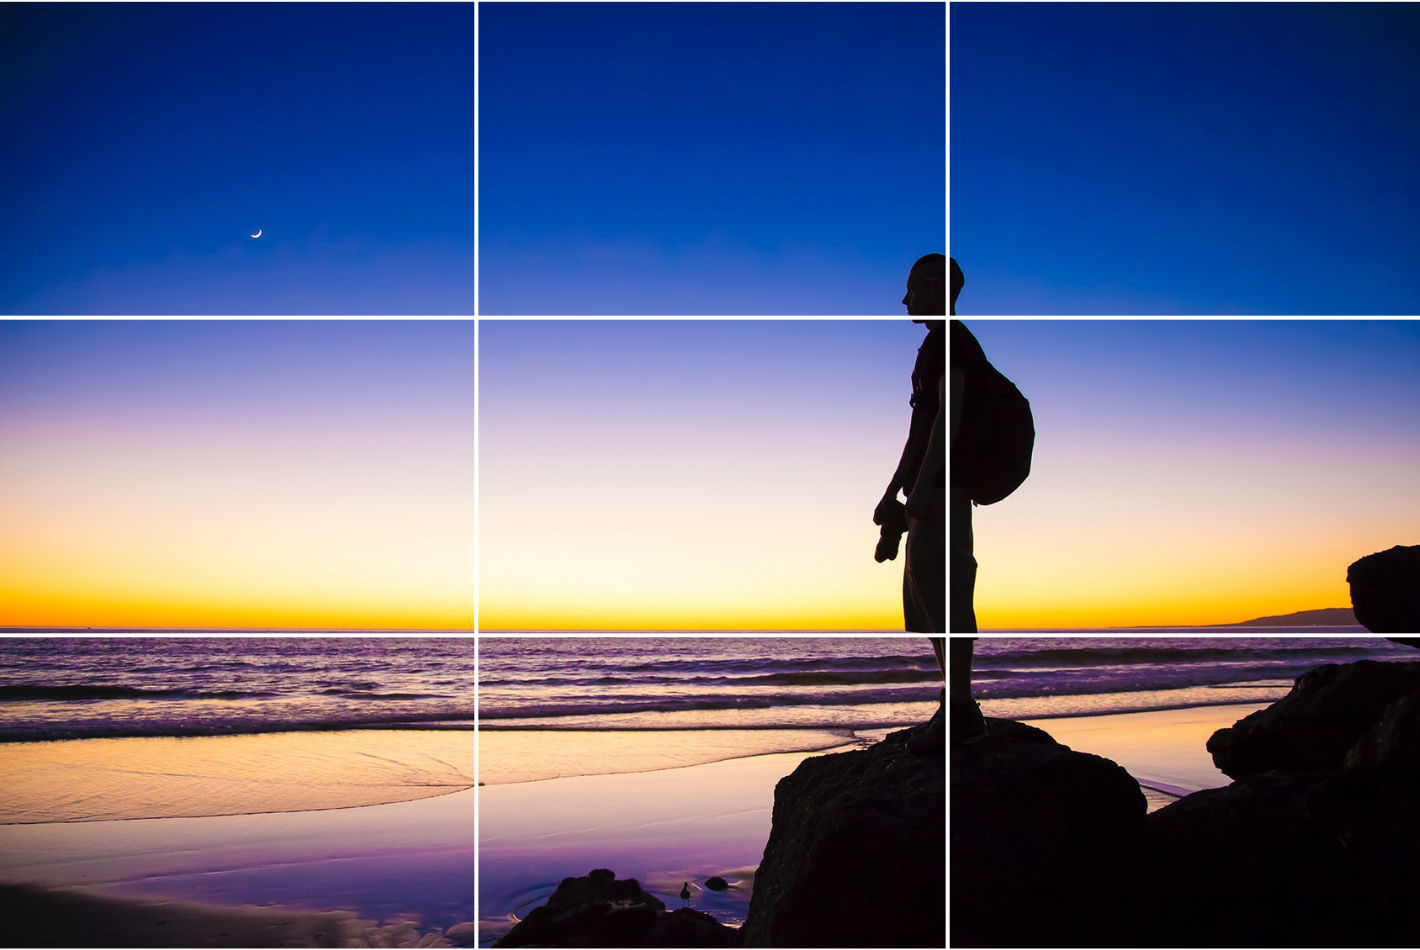

The rule of thirds being an essential aspect of composition when it comes to films, animation, shows etc. helping establish aspects within a shot. Making sure things don’t overlap, things are readable and also implement the idea of using it as a storytelling tool. Like an example would be having the camera overhead, making the person in the shot “small” this helps establish the concept of them being weaker, or seen as the submissive of the story. While having the shot be from below establishes the idea of them being a more dominate person within the scene. Placement helps with the “where the eye should look” from what part should the starting point be and where does the eye lead. These rules aren’t limited to just rule of thirds, symmetry, rule of odds and triangular compositions are other ways of establishing these concepts towards the viewer. Another aspect of composition is the idea of a “golden ratio” which is a more complex method of composition compared to rule of thirds.
These ideas and concepts helped shape the next draft of the previs, helping figure out where aspects of the scene should be and where aspects and elements should go to help make the reading of the scene easier.
One other aspect to consider going further is Shot-reverse-shot a composition technique that helps when two characters are speaking with each other. Over-the-shoulder, matching a single shot are other ways that dialogue can be shown off to each other. These should hopefully help give a basis to characters having a conversation however these rules for all aspects of filmmaking don’t having to be hard-locked into following and can be broken however there are some aspects of shots that should still follow a sense of understanding and flow.
11/08/25
This time when speaking with Mike, the discussion of adjusting the establishing shot, fixing the camera so aspects of characters weren’t clipping into there frame, such as hands being out of frame or helmets a lot of elements being out of frame and making the shot look slightly awkward due to where aspects are being cut off. Some aspects were some posing awkwardness and pulling the camera back from the character to allow for some room to be implemented. This all comes back to composition aspects, as a big part of composition is making sure everything in the frame is easily readable and understood, things aren’t awkward to the viewer and the eye follows everything.
The last part was adding a scene of the two characters interacting before transitioning to the end of this portion. The intent is to try and get as much of the internal scenes done as possible before submission and hopefully have enough ready. So the internal shots were considered so 2/3rds of the entire animation were planned out and the previs ends before the final scene. The intent is to have a neutral shot as most of the shots throughout have had a balance of dominate and submissive in aspects to them taking over the scene. It begins with the rat having dominant staging then moves onto the Shark near the end.
Blocking and staging, blocking is how a character moves through a scene and interact with their environment and staging is the placement and movement of the camera in relation to blocking and when the two elements combine can help create a visually unique storytelling method. The idea behind it for this was to try and use staging to help establish an understanding of the relationship through this scene, one is lost and isn’t sure of their situation while the other calm and fully composed but as the scene progressed the idea of that imbalance shifting as one’s emotions take over and make the other’s own emotions shift creating an idea of tug-of-war with calm and irrational.
18/08/25
This was an updated version of the previs, and the start of animating with the characters. Mike mentioned to adjust the establishing shot and discussed the aspect of jump cuts with the 30 degree rule.
https://www.studiobinder.com/blog/what-is-an-establishing-shot-definition-examples/
A traditional jump cut is when a single shot/sequence is cut down the middle and a lapse in time has occurred which gives the idea of a quick movement. This is an aspect we want to avoid when creating an establishing shot as its more about creating the idea of giving critical components and opening up a scene so that it conveys exactly what you want to your audience it helps them understand the world, where they are and potentially what to expect. These two elements are what the feedback was trying to help with. Avoiding the idea of a jumpcut, so pull the camera to a direction that helps it feel more like its the same area but a new shot is here. The 30 degree rule is the amount the camera should have moved to determine whether it is a jumpcut same spot but time has changed or a different shot.
These elements were considered when further progressing the next previs, ensuring that the establishing shot made more sense and that it didn’t follow the 30 degree rule to hopefully not create the idea of a jump cut.
25/08/25
Next previs, fixing the feedback Mike had given the previous week next and adding additional animation to the scene. Shark flexing his fingers and looking at his body. Overall the weeks progress was solid pushing past the previous week and onto another scene with a different character. Also adding small details like the character swimming from the door to a settled shot. However some of the shots movements could of been paced better as some of it feels a bit too long to just too short especially if dialogue is there (which it will eventually be).
The use of referencing within the animation is a must and to do so requires some research, to begin with the establishment of finding footage for the reference either taking it yourself or finding similar videos online. Finding such specific references online can be rather hard to figure out however there are some tools that have helped. The first one is obvious recording it yourself, which has been done in some of the scenes. This helps figure out simple actions and the acting of the character, the problem is figuring out the character itself and getting yourself into the mindset to play the character enough for it to work as reference.


Mixamo is an auto rigging website but has some animations that are more common examples of daily life, standing to sitting was the one the animations on the website which was a useful way of finding a reference of something simple as video of such a specific action. A stand, the anticipation to crouch with where the legs, arms and lower body move to and smaller details. However it doesn’t include the facial features or fingers.


Creating my own video reference of the main rat character walking and then sitting down and rubbing his feet, an idea given by a tutor on potentially changing an aspect of the acting do to him walking and seeming like his feet are sore from walking, which was the original idea. (In the earlier boards).
This reference was helpful in animating however creating the footage is tough to figure out direction and making sure that the reference covers what is needed for the scene plus being nervous by acting is a hard hurdle to get over. However the movement and general idea worked well.
The mistakes here are an error due to the shovel within maya breaking and needing to be re-established, a similar issue occured with the shark model were his eye is broken and thats why a change to him having his eye closed was done.


After creating the previous one with mike’s advice and then further advices on adjusting the character work with moving the body more due to him struggling, then further progress was done on a previous scene where the first spoken lines of dialogue occurred which required a scratch track. Then once that was established it was then onto creating some acting reference using myself for movement and where eyes go etc. there was a lot of small technical detail to keep track of due to the complexities of the human face.
The biggest advantage of this was the abilities to see a clear idea of how things are broken down as general movement and emotion were conveyed through the reference footage, taking the footage and figuring out what was needed was the most complex part. The disadvantage is my own acting abilities and the placement of the camera as the lower body isn’t there to help convey how thighs and hips move.
A big thing to keep in check was the 12 principles as well, anticipation, squish and stretch, timing, arcs etc. all come into play in different ways and its important to keep them in mind. Easing in and out is pretty common throughout, walking uses a lot of these such as arms and leg movement. The principles throughout were considered however a strong implementation to certain parts like arms and legs might of cleaned up some of the rougher patches of the animation. Spacing was another one that was difficult to figure out with timing as both rely on more of a feeling but audio can help figure out them better.
Moving onto splining it after the scenes that were done, adjusting a lot of problems when that time arrives is a big part of the animating process with maya as a lot of issues relating to IK/FK switching can break movement and there’s a feature within animbot called smart ruler which tries to fix a common issue when it comes to arms/legs were the animation goes into the negative and the entire arm/leg can flip around during a standard animation, luckily this fixes that. Another big problem when switching can come from the placement of the IK were the FK was and a feature called Xform copy and paste helped with that issue as it allowed to copy the world space of the limb from the FK to the IK.
This is where the final version of animation is, cleaned up and fixed. Timing was a big factor in problems as longer takes can end up with a lot of computer guessing so additional keyframed had to be added to help smooth out the movement even further ones might of been needed if the movement was too problem however nothing was too drastic in needing fixing. Certain scenes like him stopping by the fireplace needed to be redone slightly as the transition from the walk to the crouch would “snap” and not flow nicely.
Overall the project was partially successful, having the models, textured, animatable and about 1 minute of animation in a “complete” state was probably the most that could probably be achieved given the time frame was so short. However in the future, thinking the schedule that was created earlier on might be a good way of cutting loses and thinking about where else could do with the project. However for this portfolio piece the animation was the most important and rendering and post-production weren’t the focus.