Baking is a strong childhood memory that I have, with many days spent looking at the pictures in recipe books, and excitedly helping my gran when she allowed me to stir whatever it was that she was making at the time (not to mention the part where I got to lick the bowl after!). I had been doing some contextual research and came across Louise Lockheart’s and Jin Kitamura’s illustrated flat lays. I really loved how they both had slotted together all of these different items within an existing theme such as textiles or stationary, and wanted to explore this idea within a baking theme. I chose a recipe from my favourite baking book that I got as a child (the Primrose Bakery Book – such tasty recipes), and chose to do the flourless chocolate cake recipe as I have fond memories of making it for my childhood idol – my flour-allergic art teacher in primary sch0ol. I thought this would be perfect, and I was excited to do it in my own style.


This was my quick sketch where I focused on fitting together all of the elements on to one a4 size page. This was definitely a challenge but it was like a visual and mental jigsaw that I really enjoyed. I wanted each element to be of a similar size so that it was harmonious, but as it was a recipe, I couldn’t add any other space filling elements so it was a good exercise on composition. I did want it to be a visual representation of all the elements in the text, and I think it was spaced out well enough that each element was represented without being squashed. For the sketch I use a consistent width pen as it was quicker, however this will not be used in the final.


This is the final line art layer, which actually looked quite like a colouring book which I thought was interesting and I might explore that in the future. I used the same pressure controlled brush (if I continue working in digital, I think this will be my go-to line art brush). I wanted to try and keep a fairly consistent outside edge with a mix of closed and opened lines, which was a challenge due to a lot of the curved edges that made stability difficult. I wasn’t able to do the illustrations that I had planned on the right side, as the recipe was too long and making the text any smaller would have made it unreadable, which would have defeated the point. I do quite like the fact that it is separate as it allows the illustration to stand by itself and have the recipe text be readable.


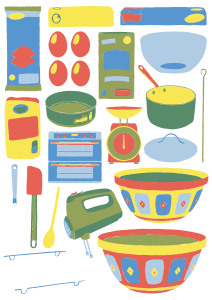
I was really happy with the final version, it looked similar to how I had imagined in my head, and I think that each colour was dispersed well enough that using only six colours was beneficial in creating a well spaced colour map. I had a few certain colour placements, such as the light blue bowl and pot lid, as I wanted to use the light blue to look like glass, and so I began to work around that. As the second page had no illustration, I added the yellow and red stars as they were the brightest colours to create a connection to the illustration. I had used a slightly more cream background colour as the vintage illustrations was on aged paper, and the bright white was too stark. I started experimenting, and will continue experimenting more, with halftone dots. It’s harder to see them on a smaller scale, but I plan on printing it to a3 size. I thought it was a good way to add texture to the illustration through clipping masks and masks, and added more of a retro feel to the illustration. I ultimately decided that the background was too dark and changed it to white, however my version with the dots still has a lowered opacity background that I think works best as a standalone poster.


This was the process when I was mapping out where I wanted the colours to go, and seeing if each colour was distributed evenly in a visual sense, across the illustration. As there were two blues and two greens, I included red and yellow as a lot of the packaging detail as there was more visual discrepancy and contrast. Lastly, I layered those colours on to one image, and made a few tweaks to make sure everything worked together, however I’m happy with how this looks, and I’m reminded of many old baking and cookbooks that I used to flip through as a child.


Although I was happy with my final design, I wanted to create a few experimental versions.
- I switched some of the colours around, changing red to dark blue and yellow to light blue. The colours weren’t as well dispersed, as the blue and green were almost quite similar, so I prefer my original colour decisions.
- I used the inverted text in the recipe for the flourless chocolate cake and a clipping mask to create a mask with words of the recipe overlayed on the recipe items, it was deliberately unreadable, however it just ended up looking like a bad texture effect
- The colours of the line art flipped to portrait, with the line art, recipe and title text remaining to create a background, however it was far too disruptive and still unreadable, and too busy in a negative way
- The original colour scheme and illustration without the line art, however the colour lines weren’t clean as they were intended to be coloured by the lines. However, I thought it was interesting from further away.
- Using the background as my colour palette, and a white clipping mask to still show through the black line art.
- Number five reminded me of a jigsaw puzzle, so I drew a quick jigsaw template with a faint opacity for cutting out, as a hypothetical small children’s puzzle for motor skills
- Black and whit version of turning yellow, dark green and dark blue into black, with red, light green and light blue into white. I kept the black line art but it ended up looking like a poorly photocopied illustration
- I tried to salvage number seven by adding a halftone brush so that there was more texture and more of a grayscale where you could see the line art better, however it would have worked better with multiple grey tones such as a desaturated version of the original and adding halftones to those, but I preferred working in the colour palette.


For a-level art we were always encouraged to keep our sketchbooks as neat and clean as possible, but since entering illustration I have really tried to get out of that mindset. I scribble things on sticky notes, print on pieces of paper that would be discarded and stick it down in my book where I have room, not worrying about how the final page looks. This initially worried me in terms of presentation, but we have really been encouraged to not worry about how our sketchbooks look aesthetically and focus more on creating one that works for us. For me, this means, printing a stage of my development and making notes on what I see, what I want to change or figure out mistakes that I’ve made that are hard to spot on a screen. This often means that my notes are all a little bit all over the place, or only make sense to me, but it’s been great to break out of that rigid perfectionism of the must-have-perfect-neat-sketchbook.

