
Production of Characters
Right after handing in the style guide, I had received some unfortunate personal news that left me feeling pretty unmotivated so admittedly I wasn’t able to keep up the tempo of my work from the week previous, and was a bit lackluster in the outcome of my work overall.
After learning about game optimisation from Rachel, I got my group to establish a standardised sizing, with it being 1x1x1m for a crate in game, which is one square on the grid system for Ben. I looked online for some research on the sizing of standard human characters online and found around 2M tall to be good practice (height of the default player actors in unreal). So for my human characters I’m going off a guide of 1m wide by 2m tall.
Initially, the plan in our style guide was to block-out the characters, sculpt these in Zbrush and then bring this back to blender retopologize. So I went through the basic set up for this in blender, following closely with the style guides proportional guides for the humans, particularly establish the correct head to shoulder ratio for the male and female bases. Started just building these with primitives and using mirror modifiers, and to make sure both were consistent I used an empty to mirror from and duplicated the mesh from the female to the male base and just adjusted these out.

I also decided to see if i could capture the likeness of my drawing with a quick speed sculpt in Zbrush using one of the head bases above. This turned out ok for a quick practice, but I noticed some of the elements not being lined up with my reference to I will need to make sure that these are consistent, (mainly the jaw and ears not lining up, but the eyes turned out ok), then I added a simple sphere and adjusted it for a quick hair base and some pigtails.

After showing these off to Mike again, he told me that instead of this pipeline it would be better for us as a group to use poly modelling. This was a bit annoying to hear, as I had already been prepping for the original pipeline and put this in the style guide, but I knew it was the right call as with our turnaround this pipeline was a bit ambitious to try and get characters not only modelled and textured, but getting them animated and functional. It does mean that the work I did previous was essentially useless which put a damper on me for motivation. (I was mainly annoyed that I hadn’t thought of this approach as it makes way more sense), but I had to just get stuck in to replace that work and it would put us on a batter path for our current scope.

Poly Modelling
So Flipped Normals video demonstrates the type of poly modelling that I am most used to, which is creating a plane and laying down the base shapes and volumes in different dimension to build up the face. They bring up a good point of the differences between both approaches, and I found why I am not as comfortable with poly modelling pretty well, as I am worrying about the topology and capturing the right volumes instead of having fun creating shapes and details.
I also largely referenced this low poly model from Brawl stars, it has been triangulated but drawing over it helped me better track where the loops were going, and also fun to note is the lack of posable facial features. I also referenced the matcap and UV checker to see how the model functioned in general, when making models for games vs animation.
So getting stuck into poly modelling, I had only done this once last year so I needed to do some more research on this approach, and Mike actually provided extensive videos explaining how to approach this workflow, my greatest concern being making the head.
I also went and gathered a bunch of topology reference, looking at the hands and shoes and see how they are connected into meshes, at this point I was getting more comfortable in understanding the necessary loops for models but it is always good to have reference to make sure I am reaching those essential loops.

I found Mike’s approach a lot easier than how I would’ve approached poly modelling the face before, as it starts you off with some base volumes while keeping the poly count low to be able to add on and adjust later. The body approach is also nice as I experimented and explored some more complicated topology last semester with a model, now I have to try be really concise with my topology for the sake of preserving processing power and loading times when these characters are in-engine. Roughly looking online I could stay under 10k triangles and I should be ok, but looking at some low poly models I could do without having less eye mobility/flat eyes to reduce poly count depending on how much of our character will end up being seen.


When it came to my model I went ahead and used Mike process to shape out topology and block out my character. The plan was to go back once I had blocked it out and start pushing and pulling to fit my character better, starting off with the female base. This was horrendous, I will be honest, it’s at that stage of 3D where I’m not sure if it gets better afterwards, or if I should redo it almost like an uncanny valley type affect. That could be because I have the topology down but haven’t adjusted it too much to fit, it could need some more TLC to look better, or it could be that I need to refer to a bit more reference to help me map this out. I managed to get some blocky topology down for the whole body, and started working on shaping the face to match the 2D image, as well as popping in some eyes, simple teeth and a tongue, but there is a chance that I give the whole thing another go, this time with a bit more attention as I work in order to get the result that I want.

Coming back to this the day after I decided to focus on just sorting out the face of the characters.
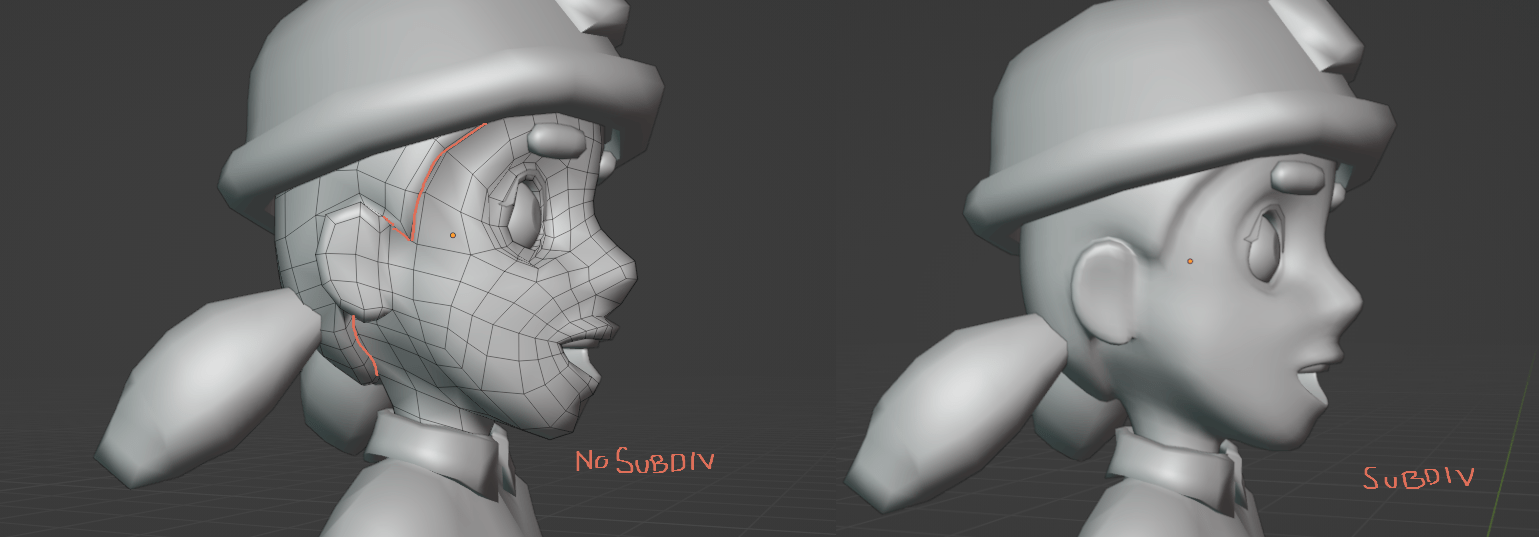
I went back in and really concentrated on manipulating verts to resemble the correct volumes of the face, while following my flat concept art. This was pretty hard, using the subdiv modifier was helpful, but I knew I could just apply this at any point because of the low poly style we wanted so I manually added and adjusted some loops to areas that needed it, when doing this I made sure to keep equal amount of quads above and below the eyes and lips to keep consistency. I went ahead and pulled out the neck and the ears once I knew the head shape was looking right, the ears I had to redo as not only had I initially placed them too high for my style guides notes, they also didn’t have great topology so I had a look over my low poly topology references again. Then you can see how I am able to just duplicate this up and make some minor adjustments to create the male head as well (just broadening the jaw and squaring out the head).

I then remade the body, really trying to match up the proportions closely with my design. There was something that was bugging me with my body topology but I left it as is to try and really map out the shapes, I decided to mainly focus on the female body and then I could just manipulate that to fit the male body just like with the head. I found one of the hardest parts of this was trying to make a hand low poly but functional, last semester I had a discovery on the hand loops to help with more natural deformation and functional topology, but my group wanted to do low poly and so this is a challenge in the opposite direction. I think this turned out ok, it ended up as around 400 tris, with the functional loops and wrist loops as well.

I went around the model and reduced some of the unnecessary loops I found, as well as adding in some functional deformation loops on the elbows and knees. I found trying to balance adding what I know is good topology that will help in rigging and keeping the model as low as possible, as most of the model won’t end up being visible, was really hard, over the last two years I’ve learnt a lot about and I really want to show it all off but I don’t think that fits my current task. I went back and added some loops for the ankles and wrist as well here to make sure it would deform well.
Then I went around the model to see where I could save on tris by deleting some unseen faces or adjust any topology. One particular area I ran into was how to approach the shoulder, I could leave it as is having fewer tris, this ‘bendy straw’ approach, but I wasn’t sure about having the quads curve all the way down the chest or I could use what I had created before and what I saw in references, which had that loop over the shoulder but more topology.

So I ended up deciding to temporary rig both versions, one with the loop over the shoulders and the original topology, with automatic weights in Blender and animate some movement to see which performed better. I showed this to my group members who thought the first one was best, as the original had this pinching on the shoulder. Then I also asked Mike about this and he said largely it doesn’t matter, but this loop I had going over the shoulder and back down is muscular topology that I didn’t need for this really on the adjusted topology version. So, I went and debated this again (aka I spent a lot of time overthinking this choice), although I much prefer the topology and movement on the adjusted topology, to be consistent with Ellen (who is working on the other characters), I decided to just go with the original version. I also ended up adding a breast loop to the female model to preserve those voumes in the movement.
I was able to save on around 500 tris by attaching the base hair directly to the scalp and deleting those faces underneath, and this will also give me a nice seam for my head unwrapping later, the only issue I ran into this was attaching around the ear, but I just attached the hair straight onto the shell instead of around it and I thought this worked well and didn’t create any weird faceting/overlaps on the model.
I also decided to change up how I was approaching my clothes, with the change in construction, so I was going to use my base mesh as the shirt layer, and just extrude out a collar for this, then expand out the base mesh and add a straight collar for the jacket. Then with the knife tool I could go in and carve out those crease loops. I also went and modelled up my hat, since the head size would be consistent from here on out.


I also spent a lot of time debating if my mesh loops and topology was ok, and one of these things I thought about was whether to close the eyelid. Closing this would ensure I had enough topology so that when I close the eyes the texture wouldn’t distort or stretch. But I wasn’t sure how to approach this in way that so that I could also have access to texture the eyes nicely. With our chosen camera angle we wouldn’t be getting that close anyway, so some stretching in this area would be fine.

I ended up adding a loop on the outside and adjusted the loop on the side as well. I also adjusted the eyelash planes to sit better with the face topology, having a cat-eye wing to separate the male and female versions.


I went ahead and put these onto the unreal project using GitHub, although this looked scary Ben was able to explain how to easily use it. I wanted the games team to be able to use their developed mechanics to help visualise what our game would look like put together, make it feel more real. I then reimported my model as a ‘skeletal mesh’ for Ben as apparently a static mesh wouldn’t let Ben replace the default mannequin, so I just imported it as a skeletal one. It was pretty cool to see my models move around on screen even without any sort of rig.


Then I went ahead and worked on the Hi-Vis jackets for my models, which was just a case of duplicating and adjusting the mesh. I had to remove the collars from my shirt, and then I went around and inflated out my mesh to give it the appearance of more thickness.


With the volumes done, I then worked to add some crease topology. I went and gathered some more references on how to create movable topology for rigging as well as more cosmetic loops to retain shape in the sleeves, I didn’t want to add too much of this, as it added to the tri count as well as it wasn’t necessary for our more simple style. This was fun to experiment with and I got a working crease on the stomach area of my models, it was fairly easy to understand the construction of this by looking at one of my downloaded rigs, (Rain rig by Blender), and using the knife tool and adjusting the volumes.


Then I made some cosmetic creases on the arms by insetting faces and adjusting the volumes like on the sleeves, creating a loop to hold onto that shape.


The one place I did struggle with was the elbows, initially I wanted to have some cloth creasing in this area, so I approached this by insetting, bevelling and using the knife tool. All of these didn’t seem to hit that shape that I wanted, a lot of trial and error and I decided to ask for some guidance on this from Mike. He informed me that, yeah I was just overthinking things and adding crease insets wasn’t necessary at all so I kept my stomach crease and would just add on creases by baking them onto the normal like I thought.


And with that the models and their outfit versions are complete! The next stage will be to start unwrapping them to apply on some colour textures and bake on some texture with normal maps.
Brief Texturing Work- WEEK 4
I also wanted to have a practice at texturing skin and clothes early on, I was able to set up some guides on texturing when producing the style guide, but I hadn’t gotten around to creating some practices for my character texturing (for this I used a model I made last year). I knew we waned to have that painterly style on our models but our main game inspirations had largely cel-shaded characters so I looked into other inspirations to help my work. This mainly looked at Fortiche’s texture work with Arcane which I love, and I was bale to grab references of the different materials and approaches to skin, that I would then simplify for our design.
https://www.iamag.co/the-art-of-arcane-league-of-legends-90-backgrounds-and-matte-paintings/
Texturing Supervisor Candice Theuillon:
Texturing Artist Céline Giglio
Senior Texture Artist Gilles Roman
Then I went about quickly laying down the colours and kind of mimicking where I was seeing the shadows and highlights to define the facial structure like in my reference. Like I pointed out in my style guide there’s a lot of tonal variation that we want to really bring that painted feel to our textures. This was pretty rough but gave me a chance to practice and understand this texture style a bit better, although I can say that recreating the hi-vis reflective material will be a bit of a challenge for me.


REASEARCH UVS and Unwrapping
Then I went and had a look at how to approach unwrapping for efficient texture space that would keep material loading time low. I found that using a combination of mirrored UVs and non-mirrored for asymmetric details was the common approach, making sure to pack all the islands together while letting some margins to avoid overlaps. As well as using 2K textures for scalability and an average textile density.


I was also able to find this blog capturing the development of a skin for a league of legends character, how they tested the texture and built up the model before landing on the final version.
https://nexus.leagueoflegends.com/en-us/2018/01/battlecast-illaoi-modeling-and-texturing/
I also went and found how I could approach the swapping clothing approach that I was using to create variety on the NPCs, I had an idea of how to do this but needed to see what was actually possible. This guide goes really in-depth of the process they use to modularly create assets (and the fact each is around 2.5k tris was crazy to read…I probably could have optimised my models better seeing this), how he lays out his UVs and seeing how he will approach texturing was interesting to me! I won’t need to go this in depth for our game but it made me realise that I would need all elements to have an equal resolution, no matter what map they would be on.
http://wiki.polycount.com/wiki/SkankerzeroModularCharacterSystem
For optimisation reasons, as well as our time scope I chose to make use of mirroring when unwrapping (elements like the jeans, sleeves, gloves etc), this will cut the texture time in half as well as get more resolution from my UVs. With our chosen camera angle I chose to have a more equal resolution over the models.

I did run into some really stretched areas when unwrapping that made it so I had to add on extra cuts, which annoyed me a little, areas like the face, boots and hands again we won’t get too close up to them so it should be ok. I also looked at that brawl stars reference on sketchfab to see their cuts. To unwrap I used the generated UV Grid image in Blender and made sure to apply the scale on my separate elements. I unwrapped the Female and Male mesh at the same time to make sure the elements were of equal resolution, and tried to group things largely based on texture/colour. I did try to see if straightening out some elements would be more compact on my Uvs, but this caused distortion so I left most things as they were.


I then went and unwrapped the hi-vis jackets and the helmet on a separate map, again making sure that it was the same resolution as the shirt unwraps. For the helmet I decided to unwrap just one and see if I was able to just use material instance and vectors in Unreal itself to adjust the colour, so I quickly added some texture in substance and this seemed to do what we wanted. The UV space on this extra map isn’t the most efficient, but it kept everything equal for what I needed on the characters.
