I chose the role of a rigger/animator as I have loved animating throughout my second year in university, and I knew I wanted to develop my skills even further in this area. However, I was not comfortable at all with rigging. Before this semester, I had done very little rigging and found it quite confusing. After this semester, I feel I have learnt much more than if I had picked another role because of this. I now understand rigging much more and feel confident in my skills. There were many things that went wrong in creating my character rig, and I would like to go back and practice these areas more, such as creating an FK/IK switch the correct way. However, I now know how to fix these problems and feel I could create a rig much quicker now.
I also feel more confident in working within a group. Being put into a group with unfamiliar people from another course for a module which was much tougher than previous modules gave me more confidence in working with other people form other areas of the industry. I feel this will help me when it comes to working in a fast-paced studio environment with new people.
I used Azri for initial practice, as she gave me the opportunity to attempt secondary hair animations in case Caity’s modelled hair needed animated. I was able to figure out from Azri’s controls what I wanted from our rig, such as the heel, ball and toe rotate, to make actions such as walking much more realistic. I also practiced facial expressions for different actions, such as a suspicious or scared look to differentiate between a criminal and a normal customer. For references, I recorded myself doing these actions.
Before I had rigged our character, I uploaded our character to Mixamo and downloaded the skeleton and mesh from there. This was, I could practice animations with our character. However, I only practiced the idle animation with some breathing as it was very difficult to animate as no controls came with a Maximo skeleton. After this, I continued practicing with Azri.
During easter, I tried Mocap for the first time with Jasmin and Cloe. Jasmin wore the suit, while me and Cloe recorded her movements and monitored the suit for when it needed recalibrated. It needed recalibrated often as the metal in the room interfered with the legs and left hand. Because if this, I was only able to capture simple movements, such as pick-ups, put-downs, and scared by panic button animations. We captured several versions of the same actions to make sure I had a reference that was as clear as possible to work from. I only used the actions as reference as I couldn’t transfer the animations over to my rig, due to the number of arm joints in my rig compared to the Rokoko skeleton. Therefore, I imported the skeleton and mesh from Rokoko into Maya and used Jasmin’s key poses as references.
Before animating my game animations with my finished rig, I referenced my rig in a new scene of Maya, ensuring I could not accidently delete part of the rig, mesh, or animation. it would also make my file size smaller and any change I made to my original rig would be automatically saved onto all my animation files.
Caity ended up taking on the Idle, Payment and Step Forward animations, so my final animations included:
Walk
Suspicious Walk
High Pick Up
Low Pick Up
Place Item on Till
Scared by Panic Button
Suspicious Look
Till Pick Up
Pick Up Basket
Right Turn
As our game is set in a shop, I knew the general walk cycle would be very casual, so I looked at other casual walk cycles or inspiration. However, unlike these walks, I knew I wanted a stylised element for our character. I wanted the arms to move like pendulum, almost like rubber which could be moulded into any way. Instead of stopping at a 180 degree angle like a normal human arm these arms would move past that. I kept this in mind for ever movement I made, such as when the customer puts an item into their basket. I felt that this style of animation complimented Caity’s over exaggerated design and model.
For the suspicious walk, I saved the normal walk into a new file and made it sterner and more rigid. I intended this walk for the criminal to give the player a hint as to who it could possibly be, however, I didn’t change the movements too drastically as I didn’t want the animation to completely give away who the criminal was.
For all animations where I was picking up or putting down a product, I used the Mocap actions as references. I downloaded our Unreal Level at the time from GitHub and exported the till and shelves as an FBX. When imported into my Maya scene, it helped me get the exact height as to where the customers would be reaching in the game, making their movements more realistic. The shelves later ended up changing a little in shape and size, so I had to go back to my animations and tweak them to adhere to the new props.
The scared by panic button animation was one of the hardest, as there were very quick changes in how the customer stood, from standing in an idle pose to crouching down with their hands over their heads, shifting the weight from one foot to another. I used Mocap as a reference for this animation also. With all my animations, I had the basket in mind, as I couldn’t do a movement where the basket mesh would collide with the character mesh. This was the most difficult movement where I had to avoid that happening. I kept the left arm a little lower than the right, signifying the weight of the basket. Even though I feel it was my hardest animation, I am happy with he end result, as I feel the mood of the action comes across well, even without facial expressions.
To pick up the basket, I did something similar to how I used the Mocap animations. I imported my previous Azri practice animation and used the key poses from it and tried to copy them as much as possible with our character. I feel the hair in the Azri rig adds much to her movements, so I was sad that I couldn’t transfer those skills over to our character as the customers hair couldn’t be animated.
For most of my animations, Ryan asked if I could create multiple versions, as he intended to have some customers only holding one item without a basket. For the walk cycle, suspicious walk, pick-ups, put-downs, suspicious look and panic button scare, I created versions where the customer would either be holding a basket, holding an item, or holding nothing at all as they put an item in their pocket. I feel this helped greatly adding more versatility to the actions and the characters, especially since we ended up only having one character model.
When we tried to import my animations into Unreal, errors kept occurring with the character mesh and skeleton. I received feedback from Alec, who told me to both change the names of the copied bones from my FK switch arm as they were being renamed in Unreal, and to unbind the FK skeleton from the skin. I had made this mistake when making the switch, therefore after I had fixed the rig, I had to re-export my animations again.
At the beginning of the semester, I started by researching simulator games, such as cooking and thief simulator, and interactive 3D animation to familiarize myself with a type of animation I wasn’t used to. I also thought of the specific animations we may want for customers, criminals, and police if needed.
Notes from word document at beginning of semester:
Customers
Simple walk cycles/interaction with sales assistant (player)
Criminal
Superhot for running criminal/being held at gunpoint
Ocean’s 8 scene, confidence, nothing to hide:
Shoplifters, subtle, strategic shop lifting:
Tiptoe references, a way for player to spot shoplifter/criminal on CCTV?
Sneaky walk reference:
Sneaky – 3D sneak walk animation:
Police Animations needed?
Police simulator:
Road 96, (also good reference for game):
Heavy rain shop scene:
I received feedback from Alec after a presentation early on in the semester, where he told me to follow his video on transferring animations from Maya to Unreal. He also told me to plan animation blueprints for unreal so I knew exactly which animations would be needed.
I used Alec’s files and transferred the character mesh and skeleton into unreal, as well as an FBX of each animation. I made an event graph, controlling he speed, direction and velocity of the character, then a state machine, controlling the order of which the animations would be played. When I tired to move the animations into the state machine, they appeared to not be there. I discovered later on that I had to go back to the maya files and change the units from metres to centimetres so the skeletons would import into unreal at the correct scale. I followed this YouTube video which taught me ow to make the blueprints and how to transition between each pose, by creating a blend space.
After I had imported the correct FBXs and added them to the state machine, I noticed the jump started mid-air. I now know that is what the jump loop was for in the state machine, therefore I needed to export the jump as two separate animations: a jump and a fall.
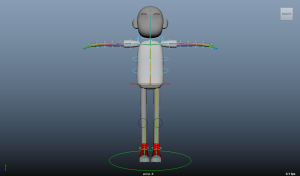
After I received the first model of our character, I began rigging by following Mike’s old and new lectures and YouTube videos on how to parent joints to make a skeleton. As our character had noodle-like arms, I looked at Gravity Falls characters, SpongeBob and Oswald the lucky rabbit as references for arms which can bend anywhere along the arm, rather than limiting them to one elbow, as I wanted to push the exaggeration of the arm movements both for the stylised character and so the movements can be seen more clearly on the CCTV cameras. I looked at rigging tutorials for snakes and tentacles as I felt these were the closest movements to what I wanted to achieve in my rig.
CCTV:
I created bends in the arms, torso, and legs by adding joints to edge loops so the bends in these areas would function properly, and created a joint in the heel, ball, and toe of the foot, allowing me to create rotations for these areas. I only created a skeleton for half of the character, so I could mirror the joints to the other side. I found orientating the joints difficult, therefore it took me a few tries to find the right orientation for the axis I was on as the settings were different from the tutorials I was following.
I used NURBS curves for controls and changed the ‘Normal Y’ value to 0 in the inputs section of the channel box, so when I matched transformations, the control would have the correct rotation around the joint. I created a shortcut (CTRL + A) using the hotkey editor so I could easily match transformations of a control to the joint. I added each control to a group allowing me to move the controls and 0 them out again without any issues. For every control, I used an Orient Constraint for rotations, and a Point Constraint on the hips, and also the shoulders, so I could translate them in case there was a need for upward and downward movements when breathing during the idle pose. Looking back, I feel I should have added a Point Constraint to the torso also, to allow a better illusion of breathing.
When I was testing the rotations after adding constraints, I noticed the knuckles were rotating at the control above the mesh, rather than at the joint. I thought at first it might be the shape of the controls, but after creating new circles, I realized I needed to change the pivot point of the controls to match the joint.
I created FK controls for the upper body, and IK for the legs by creating an IK handle from the hip joint to the ankle and setting a preferred angle for the knees before creating a pole vector for each knee.
I followed a tutorial from Alec to make a reverse foot rig. I created locators for the heel, ball, and toe and snapped them to each foot joint. Before creating IK handles, I changed the settings to Single-Chain Solver then created 3 IK handles for each part of the foot. I parented the joints to the locators in a hierarchy that gave me more control over how the feet could be rotated.
After I checked the foot was rotating properly, I added attributes to the ankle control and used the connection editor to assign the attributes to the correct rotations of the locators. This meant I could animate the heel, ball, and toe rotations without needing to select the locators.
I had only tried skin weights once before this year, which is one reason why I chose the role that I did. I was comfortable with animating, however, found rigging (especially skin weights) quite confusing. I felt more confident with skin weights after going back and old skin weight videos on blackboard before trying again this year.
Rather than painting the skin weights like last year, I highlighted the faces around the selected joint, clicked Select then inverse so all other faces were selected instead, then flooded these areas with a 0 value so they weren’t influenced when the joint was rotated. In areas where volume would be lost when bent, I selected Add instead of Replace in the skin weights settings, then added a low value gradually to fix these areas, such as the elbows.
I made the mistake of doing the FK/IK switch after the other parts of the rig were finished which made it much harder as the controls were already made and orientated to the skeleton. I decided to create one anyways as, at that time, we weren’t completely sure how the character would carry the basket and I felt having an IK option would make setting down/picking up the basket a little easier. I followed a YouTube tutorial and some of Mike’s tutorials to create the switch.
I had to unbind the skin from the skeleton on the arm before duplicating the arm joints. I then only needed to create IK controls as I had already created FK ones previously. I made another circle and added FK and IK attributes to it and used the connection editor to assign the FK attribute to the FK constraints and the IK attribute to the IK constraints. I also used the expression editor for the first time, writing a short script so when IK was turned on, FK would turn off and vice versa. I would like to try another FK/IK switch again before finishing the rest of the rig as I feel it made making the switch more complicated.
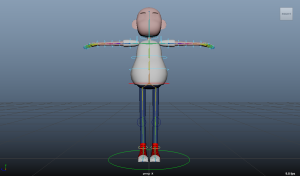
Unfortunately, our small character wasn’t finished. As a backup, Alec showed me how to make a smaller and wider character from Caity’s tall model. I duplicated this model and enlarged its stomach to add some variation, then bound the already made skeleton to the new mesh and transferred the skin weights. I added the scale constraint to the master control, allowing me to scale the character down. I later used the same method to change the original mesh to the current UVd model I received.
To give more options for how the customers could carry the basket, I created a simple rig so it could be animated if needed. I researched prop constraints in Maya and created two joints and an IK handle. I added a move, rock and swing control and added a Parent Constraint to the shoulder so the arm could move at any point and the basket would follow. I used Alec’s video for the majority of creating the rig, however, it was to large to upload to the blog.
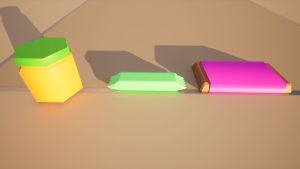
Following the simple, colourful, low poly style Caity set in the style bible, I made concepts for my props which were, at the time, a Petrol/Diesel board, a wet floor sign, a chocolate and cereal bar, and a cigarette packet. I also made concepts for our characters before they were finalized, thinking how to incorporate different body shapes and sizes with different features to identify the criminal, such as scars and facial hair.
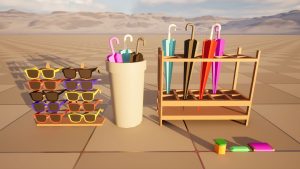
I made a simple model of the cigarette packet, but later the cigarette packet and wet floor went to Kaz, so I picked up a couple more props and created baby food, a small and large umbrella stand with umbrellas, and a sunglasses stand modelled to the shape and size of our characters head.
As our game style included low poly props with flat colours, I textured in a way I had never done before by attaching a single texture sheet as a file in Maya and scaling down by UVs to fit each colour box. Games Design stated it would help the game in Unreal run faster if all models had 1 or 2 master sheets instead of using substance painter to texture our props.
The prompt for our game this year was Isolated – Connected. During week 1, each group had to think of multiple game ideas to pitch. For our game, we decided on a low poly VR game based in a petrol station, where you play as a sales assistant who must identify a criminal as more customers come into the shop. There will be a wanted poster beside the player and CCTV cameras to identify a shop lifter. The group created a Miro board and added internal, external, UI, prop, and character designs.
My main role was the Rigger/Animator, and my minor roles were 3D modeller and visual effects.