ANIMATION STRATEGIES – ASSIGNMENT 2 – ANIMATION
For this assignment we were tasked with creating three biped animations in 2D or 3D, using animation techniques and principles we had learned previously. The animations were a walk cycle, run cycle and body mechanics animation.
WALK CYCLE:
For my walk cycle, I wanted to animate a character with an obvious and exaggerated mood or personality. I really enjoyed the idea of an angry walk cycle with stomping feet and energy, so I decide to use that as my starting point.
Character Design References:
I wanted to use the character Bakugo Katsuki from the anime My Hero Academia for my character walk cycle as he is characterised as a very angry, grouchy individual and I thought that this would be a fun personality and emotion to attempt in this walk cycle.

I had to simplify elements of the characters outfit to make animating him more manageable, but his character is still intact.
Artist References:
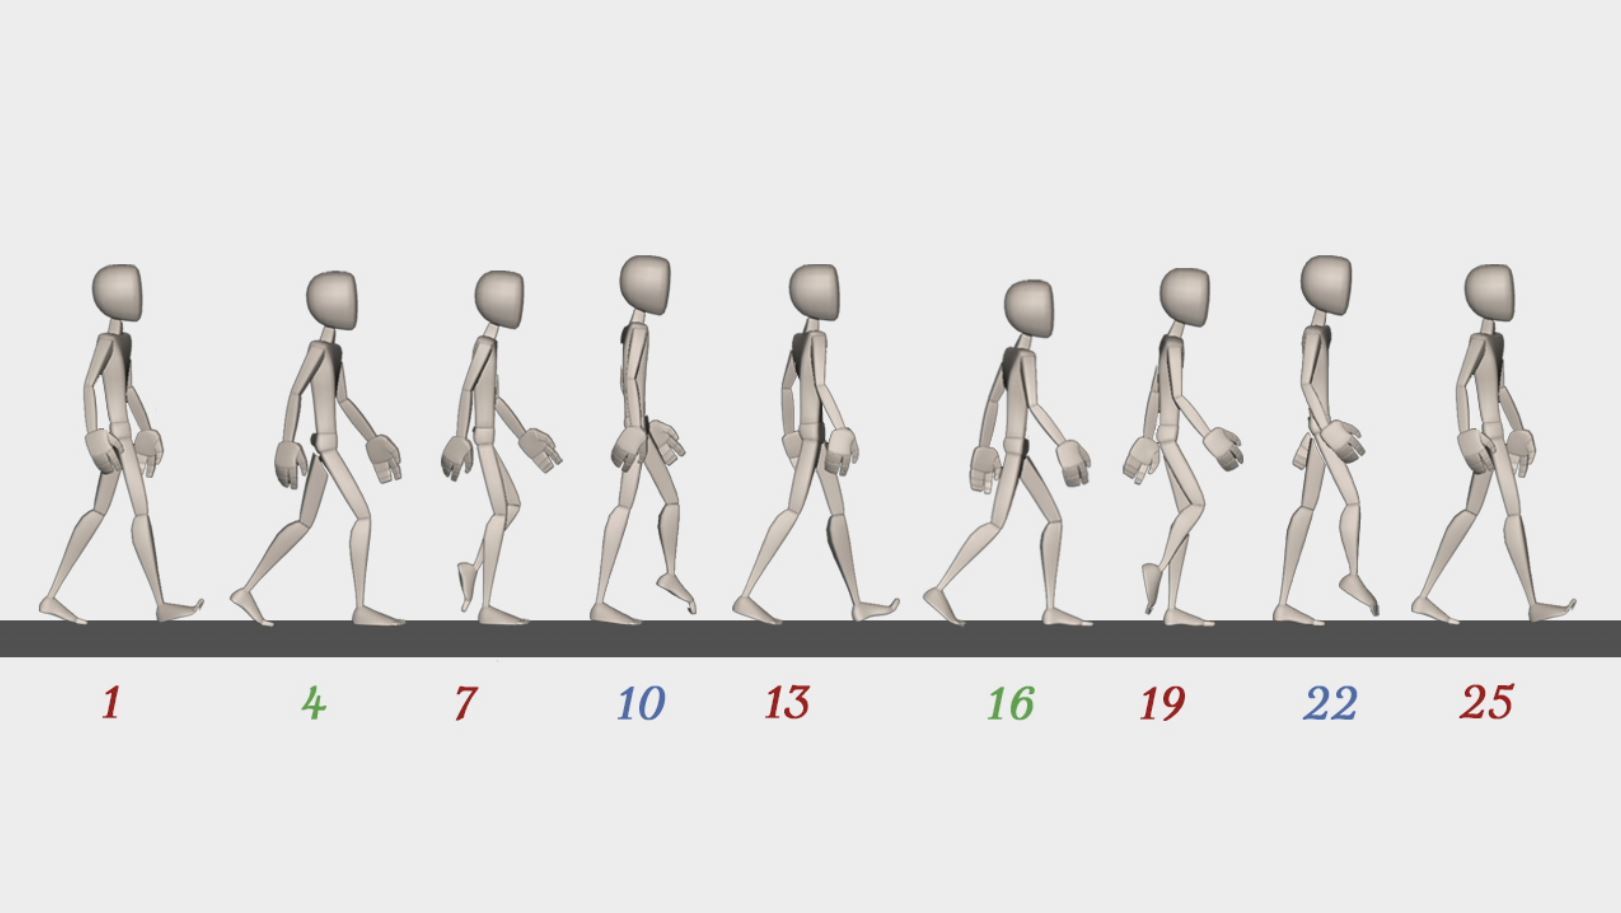
To begin my animation, I looked up guides on how to begin animating a walk cycle. I found the following guide on the website: Rusty Animator, which goes through the step by step process of creating a walk cycle:
The guides tells you how to begin a walk cycle by starting with key poses and tells you what to focus on. It also gave a very helpful image showing each key frame pose that I then could use as a guide for my walk cycle:
I also found the following tutorial on Walking Tips by Sydney Rouse, which explains the importance of using the whole body to walk rather than just the legs, and adding character through how each body part moves:
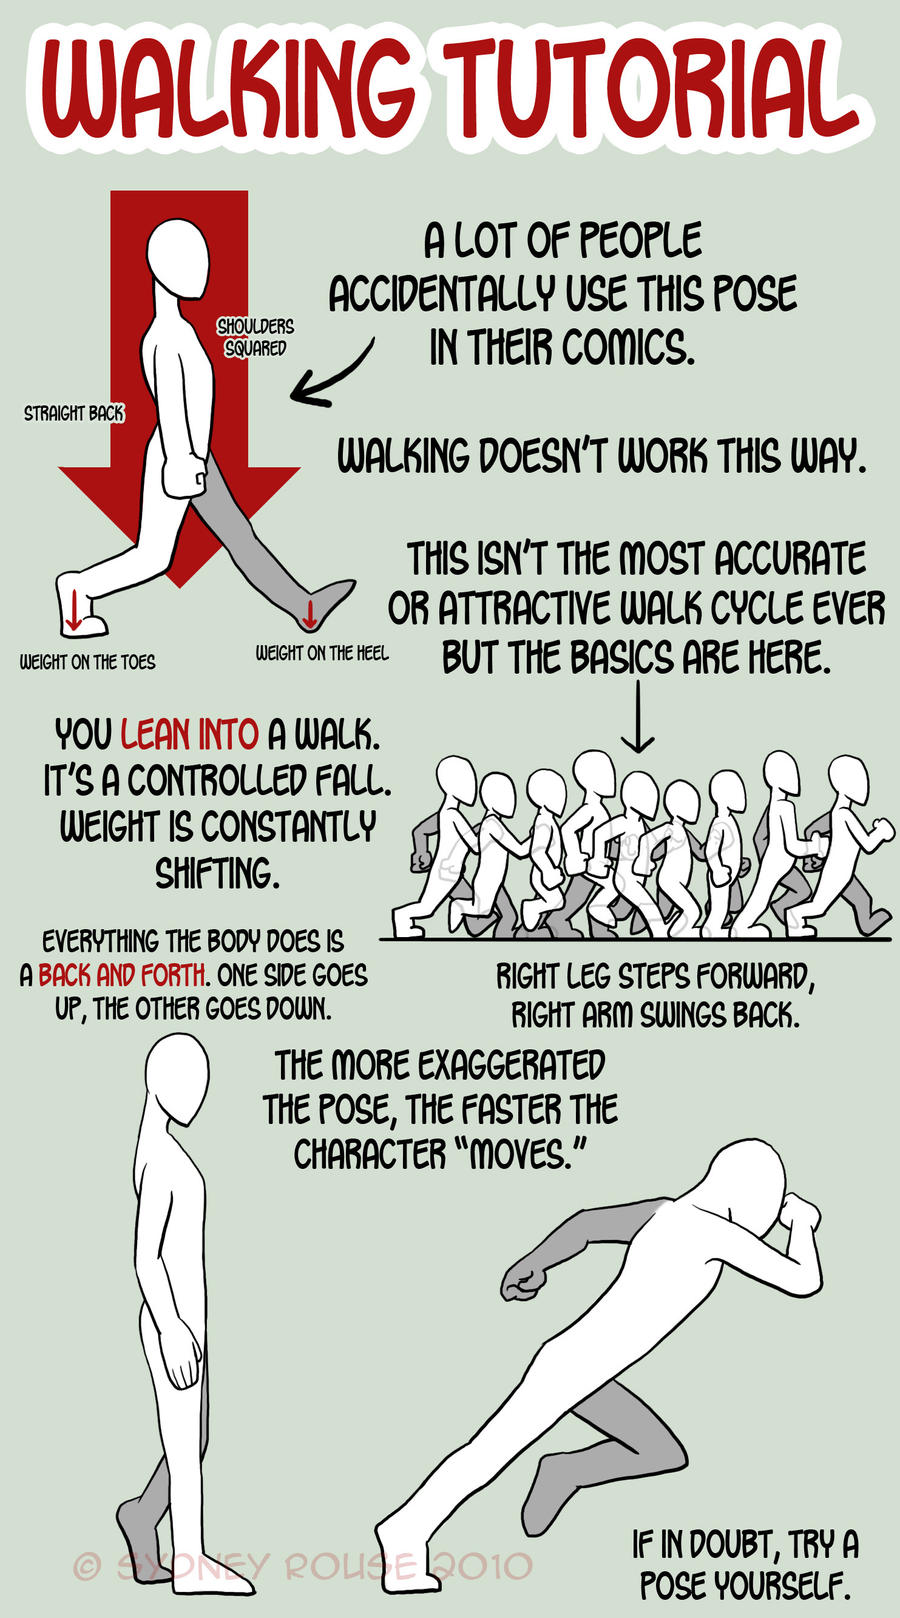
This tutorial also helped reinforce when Alec taught us in class about focusing on the shoulders, torso, pelvis and spine positions in our initial poses as these will affect the way the whole body moves in our animations. I found this particularly helpful when starting my animation by having my character be hunching forward angrily while walking.
I also was heavily influenced by the character walk and run animations from Disney’s Robin Hood (1973), specifically Milt Kahl’s who character walk cycles include so much personality and charm to them in only the movements:
Each character in the film gets their own particular walk cycle that is unique to them and their personality. I have always been inspired by this and so I set out to try and do this also in my animation.
Other walk cycle references I looked at:
When animating, I was particularly inspired and using as reference the following angry walk animations:
This 2D animation walk cycle has a lot of character and fluidity in its motion. I wanted to try and mimic these as well as the strong swing of the arms and arch of the shoulders forward. I think this animation has a lot of character and personality that I was very influenced by.
This 3D animated walk cycle has a really effective grasp on weight and the emotion of the walk. The character stomps and moves very determinedly, which I also wanted to recreate in my animation.
I also looked at the similar animation work of animator Brian Lim who had animated the same character doing a walk cycle, however in much more detail than I aimed to accomplish:
Brian Lim’s blog post displaying his animation and showing his lineart and colour for the animation separately really helped me understand the process and outcome I was aiming to achieve when creating my walk cycle animation.
Another walk cycle of Brian Lim’s that I looked at as a reference:
ANIMATION PROCESS:
When I began animating, I used the Animators Survival Kit by Richard Williams as an initial reference to figure out how to begin animating my walk cycle and what the rough key frames would be:

I began drawing up the key frames on my iPad in order to get a better idea of the body movements and how each frame would appear when making it animated.


These tests really helped me to see where to begin structuring my animation and how a normal walk cycle flows.
I started animating by using my references and this test animation to create a rough animation of the kind of movement I wanted. I altered the basic walk cycle to have more of a heavy step and for the arch of the back and shoulders to come forward so the character is hunched. I also wanted the arms to have more of an angry, deliberate swing to them.

I needed to edit more of the body through trial and error to get the arms and hand placements looking more correct:

I then showed the following animation to my lecturer and classmates in uni and they let me know that the way the arms moved was sort of irregular and needed fixing and that the walk was too normal to be angry, and that I needed more of a stomp. After hearing this advice it became clear to me what I needed to update and fix in the animation.
Following this advice, I decided to alter the basic walk formula I followed so the personality and emotion would appear more. I changed the timing, altered the arm movement and spacing, as well as altering the way the feet fall into more of a stomp, which then dramatically changed the attitude of the walk. It was definitely more angry and emotive as well as like the character which I was really happy with.

As I was happy with this rough sketch, I could then clean up and line my animation, whilst also adding a bit of secondary movement to the hair. This came out really nicely.

FINAL ANIMATION:

Overall I am happy with my walk cycle animation, as I believe I have done an effective job in showing the movement of the character and also making the character have an angry walk to make it more unique to the character and give the animation more emotion. I think I could have been a bit more precise with the arm movements as well as body proportions, and I also think I should have added more in betweens to make the animation more fluid and smooth.
RUN CYCLE:
For my run cycle, I wanted to create an energetic and sporty running animation. I decided to use the character Midoriya Izuku from My Hero Academia because he is often running to help and save people so I thought it would be a fun animation to do!
Character Design References:

I also had to simplify parts of this characters outfit for this animation in order to make the deadline, however I might edit the animation later to improve it and include these small details.
Artist References:
When gathering references, I looked at animated films and TV series’ that had walk and run cycles that inspired me. This included the Disney animated Film Robin Hood (1973) which has a whole sequence at the beginning of the film dedicated to walk and run cycles particular to certain characters and their personalities:
I wanted to try and mimic this in my run cycle and walk cycle, as stated previously.
I also looked at the run cycles of Spiderman: Into the Spiderverse, which have very unique run cycles for each of the main characters that coordinates with their personality. I found the following animation by Tony SH Yeom who used a Mile Morales model rig and created a run cycle using this, which I found as a very helpful reference for my run cycle: https://creativedisciplinary.artstation.com/projects/dOVk4X
Miles’ run is significant to his character as he is meant to be sporty and “run better than he swings”. I wanted to capture a similar style and character in my run cycle.
I really liked the movement and style of Julien Perron’s run cycle animation below and was inspired to do something similar in my animation. The arm movement and sketchy, but mostly fluid, style is what really influenced me.
I also really like the speed and power from Inbal Breda’s character’s run cycle here, as well as the hair bounce:
I also looked at Chuustar’s rough animated run cycle: https://www.deviantart.com/chuustar/art/Run-WIP-280772452
and the following animation I found that focused on the animation of a walk cycle, but mainly gave a very helpful preview of how I could animate a scarf’s and secondary animation: 
I also looked at this run cycle made by Lauren Sassen (Losassen on Social Media) who created a sketchy animation of the same character. I really liked their arm movements and how the characters hair and hood bounced! I wanted to aim to include these elements in my animation also.
https://losassen.tumblr.com/post/149139390933
ANIMATION PROCESS:
Similarly to my Walk Cycle, for my Run Cycle I again looked at The Animator’s Survival Kit in order to undertand the initial key poses to begin with and how to create a basic walk cycle.


I again, used this as a warm up exercise to practice at doing a run cycle and see how the body moves:


This then enabled me to use this as a basic reference and begin my own animation, following a very similar pattern. I sketched out a rough thumbnail animation to capture the basic movement I wanted the body to have:

When I was satisfied with this, I could then draw over the top of this animation and then include clothes, hair and rough character details to get a preview of what the final animation would look like.

After I was happy with the body movement and saw the character’s personality coming through, I could then focus on secondary animation such as the jacket, scarf and hair.
Admittedly, I would have like to have animated these secondary items more accurately, however they gave the desired effect.

When I was done with the sketch layer, I could then clean up and line the whole animation. There are small details I would have like to include if I had had more time, however I am very happy with the outcome. After this, all I had to do was colour each frame.

FINAL ANIMATION:

I am pretty happy with this final animation because I think the legs move quite nicely and the foreground arm has a nice swing. I would have like to improve on secondary animation details like the hair and scarf, as well as include more minute details, however these were not imperative at the time. Shading would have made it look much nicer also, and I want to add this and a moving background in the future to fully complete the animation for my portfolio.
BODY MECHANICS ANIMATION:
When thinking of ideas on what to make my body mechanics animation, I wanted to do a skateboard trick. I started with the concept for just animating an ollie, and using my previously mentioned YouTube reference primarily. However, later I wanted to include a push to get the character moving before the ollie.
Character Design References:
For this animation I animated the character Reki Kyan from Sk8 the Infinity, who appropriately, skateboards and I thought would be fun to animate!
Here are the character design references I used of him:


I left out the complicated designs of his hoodie and skateboard for ease of animating.
Artist References:
Initially, when finding references to use, I looked at real life skating videos and tutorials on YouTube.
I found this video incredibly helpful for understanding the body movement and getting key poses of a jump and ollie trick on a skateboard. This video was my primary reference for this body mechanic animation.
These videos also helped me as references to understand how the body moves:

Then I wanted to see how people animated skateboarding in 2D to make it stylised and more fluid.
An Extremely Goofy Movie – Skating Around Campus Scene:
The Amazing World of Gumball – Skateboarding
I found these really helpful in learning how I could go about animating skateboarding but also making it exaggerated and expressive. I wanted to maybe follow one of these styles, but simplified for my animation.
I also looked at the actual anime Sk8 the Infinity and how it animates skateboarding:
I found these helpful for my animation as the anime explains how to do it and shows the characters doing the tricks!
I was also helped by the tutorials and animations of Toniko Pantoja who shares tips about animating. In particular, he shared a tutorial about adding smears in animation which I thought would give my animation an added bit of character and fluidity.

I also found a really nice timelapse video on how to create a skating animating using Photoshop and AfterEffects by rigging a 2D character. This was really helpful to watch for pose reference tips and to maybe use in the future.
The artwork of Gabriel Iumazark on Deviantart was also very helpful in figuring out the key poses of the jump:

https://www.deviantart.com/iumazark/art/Ska-Nollieflip-512268438
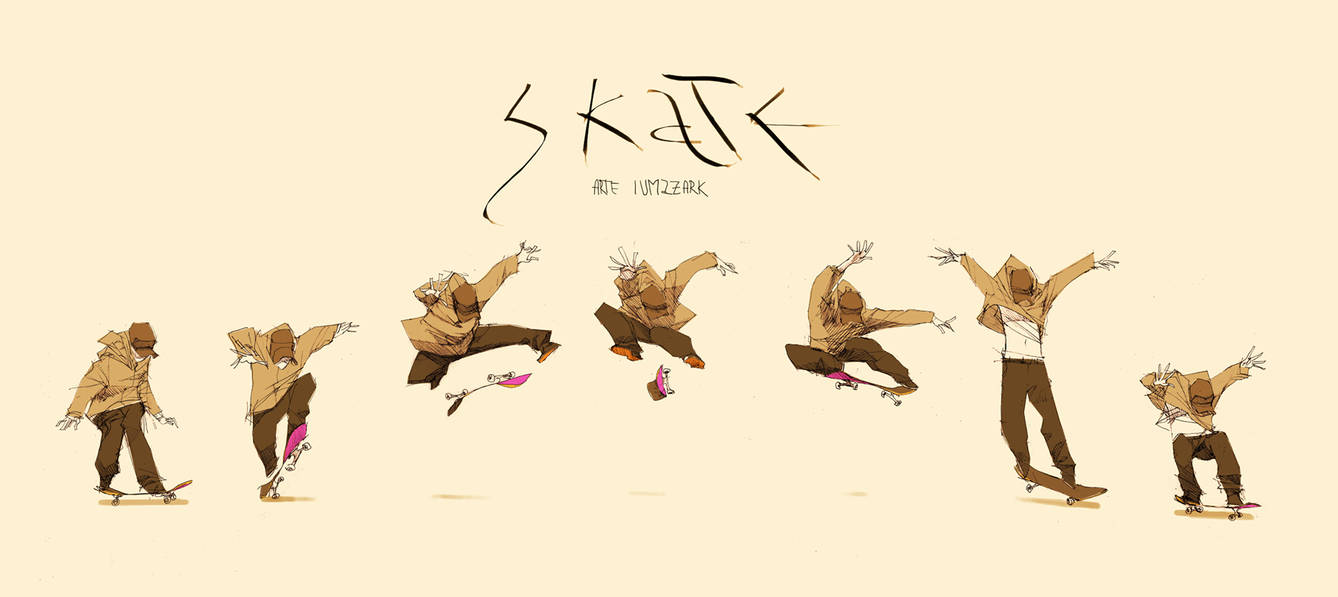
https://www.deviantart.com/iumazark/art/Skate-490843793
and similarly Puba24‘s skateboarding art:

https://www.artstation.com/artwork/P3Vnn
ANIMATION PROCESS:
When we were going over the final animation in class, we were tasked with creating key frames for the body mechanics animation to understand how effective a good key frame is for an animation and how long it takes. I began by looking at sports body movements, specifically and blocking them out:


I liked the idea of creating a volleyball animation however, I then thought of skateboard trick poses that could be effective in an animation. I found a reference image to use and a rig for Link from the Legend of Zelda series that I then positioned into an ollie pose:


I was really interested in creating my body mechanics in 3D however I knew I would not have time before the Christmas holidays to use to the university computers to do so. However, this did give me my first practice and look at skateboarding poses.
I decided that for my body mechanics animation that I wanted to do an ollie skateboard trick in 2D and I found these references and theres loads of tutorials/videos on youtube for it
I wanted to begin my animation by first thumb-nailing out my movement using my video and animation references of skateboarding and ollies like animator Takafumi Hori (porigoshi):
— 堀 剛史 Takafumi Hori (@porigoshi) June 23, 2019
My primary animated reference for this animation was 3D artist and Motion designer Nguyen Nhut’s 3D animation of a person skateboarding and then doing a kick flip:

This animation really helped me see a stylised animation of a push and skateboard jump trick that I could then reference for my own animation. The squash and stretch of this 3D animation was really inspiring, and the end wobble also influenced my characters landing at the end of the animation.
My Thumbnail:


I was able to show this to my classmates on Discord who were able to let me know that it was moving okay
I then sketched out the motion over this:

I considered adding another trick to make it longer and more complicated such as animating an ollie and then having a flip of catching the skateboard at end. However, I found it easier to animated a cycle that could start with a cruising skateboard sequence and then have the ollie, the character catches themselves, wobbling, then resuming the sequence.
 At this point I was running low on time before the deadline so I decided to use this sketch layer as my line art layer and colour each frame in, somewhat cleaning up as I went. I was unable to fully shade and colour this animation in the end, however I completed it quite well.
FINAL ANIMATION:

I am really happy with how this animation turned out as I really like the motions I was creating and adding exaggerations to make the animation more visually effective. I would have like to have been more prepared and time sensitive when creating this animation as the frame-by-frame colouring took very long and in the end I did not have enough time to give the character cleaned up line-art. I also feel that I could have added another trick or the character picking up their skateboard in order to add a bit more body mechanic movement to study.
—–
OneDrive Animation Files: https://ulster-my.sharepoint.com/:f:/g/personal/maciver-u_ulster_ac_uk/Eu40l1vMjKFMszX7BGnXy-MB2iAdfimJlPiuj0VdVQRPYw?e=8iKuqq
To create all three animations, I used Procreate on my iPad. I would have liked to have tried one 3D animation for one of the prompts however, I do not have a PC and could not get back to university over the Christmas Holidays. In the future, I would be very interested in practicing animating more using 3D software. I also would like to learn how to animate using ToonBoom or RoughAnimate also.
Overall, I am quite happy with my three final animations, however I would have liked to have planned the animations well in advance so I would have had time to shade all three and include animated backgrounds to give the effect of them all moving. In the future I plan to make these changes and use them in my portfolio as I believe these display my knowledge of animation and body motions nicely, and I think with minor changes and additions they could be very effective.