
During this week, we began to practice more with 3D animation. Below is a video of my outcome from using the ultimate walker, in which I had chosen to do a relatively simple jump. At first, doing this was difficult as I tried to roughly sketch out the anticipation sequence using the grease pencil tool, which was deemed to be difficult to translate into the model. I did have some issues with the grease pencil as it kept showing in my animation after I hid it- which was extremely frustrating. I ended up resolving this issue eventually by resetting Maya’s animation settings to default. Additionally, I added a sphere into the scene and moved this to the grease sketch’s motion, which aided me in making the final action. The outcome itself wasn’t the best as the timing was slightly off and some of the ultimate walker’s limbs looked unnatural. However, I will give myself the benefit of the doubt, as this is something I am completely new to and it’s definitely an area needing practice. Although this ended up being somewhat of a failure, I will take the experience and determination gained here to improve towards my future work.
Grease Pencil tool experimentation:
Final playblast of ultimate walker:
Afternoon sessions: Exercise – 01 – Parent Rig
Below is a simple parent rig setup that I have performed as an outcome of our first-afternoon exercise. In this, I was required to learn the basics of parenting and how this can help do simple animations. This one that I have done would most likely be used for previs work as it is far too simple and lacking to be a final mode. Despite this, this lesson was extremely helpful to my understanding of how parenting works in Maya, and I will further put this knowledge to use for future pre-production work. Ultimately, I found this task to be relatively easy and there were no issues in the process of parenting these objects.
Exercise – 02 – Control Rig
Underneath, I have experimented with my outcome of the control rig. This type of rigging was a bit more difficult and complex in comparison to the parent rig method. This is due to how there was a process of parent and scale constraints involved. In addition, NURBS curves were required to be constrained in order to control the objects easier. Although this process was slightly more challenging and more steps were involved, the outcome was far more desirable in comparison to the previous exercise. It is more flexible and therefore professional-looking, making it better to use for final models.
Adding more flexibility…
Exercise – 03 – Robot Control Rig
Here is a sped-up video of my rigging process with Exercise 3. After learning more about rigging from the exercises prior, this task was fairly straightforward and quite simple to do. Moreover, in the video, you can see me rigging each finger to make the model move naturally in sync. I had difficulty near the end of this video as I got confused about how I would attach the palm to the bottom of the fingers- doing this would allow the palm to be the hiechary of the fingers. I think the reason I got so confused is that I was working for a long period of time without break, which meant I got burnt out halfway through this exercise. Before this lesson, I was unsure how to go about rigging arm/hand joints, and doing this exercise, has taught me that it is much easier than initially thought to be. Ultimately, I will take what I have learned here and put it towards my future studies.
Tom the cat rig practice
Below is a pre-rigged model that was modeled and rigged by Artem Dubina and the character itself belongs to Warner Bros. I decided that the theme of this model would involve the character being scared of something and I feel as though I accomplished this reasonably well. The timing could be much better, and the anticipation is lacking, however, as a first-time animating emotion through body language and facial expressions, I don’t think this outcome was too bad. Furthermore, the model itself was really well made, having controls for almost everything including the eye pupils and tongue. Looking at how smooth and professional this model looks inspires me to continue to improve with my modeling/rigging skills. In the future, I aspire to get to this level of experience in order to improve the quality of my work and style.
Screenshots of the model’s controls
Here are some images for further reference

FRONT VIEW

BACK VIEW
Link to Tom model: https://agora.community/assets
Summarizing my aims for week 8
Next week, I aim to begin working on my upcoming assignment titled, ‘Assignment 2 – Animation Studies’. For this assignment, I will be required to make two animations from pre-rigged models. I am required to choose one out of two, which includes the Monty Rig and Ultimate Walker models. The first animation has to be a study of weight and body mechanics and the second is to manipulate body language to convey an emotional reaction. At the moment, I am nervous about how I will go about this, and if I will have a sufficient amount of time in order to get everything completed to a high standard. In order to reassure myself, I am going to dedicate next week to get a start with this task, which will mean I will have a decent amount of time to get into the production of this assignment.
Initial research
Here is a video that I watched in preparation to help me in understanding the importance of body language. The reason why I decided to look into this is due to how the models for our assignment have no facial features, therefore depend solely on body language. This video was particularly informative as it goes into thorough detail about how animators can use the body to convey a scene. Moreover, I really enjoyed this video and will attempt to get into a routine of using the tips in which he mentioned in the video.
Note-taking
- Poses can communicate emotion – e.g. if someone is relaxed, their body language will be more laid back as opposed to anger which would be tenser in poise.
- Focal length- important! The more depth of field, the more dynamic the shot will be.
- Hands are very expressive and can play a huge role in body language.
Artist reference
At the moment, I’ve been very inspired by the work of Cliff Nordberg for his use of expression through body language. Below are some examples of his sketches which really put into perspective what his style and work look like. I feel as though this image in particular could be helpful to reference as it focuses more so on the body rather than the facial features of the character. Therefore, when I am making my storyboards next week, I will think more about how Nordberg uses body language as an attempt to incorporate similar techniques into my animation studies.


With this image, it is the same as above, although I have removed the face of this character. By doing this, it has allowed me to analyze more on the body language which is drawn here. From the way that Nordberg has created these sketches, they are still readable by emotion. In fact, they seem to have more emotion now in comparison to the original image. From my observations, Nordberg has specifically used the hands as the main way to convey the mood of the characters- e.g. angry poses a clenched fist, and happy has cheerful open hands. This is extremely effective, and I will definitely take this into account for future animations. Although the model I will be using doesn’t have hands, I will try and make up for this by focusing on the torso and legs to portray the scene. In the future, I feel that I will continue looking into Nordberg’s work as I adore his body of work, especially his character designs.
Research into books: Richard Williams- The Animator’s Survival Kit


Above, I have looked into a book reference titled, ‘The Animator’s Survival Kit’ by Richard Williams. Moreover, I picked these specific pages as they go into detail about how to improve expression with both facial features and body language. Reading these pages and observing the diagrams, has given me more of a visual understanding of how expressions can convey intent and thought. In one of the pages, it mentions pantomimes and silent movies. Depending on my time constraints, I may investigate these types of productions in order to analyze body language, thus becoming more experienced with motion and anticipation.

Here is another page that I found valuable to my research. This page has given me a lot of decent information to making a figure jump more realistically and to enhance anticipation. I especially like how the narrative has added extra frames like the one that is before the frame of contact. Adding the feature of having one foot up and the other point down exaggerates the jump and weight of the character, and this seems to be more effective in comparison to the first set of frames at the top of this page. Ultimately, I plan to take some of these techniques to make my final animation more believable and easier to read.
Putting these techniques into practice
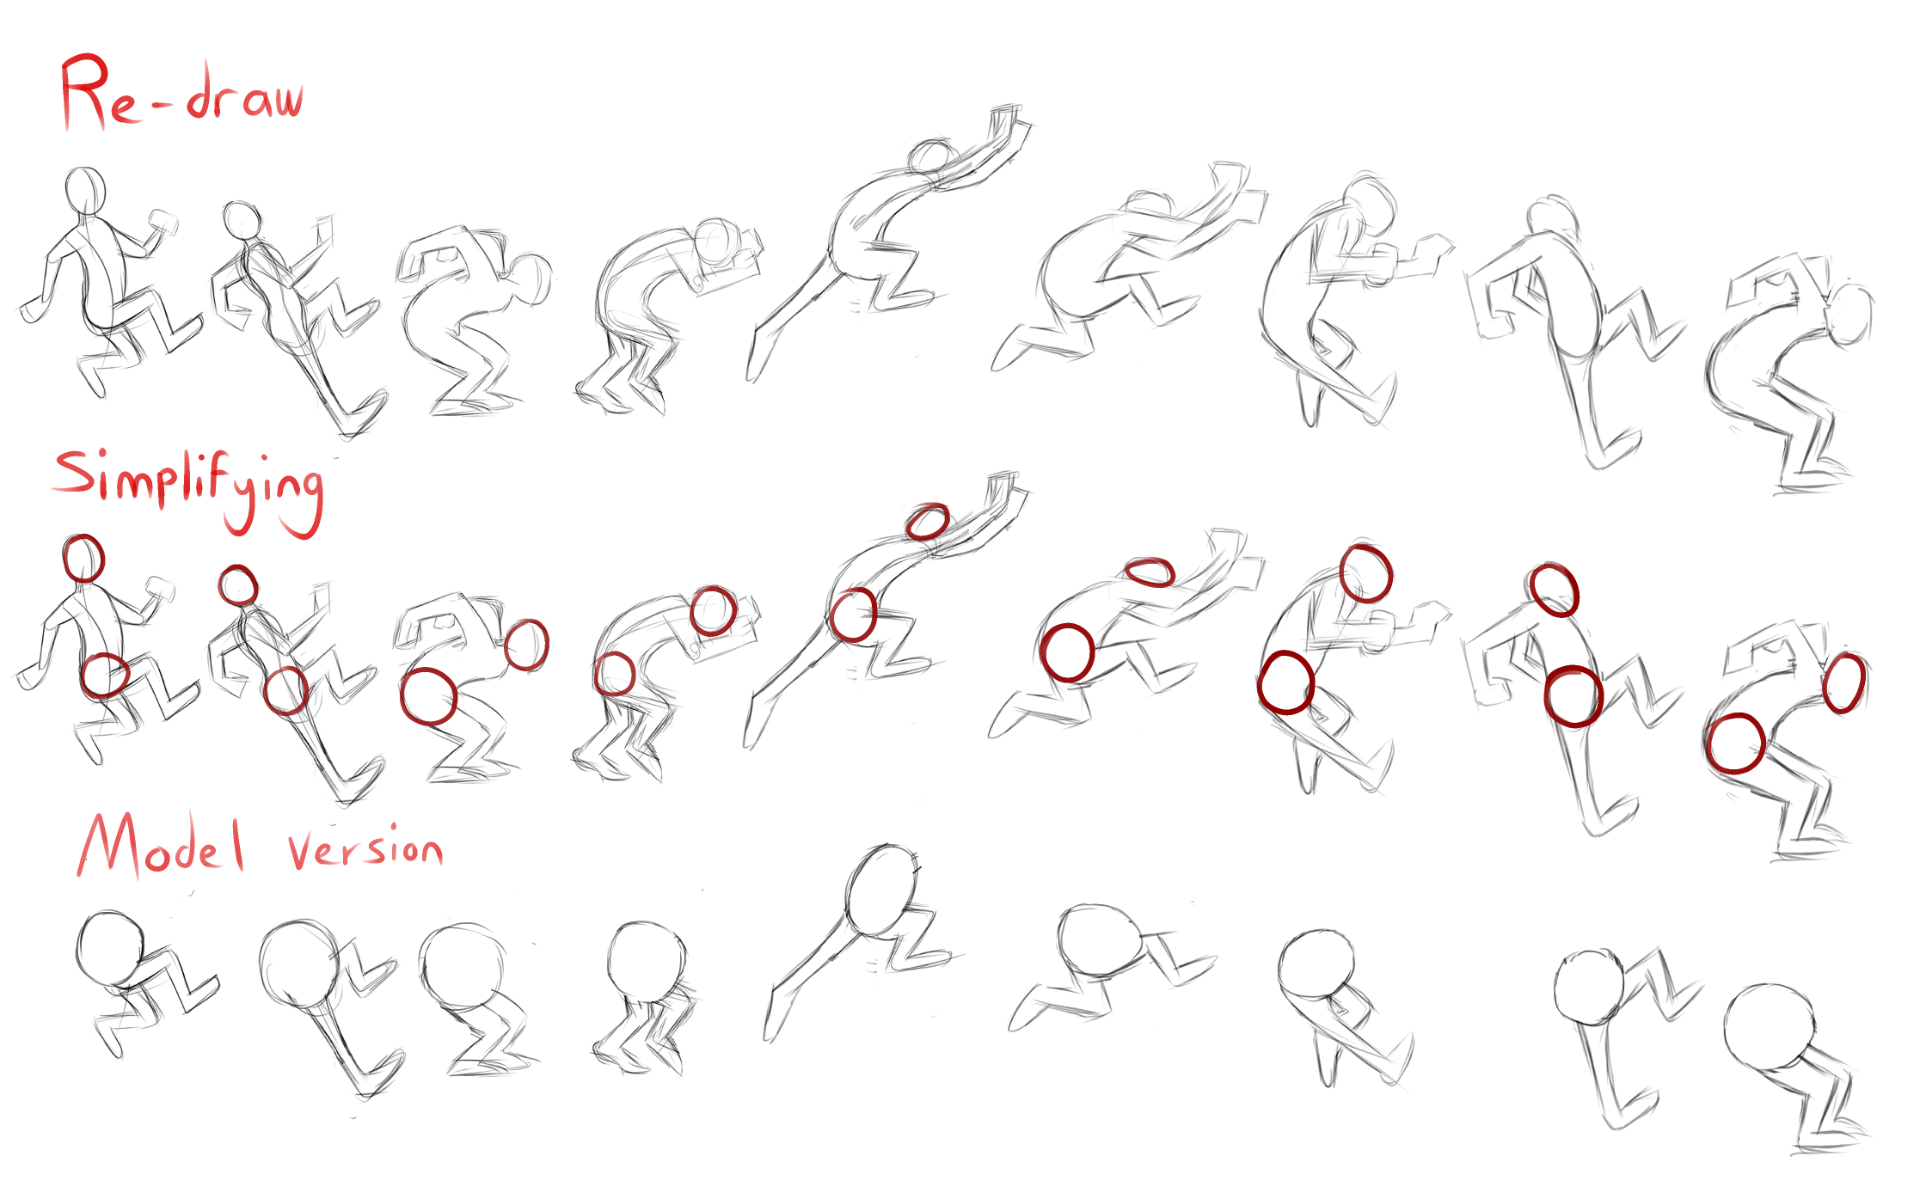
Here, I decided to put what I have learned from the previous book reference about anticipation and weight and re-drew the cycle displayed. This allowed me to understand how to put this cross visually, and in addition, I added a simplified and model version. The simplified cycle was done in order to understand how the body moves and I did this by imagining the two important parts of the body as bouncing balls. This method further makes it easier to understand flexibility and movement, even more so with jump cycles. The model version is the same as the other two, only I replaced the torso with the head alike the model that I will be using. By doing this, it has given me a rough idea of what the model will look like when doing this action. Ultimately, I will use what I have learned here to use towards my studies- I feel as though the anticipation, leaning and weight advice will benefit me greatly in the long term.
Animation short: Mouse for sale
This is one of the recent animations I have looked at for inspiration. Although the models aren’t similar to the ones I’ll be animating, the emotions and body language here is the main reason why I have chosen to mention this short. Its use of expressions is really unique, especially since the mouse doesn’t have much to convey this with.
Notes I’ve taken from this short:
- Anger – close up eye twitch and charge at source
- Sad – lowered head, slow walk, eyes half shut, ears down
- Excited/happy– jumping side to side, ears up, hopping
- Curious– head tilt, ear twitch