During this week we presented another weekly presentation, we found solutions to problems that greatly helped our progression, and are still aiming for some more models produced.
We presented our new updates to the class and got some feedback on our timeline progression, and other small details about our work. Our main goal was to keep producing models, and bring them into UE as soon as possible. This would greatly improve the engagement in our game while people playtest our progress, and better for us to tell the narrative and give players things to look at and objectives to complete. Though at this time there some to no communication from the modellers in our team, so it is very difficult to get to this point right now.
In the meantime, parts like the players arms/animation, ballpit, and UI design has been produced this week. I had continued working on fixing the geometry of the walls and floors. However, teammate Patrick found a solution.
He found a video on ‘World position materials’. This is a technique within UE that helps to ‘project’ textures onto a mesh based on the world position, like axis x and y. This meant that I did not have to continue on with fixing the geometry for most of the floors and walls in our game! Patrick and I learnt how to use this set up and I applied the rest of my textures so far into the game this way.
Source:
We used a UV scale to scale up or down our materials, and a mask parameter to change the different ways the position would face on an object. So there were around 2-3 instances of a material for each wall to have a uniform projection. It was a matter of guessing which instance fit which wall going around the level. When they didn’t fit, they would appear lined and stretched like below.


The technique worked very well for all my textures. Tiled textures that we had trouble with before such as the toy store floor was able to tile properly this way.

For some shapes in the ball pit room, there were rounded shapes that act as the pit for the balls. Applying the ‘water’ floor was tricky at first but in some cases, it looks like small waterfalls.

And for the rest of the textures, such as the brick, worked very well too. It was able to merge together with opposite sided walls just how I envisioned it.
Next I added in my mural decals from a couple weeks ago. I imported them as they were, made a material for structuring it into decals, and made instances each image.

My mural decals fit very well inside the rooms themed for them. The Toytopia mural can repeat along some walls and appear once or twice on other walls. It looks great and adds to the balance of the color scheme of yellows and cyans.


My swamp mural is placed in the big play area inside the ball pit room. It is placed once on two walls and lines up well with each other as I made it so it would repeat along. It fits very well and definitely gives the kid play area visual I was thinking of.
I created some additional decals for around the game made for detail to narration, theme visuals, and guidance for navigation. I produced bloody hands, swamp trees, and bear footprints.


Here I had made tree decals for decorating the ball pit room, sticking to the theme and art style of the mural I painted. I made four variations and will be placing them all around the walls of the room. It could help with filling up space, and enhancing both the room theme and kid imagination.


Next I painted the bloody handprints. I was hoping these would provide more of a scarier vibrance to the game as it is quite jolly and kid-looking at the moment. This would be great to place around walls for the player to investigate, and lead them on the right track.

Lastly I painted bear footprints. We are hoping the enemy bear will be walking around (or patrolling) the warehouse at some point in the gameplay, so I though footprints would indicate the bear is close, or walking to a destination the player has to go through. I made reference of Simas’ bear model to look at the shape of the feet, and painted the shape of the foot from there.
Since these images are transparent In the background, they are added differently into UE. They require an alpha map to distinguish the texture and the background from each other. The white means to show, and black means to hide.

After this, I took on the task of texturing James’ arm models.

I helped James with his arm rig to UV it in a proper way. This UV will help me to texture correctly on Substance Painter.
I got a bit of help from this YouTube video. The video helped with observing skin image references, and starting from scratch how to paint skin.
Source:
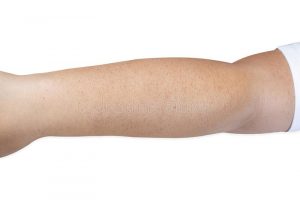

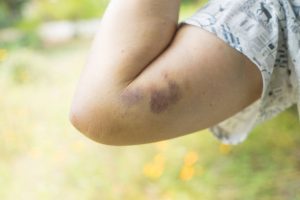
I used these images for reference on what the arm for the child should look like. We were going for a freckly arm, with cuts and bruises – to tell narrative that this kid may get bullied.
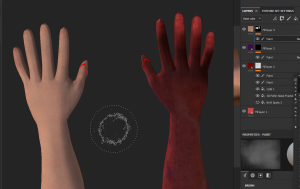
Following the tutorial, I started with a red base on the arms, as our arms/skin have a tint of red on them. I added a top layer of a skin colour and painted it on manually, so tints of red can show from below. I also made an additional layer to paint more redness around the fingers and knuckles.

I used multiple layers of noise textures and dark tones, blended them together in the way I preferred, and got some rough textured freckles on the arm
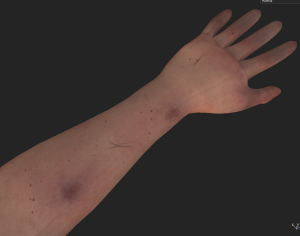
With my reference, I painted on bruises and cuts on the arm. The bruises consisted of a purple like base, with redness in the middle. I used a thin paint brush to paint on scratches and cuts around the arm too.


Lastly, I added a pair of plasters onto the arm to again add to the idea the kid gets bullied and beaten up that they have to cover their cuts in plasters.
Finally I exported the textures with the unreal engine export package. The arms look great when imported into UE.

We have our next presentation coming up on Monday for week 10. I will be showing my texturing process and adding my materials to the game.