During week 6-7 of the vertical slice project, we made some strong rules within the group to keep our work concise, my teammates made progress with the UE blockout, continuing to produce models, and working to properly adjust our work to an art style.
In our meeting on Tuesday, we agreed on making our workflow a lot more controlled and collaborative as we acknowledged our team progress was falling out of place. I set up a google drive for each modeller to upload their finished model asset, so we can all take a look at them, and see what needs adjusting – considering the topology, geometry, and any UV mistakes. Simas will be completely in charge of art direction, and wants each modeller to contact him first before making a model, so it can stay concise to the art style we are going for. In addition, Simas is creating a style sheet for us to look over while we work on our respective asset progress. These decisions will hopefully get us back on track and communicative again and as a result make a consistent visual look to our game.
This week I continued both my roles of environment layout and texturing. This Monday we had our studies advice, though next Monday we are able to present our updates again.
For my environment layout, I started making a clear view and structure of the maze room so that it is easy to replicate into UE. I used Patrick’s map design concept of the maze room to block out the layout first of all.

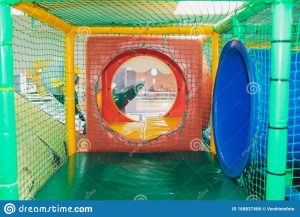

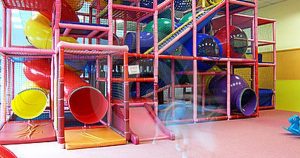
In one of our discussions on discord, we agreed we would like to capture this type of ‘play area tunnel’ for the maze. I used these references to plan out the maze In a clear layout. I made two references for the group to use. One is for where the toys inside will be placed, and another is the directions of where the player will get around the maze.


From here we were able to present our work again. We included all our work from the previous weeks we missed but summarised our progress the best we could. The group added in their work consisting of blockout, UI design, modelling and concepts for toys. I added in my environment layout progress, and my texturing progress. I mostly talked about how the layouts will help to picture where props can be placed for visual design and interactions, and how to navigate around these rooms. I mentioned for the textures how I will be organising which textures will pair with each other for each room, and how I made use of the substance UE plugin to add my work into the engine.
Our main feedback from our presentation this week is that the modelling process needs to be more organised, and to be producing quicker. After the presentation we started remaking our asset list into groups of models to be made by one person, so that for each room/each toy asset etc. can be made in a similar style. We encouraged the whole team, who are modellers, to assign themselves to a group of models and to make them in a faster pace.

We also made an animation list and scripting list in the same table format for those in the scripting and animation roles to organise their tasks easily too.

When this was done, I got to work with making additional textures for rooms I have missed, such as the walls for the Toy store, floor for bathroom and more.

This time I wanted my workflow to be more organised, instead of producing many textures that may not be used. I sorted on Miro Board a layout for what textures are going to be for which rooms floor and wall. This week I had finished up the Toy store rooms textures, the bathroom, and the warehouse.
I changed up most of my textures that will help fit into the art direction style sheets, for the themes of some rooms. I Started with the toy store, which is going for a marble tiled floor and a yellow wall, with cyan coloured accents all around.
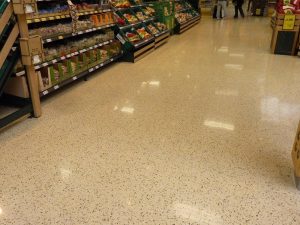

The art director was looking for a floor design much like these references. So I got to work recreating the style on Substance Designer. I used the tile sampler to get the tiles and plugged them into the suitable places, then tried out masking the same tile sampler to block out a different colour tile in the middle of the pattern.
 Again this was one of my own designs, just with help from tutorials of how to do mask tiling.
I am getting more confident and experimental with this program which is great for making better quality textures, and using this as a skill for the future.

 Next I changed up the blue solid wall texture I made before but changed the colour to cyan to fit with the toy store theme. This could possibly be used for upstairs, or for a minor wall detail. I also updated the yellow wall around this time.
 I redid the bathroom tiles with a different node for a better looking effect. I made use of a node called brick generator, and adjusted the settings so it could replicate the bevelled design of the tile.

I remade the warehouse floor as last time when I uploaded it into UE, it looked too glossy, and the detail could not be seen. I added a tile node, some grunge maps to add to albedo detail. I also turned up the roughness settings so the glossiness should be less prominent.

I did try out a wood material from one video, but I did not like my outcome, so I tried again with help from a different wood material tutorial. This tutorial helped to grasp the idea of the brick generator, and the technique to capturing the knots and detail on wood with directional warp, and many noise textures. I used my own settings in some parts and referenced back to pictures of rooms with dark wood for the colour.
Source:

Lastly, I updated the tiled stone floor as I thought the smaller tiles were too repetitive and did not look well. I made the tile as big as each plane so the tile would repeat in a bigger scale, and is able to show more of the detail.
From discussions with the art director and looking at the new style sheets, I have been designing painted murals for a couple rooms of the game. These included the swamp/forest themed ball pit room, and the castle themed accent on the toy store walls. I will try using these as decals inside UE to place on the walls.


Simas suggested I could create a mural of a an illustrated swamp from this reference photo. So I collected some illustrated paintings of swamps to get inspiration, and got to work.

I started off with painting a landscape, some trees and foliage in greyscale so I can see what the foreground/background can look like. Though later on I noticed the landscape goes upwards the further back it gets, I would like the background assets to be more visible.

My next draft of the greyscale looked much better. I can now see a good proportion of the trees from the front and back, and can see the sky a lot better too.
I continued on with this painting and added colour. I stuck to a muted green colour scheme with hints of greenish-brown, and a dark purple for the foliage to stand out.
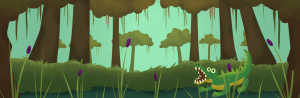
Next I wanted to add the crocodile to the painting, as the crocodile enemy will be present where this painting will be placed. Here it looked quite off from the background, so I will change up the look.

Now I have illustrated the crocodile swimming in the water, and added a bird flying across the sky. I like how this is looking, and decided to add a few more animals.
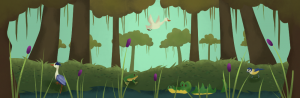
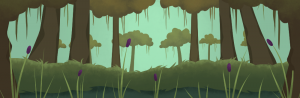
This is my finished painting, with a few more animals. I made sure they were positioned well, and they had a consistent visual look that fit well in the background.

Next I took on the toytopia castle mural. I collected some references to help me out. I used the image of the leaves to help with my colour scheme, and the murals to help capture inspiration for a castle mural.

In my first draft I was experimenting with the blockout of the buildings, and the different shapes it could have. Also shaping out a good structure of the castle for the middle.

Here I finished the blocking out, and painted the buildings in a nice gradient look. I added the windows and doors as well, following my colour scheme image.

Lastly I added clouds to the background, and fixed up any other details I missed along the way.
This Monday coming is our first play testing of the class’ games. We will be fixing up our game, ready to be presented and take time to look at everyone else’s games too.