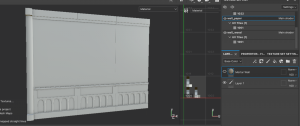
I have started modelling and planning the structure of the walls of the mansion. This is an important modular set to start with so we can build the layout of the rooms first then it will be easier to add the furniture parts after.
I placed down a human scale mannequin from Maya’s contents into the scene, and put in simple cube polygons to make a wall, the low part being the wood paneling, and the high part being wallpaper. I discussed with my team during class and we agreed we wanted to make the walls quite high for us to display lots on the wall, and produce the angular and spooky look we want.
I made three different wall modular assets. one as a singular wall, and two separate corner walls.


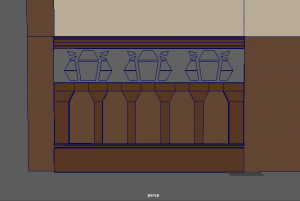
When taking reference from Alisa’s room concepts, and many housing reference such as the image below, I wanted to create some nice wood panel design to enhance the antique/victorian mansion look.


Here are a few parts I modelled. I added pillars, skirting board design, and details at the top. However, this was quite difficult to model, as I came across non-manifold geometry.
The images below show that I modelled this design separate, then used boolean – difference on a plain cube. This created non-manifold geometry, because the shapes contained more than four faces in the geometry. I tried my best to cleanup the model and add some edge loops, but it did not fix the solution.
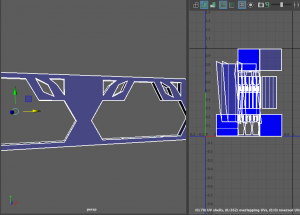

I did try to do this again with shapes that were only four sides to try avoid the problem however I still could not find a good solution.

During this time I also assigned each part a material to keep it together. One Lambert material for the wallpaper, one for the wall wood, and one for the wood paneling.
After presenting this problem to my group we discussed this and decided I should go a different route. I decided to replace this part with a border. Matthew also suggested I could recreate the detail above for when I get to substance painter – designing the texture. I could use the height option to allow the detail to stick out like how the wood panelling is. So as of now this is what the wall looks like.


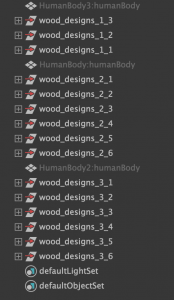
After this, I made a few more adjustments to the walls such as giving more structure and build to the side pillar of the wall. My outliner as this point, is sorted into groups. I had three separate walls, and around 3-6 wood design groups for each wall.
I started UV editing each model as I was able to optimise their maps, now that the geometry is fixed. I started with the back walls as they are the easiest to cleanup. They were cut in the right place and were simple to layout on the UV map. Next I worked on the wood details as they needed some more focus on. I made sure to cut and sew the seams in a suitable way, and optimise them in a good position. Lastly I worked on the side pillar as it was a little more complicated, but worked a similar way to the walls.


 At one point I was happy with how the model was looking so I created three different versions of the walls. One on its own, and two different corner walls.
However, after week 5 I had shown my progress to tutors/teammates and I figured some more work needed to be done to make this assets structure better.

Me and the group discussed about the room walls and we decided we wanted to go for more irregular shaping in the wall itself / more wonkiness. So I went back into the Maya scene and replaced the corner wall versions with three singular walls for me to work on.


I used the lattice tool on these three walls to warp the wall in different angles. I made it different for each wall so there are variety in the pattern. As soon as I was finished with the lattice tool I selected it, then deleted its history, so that the warped part on the wall would stay as that shape.

I went back to check the hypershade to fix up the assigned materials, as there were some duplicates. I assigned back the original materials to what it was, then I deleted the other materials. I also checked on the UV maps of each of the walls. I cleaned up the detail wood mostly as some parts were flipped over/not cut right etc.
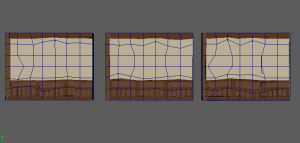
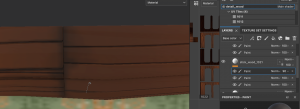
 After this the models were done (apart from a few adjustments I make later). So I exported each model as an fbx. I uploaded the straight singular wall into Substance painter on 2048 resolution, and UV workflow maps turned on. Here It is as I baked the mesh maps.
I was happy with the model apart from the subtle lines that appear on the middle of the wall, where the wallpaper is being placed. I tried the wallpaper on to see if I preferred it but I did not. – The wallpaper does not overlap over the line but the line cuts it right through, so it doesn’t pattern all the way through. I went back into Maya to change this.

I separated each of the wall models and swapped the 3-split wall with a full wall – the size of there three parts combined. Here is what it looked like after I swapped these parts.

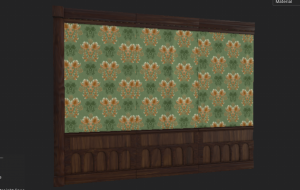
I set up a Substance painter file again and added the fbx. I placed down the wallpaper and I was much happier with this outcome. To get an idea of colours and looks I had also placed down temporary wood materials.

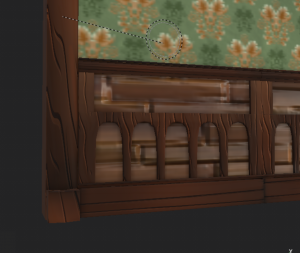
Since this model is a UDIM, I was able to space out the parts of the model for different materials. Here I am applying wood materials but In separate areas so that the wood material I am using will maintain its size that fits right for the shape.

Using Matthew’s wood materials I was able to add a variety to distinguish the back part of the wall, from the front. This made it look more unique and busy. I also used the same technique I did with the Grandfather clock and used paint layers to paint on contrasting colours, highlights and shadows onto the wood to give it more vibrance and depth.
I worked carefully on the edges of the wood material to give that wood look. I had collected a few references to help me with this look.


I used some reference of real wood to picture how the tones/value of the wood looks. I tried to capture how it is dark on the edges/sides of the wood, vibrant around the middle, and lighter at the top part of the wood.


I also collected existing wood materials made on substance etc. to find how other artist have gone about this. They also have that same idea I am going for with dark-edges, light-middle. They also experiment with scratches and dents in their work, which I could explore.

After going through these references, I was liking how my wood planks were looking.

After some more adjustments this would have been the finished look of the wall. I also wanted to bring this same design onto the other walls also so I combined my layers of materials/textures/paintings and made them a Smart material.

I started bringing all my smart materials onto the three wonky walls. They fit on well apart from small areas such as the shadow lines on the pillar, and the detail wood planks whens took up/down. I was able to adjust the painted parts fairly easily.
And this is the finished model and texture of the room walls! They were challenging to make especially at the start of the process, where I changed up the structure of the wall multiple times. I really liked designing the wallpaper and painting on the vibrants, highlights and shadows on the wood. This is a very important asset for the Haunted Mansion as it Is what builds the environment.

In addition to creating this model, I came across a problem relating to the degenerate tangents and almost zero bi normals in the mesh of the asset. This error came about in both Unreal Engine and Substance Painter. To tackle this problem, I visited my model back in Maya. I noticed the original pillar design was quite difficult to arrange on the UV editor. I did have a spare pillar design that was a simpler mesh, that I replaced with the original pillar, on each wall. This model was easier to UV map and still fit well with the wall.
Although, this still did not fix the problem. I asked my tutor Henry, about the situation. He inspected the model and suggested I should look about a few clean up options before I export my FBX. This included deleting the history,
This all eventually fixed the issue. I was able to redo my textures on substance Painter without the error, and import my models into Unreal Engine with ease.