
Staff
Ideas:
I immediately wanted to play around with the idea of contrasts. Combining two contrasting elements together in order to create a visually significant idea. The first idea I ended up with had me hooked off the get go.

I ended up contrasting nature, with machinery. I found this super interesting. I Loved how the crooked shape of the stick, clashed with the uniform layout of the metal. I also intertwined the two elements together with a vine, made out of chain-link. This was immediately the basis of what I knew I wanted to develop for this project.
-Flower Development

I started to imagine what the flower centre piece could look like by experimenting with colours, shapes and textures. The more I experimented, the more I wanted to lean towards other nature elements. So, I then decided to try out other possible nature ideas we could use as a centre piece. And found that a glowing rock/crystal shape, demanded your attention most as a viewer.
-Metal pieces development

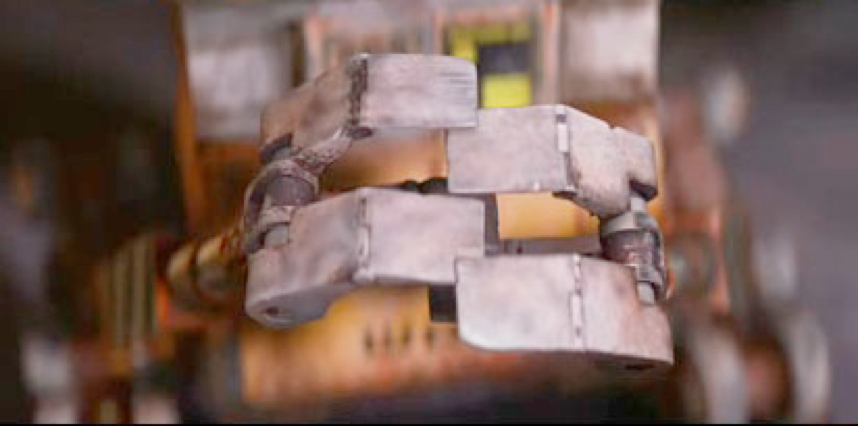
When experimenting with the metal fingers, I wanted to simplify the shapes to make them more visually appealing. I think I succeeded in this front, the shape is far easier to read, and feels much more blocky and less organic. Adding to the contrast. However I also wanted to get more in-depth with the functionality of the metal fingers, adding bolts and holes where the pieces would connect together. I knew this was going to be the most challenging part of the modelling process. So giving myself a clear plan was in hindsight very useful, as it meant no time was wasted when modelling. And I could plan ahead of time more effectively.
-Crystal & Metal Fingers

I ended up replacing the jagged crystal shape with a perfect sphere. I thought that the contrast between the complex but organised Fingers and the organic nature of the stick, would both equally contrast to the perfect shape of the ball. I hope to further exaggerate this contrast through textures later on.
References:
WALL-E – Wall-e’s hands ended up being what I used as my reference when modelling the metal fingers, Obviously the overall shape isn’t the exact same, but this reference was a very useful find as it gave me more of an opportunity to visualize my model somewhat.
Stick: This image was the closest I could find to the shape of stick I wanted. This reference came in most useful when looking at the ins and outs of the organic flow of the shape. The bends in the wood and such added so much in terms of making my stick look more real.

Getting started
I began with modelling the stick. To do this I added a cylinder and increased its height. Then began to add variations to the overall shape, in order to make it look more, stick like.

For instance rounding off edges, thinning and widening certain areas, ruining faces, along with moving sections of the stick in various directions. Again to make it appear like more of an organic imperfect shape as well as keeping it in accordance to my original design. Over the course of modelling various small adjustments are made to the stick, such as its height is changed to allow more emphasis on the metal as well as it being even more misshapen to further in keep with the original design.


I began to add the nobbly bit to the stick, and ran into some issues with engons and triangles while doing so. I was able to fix this problem after some time however. Overall, learning how to overcome this issue proved really useful, as I learned a lot of shortcuts from it, that would later prove invaluable in saving time on this project.
Modelling Metal Fingers
This was by far the most challenging part of my staff to model, as it is quite an intricate shape for me, with a lot of small details.

For instance when adding the holes for the bolts to go through, I originally used the bevel tool. This resulted in me having a lot of challenging engons to try and fix. Which took ages. 
I later learned in one on one talks, a much more reliable way of creating the holes I needed. By laying out the vertices using the multicut tool, then deleting the required faces and circularizing the vertices. This meant there were much less engons to fix after words. resulting in a much cleaner work flow. Overall I’m really happy with the visual of actually seeing the hole the bolt slots into. I also really like how if you adjust the pivot points it actually pivots on the bolt. I think it looks really cool, and was worth the work.


I also cut some early time down by utilising the duplicate special tool. Which allowed me to work on each side of the finger at the same time. This was unbelievably useful for dealing with engons. However this caused problems further down the line which I will discuss.
Once the fingers were completely finished I created a group and duplicated them four times, placing them were they needed to be on the stick model.


Chains
The chains were really fun to do, experimenting with wrapping them around the model and making them look weighted and real was a welcome challenge.


UVs
When I originally started to try unfolding the UVs, It gave me a 3D processing error. This ended up being a very easy fix, but the search for how to fix it took a long time.
It turned out if I simply tried using a different option to select unfold. Maya would allow me to unfold without an issue. It was only when I used the modify dropdown window to unfold. That it would show me the error.
Making the UVs
The UVs ended up taking a very long time, as I was confused by them at first. However I wanted to learn them. I tried my best to create useable UV maps of objects which made sense. And although they took a long a time to learn to do. Eventually I understood the premise, and was confident with organising them.


These took a really long time to do, as it was. However when doing them, many complications arose in regards with my previous workflow. One of these complications was the issue of UV mapping the chains. Since going back and UV mapping each one would take forever. I decided to create an entirely new chainlink, in order to correctly UV map it on its own.

Then I duplicated each of the new correctly mapped chains over each of the old chains, and once the old chains were completely replicated I deleted them.

Finished chain

Substance Painter
I completely finished my UV mapping and was ready to export into substance painter. However when I did export I noticed a problem.

This brings me back to the problem I believe I was facing with duplicate special. Because as a consequence of using it, it reversed my left fingers normals. Of course, this is an easy fix looking back. But me being a not so smart person, I didn’t know this. I thought it was an issue with geometry. So instead of just doing what I later learned, clicking the left finger and reversing the normals. I instead deleted the left finger, duplicated the right finger and inverted it. Which when I imported into Substance did nothing to help my case. I decided to look up a solution which was to reverse the normals. And after doing this the model now looked ready to go.
Website: https://knowledge.autodesk.com/support/maya/learn-explore/caas/CloudHelp/cloudhelp/2020/ENU/Maya-Modeling/files/GUID-17593923-D94D-4A8D-AE09-FA4E98FEA197-htm.html – How to reverse normals

I think Maya is tricky to learn when it comes to stuff like this, and I’m happy I made this mistake because now I’ve learned from it.
Texturing

Here’s my first attempt at assigning smart materials to my staff, I think it looks super great. However I found an error related to my UV mapping.
So I went back into Maya and adjusted the UVs accordingly.

This consequently fixed the area with stretched textures

My idea for assigning the materials was pretty straight forward. I chose the material which looked most like a stick, and did the same for the metals. Making sure they looked rusted and aged. However I wanted to further compliment the contrast of the balls perfectly round simple shape, with the staffs irregular organic shape, using the materials. And so I assigned the ball a shiny glistening marble with this in mind.
After that, I played around with a few other materials. I added a few bolts into the top of the staff as well as a nail under the floating ball. I also experimented with adding weathering effects to make the staff seem further old and withered.
Then, I exported the model and textures into sketchfab.
Finished Model: https://skfb.ly/6Zyyt
Reflection:
Overall I’m really proud of the finished design, I definitely feel as if I achieved my original goal. I’ve learned so much about Maya as a program, comparing how alien 3D work felt just 4 months ago. It’s crazy to think how much of it I feel I actually now understand. I’m really happy with the progress I’ve made not only in understanding the software but also in learning from past mistakes.
Many of the tasks I did in this assignment took a long time, and that was mostly a consequence of my knowledge of Maya as a beginner. If I was to restart this project, I would associate my workflow to be more innkeeping with some of the issues that presented themselves later on. Such as the chain UV map issue and the alternative Bevel tool technique. Therefore, I could cut a lot of the wasted time off.
Being able to notice and understand this wasted time shows me how much I’ve actually learned, not only in terms of understanding Maya as a software but also in regards to understanding 3D workflows.