
Research on my character
 Our task for this course was to develop a character or creature and set them on a stage we made. I started brainstorming any potential ideas on what my character will be and I settled on having it based on cryptids. I looked up on the internet on the most well-known cryptids such as “Bigfoot” and “The Loch Ness Monster” but I decided to have my character be based on the Mothman.
 I researched any information I can find about the Mothman, I even did a rough sketch based on its statue in West Virginia and made notes about it’s appearance. This is so I can use the knowledge I’ve compiled and make my creature based on the Mothman’s attributes.
Notes on the Mothman:
![]()
 Initially, I had a hard time trying to figure out how to get the Mothman to fly as I wanted to keep the trait of it being human-sized bipedal creature. I researched if it was possible for an average human-sized creature to fly and most of the results that pop up said that it’s impossible or would need to have heavy evolutionary adaptations. One article even states that “if humans developed wings, the wingspan for an average male adult would need to be no less than 6.7 meters (-22feet). In some cases, a wingspan of 9 meters (-300 feet) would be needed, especially for carrying a heavy load” and the main drawback from having large wings on the back is that they might drag along the ground when folded up.
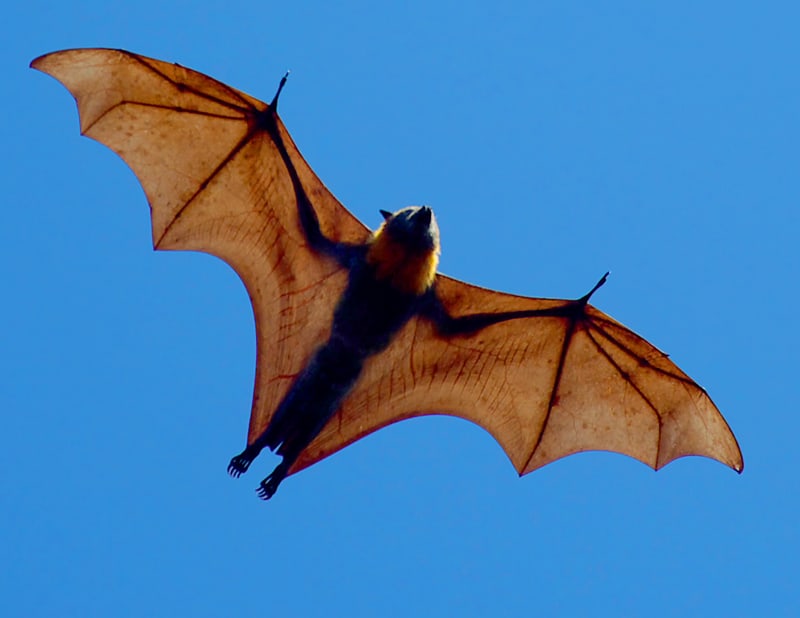
I was stuck as I wasn’t sure how I can logically explain how the Mothman would able to fly if it was a real creature. However, I discovered that one of the ideas for creature adapted for aerial behaviour would be developing “skin membrane”. I looked up what that is and found that it’s a part of the body anatomy of bat wings. After learning this knowledge, I switched the wings of my creature to be bat wings as bats evolved to have their arms to be their wings, which was benifical as it allowed for more flexibility and made them better flyers than birds.  Overtime, I started to like the idea of the Mothman being just a giant bat that was mistaken for what it was, leading to the cryptid we all know today. It also helped that a lot of the traits of the Mothman could be somewhat seen on bats, especially the West Virginia statue’s depiction of it. i.e. the bulging eyes could be bat eyes, the chest hair could be fur tuffs as their fur is most prominent on their torsos, and the muscular build could be explained as the creature needing it to be able to carry it’s weight and fly as bats are one of the mammals that could actually fly.
I ended up taking the “Fantastic Beasts and where to find them” approach on how they depicted their mythical monsters; creatures with traits or abilities that loosely resemble their mythical counterparts, and created a concept design of what I think my Mothman should look like and explained why a giant bat is the Mothman was because of it’s pitch-black skin and combined with it being active at night, people had a hard time seeing it and mistook it for a giant moth.

 One of the most defining features of the Mothman was its glowing red eyes and decided that the explanation to this was that it was eye shine due to it being a nocturnal creature. It’s also confirmed that different animals can have their colour of eye shine be in a different colour so it’s possible for my creature to have red glowing eyes.
Character profile:


Development of the mothman
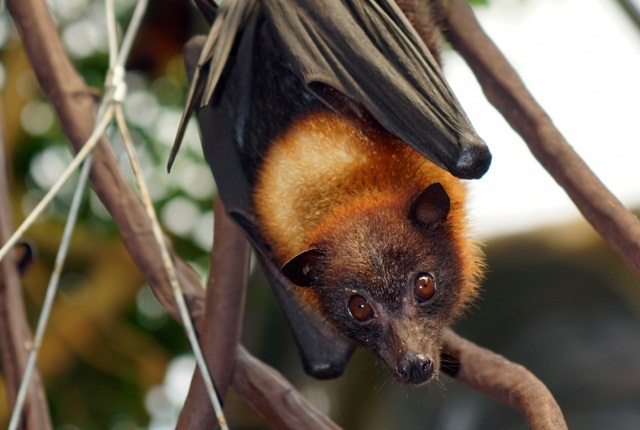
I based the creature’s design on vampire bats, with the giant crowned flying fox bat being my main inspiration as it’s the closest creature that perfectly resembles the image of my creature’s appearance. I also had to look at the crawling positions of vampire bats to understand how my creature will move.
Design References:


The first Mothman design:


The design of my creature was well received but my tutor, Henry, told me to add more colours, other than black, to the design. That way it will look more appealing and won’t face any issues during the later stages of development. I decided to have the inner wing membrane be a different colour as the main inspiration had it’s inner wing membrane in a brighter colour. I created six different types of colour palettes for the wings and Type 4 was most liked as it made my creature look scary and fitted with the overall night theme. I also decided to use Type 5’s pale white colouring for the wing fingers to give colour variety to my creature’s design.

Development on the final design of the Mothman:


Creating the Mothman model
I started creating my model by blocking out the basic shapes of my creature in Blender. I focused on one side of the reference as the design was slightly uneven. However, I was able to offset this by applying the “Mirror” modifier on the mesh, which mirrored the limbs and ears. Further revisions of my model had the legs rotated to face forward as they might have an issue whenever I’ll start posing my model.


Sculpting my model:

I had issues with the feet, especially the toes. To fix this, I added cylinders to the model, clicked “remesh” and used the “inflate”, “snake hook”, and “move” tool to give the toes more mass.

When sculpting the model I started to dislike the design. The wings felt a bit too small and the tail looked weird and got in the way of sculpting the legs. I was contemplating on either continuing to sculpt my model or remodel my block-out model to make sculpting smoother but was able to fix it by using the “snake hook” tool to extend the wingspan’s size to be bigger and reposition the tail to be at the back. I also had to sculpt the thumbs to be straight as I found out I can create custom brushes later on in development, which I will use to make claws and fur tufts.


 I fully retopologized the body but I struggled with the wings, having to constantly redo the previous retopology on the wings just to see if it looks right. I had to play around with the “multiresolution” modifier and turn of “In Front” in the object options to see if retopology planes are overlaid on the wings. After continuous repeats I decided to separate the retopology of the body and wings and ask for help from Henry on how to retopologize the wings and he outlined an image on where I should extrude the retopology from.

Full retopologized model:

While marking seams for UV mapping, I found an exploit, which is if I use a “Mirror” modifier, “mark seams” on the retopology and apply the modifier the marked seams will be mirrored as well, saving time and convenience. The downside is that I have to do this before I apply the modifier so I had to un-apply the mirror modifier previously used to get this to work.


Creating custom VDM brushes for fur tufts and claws
 I decided to create custom brushes to make the fur tufts as I felt that it would help add details without editing too much of the model. I decided to create the claws for the thumbs and toes first. I created them by using a plane, used the “snake hook” tool in sculpt mode, “appended” the VDM brush image provided in Blackboard, changed the render settings to be in the right settings, baked the materials, saved the image into my laptop’s desktop, and imported it into my Mothman Blender file.
However, something when wrong. When I tried to use the VDM brush the claws weren’t appearing, despite being set up correctly. I was unsure what was going on so I asked our tutor, Henry, for help and he discovered that the “Vector Displacement”, which is needed, isn’t available in my current version of Blender so I had to download the current version, 3.5, just to fix the issue. Once I ticked the checkbox on the vector displacement, the VDM brush started to work properly this time.


On the other hand, I struggled creating fur tufts for my creature as I wasn’t sure how to make it look like it’s fur. I tried a couple techniques I thought could make one and references from other sculpted models but the end results always didn’t even look presentable nor appealing to me; either they looked too flat like a scale or too bloated that it resembles a tumour than fur tufts. I even tried drawing lines and smoothing them out but it made the body look rough and ugly.
Types of experimental “fur tufts”:


Eventually, I was able to fix this by increasing the “hardness” of the VDM brushes so that when I use the brush the viewers are able to tell that it’s a fur tuft. Next, I used the “snake hook” tool and the move tool to extend the tips of the fur to make them puffy and 3d.


There was an issue with the armature as anytime I try to move in into my model the y and z axis of my armature were affected. My tutors can’t figure out why this happens so they told me to use the transform settings when extruding my armatures.

Eventually I found that the problem was that “snapping” was on, which affected the armature’s location placement, which was weird as the tutorials in Blackboard about posing models had it turned on but I just concluded that it was probably a version difference as I was using version 3.5.


Finished armatures:

After adding the fur tufts on the chest, pelvis, and the shoulder pads I decided I wasted too much time on the fur tufts and just left it as it is, feeling that adding more would ruin the presentation of my creature. During the development of my VDM brushes I made separate UV maps where I reorganized my UVs into different sections, each being where the body parts will be textured based on my design reference. I did this to make it easier to texture my model and add details or changes to my model when I export my model’s FBX file into Substance 3D Painter.


Posing my model:


Texturing the Mothman
Before I added textures to my model, Substance 3D Painter wasn’t working. Turns out, I haven’t provided a payment method for the software, preventing me from accessing it. This resulted in me having to go through the hassle of trying to add a payment method for the software. After it was resolved, I was able to access it. Unfortunately, I later found out that I can get it for free by joining the Ulster Uni team when I log onto my Adobe Account, which I initially didn’t, meaning I did all of that for nothing and had to cancel the subscription in my personal Adobe account.
I learned in class that we can just add the textures in substance and add them into unreal engine, if we have the model for it. As such, we don’t have add the textures in blender and export it, saving time. I also learned that if we’re gonna pose the model it has to be done in Blender as you can’t pose the armatures in Unreal Engine and the textures will have to be separate from the posed model.
 When I imported the FBX file of my creature into Substance, the model didn’t look right; it had a high polygon than it should initially have and sections of the wings are missing. I asked one of my classmates about it and she told me that the “Multiresolution” modifier used in my model auto-applies when imported to Substance 3d Painter. To fix this, I had to turn down the multiresolution to decrease the high poly-count but kept it at 1 because I wanted the sculpted fur tufts and claws to be visible.

She also told me that the missing sections on the wings are inverted faces. She told me that to fix them I had to turn on “Face Orientation”, select all of the red faces, click on the “Mesh” tab, go to “Normals” and click “Flip” to flip the inverted faces. Afterwards, I exported it as an FBX file and once I imported it into Substance it finally showed up correctly.


Texturing my model took a lot of experimenting as I had to guess which textures closely resemble what textures I want. These textures include:
- Stone textures for the main body (made darker by adding a level layer and adjusting its settings, as well as changing the “normal” settings), along with a slightly altered lighter version of a stone texture for the fur tufts.
- Human skin that was coloured a lighter shade of grey for the feet, inner ears, and nose
- Vegetable skin, which had it’s colour changed to red and the veins altered to be opaque, for the inner wing membrane.
- And Bone for the claws and wing fingers.


While browsing through the materials, I discovered that there were actual fur textures which I used paint over the main body and the fur tufts. Then I experimented with the “Normal” map settings to give the texture brush a gradient fade from black to white whenever I paint near the tips of the fur tuft.

There were a few changes to the textures. I decided to change the back wing textures from the initial “Stone Slate” texture to a “Rubber” texture because it didn’t make sense for the wing membrane to have cracks and bumps. Another change was that I altered the lighter skin of the feet, inner ears, and nose to be a bit darker as I felt that they were too bright compared to the rest of the body and adjusted the “roughness” settings for every texture used as my tutor said it’s making my model too shiny. Lastly, I added a dirt texture for extra details.


Creating background for the Mothman in Unreal Engine
Using Unreal Engine for the first time was a nightmare. At the time, I spent way too long trying to make the fur tufts look puffy that by the time I was done I had three weeks left before the deadline and I haven’t made anything in Unreal due to my laptop not being powerful enough to run it smoothly so I was incredibly stressed. I had to go to school during the weekends so I can use the school’s computers to get started but even that was a hassle. The computers in our classroom were being used by other students so I had to use the computers in the other room next to our classroom but those computers didn’t have the current version of Unreal Engine, 5.3, installed so any files made won’t be compatible. We also had issues trying to get the software to work, even the classroom assistant, Adrien, had issues trying to get it to work. After 2 hours, we got Unreal Engine finally to start working.


I didn’t really know what type of scene I what to make in Unreal so I decided to sculpt a background and just played around with the brushes and tools until I got something that looks nice.

After I was satisfied with my scene I made custom texture brushes and used them to paint different textures on the sculpted landscape.


 Next, I had to add props like trees, rocks, or foliage in my landscape to make it look natural and alive. I imported some environment props into my Unreal Engine file, such as the props we used for our class exercises from Blackboard and a free spruce tree pack in the Epic Games Store, to make my scene look natural. I added multiple trees of different sizes, increasing their sizes to make them look bigger, and made custom foliage brushes in “foliage mode” to create grass to add detail to the floor. Lastly, I imported my posed model and the textures into my stage.

For the lighting, I rotated the sky lighting 180 degrees to create a night sky as I wanted to have my scene take place at night. Next, I tried making a moon but anytime I use a “directional light” it made the scene too bright. As a substitute, I added a sphere, applied a created custom texture that glows and moved it above the scene to create the moon. This process was repeated to create the glowing red eyes of my Mothman.


After I was finished, I took a high resolution screenshot in Unreal Engine and the result looked great. However, I wanted to do some post-editing in Adobe Photoshop to add more detail to the base image. Unfortunately, the lighting and world depth PNGs weren’t rendered properly, no matter how many times I retook the scene; all that’s seen is just a pure white image. I had to go to go to school and show Henry my Unreal Project to see what was the problem.
We couldn’t figure out the problem but we were somehow able to get a lighting PNG rendered. Using this, I was able to use Adobe Photoshop and create depth perception.
Developing final image in Photoshop:


 Knowing I couldn’t get the “world depth” PNG to render, I tried to substitute by using the “blur tool” on the mountains and sections of the trees, to make them blurry. This creates the illusion of depth perception and made the image look better.
Final result:

Overall, this course was stressful to complete but I did enjoy the final result of my work. I hope in the next semester I will be able to handle both course assignments in order to not rush completing one and the other later.