 I decided to use Blender to create my walk cycles, not because I wanted to but because I needed to find a way to catch up. This is because I had to take care of my younger brother during the weekends as my parents were working. Along with having to make a separate project for another Animation course ,”Character Creation”, I wasn’t able to have the time to start making my walk cycles. Thankfully, my dad wasn’t working after week 3 so I was able to begin my walk cycles onwards. To prevent myself from falling behind the workload, I decided to use the walk cycles I’ve done in my class exercises as we we’re allowed to use them for our walk cycles and, although unfinished, was able to get the beginning poses premade so I could just continue where I last left off and convert them into my own animation. The model I was using, Snow V2, also had the armatures premade so I didn’t have to worry about making a new model from scratch.
 During the development of my walk cycle, I had to turn the “FK/IK switch” for the arms’ off as I felt that it was hindering their movement range and flexibility, making the legs move unnaturally. I also had to look at a video of an “Athletic Male Standard Walk” just so I can get an understanding on how the waist and shoulders should move when walking and how high the body should be raised when they stand on their heels.
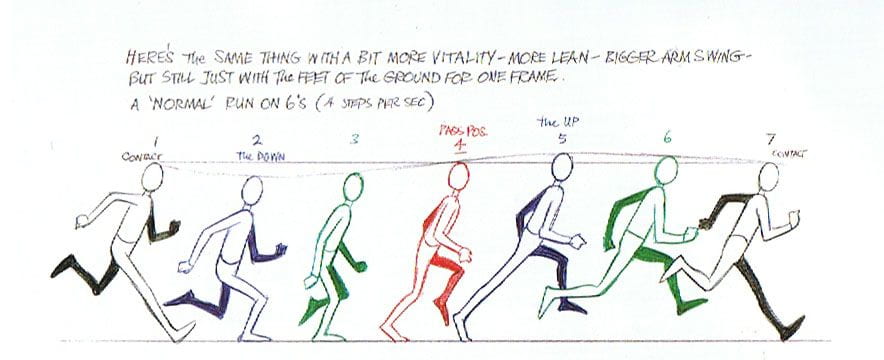
I also used this walk cycle reference sheet as visual reference on how the poses should look like:

When I was creating my walk cycle I have forgotten how to create keyframes and how to get the camera to switch perspectives, due to me not using Blender as much during the summer break. After asking my classmates or tutors for help and watching the previous year’s tutorial videos available on Blackboard I was able to remember how to do them. I can create keyframes for the poses by selecting the armature, pressing “i” on the keyboard, and apply “Location, Rotation, and Scale” while to get the camera to switch perspectives I had to select the camera view and pressing “Ctrl b” on the timeline.


 When I rendered my walk cycle into an Mp4 I didn’t realise that the textures weren’t applied to the model. As such, the model appeared purple. I asked my tutors about this and they told me that there was a zip file, included with the Snow model when I downloaded it, that contains the textures and I had to unzip the folder and re-apply every textures for their respective body part and clothing. However, the textures for the eyes and lips aren’t appearing despite the textures already being applied.

 I asked my tutors, Henry and Mike, about the issue as those two are knowledgeable on 3D software. We tried a few options to get the textures to show up from applying the textures in a PC instead of my laptop because we believed that the textures weren’t appearing due to my laptop not being powerful enough to render them and we tried adding a background light because they believed that the textures for the eyes aren’t showing because of eyeshine but none of them worked. This culminated in me having to send Henry the Blender file for my walk cycle, along with the textures, so he can take a look at the problem in his free time. Eventually, he found that the reason why the textures for the eyes and lips aren’t appearing was because the textures were missing. To fix this, I had to go to the “File” tab, go to “External Data” and click on “Find Missing Files” in order to get the textures to appear.
After the textures were applied I was able to render the first version of my walk cycle:
 I showed my walk cycles to my tutor to see if they’re ok. He told me that the legs needed to be fixed as they looked stretched when the model steps down or move too quickly when the model bends their knee. To fix this, I had to make the step position have the legs straight and lowered the waist to prevent the legs from being stretched. I also had to rework on the timing of the leg movements, something that took much longer to complete than I thought as I had almost completely retimed the entire walk animation to match the leg movements.
After I finished fixing the legs I rendered the final version of my walk cycle.
 The creating of my walk cycle with personality was a fun one to make. I wanted it to be a swagger walk cycle similar to the “Treasure Island, Dr Livesey walk cycle” where it conveyed a confident personality. I used a gif I found on a gif website as reference for my animation. However, when I went back to the site to find my reference I couldn’t find it anymore. This resulted in my having to find a walk similar to the old reference. Luckily, I found a walk cycle, called “WWE Vince McMahon – Power Walk”, that was the most similar to my intended personality. Using this new reference, I completely remake the arms and legs to match the new movements as they were originally based on the old reference.
When I showed my tutors the final version they said it was fine and didn’t need changes.
When creating my run cycles I wanted to use Toon Boom because I want to show that I was capable of using both 2d and 3d for animation. I decided to use a run pose reference sheet as a basis for my run cycle and made layers for each body part so I can easily fix any mistakes I made with having to re-edit the rest of the body. I also enabled Onion-skin to see the previous frame and make the next pose without having to go back-and-fort.


 Animating with Toon Boom was an informative learning experience. There were things I found out when using the software with made animating easier. I learned that in the pencil setting there was an adjustment called “Centerline Smoothing” which helped make the drawings I drew with the tablet pen look smooth and presentable. I also learned that I didn’t have to add a keyframe anytime I want to make a new pose as, unlike Blender, Toon Boom automatically makes a new keyframe whenever I draw on a blank frame.
 There were some issues I had with Toon Boom that I just had to get used to. The main one being how Toon Boom can sometimes be “nit-picky” whenever I try to use the paint bucket tool on a drawing. This happens when the drawing has opens gaps but even if I connect the lines to make it look connected the paint bucket tool wont paint the empty space on the drawing. This resulted in me having to cross the lines together, making it look rough, especially around the arms and wrists.
 Rendering my animation on Toon Boom is also different as in order to export an animation I had to go to File, Export, and Gif. When I initially exported my first run cycle it didn’t show up. I realised that I the drawing is there but due to the animation not having a background and the character not being coloured, it automatically turned to a black screen. To fix this I had to outline a background and paint it white with the paint bucket tool and once I exported the animation again it the run was now visible.

 My tutors told me they liked it and to add a secondary animation for my run cycle and chose to make a cape. The only issue I had to fix was to make the cape more curved at the jumping poses as my tutor, Alec, told me it was causing a flickering effect.
Final run cycle:

Reference for the cape when running:
[OC] Hero run cycle for Animus: Before & Beyond (Action RPG)
byu/weirddogstudios inPixelArt
On the other hand, the development of my run cycle with personality was tedious, stressful, and exhausting. There were two different versions of my run cycle with personality before the final one, both of them rejected.
 I initially wanted to do an tired run cycle but couldn’t fine any visual references for it and the ones I did find weren’t good enough as they always start with them running only to stop to take a breather a few seconds later. I eventually decided to do an anime run, not the Naruto ninja run, where the characters run as if they were a track field runner. I used images of Tenya Iida from “My Hero Academia” as well as run cycle from “Evangelion” for reference as most of the runs that popped up looked more like the Naruto run, which we weren’t allowed to do.

After I showed some of my classmates about what they think they told me that the character didn’t feel like they sprinting so I had to redesign the head and rotate the body to be leaning forward and to have the eyes look serious to reflect the intense expression of my reference.

After I finished the run cycle I showed it to my tutor, Alec, to see if it counts as a run cycle with personality. Unfortunately, it wasn’t.
The next run cycle with personality I did was a happy run. At first, I was worried that I had to start all over but I was able to find a way to get a start on my happy run without having to do it all from scratch. I did this by reusing my anime sprint run and rotated the torso to be in an upwards position rather than leaning forward.
I looked at a happy run cycle video for reference and noticed that the hand were fists positioned closer to the chest anytime the character jumps. Using this, I repositioned the arms and legs, as well as reworking the hands to look different and after much time I was able to make a happy run cycle.

When I showed my peers my run cycle they said it looked good but it still felt like a normal run cycle. I looked back at my reference and decided that the jump wasn’t high enough to reflect a happy personality. After looking at some videos for reference and found this one.

 I looked at the walk cycles shown and felt that the skip walk would fit a happy persona. I then created layers for my new legs as I didn’t want to get rid of the old ones.

After I rendered the happy run I wasn’t sure which one looked good so I asked for feedback on the Discard chat one which one looks the best, the original happy run and the happy run with the skip. This wasn’t the case as both were rejected by my tutor, Alec, due to them not really portraying a happy run at all.
My tutor then told me to try making a scared run cycle as it was easier to find visual and video references for it. At this point, I was stressed. There was only five days left before the deadline and I just wanted to get this run cycle done and finished so I can start putting my finished animations on SyncSketch and make my Reflection and Research blog. My saving grace was that I was able to find a scared run cycle that looked similar to my anime sprint.
Using this as visual reference, I remade the arms, hands and face, reposition the legs and I was finally able to finish my run cycle with personality.

Overall, I had an okay time with this course. Most of the experience I felt was informative was with my experience with Toon Boom as I actually enjoyed creating the run cycles. It was stressful at the beginning but later on got more manageable. I was a lot more prepared than last year as I knew what was expected. I updated my blogs for my course each week and did my workload once introduced.