
I looked forward to starting this module this semester, it seemed exciting and challenging, and I enjoyed delving more into the VFX aspects and learning as much as I could in the 13 weeks. It was still a stressful and time-consuming project but I found it to be more exciting than not. I knew coming into the project that I would have a lot of new things to learn and a lot to relearn from last year but having the recorded sessions from last year at my disposal proved helpful.
CREATING CONCEPTS AND INFLUENCES
I started the project off by brainstorming, I really wanted to make a scary detailed character but I just didn’t know how to especially since the last time I made a character on Blender it was a lot simpler. I spent the summer making a tall bony forest monster and decided I’d pull inspiration from that but it was still a bit too simple.


I began to get a better understanding of the level of detail I would need after the class work of breaking scripts down and really going into the nitty gritty of the character. I started by writing a few options, another forest monster, a post-apocalyptic monster and finally the one I landed on which was the swamp creature. I knew I wanted the creature to be anatomically similar to a cross between a frog and a human but make it unrecognizable. I made sure to ask around, my friends and family what they thought and to ask them to let me know if for some reason something didn’t make sense. I gave the legs of my creature out turning calves and webbed fingers and toes as well as gills and fins. I used Pinterest a lot as inspiration and research, I made a board that contained sculpted characters and sketches and took a lot of inspiration from somewhat similar designs so that I could make sure my character looked the best that it could. It was a post apocliptic creature so giving its skin texture was very important and getting references on mouldy skin wasn’t the most pleasant experience but helpful, to say the least.


BLOCKOUT
I watched a video over the summer that Bran Sculpts uploaded on YouTube that went into more detail about blocking and how to make the initial sculpt easier with a better block out. I used a lot of squares with subdivision applied so that I could have a smooth block out but also have more faces to work with in edit mode so that I could drag them into the right place over my sketches. It was then I realised a problem with my sketches, the front and side view didn’t line up in a straight line so I made my way back and fixed that up before I moved any further to avoid distortion. I didn’t know whether to make a blockout of the teeth or not but ultimately decided I leave the mouth until I began my initial sculpt which in hindsight I should not have done. Blockouts are supposed to be simple but I think I would have really benefited if I had made the mouth open in the block out to avoid stretched faces and struggles of opening the mouth later on.

SCULPT
I talked to Henry one day after class about the struggles I was having with how to go about sculpting a mouth. I had one sketch of how I wanted the mouth to be, open with sharp teeth and it was only in side view because I just couldn’t figure out how to draw it face on. I spent days creating copy files, and new mouths but nothing looked right. I wanted to give up at this stage and really questioned my blender skills. Henry sat down with me and showed me how to go about this, I went home and again tried several new mouth options and Henry even offered to make me a tutorial video conveying what I could do but I gave it one last go and was delighted with how it turned out. I learnt so much about patience and not giving up or changing my sketches this late in, finding more references definitely helped, and having multiple angles to understand the anatomy but still follow my original idea.


RETOPOLOGY AND UDIM MAPS
I was terrified to start retopologising. Last year it’s what I struggled with the most but one day in class it just clicked. When retoplologising a head for a class workshop I feel like it finally clicked, where to make loops so that in the future I can unwrap my character and how not to have so many unnecessary faces.

I was so happy with the way it turned out and genuinely without the help from the class workshops I think my project would have turned out a lot worse. I researched several YouTube videos on retoplogizing and getting a low poly good outcome. I watched Noggi’s video on youtube ‘How to Retopolgise like a Pro in 6 Minutes’,
I obviously didn’t get it done in that time frame but it really helped me speed up the process. I have never really understood unwrapping, I know how it works and why it needs to be done but I can’t, in my own head figure out where the object needs to be unwrapped so the character can be taken into substance. I looked up on Google, body unwrapped and there I found a lot of images of simple bodies being unwrapped because my creature had two arms and two legs I found these helped me a lot.

Because I had put so much detail into the retoplolgy and focusing on loops and straightforward shapes this came as a breeze, compared to last year when my retopoly did not contain one straight loop. I was so proud of this progress and the fact that my loops lined up so well, I could really see the growth in my blender skills.

After unwrapping came the UV mapping, it took a while to figure out how to add UDIM maps but I had the class recordings to go over what the class workshop did. I keep a journal every week in class and write down as much as I can in class so that I can use it instead of class recordings to try and improve my work and keep it in memory. This helps so much for me, it helps me lock down in my brain how to do things I learn in class and keep it there. I knew I wanted to have as much detail on the face because I wanted close-ups so I gave the head its own map. I didn’t give any other part of the body its own UDIM because I knew there wasn’t going to be so much detail that it would need it but in the future, to go into VFX more and practice I definitely would to ensure I can get as much detail as possible.

CUSTOM BRUSHES
For the second sculpt I wanted to create my own brushes, originally I wanted scales on my character but slowly, after trying out many different custom brushes I decided against it and I would make my character have more of a reptilian look like I had explained in my script. I did find myself constantly returning to my script so that I didn’t go off the original concept too much. Instead, I created two brushes. One, I made out of a brush on Procreate which I made black and white to turn it into an alpha, the brush created a texture like rough moldy skin

and the second had holes and crevices in it to represent the frog features of the creature.

I returned to my references, checking how other people went about adding sculpt detail and a common factor was a lot of detailing in crevices and pores. I was really happy with how the brushes were turning out and I knew to make gills I would need to perfectly replicate them a few times so I made a VDM brush. I loved learning about stuff like this, making a brush that applied dimensional sculpt was really cool and allowed the character to have identical gills on either side of its neck as well as its legs.


A problem I faced which came back later on in the project was when I initially added the multiresolution modifier there were problems with the eyes, for some reason there were holes in the sculpt. I checked and for some reason, there were faces layered on top of one another so I re retoplogised them and it seemed to go fine but little did I know that wasn’t the only problem.

MATERIALS
When moving to Substance Painter I experienced a few problems. I couldn’t even get my low poly fbx into substance, I checked that I ticked the option for importing UDIM UV maps and everything looked fine so I waited until I could talk to Henry about it. For some reason a single edge on the neck reto had three faces coming out of it, how I did this I still don’t know and Henry warned me that it could be detrimental. I think this was the most stressed I’ve ever been in my entire life, from what went to a joke of ‘Oh I hope I don’t have to restart’ to the look on Henry’s face when I said that I knew the problem was way bigger than I expected. Even after the problem was solved the file still would not go into substance. Henry and I couldn’t figure out what was wrong until I got help from my classmate and it just started working. Henry said don’t ask questions, if it works it works. I definitely needed a refresher on substance and asked if there could be a video made and I followed it and learned so much! I wanted to add more that I didn’t know so I went into Youtube and began watching videos of people adding skin detail, most of the videos were of people just adding materials to heads and I wanted to do the whole body but I ended up getting a really good understanding of Substance Painter by the end of it. I was really happy with the detail and made sure to make it look like the skin had layers of colour as skin isn’t just a block colour. I had to come back to substance after importing it into unreal because when I had it in my own environment I realised that the mouth was too shiny and I had time to fix a few other things like how the teeth were too white and unrealistic for a swamp creature with no dental hygiene.
https://youtu.be/h98gJ9vCbpM?si=hcvDw7JkVUw7B8Zh


UNREAL ENGINE
When it came to unreal it was definitely a reality check, having to learn a brand new software was scary especially when it’s so complicated and a major part of the marking would go towards it. I followed every class tutorial and thought I would never be able to create anything realistic looking but I kept trying. Originally I had made a grid on Quixel and loved the way it looked, the same tutorial that had watched in class, it looked wet and slimy and a perfect ground for my character but there was one problem, adding a height map wasn’t enough to achieve a good landscape and it would ultimately take too long so I scraped that and restarted. I wanted water in my world but had no idea how to go about adding it. I watched video tutorials but it involved applying the modeling plugin and adding a bunch of subdivisions to a plane which slowed down even the PC
so I went to Henry and there was a much simpler solution. I took my plane from quixel and used that instead, editing the node tree to get the rippled water effect while also having an opacity around the edges to fake low water.

I looked up a lot of unreal projects made of swamps and had a good idea of how I wanted mine to look, pulling inspiration from different ones like fog, trees with leaves and dust particles.


I asked for advice on the fog, I watched a video explaining how to add it which was super easy but I wanted it to distort the light through the trees and once I got that everything changed, I learnt about volumetric Fog which basically made it so my fog reacted to the light source in the sky. The whole environment transformed in a matter of seconds. I watched a tutorial on how to add dust particles and came across Niagara.
It’s insane how easy some really cool-looking features are to add to Unreal. I loved this. My creature eyes were always going to be added in unreal but it was difficult to figure out what to do. I wanted to give them emissive and make them glow but I was stuck on whether I should leave the sockets empty or add the spheres and eventually after some feedback I decided to keep the eyes. All that was left was to add lighting and last-minute touch-ups.

I got feedback saying it was a bit too green so I changed the skylight to a lighter shade of white and added a cone light above my character to light him up a little bit more. There’s a plane of light next to my character to ensure the detail is visible but my only fear was that it would be too bright but I think I was fine.
I figured I was finished at this stage, I had followed the class workshops and recorded each step of the pipeline so that I kept a good understanding of the progress. I asked Mike to give me some feedback, I was told the teeth just weren’t right. He had a point, the focus was on the teeth and I didn’t do a great job on them originally so I went back and changed them. It was stressful and a massive risk to take this late into the project but I’m so happy I did. I looked up monster teeth on Pinterest and chose a few to reference, I watched a tutorial on how to make bendy sharp teeth aswell, using the curve modifier to bend them slightly.
I created two options, the first being too skinny and similar to an Angler fish so I went with the second option, went through the process of blender to substance to unreal and was delighted with the results.
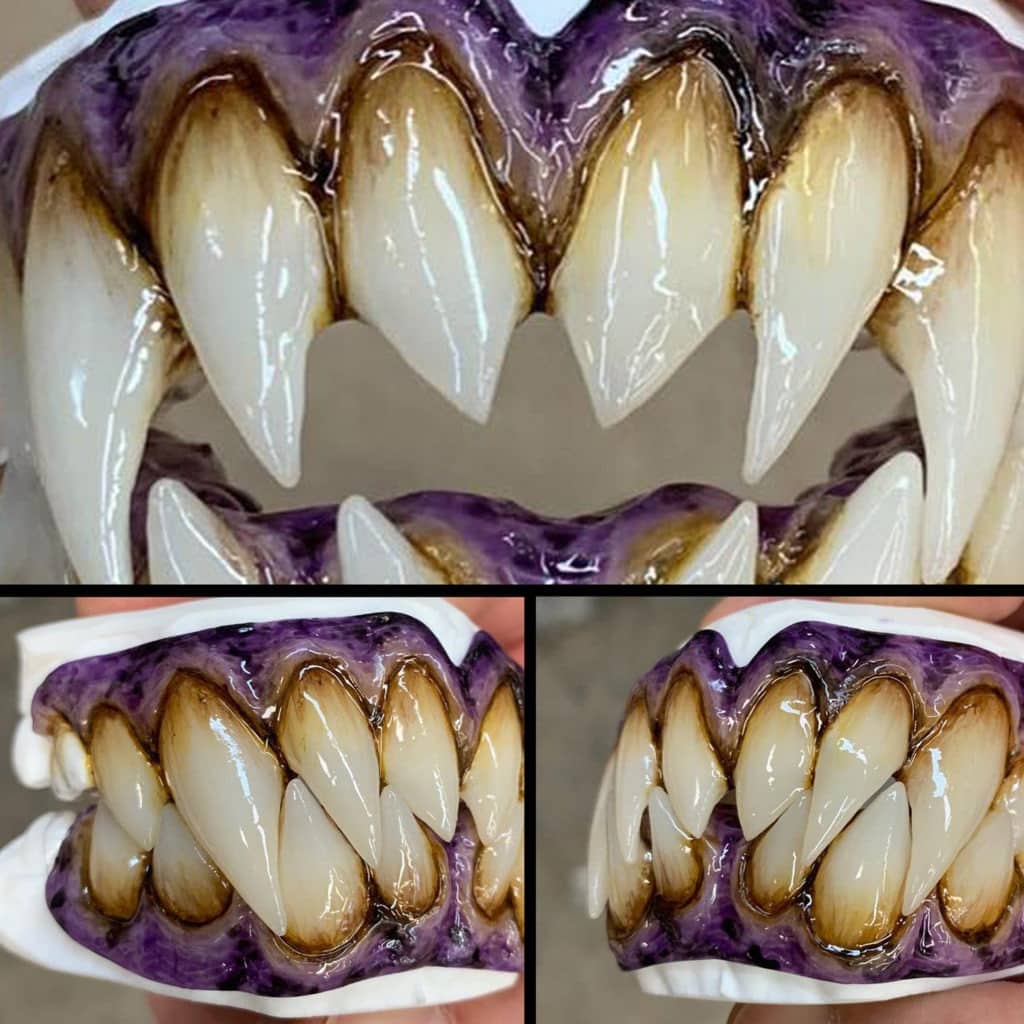

reference images

first option made using video
second option made using reference
More feedback that I received was to add more assets, I had mad custom brushes but it was suggested I make another but in unreal engine. I always wanted to make seaweed hanging off and I figured I would just add that as a decal or drawn on in photoshop. Instead, I created planes in blender and edited the UV maps to create alphas. It wasn’t a difficult process but it was definitely confusing to know what to do next. I added a noise map to the planes to create a more realistic look.


MY THOUGHTS
Once this project came to an end I felt so relieved, it was by far the most difficult one as of yet but I learned so much in the 13 weeks. I loved the research and gathering samples of other people’s work in the hope of creating something equally as good and also learning from other people’s work so that I could improve mine. I loved being able to achieve the level of detail that I had in mind from the beginning and I genuinely never thought I would be this happy with the final scene. I found that returning to the original script I had written was so important to keep my project on track and not looking confusing and overworked. The class workshops helped more than I imagined, relearning things even from a new perspective was important in the process of this project so I could grow my skills and understand the process a little more.


