
This week we jumped right back into work. The next assignment was explained and the criteria were set out. I definitely am a little panicked about this one. There is a lot about animation that I struggle with and fluidity is definitely one of them.
Today in the morning class Alec walked us through blocking out animation and fixing graph editors. He provided several files and exercises to complete in each one. The first one was fixing the graph in a moving cube.

I fixed the graph editor like Alec asked and got the cube to move smoothly.
I moved on to the next exercise file, which was six separate files. Starting off, I added different blocked-out positions. In each file I moved along, adding extra keyframes and poses, and fixing the position of the head until eventually, in the 6th file it all came together and I changed the graph from constant to smooth which allowed for a flush body movement.

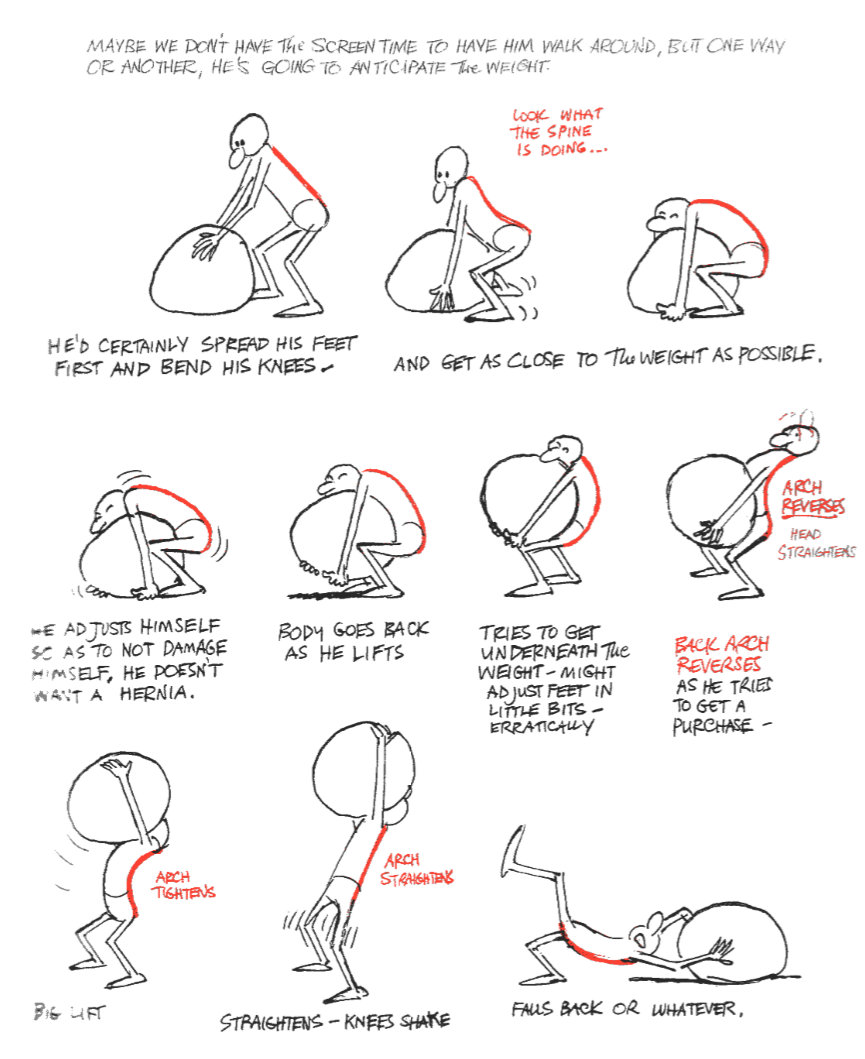
For the second half of the class, Aodhan began teaching us about weight lifting which alec prepared us for in the morning class with the bending of the body using FK controls.
I began blocking out my animation and adding poses every few seconds using the constant on the graph and referencing a video Aodhan posted.
I used pure ref to take screenshots at vital points and completed the block out of the character.
I have bigger plans for what I want to do for my submission but I’m struggling with this one already so I am a bit stressed about how I’ll do that I’ll try to complete this one first before I panic any more.
I used the animator’s survival kit to look at the positions of the back in my animation which were very important.
After talking to Aodhan he suggested switching to a deadlift instead of above the head to focus on getting the mechanics and body weight correct so I deleted the last few keyframes and focused more on the timing. I spaced out the keyframes from where he bends down and grabs it to when he starts lifting, to show the weight of the bar. I added a bar with weights to help convey the lift.
I smoothed out the keyframes and next, I had to space them out more and get the timing right, I want to demonstrate the heaviness of the bar. I am struggling a bit to get it right but ill try again tomorrow and get it better. It looks like I need that snap to get better when he lifts it up to the top.
After talking to Aodhan he said to fix the speed of the body moving upwards so i did that and then asked Andrew about how to go about parenting the weight to the hands so it moves up with the body animation. Andrew suggested i use IK instead of FK because there is a way to do that using IK but unfortunately i used fk.
I wanted to come up with my own animation weight lift idea and began researching. I found videos of tire lifting that I wanted to do. I took a lot of inspiration from the animation below but also knew I couldn’t follow it fully. I wanted my legs to slip like the one below
I wanted to go back to the basics and get the key poses set in so I started researching videos explaining the right form to have in your body when lifting the tire, the video shows the leg lifting to balance the weight of the tire which I did not want to do
My first attempt wasn’t going great, I realised that in the reference the tire was not being dragged in the slightest because you don’t pull when you lift a tire so I watched more videos of people lifting tires to watch how they lifted and found the tire didn’t move at all so I had to change the way I was rigging my character, I moved his arms forward and his hips so he didn’t pull it towards himself.
For the initial lift I needed it to be as realistic as possible, I don’t lift weights or own a tyre that big so I used what I had in my house which was a part of the couch and watched how I hunched my body and how my legs reacted to carrying that weight which was taking a step or two forward to counteract the weight which I used when making my own animation.
I took a lot of reference from the way the tire was pushed in the video above
time stamp 1:13
Above is a render I did using the dynamic parent but I found it really difficult to use. Alec made a video for me about how to make a rig for the tyre, it used three armatures and made the dynamic parent really easy, allowing me to use the origin point of the tyre.

The problem I had using Dynamic Parent instead of rigging the wheel itself was that it wouldn’t connect to the hands properly. It was easy to fix because of the armature I had made but because the hand turns it messed the when up so bad and having it switched off at that point made it look far too jumpy so unfortunately I switched back to just animating the tyre itself.

I changed the body to come closer to the ground because, after feedback that I got the character didn’t look like he was pushing the tyre, there was too much push coming from the hands and wrists instead of the legs so I made him go a bit lower.
I still think it’s a little bit low so I’ll go back until it looks more realistic, I also need to follow my reference to see how the tyre falls and get that right.
After some feedback, the wheel just didn’t look right. Switching out between three different tyres was not the way to go, I tried adding motion blur which made the ball look so much better but when the wheels switched it was so obvious because the blur became super strong.
I went back and started using just the one tyre, it was difficult due to the location of the origin point but I kept at it, using the Epic pen to make sure the wheel’s corner didn’t move when the turn was happening which was super helpful.
After a lot of evaluation and feedback the one with 3 tyres was liked more so I had to figure out haw to render with motion blur but without it being too dramatic so I lowered the shutter and it looks a lot better.