Animation Development – Lip sync

Research

For this assignment, I decided to continue attempting to improve my 3D animation skills, as I think it fits into the area of the animation industry I’m interested in the best. Picking the audio proved difficult for me at the beginning as I was struggling to find ones I wanted to animate that were within the right time frame and had enough speech in them. I enlisted the help of my friends and siblings to send me and interesting audios they had saved.

It came down to;

  • Audio from the Great British bake-off of James Acaster and his flapjacks
  • A clip of a stand-up comedian, Rhys James
  • Part of a podcast I listened to, The adventure zone, found through 11 sec club
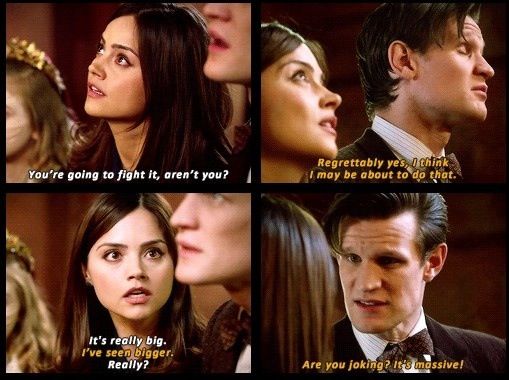
  • Audio from Doctor Who, which I’ve never actually watched

I ended up choosing the Doctor who audio, as I had an idea for it and had never watched the series so there were no preconceived notions in my head about what the animation ‘should’ look like.

I also had to find rigs to use, as I had chosen and audio with multiple characters, as I’d wanted to animate an interaction. I found the Zelda and Link model rigs, and with the new release of Totk and me and my friends playing it non-stop I figured it might be fun to use those ones. The rigs are by https://twitter.com/artstoff?lang=en

The Audio Clips;

I found a lot of videos on lip-syncing animation to learn more about the specifics of what to do and what not to do when animating it. I also did some research into animating people speaking and the mouth shapes that we form to make sounds, as I have little to no experience with actually animating speaking. (Links and Reference Images below)

Reference Video

I didn’t record an actual reference video for the movements in my animation due to time constraints, however, I definitely think it would’ve been helpful for some of the movements. I did record myself saying the lines of the audio though as I wanted to see how my mouth moved when saying them, and I couldn’t find the full clip of the audio online easily. Also, the parts I could find didn’t have a clear view of the mouth. Each line was recorded individually so I could easily animate one line at a time, so I’m only putting the longest 3 recordings in here.

Animation Process

As I was doing a 3D animation, I was using Maya for the process, so I referenced the rigs in my scenes and fixed the texture paths. I started by writing out all of the lines in the audio and highlighting the obvious sounds, like closed mouth B,M,P and open mouth Oh sounds. Then I used the studio library plugin to create the mouth shapes for the sounds I needed and then used them to animate the lip-sync, and then tweaked some of them when needed.

I am actually really happy with how the lip-syncing came out, although I know it isn’t perfect and I could’ve focused more on the main sounds and pronunciations so that the mouth wouldn’t be moving around quite as much and the speech might be clearer. Despite this, I think you can tell what they’re saying pretty well, even with the audio off if you scrub through it.

I focused on moving the head and eyes next.

I then began animating the basic movements I had in mind for the animation, though I forgot to take a video of the blocking-out stage. I pretty much free-styled the movement due to the strong image I had in my head and the lack of references I had, although it was fun I think making a reference video is a good idea for next time.

I also had to look up a video on how to make constraints, as I hadn’t realised before I began animating that the sword only had constraint controls for the left hand when I needed it in the right one. At this point in animating it was too late to switch the layout or characters around so I made my own, which was easier than I thought it was going to be.

I then tried adding more facial expressions to the animation using the rig brow controls, though due to the upcoming deadline and my personal issues, I had to rush it a little bit.

Feedback

I sent the last recording above to some of my friends, as well as showing it to family members to collect feedback on changes I needed to make or find any issues that I wasn’t seeing personally.

I also got feedback earlier on about making the characters blink from one of my siblings, which I hadn’t immediately thought of but I’m sure I would have.

Finished Animation

The animation gets lower quality as it goes on due to me having to change render settings to get it done on time.

Animation_Assignment_Hand_in

Reflection

I had an idea in mind for what I wanted the animation to look like, especially knowing the characters I chose for the rigs and their dynamics/personalities. I wanted to put a lot of effort into the lip-sync part of the animation as I wanted to improve that area of my animation work, and I think it paid off as I am proud of the lip-sync I produced. I do know that there is room for improvement there though, like letting the sounds linger more instead of trying to fit most sounds made for each word in. If I could do this assignment again, I would’ve definitely started earlier on so I would’ve had more time to fully polish the movements the characters made and add the little extra details that I believe make things come to life. I just didn’t have the time to perfect the movements or add the smaller details like lots of finger movement, meaning the hands look a little stiff to me at least. Apart from that I am generally happy with the energy and personality portrayed through the animation, even if not perfect, I think it puts across what I was trying to get it to, and it shows the character’s dynamic well. I’m also proud of myself for getting it done despite all of the issues I’ve been having.

Vertical Slice Project Post Index

Vertical Slice Project – Week 1

Vertical Slice Project – Week 2

Vertical Slice Project – Week 3 & 4

Vertical Slice Project – Models (FBX)

Vertical Slice Project – Texturing

Vertical Slice Project – Animating Textures

Vertical Slice Project – Inspirations and References for my work

At the time of hand-in the games design people hadn’t finished everything so level 2 is not in this youtube video.

Video Game – https://youtu.be/JwH8f-Sqtr0

Vertical Slice Project Hand-in

The Video Game Files

Word count; 2580 (Including headers & links)

Vertical Slice Project – Reflection

Overall, I enjoyed this module as collaborating with another course was very different from what we’ve done before, as we don’t have a complete understanding of what they do and vice versa. So communication between everyone was very important and it was a worthwhile experience to learn more about the production of video games as that’s the industry I hope to work in. It was interesting to learn more about how our art and animation work in tandem with the other areas to create the end product.

I found that the communication between the games design student and the animation students in our group was mostly on the right track, as we talked a lot and everyone was kept generally in the loop about what was going on. The students I worked with from both of the courses were all very nice and easy to talk to and work with, which created a good overall atmosphere for our project. There were times that the communication wasn’t as good, generally on the technical side as the games students would make changes to things and not make this information well known to the whole group, but we got there eventually. It felt a little like there were two groups in the team instead of one, which is understandable as we were working on different stuff but there was a little bit of a divide, which was especially noticeable with the games design students who wanted to do more modelling.

We generally kept everyone updated on the work we had done, with people posting their models as soon as they finished and looking for feedback from everyone else, which helped keep our art style consistent and made the overall game look coherent, which was noted during the playtesting sessions with industry contacts.

I feel like it’s a bit of a shame we didn’t go with the other idea for the game due to being conservative about what we thought we could do as we produced a lot for this project, however, I did enjoy working on this concept as well and it’d be a game I’d be interested in playing. I also wish there had been more overlap/communication between games design and us when it came to the level designing as I found I heavily enjoyed building the environment in the last semester’s project and I would’ve loved to be more involved with making the levels more artistically pleasant/less bare.

I’m happy enough with most of the models I produced during this project, though I truly enjoyed making the animated texture materials within unreal and learning more about VFX type things in it. I had a lot of personal issues during this project that I’ve made known which caused me to fall behind and struggle to be able to finish or start my work. So I’m proud I got as much as I did done, and that it still is mostly up to my standards quality-wise. However, I am nonetheless disappointed by the fact I didn’t do a bit more than I did, as I had ideas I wanted to bring to life and this was a project I truly was interested in and passionate about, as it lies within my areas of interest. I would love to have the opportunity to work on something like this again and will look into opportunities.

Vertical Slice Project – Inspirations and References for my work

These are some of the references I found through researching other projects like our and finding models fitting in our aetheric for inspiration.

This is a cyber-punk themed city project Juanling Zhan made

A Cyber punk city created by Junliang Zhan

There are model collections and individual models that helped me with concept inspiration.

Sketchfab Collection 1

Sketchfab Collection 2

https://www.businessinsider.com/cyberpunk-2077-design-cars-vehicles-garage-video-game-mirror-reality-2020-12?r=US&IR=T 


Vertical Slice Project – Animating Textures

Death Wall

I followed along with this tutorial to try and make the death wall textures the way I had been imagining them to be. I’m enjoying trying to make more detailed materials in Unreal using the nodes, It’s complicated but very fun. I think following along with this really helped me with understanding more about how different nodes work and where to use them.

The Artstation Link

Animated Billboard Sign

I wanted to try and make some animated textures after messing with the death wall one, so I was looking at different types of signs that exist and thought I could try making one based off of LED light signs. I got Henry’s help with how to make the textures move in the way I was thinking of, as he explained what the nodes do and helped me fix it when it was leaving trails behind itself. (by changing the blend mode to translucent.)

Billboard

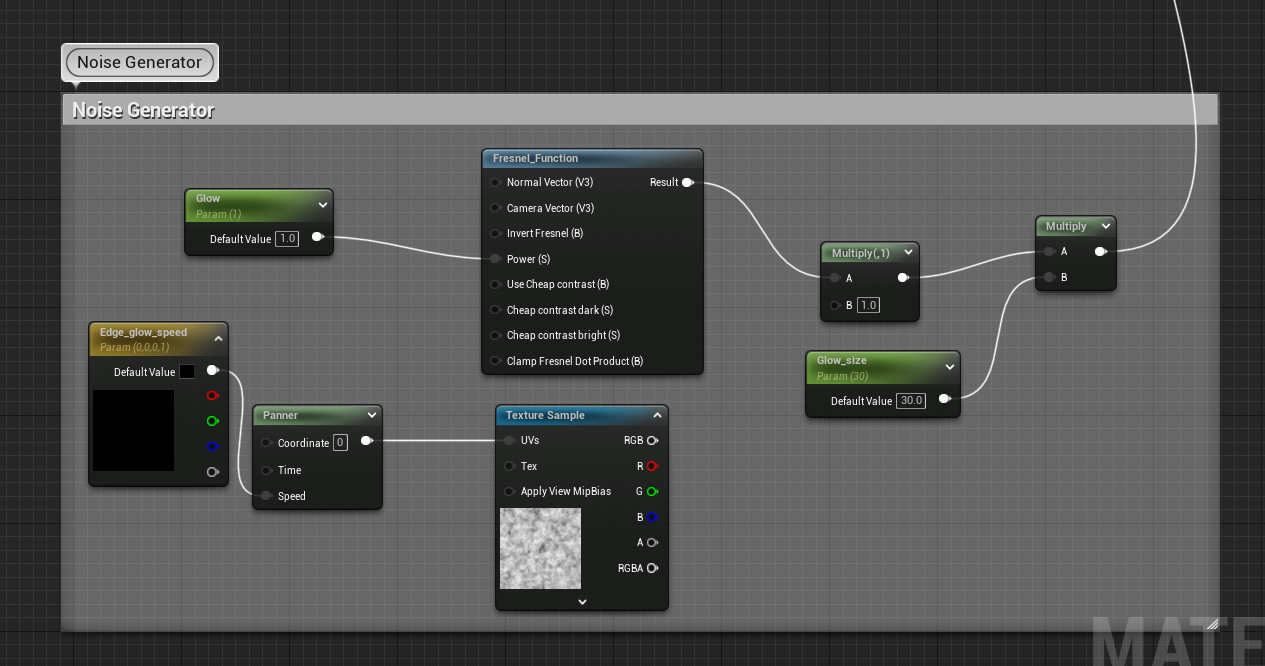
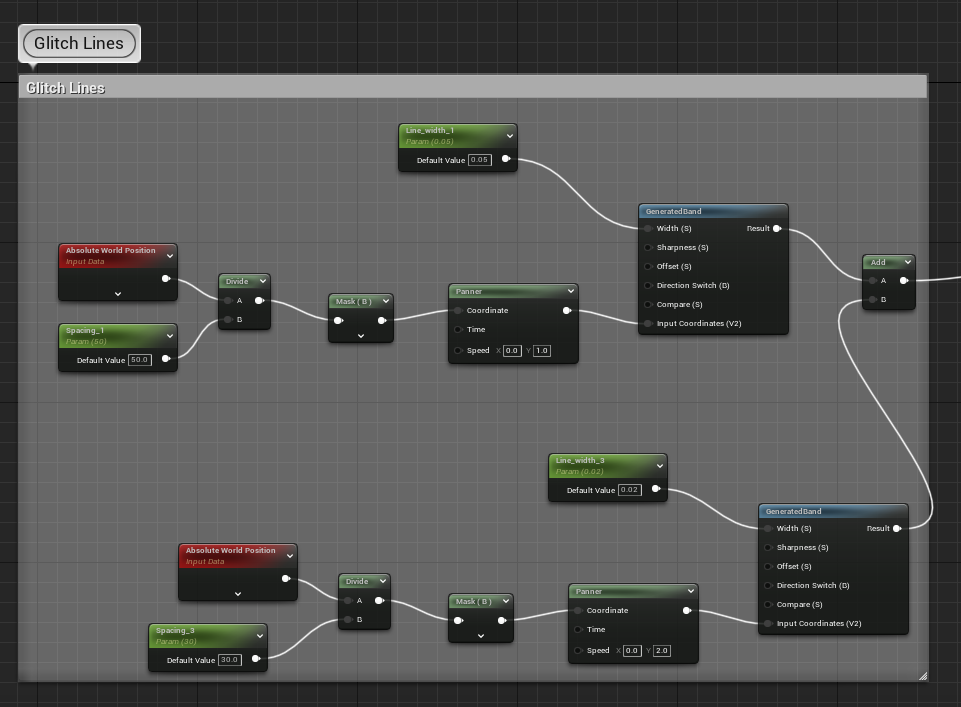
This was the texture used to make the glitch pattern, saved from the video tutorials.

Conall asked me to create a billboard model for his level in the game, with two textures; one red and one blue, so it could switch between them when the player triggers the mechanism.

This is the image he gave me as a reference asking if I could make it glitch like that, which I tried with the bard but couldn’t figure out how to change the colours of them. I think I might go back if I have time and make the actual textures of the billboard screen more complicated as I feel like it’s quite simple right now.

I really like the fact I was able to make the texture glitch like that though and I’m happy I put some time into trying to learn more about materials and nodes in Unreal.

These are the video I watched that helped me create the final product. There were some other videos that were used for testing and other versions I didn’t like as much.

Vertical Slice Project – Texturing

For texturing these models I made sure to follow the style guide section on texturing, and we figured out how to use emissive textures in substance painter, as it is not readily available or obvious. At the beginning of making them, I still wasn’t operating parts of the model with different materials, as I never had done this before.

However, when it came to the later models I realised this would make everything much easier to deal with texturing-wise and began to separate materials.

I went back and made some adjustments to some of the models, especially the neon sign below, as it was annoying to me that the Ramon bowl part had bits overlapping at different depths. I also tried to incorporate the symbol for the overlord AI from our narrative into some of the models texturing.

Overall I’m happy with the details on the texturing, as it’s something I’ve really been trying to improve because, in my opinion, it’s one of my weaker areas in asset creation. The ones consisting of only neon lights are obviously a lot simpler than the other ones because there wasn’t much detail I could add to those ones.

Reference Videos

Vertical Slice Project – Models (FBX)

I ended up working on a lot of neon signs and decorations for the game, as most of the modular, level-building assets had already been claimed in the asset list before I got a chance to look at them. I modelled the first neon sign by using the draw curves function before I even realised there was a text function that could be used for a similar effect in Maya.

We had originally agreed on Japanese-looking language but not actual Japanese, which I actually found harder to do than just translating things into kanji and using that. So I mostly stuck with the actual kanji words, which other people seemed to do as well.

I modelled everything in Maya as it’s the program I’m most comfortable with and enjoy using the most for assets.

Models

Crate (not a fan of this one)

Zipline Variations (with metal bar, and without it)

Death Wall

Neon Signs

Billboards

Overall, I’m quite happy with how the models I did manage to get done with all my issues came out. I think they’re of a high quality overall and I tried to keep them lower poly so it wouldn’t impact game performance too much. Although some of the I couldn’t make any lower due to awkward shapes, like the big billboard.

Vertical Slice Project – Week 3 & 4

I wasn’t able to be in for the presentation on week 3 but I still had all my slides done and ready to showcase what I’d been doing.

We ended up going with Alex’s character design with the glowing hair, which was obviously incredibly disappointing for me as I had really wanted to try sculpting a character again, but overall it’s understandable as it’s a group project and everyone can’t do everything they want to. I also think Alex had focused more on the overall design and not just the clothes as well as going down the more cyborg route which fit our game well.

Concepts for Models

We all spent a little too much time on concepts for the models, and not actually moving on to making them. We also added more models to the updated asset list, which Alex had moved into an Excel spreadsheet for convenience.

Team Communication

My team were very helpful in keeping me up-to-date after I missed days, as I would put a message in asking for someone to update me on what happened and they’s give me all the information and feedback we got.

Ryan had uploaded my first few models for me into the project as I didn’t understand github and was still more focused on creating models than uploading them. He was very helpful and I had to fix the models as I’d forgotten to combine the first model we uploaded and then I’d sent him the wrong fbx with the wrong UV maps so I had to fix that. So it was trial and error but we got there in the end.

I wanted to be able to upload them myself as well, instead of bothering him every time, as well as wanting to try my hand at creating more complex materials inside unreal in the game. So Alex and Conall were both very helpful for me in trying to understand how to use Github, as Alex recorded me a video on it as a visual and walkthrough example and Conall answered all of my questions as I was worried about breaking things in the game.

Week 6 Presentation

Week 11 Presentation

Vertical Slice Project – Week 2

Art Direction

After receiving feedback from our presentation, we realised that the art side of the development was severely lacking due to our not-so-great communication during the first week. We had mostly spoken about the game mechanics and video game side of it and we had not put too much thought into our side of the production. We needed to refine the art direction and decide the specifics of what we wanted the game to look like. We spent some time in person making decisions about colour palettes we could use with most of the animation group.

Character Design

At the beginning of working on the game, it had been decided that I would be doing the character, but Alex hadn’t been in and also wanted to do that, so we hadn’t decided on character design yet either.

As Alex and I both wanted to try our hand at making and modelling the character, and there was only one character model due to the nature of the game, Alex suggested we come up with more complete designs and then see what the lecturers thought and try and pick one. These were my more refined design, although I think I was focusing on the clothing more than the overall character as I definitely could’ve made them more interesting in terms of overall design.

Getting Organised

We still hadn’t actually started to compile what assets were actually needed for the game so I made a list when we were talking, compiling all the models we could think of at the time, and some I thought we would need as a starter list for people to add on to as the weeks went on.

Aside from that we still weren’t very organised overall, and nobody had fully solidified roles or knew 100% what we were doing when the other groups seemed to have that figured out already. So I tried to get us organised for the beginning at least, as people would obviously have to switch roles later on and help where it was needed. Role descriptions were copied from what we had to have done for the next week’s presentation. It sort of worked as it became more clear what everyone was interested in doing primarily and how much of each role we had so we could ensure there was enough work for everyone.

We also sorted out the issues we had with the style guide that had been created at the beginning, as it was not matching up with what most of the group had agreed on in the first week. We had a few organised calls throughout the weeks to solidify things and figure out how to go on from here.

Vertical Slice Project – Week 1

My group is Group I for this project!

We had originally had a lot of different ideas, but eventually narrowed it down to ‘Home Alone Style Gameplay’, ‘WWII Tower Defense style game’ and ‘Slide & Glide’.

After we gave the ‘pitch’ presentation, we settled on the Slide & Glide Gameplay idea, which wasn’t my favourite one, but with groups that big it’s bound to happen. We chose this because the WWII one didn’t have enough creative room, and the Home Alone one would be pretty challenging due to the number of animations needed – and most of our group was more interested in the art side rather than actually animating.

However, we had to rethink the premise of this game after, as the narrative and environment we were going for left an incredibly simple environment, which had very little need for props and not a lot of room for detailed art creation and would’ve had only a few animations; sliding and gliding. Eventually, we agreed to change the idea to a wall running/parkour-type game, as most of the group was still very interested in motion-based gameplay. The setting for the game is a cyber-punk style/industrial city that has been taken over by an AI and is turning everyone into cyborgs – which leaves a lot more room for props, modelling and better animations.

Meetings & Miro Boards

We had two meetings during the week – one of them was to further discuss our new idea and set up/work on our miro board together; and the second one was to create our PowerPoint presentation for Monday. We also took notes for group members who couldn’t make it to the meetings and posted them in the Discord chat.

Individual Work

I started my research into creating character concepts by looking into the cyber-punk aesthetic more so I could better understand the aesthetic I was working in. This included looking into styles of clothing that existed and twisting them around to fit our world better.

Looking at games like Cyber-Punk, Severed Steel, Ghost Runner and Project Feline helped.

Due to changing our idea in between these weeks, we hadn’t fully settled on a narrative for the new game – so I focused on designing general outfit concepts for the basic character until we had the narrative sorted and details could be added.

Powerpoint for Presentation