Animation Strategies – 2D Animation (Run Cycle)

I started with researching run cycles, so I turned to Pinterest and Youtube for inspiration, I was looking specifically for strong fast runs.

I found inspiration like this animation –

I also found 3D walk cycles like –

I found the further someone is leaning forward, the more intense the run, so I tried to implement that generally with Nyx. I started with blocking out the general movement. I slowed this down to show off posing.

I began implementing smear frames as an experiment, and I ended up keeping them after recieving feedback that they added power to the run.

This was me still filling in the character pass. Something was off but I couldn’t tell what it was at this point. I felt like there wasn’t enough weight in the animation.

The hair gave me a lot of grief, but I think I conveyed movement alright here. I also realised what was throwing off the motion was the up pose was too drastic, so I scaled it back and it look a lot better now.

The finished animation! I learnt a lot from my walk cycle. I used separate layers for smaller details that moved, like the eyes and her tattoo, and I think that really helped with consistency. I captured the energy that I wanted to convey, so in that regard I was successful. I also really enhoy the experimental side of animation, trying things to see if they work and trying out ways to implement it into my workflow. The smears/motion lines were a part of that. It’s the benefit of being a complete beginner, I get to try techniques I never have before.

Animation Strategies – 2D Animation (Jump Cycle & Other Unfinished Body Mechanics)

Initially, I wanted to do a sword tricks animation, as tw0 swords are Nyx’s usual weapon of choice besides her magic. I realised as I was doing it that I didn’t have time and it would be better to stick to something simpler and do it well than something complex badly.

I got this far before deciding to go for a jump instead. This is an animation I’d like to go back to over the summer, maybe. It also wasn’t a waste of time as it allowed me practice with smear frames, which is something I’d like to experiment further with.

I used this account as reference –

@edenwilliamskarate

I vibe with this. #sword #martialarts #karate #sportkarate #weapons

♬ If We Were A Party – Alexander 23

@edenwilliamskarate

a lil sword action ⚔️ #martialarts #swordtiktok #sportkarate #karategirl #sword

♬ Jupiter & Mars – ARDN


As Nyx is athletic and has been doing things like jumping buildings for a long time, I started by looking for reference from parkourists. I found a few good refs on Youtube shorts.

These all helped me figure out general posing and jumping with confidence. It also helps that they slow down the video during the height of the jump, so I had a better idea of how a jump actually works.

I also gathered reference from Richard Williams’s book, which is included in my Pinterest board here

His book, along with multiple animated references within that board, helped to inform my animation.


I started with blocking out my animation, as I have previously done. I included my run cycle as height reference, and also because I planned to insert a few frames to give power behind her jump and also so I didn’t have to animate another run.

In hindsight, I should’ve left more room for the run up to be seen. Oh well, it’s something to keep in mind when framing future animations.

Here’s my blockout without the reference or secondary motion.

I sketched in hair and arms here.

Character Pass progress

I started lining not too long after this point. I actually made a progress video of some of the lining process.

Here’s the lined and sketch animation


Finished animation.


I think this animation really demonstrated my improvement, it’s got nice movement, a good flow and I think I improved a lot on consistency due to the errors I’d made previously. I’ll admit I forgot the smears in the second half of the animation, but I don’t think it looks too out of place. I think I’m finding a rhythm with animation, and that’s a really nice feeling. I’ve made massive improvements over the last year. I still have a lot to learn, there’s a little bit of snapping, the hair at the end could be refined, and I think I could make the jump feel more bouncy and stylised with some practice. In all though, I’m happy.

Animation Strategies – 2D Animation (Character Design & Walk Cycle)

I knew for this project that I wanted to do 2D animation to further my skills in it.  I also knew I wanted to use my character Nyx for the project, she’s a character I’ve drawn and doodled so I’d have a good shot at keeping things consistent, and I thought she’d be fun to do.

To try and summerise her character is a struggle for me, but Nyx is a criminal who, at the time we meet her, has just broken out of prison to hunt the man who put her behind bars. Againt a cyberpunk themed backdrop, Nyx is essentially battling the law, old enemies, and her former friends to reach her goal. She’s disciplined, confident, assertive and athletic. She’s skilled in combat, which informs the way she moves. It’s very precise, is the best word I can think of. These are core personality traits that will inform my animation.

This informs her character design, as you can see below. This isn’t a full design, I left out some details because I drew this generally knowing what I wanted to include in my animation. She usually wears a long coat and has weapons matching the theme, but I didn’t want to complicate these cycles too much.

I used this sheet as a way to draw her as I know her, and then refine further.

I started with drawing a sheet of her usual design, and began problem solving to simplify it down.

I’m at this weird inbetween with my art style where I can draw side profiles, but they don’t look consistent with my style, this is because I learnt how to do them a certain way, and I just haven’t been able to break those habits. this project definitely highlighted that area for me to work on. But, for this project I thought I could maybe get away with it, or get it to work.

I made some notes on the page to remind me when I was drawing up further iterations. Some of the key ones are her tattoos and her prosthetic. For the time that I have and the skills I currently possess, I don’t think I can keep these consistent while animating, so I plan to hide or simpify them down.

Then I drew up some very messy and not great sketches of the design. I wanted to get started quickly as I knew with my inexperience and general slowness, mixed with the other assignment taking up a lot of time, that I needed to start this asap.

Yeah, not great, but it’ll be enough for me to get started. If I have time I’ll go back and try to make these more consistent.

Next was to seek out reference for my animations, I started with the walk cycle.

walk cycle animation walking

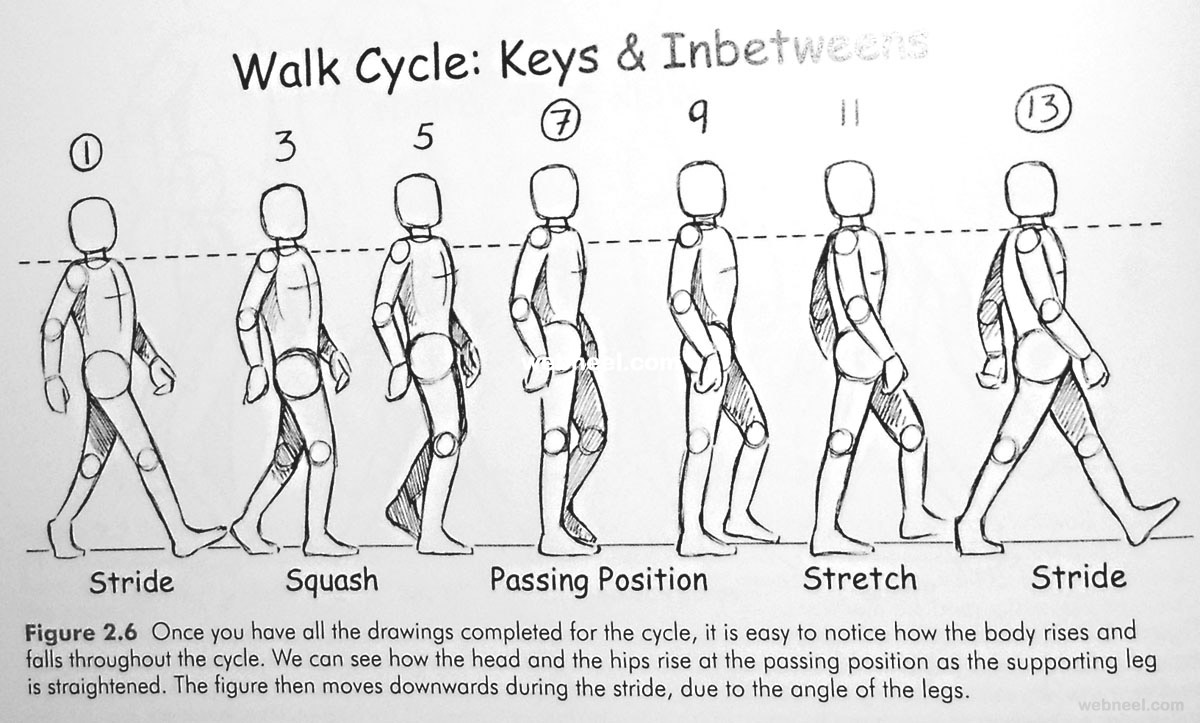
I found this on Walk Cycle Animation Walking 5 – Preview (webneel.com) and I found it quite helpful, it’s easy to over exaggerate the step the character is taking and make it look more like a jog or someone with a very wide gait.

I also used Richard Williams’s book, Animator’s Survival Kit to get more indepth advice and explain the why. Why his advice works and how the application should look if done correctly. I find his book to be of great help.

Nick Kondo 近藤 on Twitter: "Richard Williams taught me how ...

I also searched for reference in video format. I found a few that I took reference from, so I wasn’t letting the reference dictate exactly how I animated Nyx.

I also collated a Pinterest board for all of my animations here

I started animating in Clip Studio.

I started with a very basic body to focus on the movement and capturing how it should feel. I wanted Nyx to feel confident, her shoulders back, and I wanted it to feel purposeful like she’s very sure of where she’s going.

I added in the arms as well. I think I generally achieved my goal with the movement, I think she has some really nice weight as well. The hair flick was added in because I liked the energy it added, I feel like it adds some power to her walk.

This was the walk sketch finished.

This was the lining partially done.


I noticed after the lining was done that the eyes jumped about a little, and weren’t very consistent. So I went back to fix it.

Also, I acknowledge the prosthetic lacks consistency at points, I noticed after I’d finished how noticeable it was, but ultimately didn’t have time to go back and fix it. However, the mistakes I made in the walk cycle helped inform my other animations, so I think I improve my issues with volume and consistency throughout. There’s a lot I’d change, but I’m happy with this animation, considering I don’t have a lot of experience.

Animation Strategies – Unreal Layout

I did the layout in Unreal. Initially, we were going to have a slanted roof with beams, but it made the space so big, we were worried it would look empty. This is also before I went back and scaled down the walls, because this space was just way too big, and the walls looked really off.

I went back and fixed the walls. Charlie resized them, took out the pillars and seperated the bricks for more customisable options. I had to redo the beam structures, glass roof and floor to match the smaller layout, but it was worth it.

I textured the items and began filling out the environment. Most of my group didn’t use the Unreal substance painter export, which led to a few annoyances, thankfully we could work around it.

This was the layout before I began lighting. I really liked how I set this out, I think I filled the space really well.

CREDIT: “The Tavern – Wall window” (https://skfb.ly/6vvXC) by François Espagnet is licensed under Creative Commons Attribution (http://creativecommons.org/licenses/by/4.0/)

Acacia didn’t manage to make the smaller windows, and there was a miscommunication between me and Charlie as I thought they were doing the stained glass one and the smaller windows. With three days before submission, I went online to find a tavern window that fit our style close enough. Ciara very graciously textured it.

I wanted some nice, atmospheric lighting, but keeping that nice stylised edge with coloured moonlight. I used atmospheric fog to create some nice light rays in the windows, and push a more ‘dreamy’ look.

In all, I think we could’ve stuck more closely to story telling, by having more ‘used’ props in the scene, but overall, I think it looks really pretty and we stuck to the initial idea pretty well.

Animation Strategies – Texturing

Before texturing, I scrolled through 3D sites like Sektchfab to begin building an idea of how I wanted to texture my models.

I searched stylised props so I could get a better idea at how stylised would look applied to 3D models.


I’ve included my textures here, and honestly I think this is my favourite part of the pipeline. I’ve always found texturing a lot of fun, but it was cemented in this project that I prefer texturing over modelling. I had a lot of fun playing with textures and masks in Substance Painter.


A lot of models had wood textures on them. In order to add a little variety, for the bigger textures, I hand drew the wood grain into the model for more individuality and also to create a more stylised appearance.


I included the sketchfab render of my model. I’m really proud of how my door turned out.

Animation Strategies – UV’s

Uv unwrapping is still something I struggle with, but I’m trying to get better. I noticed during this project that I was faster at identifying edges that would unwrap my models efficiently, but I did have to redo a few of them for better results.

Another thing I noticed was that I’m better at laying out my uvs. I do use the auto layout tool, but I found there was a lot of dead space around the shells, so I took the time to adjust them as needed. Even looking back at these now, I can see ways I could’ve laid them out better for better texture resolution.

This is the UVs for my bar.


This is the uvs for my shelves.

I forgot to screenshot before combining a lot of my models so I don’t have the uvs for them.

I used two videos to help me develop a better understanding of UV unwrapping. These videos helped me further grasp UVs and what makes a good UV unwrap, rather than the more time consuming experimenting to see what works better.

Animation Strategies – Modelling

I got ahead on modelling assets, I started easy to get back into modelling. I made a little tankard, it helped me ease back into hard surface modelling, and gave me the opportunity to practice simple shapes.


Then I moved on to modelling the rest of my assets. I uv unwrapped as I went so I could break up the processes and mitigate burn out. We used a human for scale reference so when we transferred assets, they would be correct in Unreal.

I worked smarter by applying different materials to a single model before combining so I could use individual UV tiles for a higher resolution texture.


For the candle, I wanted that organic wax melting look, so I modelled and sculpted it in blender before taking it back into Maya to retopologise and unwrap it.

I didn’t have time to finish the last lantern.

I also remodelled the door, the final door isn’t my first pass.

The second pass is far better, and fits better with the environment. I’m much happier with it.

I think my ability to reflect as I go is a skill I’ve been refining since last year. I’m very happy with my progress, but I struggled a little to visualise how to actually create some of these models. I used a lot of problem solving and redoing aspects of models to be more efficient. I think I’d like to tackle more complicated models in future to further my skills in modelling.

Animation Strategies – Week 2

We began discussing specifics of what we wanted to do for the tavern, including how we were going to split up the assets. Manny created an asset list, and we claimed assets we were interested in making. Any asset that was smaller or that we’d need many of, group members could make them as they pleased.

My final asset list was

  • Bar
  • Shelves
  • Ribbon
  • Lantern
  • Plate
  • Tankard
  • Roof
  • Bottles (3 kinds)
  • Front door
  • Beams

We also had to do a presentation in class, showing our progress.

Wedding Tavern – Google Slides


Animation Strategies – Week One

I was off with Covid the first week of teaching, but I organized to be a part of a group with Manny, Lel, Ciara, Charlie and Acacia. Originally the group had 8 members, so Henry split us up into two groups and those mentioned are my finalized teammates.

We wanted to do the tavern prompt, and we decided as a group to focus on a wedding as the narrative. The environment is supposed to be set at night, after the wedding. We are going for a medieval, D&D inspired vibe for the tavern overall.

Concepting began not too long after we were put into the group. We made moodboards to help inspire us with the aesthetic, colour scheme and layout. I’m not experienced in environment or prop design so this was really useful in helping me to begin visualising the project.

I put together my own Pinterest board, but allowed my team onto it so they could see my thought processes.

https://pin.it/VjDeYSj

Immediately, it was agreed that we wanted a more stylised approach for our environment, so we collected references with painterly, bright textures.

I began sketching up concepts for the tree to get a general sense of environment. This piece is half finished.

These are lantern concepts that I decided to play with! I also added a more rendered version to get an idea of colour and how we wanted to apply that to the scene.